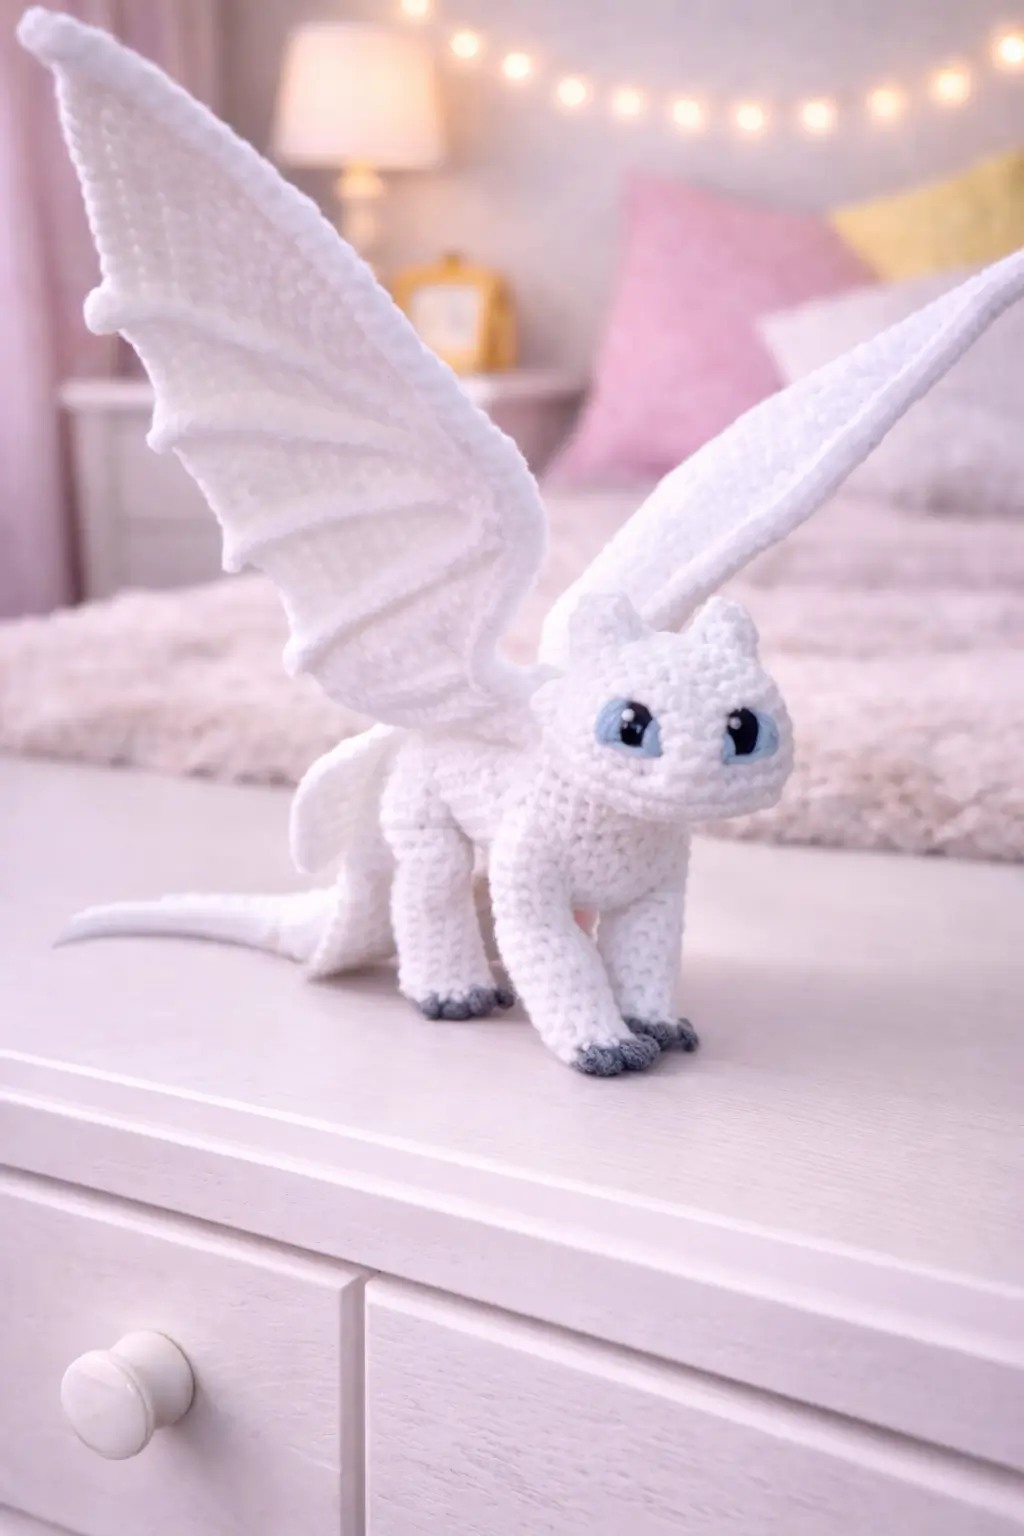
A white dragon only looks airborne on the ground when the wings sit taller than the back and the neck stays short. This white dragon amigurumi crochet pattern gives you the verified size, hook, yarn style, and a full build for a standing plush dragon. You get the head, body, legs, tail, wings, horns, eye patches, and claws. The useful part is control. The same body math supports dramatic wings without turning the toy unstable.
The Design: What Makes This Dragon Different
This dragon is built around silhouette, not spikes. Many fantasy dragon patterns lean on dorsal plates, long horns, or heavy snouts. The photographed dragon does the opposite. The head stays compact, the muzzle is blunt, the horns are tiny, and the wings carry the whole identity. That changes the engineering. The body cannot be too long or the wings look decorative instead of structural. The neck cannot be too narrow or the head starts reading as detached.
Then there is the surface treatment. White plush yarn is unforgiving. Every seam shows. Every dent shows. Dark colors can hide uneven joins; white cannot. A common mistake in a plush dragon amigurumi is stuffing the body as firmly as the head. That makes the belly barrel outward and lifts the front feet off the surface. This version works because the head is dense, the torso is slightly softer, and the wings are sewn with enough spread to frame the dragon instead of folding inward. The blue eye areas matter too. Without them, the face loses contrast and the dragon turns blank fast.
Project Information at a Glance
| Skill Level | Time | Finished Size | Hook | Best For |
|---|---|---|---|---|
| Intermediate | 2.5–4 hours | 15–17 cm | 4 mm | Fantasy gifts, shelf decor, dragon collections |
Materials and Tools
Yarn
- White plush yarn — plush / chenille — about 100g — Alize Soft Plush or similar chenille-style yarn
- Light blue yarn — scrap amount — for eye patches
- Black yarn — scrap amount — for pupils or optional facial detail
- Gray yarn — scrap amount — for claws
Tools
- 4 mm crochet hook
- 20 mm safety eyes
- Fiberfill stuffing
- Yarn needle
- Stitch markers
- Pins
- Small scissors
Crochet Abbreviations
MR / sc / inc / dec / sl st / ch / BLO / FLO
Use invisible decrease on the closing rounds only. A standard decrease leaves notches in white plush fabric, and those show immediately below the eye line.
Step-by-Step White Dragon Crochet Pattern
Work in continuous spiral rounds unless noted.
Head (Make 1)
Yarn: white
Source: Standard amigurumi math
R1: 6 sc in MR (6)
R2: inc x6 (12)
R3: (sc, inc) x6 (18)
R4: (2 sc, inc) x6 (24)
R5: (3 sc, inc) x6 (30)
R6: (4 sc, inc) x6 (36)
R7: sc around (36)
R8: sc around (36)
R9: sc around (36)
R10: sc around (36)
R11: sc around (36)
Insert 20 mm safety eyes between R8 and R9, about 8 stitches apart.
R12: (4 sc, dec) x6 (30)
R13: (3 sc, dec) x6 (24)
Stuff firmly through the muzzle first, then the crown.
R14: (2 sc, dec) x6 (18)
R15: (sc, dec) x6 (12)
R16: dec x6 (6)
Fasten off. Leave a 30 cm tail.
Body (Make 1)
Yarn: white
Source: Standard amigurumi math
R1: 6 sc in MR (6)
R2: inc x6 (12)
R3: (sc, inc) x6 (18)
R4: (2 sc, inc) x6 (24)
R5: (3 sc, inc) x6 (30)
R6: sc around (30)
R7: sc around (30)
R8: sc around (30)
R9: sc around (30)
R10: (3 sc, dec) x6 (24)
R11: sc around (24)
Stuff lightly. The body should stay slightly softer than the head.
Fasten off. Leave a 30 cm tail.
Snout Ridge (Make 1)
Yarn: white
Source: Standard amigurumi math
R1: ch 7
R2: starting in 2nd ch from hook, sc across (6)
R3: ch 1, turn, sc across (6)
R4: ch 1, turn, dec, 2 sc, dec (4)
Fasten off. Leave a 15 cm tail.
Horn Nubs (Make 2)
Yarn: white
Source: Standard amigurumi math
R1: 4 sc in MR (4)
R2: sc around (4)
R3: sc around (4)
Fasten off. Leave a 10 cm tail.
Front Legs (Make 2)
Yarn: white, gray for claws
Source: Standard amigurumi math
R1: with gray, 6 sc in MR (6)
R2: switch to white, inc x6 (12)
R3: sc around (12)
R4: sc around (12)
R5: sc around (12)
R6: (4 sc, dec) x2 (10)
Stuff firmly at the paw, lightly above.
Fasten off. Leave a 20 cm tail.
Back Legs (Make 2)
Yarn: white, gray for claws
Source: Standard amigurumi math
R1: with gray, 6 sc in MR (6)
R2: switch to white, inc x6 (12)
R3: sc around (12)
R4: sc around (12)
R5: sc around (12)
R6: sc around (12)
R7: (4 sc, dec) x2 (10)
Stuff firmly. Match both back legs for equal height.
Fasten off. Leave a 20 cm tail.
Tail (Make 1)
Yarn: white
Source: Standard amigurumi math
R1: 6 sc in MR (6)
R2: sc around (6)
R3: (2 sc, inc) x2 (8)
R4: sc around (8)
R5: sc around (8)
R6: (3 sc, inc) x2 (10)
R7: sc around (10)
R8: sc around (10)
Stuff only the first half more firmly so the tail tapers and trails.
Fasten off. Leave a 20 cm tail.
Wing Arms (Make 2)
Yarn: white
Source: Standard amigurumi math
R1: 6 sc in MR (6)
R2: (sc, inc) x3 (9)
R3: sc around (9)
R4: sc around (9)
R5: sc around (9)
R6: sc around (9)
R7: sc around (9)
R8: sc around (9)
R9: sc around (9)
R10: sc around (9)
R11: sc around (9)
R12: sc around (9)
R13: sc around (9)
R14: sc around (9)
Stuff firmly, especially near the base.
Fasten off. Leave a 30 cm tail.
Wing Membranes (Make 2)
Yarn: white
Source: Standard amigurumi math, informed by published separate-wing construction
R1: ch 18
R2: starting in 2nd ch from hook, sc across (17)
R3: ch 1, turn, dec, 13 sc, dec (15)
R4: ch 1, turn, sc across (15)
R5: ch 1, turn, dec, 11 sc, dec (13)
R6: ch 1, turn, sc across (13)
R7: ch 1, turn, dec, 9 sc, dec (11)
R8: ch 1, turn, sc across (11)
R9: ch 1, turn, dec, 7 sc, dec (9)
R10: ch 1, turn, sc across (9)
R11: ch 1, turn, dec, 5 sc, dec (7)
Fasten off. Leave a 30 cm tail.
Secondary Wing Ribs (Make 4)
Yarn: white
Source: Standard amigurumi math
R1: ch 8
R2: starting in 2nd ch from hook, sl st across (7)
Fasten off. Leave a 10 cm tail.
Eye Patches (Make 2)
Yarn: light blue
Source: Standard amigurumi math
R1: 5 sc in MR (5)
R2: inc x5 (10)
R3: sc around (10)
Flatten lightly.
Fasten off. Leave a 12 cm tail.
Pupils / Eye Shine (Make 2)
Yarn: black or black felt substitute
Source: Standard amigurumi math
Embroider or attach a small oval pupil centered over each eye area.
Keep the pupil low enough to preserve the forward-looking expression.
Assembly Instructions
- Sew the snout ridge to the front of the head to sharpen the muzzle line without making it long.
- Attach the horn nubs close together on the crown, just behind the forehead line.
- Sew the front legs low on the body and angle them straight down rather than outward.
- Attach the back legs wider apart so the dragon stands level.
- Sew the tail to the rear center and angle it slightly left or right so it trails naturally.
- Attach the head to the front upper third of the body, keeping the chin low to avoid a floating-neck look.
- Sew each wing arm to the upper back with a wide spread; do not place them vertically parallel.
- Attach one membrane to each wing arm, then sew in two rib lines on each membrane so the inner curves read as wing sections.
- Add the blue eye patches around the safety-eye area and place the black pupil detail inside each.
- Check the dragon from the front and both sides, then tighten or loosen the wing angle before weaving all tails at least 4 cm into the stuffing path.
The white dragon is complete.
7 Technical Tips for Cleaner Amigurumi
- Mark the 36-stitch head plateau immediately. Missing one increase before R6 shifts the eye line and ruins the symmetry of the blue eye patches.
- Stuff the head harder than the body. If both sections are packed equally, the dragon tips forward once the wings are attached.
- Use invisible decreases only on the white closing rounds. Regular decreases create six visible dents that are hard to hide in white plush yarn.
- Pin the wings before sewing both sides. A wing placed even 1 cm lower than the other is obvious because the design has no dorsal spikes to distract the eye.
- Keep the wing membranes taut but not stretched. Over-tensioned membranes pull the wing arms inward and collapse the dramatic span.
- Match front leg height precisely. A difference of just 5 mm at the paws makes the dragon rock diagonally on a hard surface.
- Add eye patches after head shaping is finished. Placing them too early often leaves one patch rotated once the final stuffing settles.
Conclusion
This white dragon amigurumi crochet pattern works because the body stays controlled while the wings carry the full fantasy silhouette. Use the verified 4 mm hook, plush yarn setup, 20 mm eye size, and 15 to 17 cm finished scale as the baseline. Then correct wing angle and stuffing density, not the core stitch math, when the first sample looks off. Post the finished dragon on Pinterest and Instagram with #WhiteDragonAmigurumi so the wingspan and face are visible in one frame. One decision remains before the second version: will you keep the icy blue eyes, or turn the next dragon into a full monochrome white build?









