Introduction
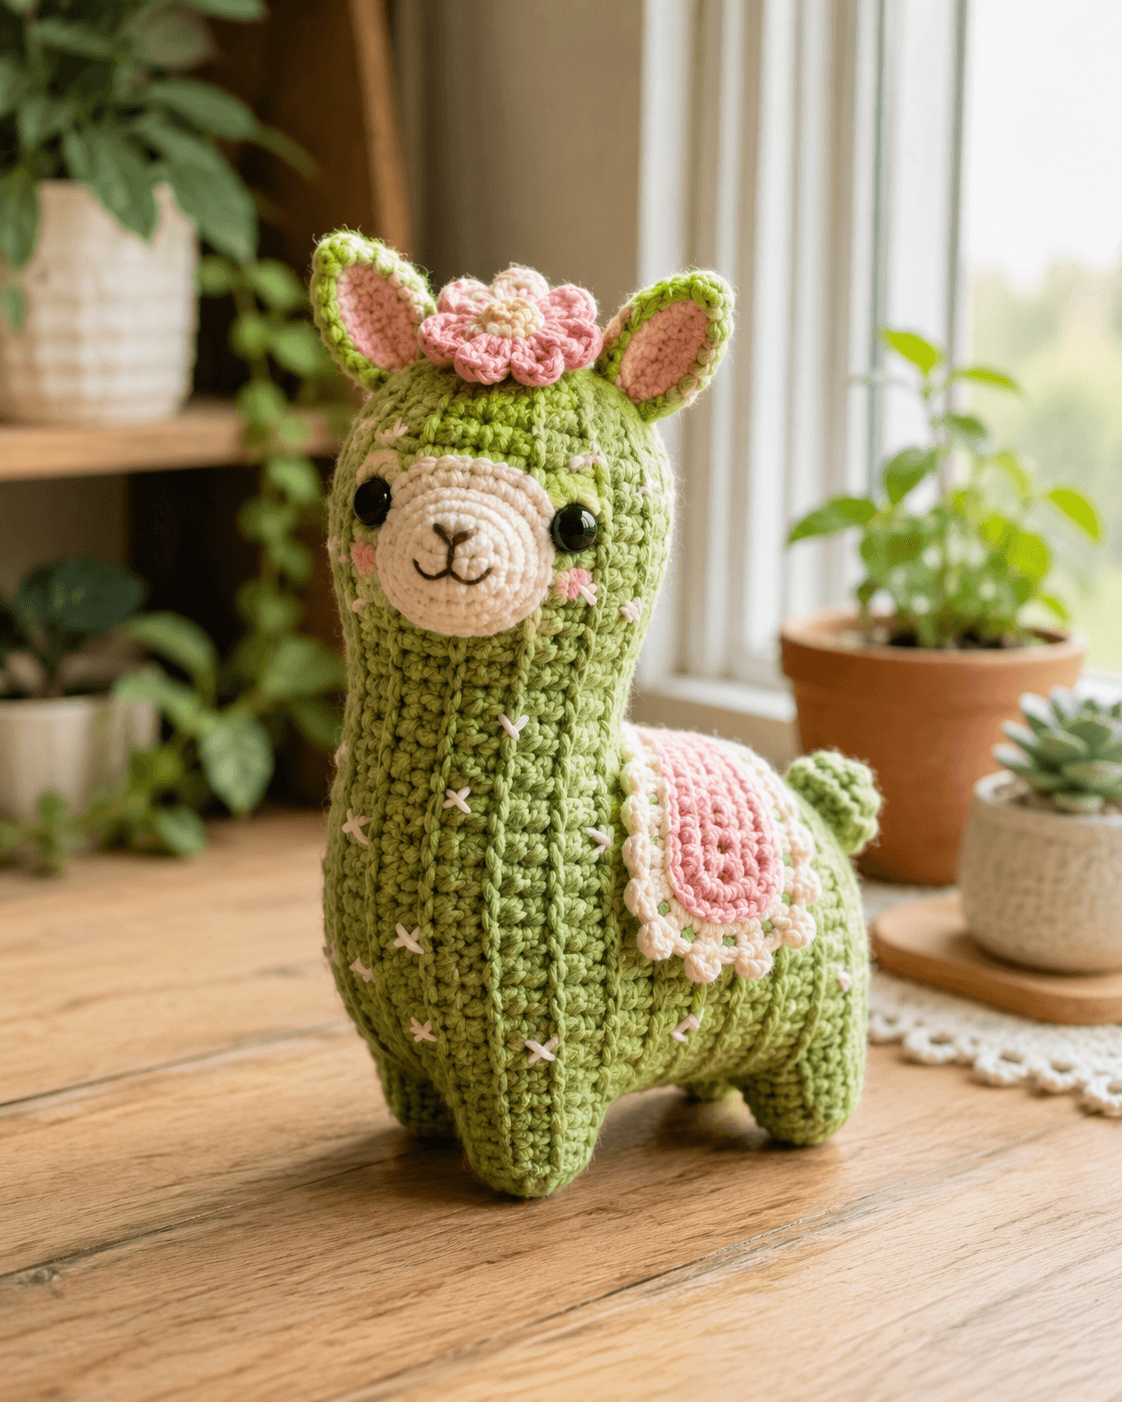
A cactus alpaca fails the instant the neck looks tubular instead of ribbed. This cactus alpaca amigurumi crochet pattern builds a standing 20–21 cm alpaca with DK-to-worsted yarn, a 3.5 mm hook benchmark, floral appliqué details, and stitched cactus ridges across the body. It suits an intermediate maker who needs a decorative shelf plush with clearer structure than a standard rounded alpaca toy.
The Design: What Makes Cactus Alpaca Different
This character works because the cactus idea is structural, not printed on afterward. The alpaca body stays upright and narrow through the neck, then gains its plant-like read from long vertical surface ribs and scattered stitched spines. That keeps the plush readable from across a room. The floral crown and saddle panel do another job. They break the green mass and stop the figure from reading as a plain cactus with ears. Proportion matters here. A real alpaca amigurumi pattern usually softens the silhouette with fluff, but this version keeps the outline cleaner so the ribs stay visible. The ears also stay short and upright, closer to the photo than a long curved crochet alpaca pattern ear. A common mistake is overstuffing the neck. That rounds out the front and erases the cactus-column effect almost immediately.
Project Info at a Glance
| Skill Level | Time | Finished Size | Hook | Best For |
|---|---|---|---|---|
| Intermediate | 6–8 hours | 20–21 cm | 3.5 mm | shelf décor, plant-themed gifts, nursery display |
Materials and Tools
Yarn
- Sage green — DK or worsted — about 100 g — main body and ears
- Cream — DK — small amount — muzzle and trim
- Blush pink — DK — small amount — flower crown and saddle rosette
- Pale pink — DK — small amount — ear lining and cheek blush
- White or cream — DK — small amount — floral ruffle and tiny stitched spines
- Black embroidery thread — small amount — nose and mouth
Tools
- Hook 3.5 mm
- Safety eyes 10 mm
- Stuffing
- Tapestry needle
- Stitch markers
- Pins
Abbreviations
MR / sc / inc / dec / sl st / ch / BLO / FLO / FO
Invisible decrease keeps the front of the neck and the curve of the body cleaner than a standard decrease, which matters on a single-color build with visible rib lines.
Pattern — Step by Step
Continuous spiral unless noted.
Legs (Make 4)
Yarn: sage green
R1: 6 sc in MR (6)
R2: sc around (6)
R3: sc around (6)
R4: [sc, inc] x3 (9)
R5–6: sc around (9)
Fasten off first 3 legs. Do not fasten off 4th leg. Leave 10 cm tails on first 3 legs.
Body
Yarn: sage green
Join legs:
R1: 9 sc on leg 4, 3 sc across to leg 3, 9 sc, 3 sc across to leg 2, 9 sc, 3 sc across to leg 1, 9 sc, 3 sc across back to start (48)
R2–4: sc around (48)
R5: [6 sc, dec] x6 (42)
R6–8: sc around (42)
R9: [5 sc, dec] x6 (36)
R10–13: sc around (36)
Stuff legs and lower body firmly. Keep the belly rounded but not spherical.
Neck
Yarn: sage green
R14: [4 sc, dec] x6 (30)
R15–20: sc around (30)
R21: [3 sc, dec] x6 (24)
R22–24: sc around (24)
Add stuffing gradually. Keep the front neck flatter than the sides.
Head
Yarn: sage green then cream muzzle added separately
R25: [3 sc, inc] x6 (30)
R26: [4 sc, inc] x6 (36)
R27–32: sc around (36)
R33: [4 sc, dec] x6 (30)
R34: [3 sc, dec] x6 (24)
Insert safety eyes between R29 and R30, about 9 sts apart.
R35: [2 sc, dec] x6 (18)
Stuff firmly.
R36: [sc, dec] x6 (12)
R37: dec x6 (6)
Fasten off. Leave 20 cm tail.
Muzzle
Yarn: cream
R1: 6 sc in MR (6)
R2: inc x6 (12)
R3: [sc, inc] x6 (18)
R4: [2 sc, inc] x6 (24)
R5–6: sc around (24)
R7: [2 sc, dec] x6 (18)
Light stuffing only. Embroider the nose and mouth before sewing.
Fasten off. Leave 20 cm tail.
Ears (Make 2)
Yarn: sage green outer, pale pink inner insert optional
Outer ear:
R1: 6 sc in MR (6)
R2: [sc, inc] x3 (9)
R3: [2 sc, inc] x3 (12)
R4–5: sc around (12)
R6: [2 sc, dec] x3 (9)
R7: fold flat, sc through both sides 4 times (4)
Inner ear insert:
R1: 6 sc in MR (6)
R2: [sc, inc] x3 (9)
R3: sc around (9)
Sew insert to outer ear. Fasten off. Leave 15 cm tail.
Tail
Yarn: sage green
R1: 6 sc in MR (6)
R2: [sc, inc] x3 (9)
R3–4: sc around (9)
Fasten off. Leave 12 cm tail.
Flower Crown Base
Yarn: blush pink
R1: 6 sc in MR (6)
R2: inc x6 (12)
Petals: [sl st, ch 2, 2 dc, ch 2, sl st] in each stitch around for 12 petals.
Fasten off. Leave 18 cm tail.
Flower Crown Center
Yarn: cream
R1: 6 sc in MR (6)
R2: [sc, inc] x3 (9)
Fasten off. Sew to flower crown center. Leave short tail.
Saddle Rosette Center
Yarn: blush pink
R1: 6 sc in MR (6)
R2: inc x6 (12)
R3: [sc, inc] x6 (18)
R4: [2 sc, inc] x6 (24)
Fasten off. Leave 18 cm tail.
Saddle Ruffle Border
Yarn: cream
Join to outer edge of rosette.
R1: [sc, hdc, 2 dc, hdc, sc] in every 4 stitches around, adjusting spacing evenly to form 6 scallops.
Fasten off. Leave 15 cm tail.
Cheek Patches (Make 2)
Yarn: pale pink
R1: 6 sc in MR (6)
R2: [sc, inc] x3 (9)
Fasten off. Leave 12 cm tail.
Cactus Rib Embroidery
Yarn: sage green
Cut 5 long strands, each about 30 cm.
Stitch straight vertical rib lines from chest base up the neck and lightly down the body front.
Repeat 2 lines on each side if desired.
Spine Stitch Details
Yarn: cream or white
Add small X-shaped stitches sparingly across neck, cheeks, and body sides.
Use 8–12 visible spine clusters total.
Assembly
- Sew the muzzle to the center front of the head.
- Attach the ears high on the head with a slight outward angle.
- Sew the head securely to the neck opening.
- Add the flower crown between the ears.
- Attach the tail at the rear body center.
- Sew the cheek patches low and slightly outside each eye.
- Pin the saddle rosette on the upper side of the body, then stitch it down flat.
- Embroider the long cactus ribs from chest to crown area.
- Add the small X-shaped spine stitches across the body and face.
- Recheck leg balance, then adjust stuffing through the base if the alpaca leans.
The completed piece should stand without wobbling and keep a visibly columned neck.
7 Technical Tips
- Neck bulge: Do not overpack the front of the neck. Too much stuffing rounds the silhouette and erases the cactus-column effect.
- Leg spread: Keep the four legs spaced evenly when joining at 48 stitches. A narrow join makes the body rock side to side.
- Eye timing: Insert 10 mm eyes before the head drops below 24 stitches. Later placement makes the muzzle crowd the washers.
- Muzzle depth: Use only light stuffing in the muzzle. A hard-packed muzzle pushes too far outward and makes the face look bear-like.
- Rib spacing: Place 5 main vertical rib lines, not 2 or 8. Too few lines read as seams; too many flatten the cactus look into texture noise.
- Flower scale: Keep the crown flower close to a 12-stitch base. A larger flower starts dominating the head and hides the ear set.
- Spine density: Limit the visible X-stitches to about 8–12 clusters. Dense spine embroidery makes the alpaca read messy instead of botanical.
Conclusion
This cactus alpaca amigurumi crochet pattern depends on restraint. The body must stay alpaca-shaped, while the ribs, spine stitches, and floral details carry the cactus read without burying the face. Start by making one leg set and one muzzle, then check the standing width before joining the full body. After that, pin the flower and saddle in place before sewing anything permanent. Share the finished piece on Pinterest and Instagram with #CactusAlpacaPattern. One question decides whether the design worked: from three feet away, does the neck still read as cactus-ribbed instead of just long and green?









