Introduction
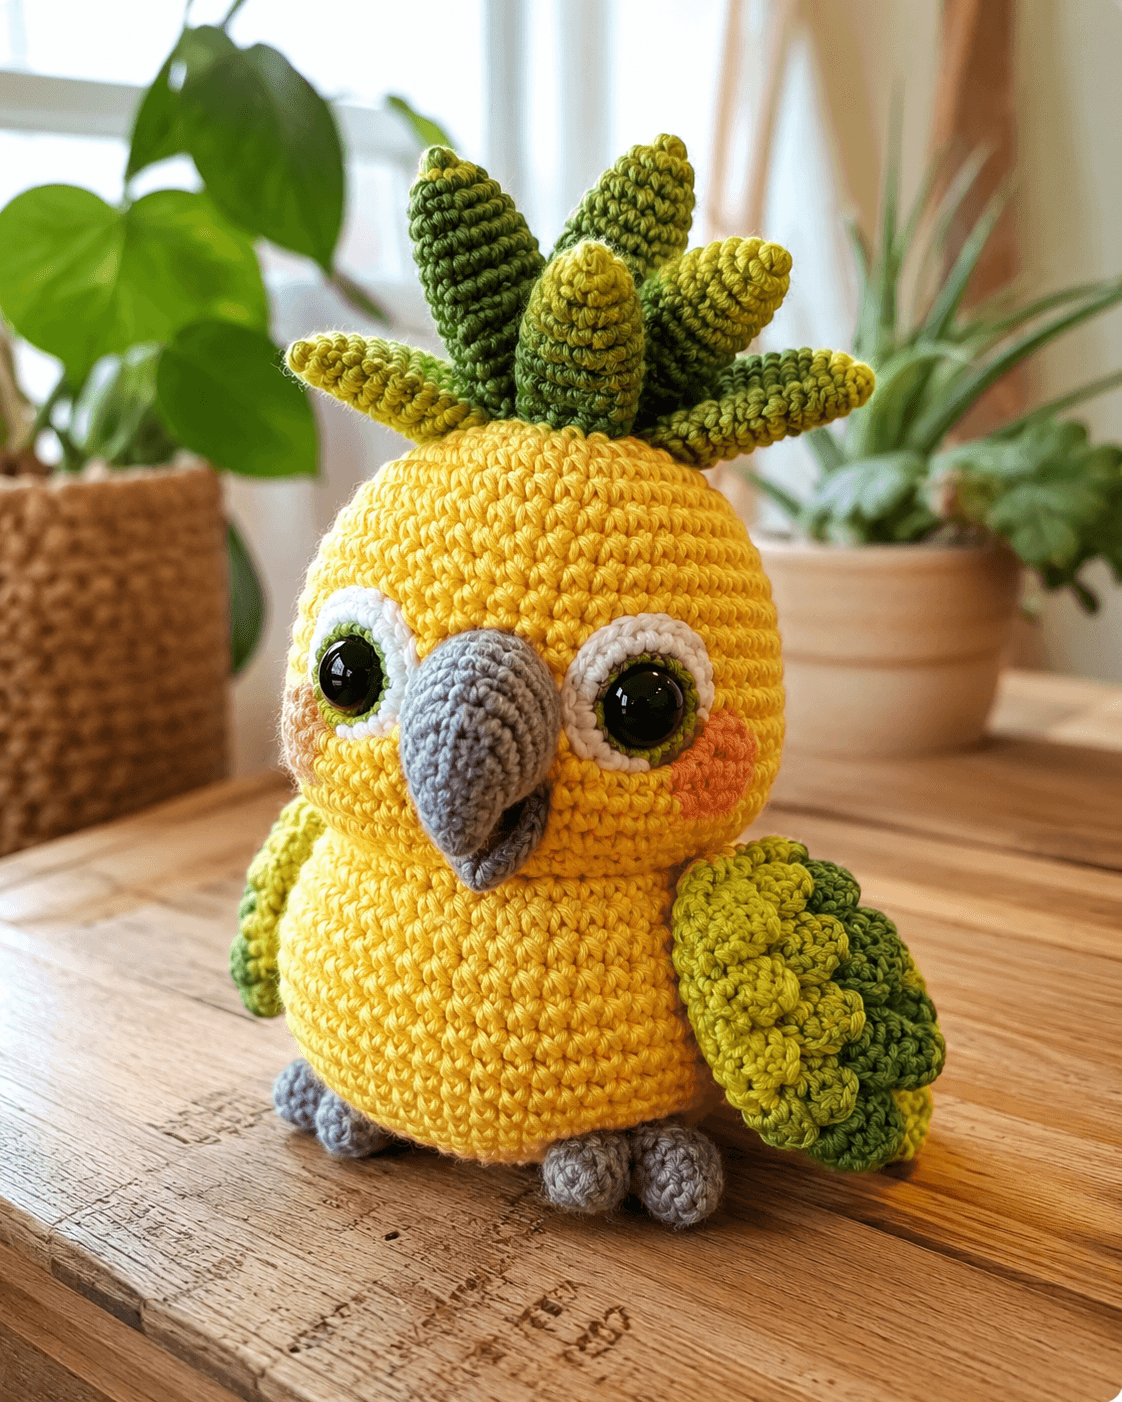
A parrot stops looking like fruit the moment the crown sits flat. This pineapple parrot amigurumi crochet pattern fixes that with a narrow leaf cluster, a rounded 13–15 cm body, DK-to-light-worsted proportions, and a medium hook range that supports firm shaping. The build suits an intermediate maker who needs a shelf piece with stronger silhouette control than a standard bird plush.
The Design: What Makes Pineapple Parrot Different
This design works because the fruit idea is structural, not decorative. The body stays close to an upright egg so the lower half does not spread wider than the head. Then the crest takes over. Six separate leaves create the pineapple profile from the first glance, and that matters more than color alone. A flat stitched topper would read as a flower. Not a crown. Not pineapple. The beak also has to project farther than on many soft bird patterns. Without that forward break in the face, the yellow body starts reading as a plain pineapple plush instead of a parrot amigurumi crochet pattern. Wing texture is the third decision. Layered greens echo feathers while still supporting the fruit theme. A common mistake on a crochet parrot pattern like this is dropping the beak too low, which drags the eye line down and weakens the species read immediately.
Project Info at a Glance
| Skill Level | Time | Finished Size | Hook | Best For |
|---|---|---|---|---|
| Intermediate | 5–7 hours | 13–15 cm | 3.0–3.5 mm | shelf décor, tropical gifts, bird-themed displays |
Materials and Tools
Yarn
- Yellow — DK or light worsted — main body — one full skein buffer recommended
- Light green — DK — wings and eye accent — small amount
- Dark green — DK — crest and wing accent — small amount
- White — DK — eye whites — small amount
- Gray — DK — beak and feet — small amount
- Peach — DK — cheek patches — small amount
Tools
- Hook 3.0–3.5 mm
- Safety eyes 10–12 mm
- Stuffing
- Tapestry needle
- Stitch markers
- Pins
Abbreviations
MR / sc / inc / dec / sl st / ch / BLO / FO
Invisible decrease keeps the body and crest cleaner because bright solid yarn shows notches faster than darker mixed-color builds.
Pattern — Step by Step
Continuous spiral unless noted.
Head
Yarn: yellow — Source: standard amigurumi math with medium plateau sized from verified parrot pattern benchmarks
R1: 6 sc in MR (6)
R2: inc ×6 (12)
R3: [sc, inc] ×6 (18)
R4: [2 sc, inc] ×6 (24)
R5: [3 sc, inc] ×6 (30)
R6: [4 sc, inc] ×6 (36)
R7–11: sc around (36)
R12: [4 sc, dec] ×6 (30)
R13: [3 sc, dec] ×6 (24)
Insert eyes between R8 and R9, about 9 sts apart.
R14: [2 sc, dec] ×6 (18)
Stuff firmly.
R15: [sc, dec] ×6 (12)
R16: dec ×6 (6)
Fasten off. Leave 20 cm tail.
Body
Yarn: yellow — Source: standard amigurumi math for a medium upright bird body, aligned to 13–15 cm target scale
R1: 6 sc in MR (6)
R2: inc ×6 (12)
R3: [sc, inc] ×6 (18)
R4: [2 sc, inc] ×6 (24)
R5: [3 sc, inc] ×6 (30)
R6: [4 sc, inc] ×6 (36)
R7–13: sc around (36)
R14: [4 sc, dec] ×6 (30)
R15: [3 sc, dec] ×6 (24)
R16: [2 sc, dec] ×6 (18)
Stuff firmly, with extra fill at the front belly.
Fasten off. Leave 25 cm tail.
Beak
Yarn: gray — Source: photo-derived shaping with standard amigurumi math
R1: 4 sc in MR (4)
R2: [sc, inc] ×2 (6)
R3: [2 sc, inc] ×2 (8)
R4: sc around (8)
R5: [3 sc, inc] ×2 (10)
R6: sc around (10)
R7: [3 sc, dec] ×2 (8)
Light stuffing only. Keep the point angled downward.
Fasten off. Leave 18 cm tail.
Eye Whites (Make 2)
Yarn: white — Source: standard amigurumi math
R1: 6 sc in MR (6)
R2: inc ×6 (12)
R3: [sc, inc] ×6 (18)
Fasten off. Leave 15 cm tail.
Eye Accent Rings (Make 2)
Yarn: light green — Source: standard amigurumi math
R1: 6 sc in MR (6)
R2: [sc, inc] ×3 (9)
Fasten off. Leave 12 cm tail.
Cheek Patches ×2
Yarn: peach — Source: standard amigurumi math
R1: 6 sc in MR (6)
R2: [sc, inc] ×3 (9)
Fasten off. Leave 12 cm tail.
Wings (Make 2)
Yarn: light green and dark green — Source: photo-derived layered wing shape with standard base math
R1: 6 sc in MR (6)
R2: inc ×6 (12)
R3: [sc, inc] ×6 (18)
R4: [2 sc, inc] ×6 (24)
R5–6: sc around (24)
R7: [2 sc, dec] ×6 (18)
R8: sc around (18)
Flatten lightly. Add layered scallop stitching or surface loops along the outer edge in alternating greens.
Fasten off. Leave 20 cm tail.
Feet (Make 2)
Yarn: gray — Source: standard amigurumi math
R1: 6 sc in MR (6)
R2: [sc, inc] ×3 (9)
R3–4: sc around (9)
Stuff lightly and flatten the top edge.
Fasten off. Leave 15 cm tail.
Pineapple Leaves (Make 6)
Yarn: mixed greens — Source: photo-derived special part using standard tapered leaf math
R1: 4 sc in MR (4)
R2: inc ×4 (8)
R3: sc around (8)
R4: [3 sc, inc] ×2 (10)
R5–8: sc around (10)
R9: [3 sc, dec] ×2 (8)
R10: sc around (8)
R11: [sc, dec] ×2, 2 sc (6)
Stuff very lightly or leave almost flat. Make two light green, two medium green, and two dark green leaves.
Fasten off. Leave 18 cm tail.
Assembly
- Sew the head to the body with the face centered over the front belly.
- Attach the white eye pieces first and align both evenly from the center line.
- Add the green eye accents low and slightly outside each eye.
- Sew the beak high on the center face so the top edge sits close to the eye line.
- Attach the cheek patches below the eyes.
- Sew the feet to the lower front body with a narrow stance.
- Pin both wings and match their height before sewing.
- Attach two center leaves at the top of the head.
- Sew the remaining four leaves around them, alternating angle and color depth.
- Weave in all tails and adjust the leaf spread from the front view.
The finished piece should read as a parrot first and a pineapple second.
7 Technical Tips
- Beak drop: Place the beak high enough that its upper edge nearly meets the eye zone. A low beak makes the face sag and weakens the bird read.
- Leaf crowding: Leave small gaps between the six crown leaves. Packed leaves collapse into one mass and lose the pineapple outline.
- Eye symmetry: Count from the exact center line before attaching each eye white. One-stitch drift is obvious on a round yellow face.
- Body firmness: Stuff the lower half firmer than the upper half. A soft base will tip backward once the crown is attached.
- Wing level: Pin both wings before sewing and compare from the front. A half-round height difference changes the silhouette fast.
- Invisible dec: Use invisible decrease on the head and body only. Standard decreases create dents that show under bright yellow yarn.
- Leaf angle: Keep the center leaves more upright and the side leaves more splayed. Equal angles flatten the crown and make it look floral.
Conclusion
This pineapple parrot amigurumi crochet pattern depends on clean silhouette decisions. The body stays compact, the beak projects forward, and the crown carries the fruit cue without covering the face. Start by making one leaf and pinning it to the head before committing to all six. That check saves time. Then verify eye spacing before the head closes. Share the finished piece on Pinterest and Instagram with #PineappleParrotPattern. One question matters on this character more than any other: from straight on, do the top leaves still read as pineapple foliage instead of a generic feather crest?









