Introduction
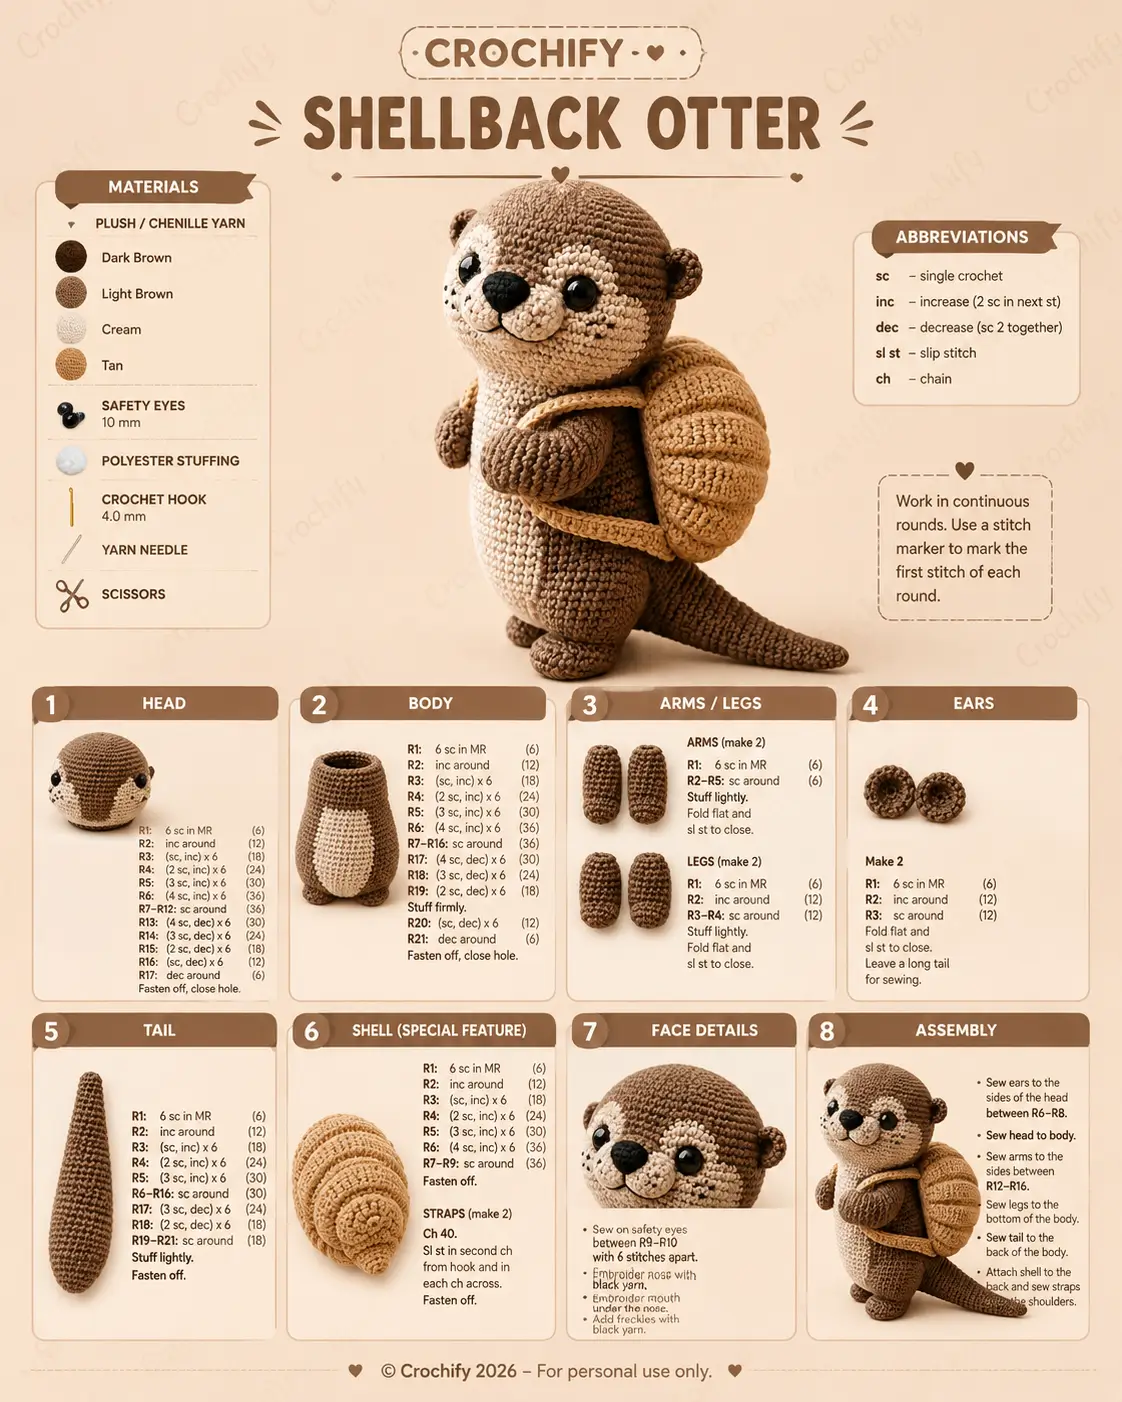
Otters carry the face low and the tail long. The shell is the harder problem. This shellback otter amigurumi crochet pattern uses plush yarn, a 4.0 mm hook, 10 mm safety eyes, and a separate shell with straps so the figure stays readable as an otter first and a shelled creature second. The build suits an intermediate maker who needs a display plush with a stable upright stance and a clear special feature.
The Design: What Makes Shellback Otter Different
A standard otter amigurumi crochet pattern usually relies on one of two silhouettes: long and flat like a swimming sea otter, or short and upright like a nursery plush. This one takes the upright route because the shell needs a broad back and a centered shoulder line. That changes every proportion choice. The head stays round and compact. The belly patch runs vertically to lengthen the torso. The tail tapers without widening too fast, otherwise the shell and body start competing for visual weight. Another decision sits on the shell itself. It cannot be sewn flat onto the back. You need lift. You need edge definition. The uploaded pattern solves that with a separate shell and two straps, which is the right call for a crochet otter pattern with costume styling. Many makers miss the shoulder height on accessories like this. The animal starts looking hunched, and the shell reads more like a pillow than a worn piece.
Project Info at a Glance
| Skill Level | Time | Finished Size | Hook | Best For |
|---|---|---|---|---|
| Intermediate | 5–7 hours | approx. 18–22 cm | 4.0 mm | shelf décor, themed gifts, woodland-fantasy displays |
Materials and Tools
Yarn
- Dark brown — plush / chenille — main limbs, sides, tail, facial details
- Light brown — plush / chenille — head top, shell, body upper sections
- Cream — plush / chenille — muzzle and belly patch
- Tan — plush / chenille — shell straps
Tools
- Hook 4.0 mm
- Safety eyes 10 mm
- Polyester stuffing
- Yarn needle
- Scissors
- Stitch marker
Market otter patterns often land around 3.5 mm to 3.75 mm in DK or worsted yarn, so the 4.0 mm hook here fits the plush-yarn scale shown in the image.
Abbreviations
MR / sc / inc / dec / sl st / ch
Invisible decrease matters most on the head, body close, and shell edge because plush yarn hides shape changes until the contour suddenly buckles.
Pattern — Step by Step
Continuous spiral unless noted.
Head
Yarn: light brown with cream muzzle area and dark face details
R1: 6 sc in MR (6)
R2: inc around (12)
R3: [sc, inc] x6 (18)
R4: [2 sc, inc] x6 (24)
R5: [3 sc, inc] x6 (30)
R6: [4 sc, inc] x6 (36)
R7–12: sc around (36)
R13: [4 sc, dec] x6 (30)
R14: [3 sc, dec] x6 (24)
R15: [2 sc, dec] x6 (18)
R16: [sc, dec] x6 (12)
R17: dec around (6)
Insert 10 mm safety eyes between R9 and R10 with about 6 stitches between them. Embroider nose, mouth, and freckles after stuffing but before final tightening.
Fasten off. Close hole.
Body
Yarn: light brown and cream belly panel
R1: 6 sc in MR (6)
R2: inc around (12)
R3: [sc, inc] x6 (18)
R4: [2 sc, inc] x6 (24)
R5: [3 sc, inc] x6 (30)
R6: [4 sc, inc] x6 (36)
R7–16: sc around (36)
R17: [4 sc, dec] x6 (30)
R18: [3 sc, dec] x6 (24)
R19: [2 sc, dec] x6 (18)
Stuff firmly.
R20: [sc, dec] x6 (12)
R21: dec around (6)
Fasten off. Close hole.
Arms (Make 2)
Yarn: dark brown
R1: 6 sc in MR (6)
R2–R5: sc around (6)
Stuff lightly. Fold flat and close with sl st through both layers.
Fasten off. Leave a tail for sewing.
Legs (Make 2)
Yarn: dark brown
R1: 6 sc in MR (6)
R2: inc around (12)
R3–R4: sc around (12)
Stuff lightly. Fold flat and close with sl st through both layers.
Fasten off. Leave a tail for sewing.
Ears (Make 2)
Yarn: light brown
R1: 6 sc in MR (6)
R2: inc around (12)
R3: sc around (12)
Fold flat and close with sl st.
Leave a long tail for sewing.
Tail
Yarn: dark brown
R1: 6 sc in MR (6)
R2: inc around (12)
R3: [sc, inc] x6 (18)
R4: [2 sc, inc] x6 (24)
R5: [3 sc, inc] x6 (30)
R6–16: sc around (30)
R17: [3 sc, dec] x6 (24)
R18: [2 sc, dec] x6 (18)
R19–21: sc around (18)
Stuff lightly so the tail keeps a soft taper instead of a rigid cone.
Fasten off.
Shell (Special Feature)
Yarn: tan to light brown
R1: 6 sc in MR (6)
R2: inc around (12)
R3: [sc, inc] x6 (18)
R4: [2 sc, inc] x6 (24)
R5: [3 sc, inc] x6 (30)
R6: [4 sc, inc] x6 (36)
R7–9: sc around (36)
Fasten off.
Do not flatten it completely. It needs dome shape.
Straps (Make 2)
Yarn: tan
Ch 40.
Sl st in second ch from hook and in each ch across.
Fasten off.
Face Details
Yarn: black embroidery yarn
- Sew safety eyes between R9–R10 with 6 stitches apart.
- Embroider nose.
- Embroider mouth under the nose.
- Add freckles with black yarn.
Belly Patch
Yarn: cream
The design shows a vertical cream belly section integrated into the body colorwork. For a simple remake, embroider or surface-crochet the outline first, then satin-stitch fill if you are adapting from a single-color body. For a closer match, work the cream section as planned color changes while building the body front.
Optional Muzzle Lift
Yarn: cream
R1: 6 sc in MR (6)
R2: inc around (12)
R3: sc around (12)
Stuff very lightly and sew between the eyes and mouth embroidery if your plush yarn loses face definition.
Assembly
- Sew the ears to the sides of the head between R6 and R8.
- Sew the head to the top center of the body.
- Attach the arms to the body sides between R12 and R16.
- Sew the legs to the bottom of the body, keeping the stance even from front view.
- Attach the tail to the back lower body.
- Position the shell high on the back so its lower edge does not cover the tail join.
- Tack the shell in place at the center back only.
- Sew one strap from front shoulder to shell edge on the first side.
- Repeat with the second strap, matching height carefully.
- Recheck balance, then tighten all joins and weave tails inward.
The finished piece should stand with the shell reading as a worn accessory, not as a back hump.
7 Technical Tips
- Shell height: Set the shell top just below the head seam. Too low, and the otter looks loaded down rather than geared up.
- Eye spacing: Keep exactly about 6 stitches between the eyes. Narrower spacing shifts the face toward bear rather than otter.
- Tail firmness: Stuff the tail lightly, not hard. A rigid tail pushes the body forward and changes the standing angle.
- Arm level: Sew both arms between R12 and R16. Higher placement crowds the straps; lower placement makes the shell float too high.
- Strap tension: Do not pull the ch-40 straps tight. Tight straps pinch the shell inward and flatten the dome.
- Plush decrease control: With chenille yarn, mark every decrease round. Miss one dec and the body shape drifts fast because the pile hides stitch errors.
- Leg symmetry: Before sewing, pin both legs and stand the piece on a flat table. Even a half-round mismatch shows immediately in upright otter builds.
Conclusion
This shellback otter amigurumi crochet pattern works because the otter anatomy stays intact while the shell adds a second read without breaking the silhouette. The round head, narrow arms, long tail, and compact ears keep the base animal clear. Then the dome shell and straps finish the concept. Start with the shell before final assembly and test its placement against the body instead of sewing it blind. Share the finished piece on Pinterest and Instagram with #ShellbackOtterPattern. One check matters more than the rest: from the side view, does the shell sit like gear on the shoulders, or did it slide into the tail zone?









