Introduction
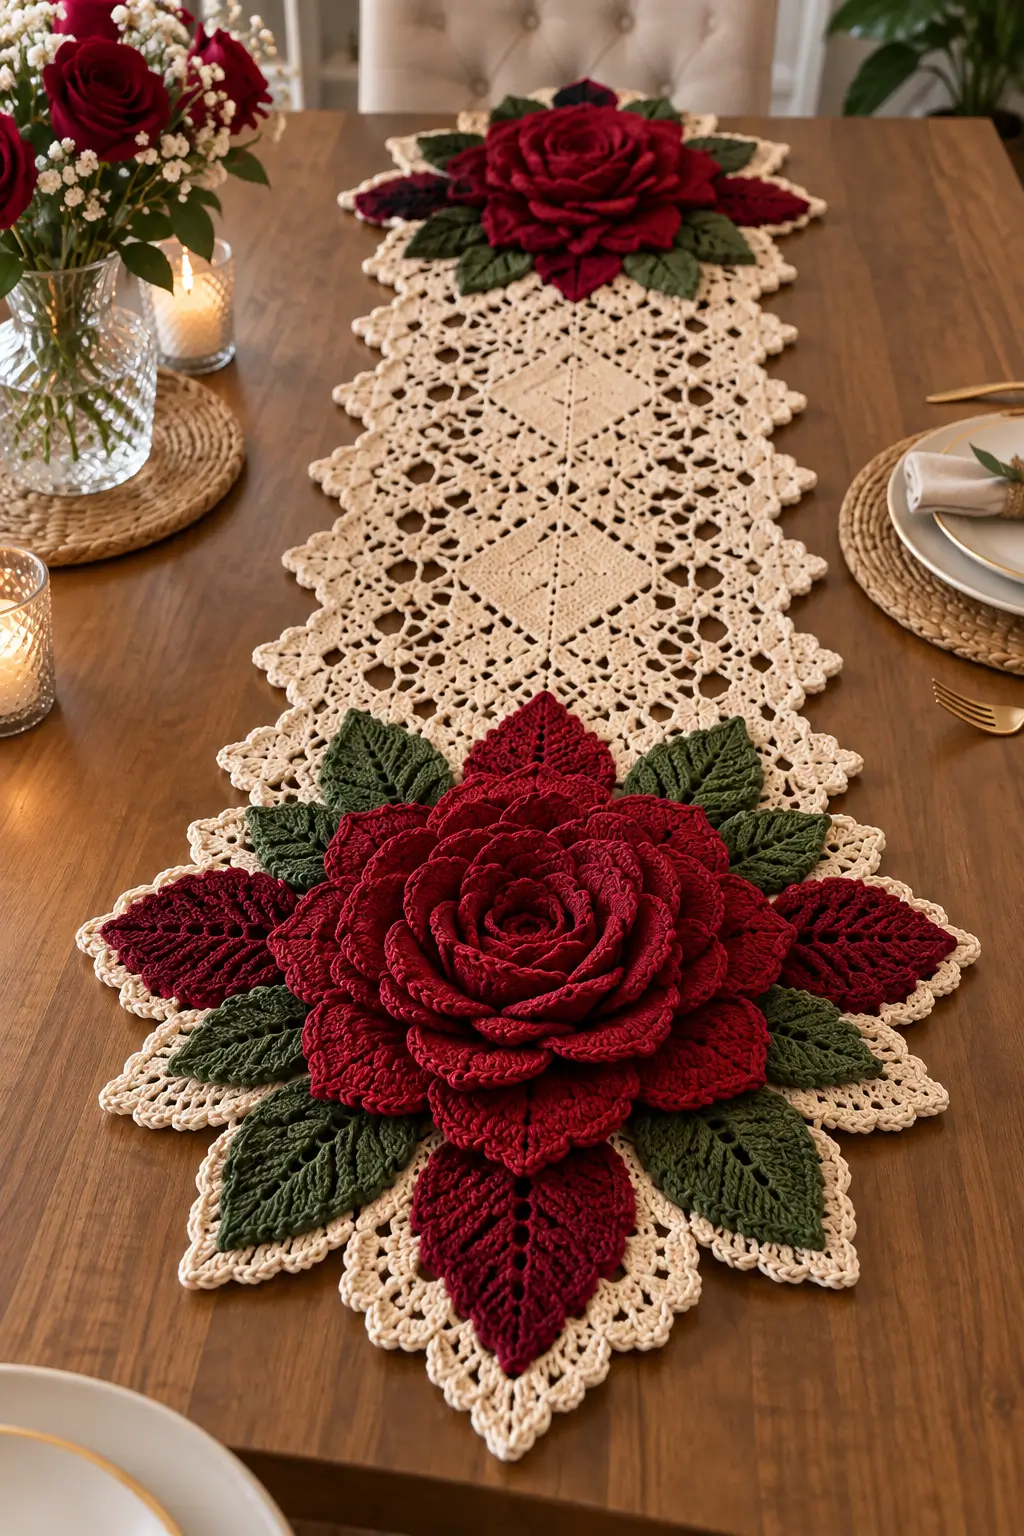
Two oversized burgundy roses anchor opposite ends of an ivory diamond-lace field, with pointed wine and olive leaves extending beyond each bloom. This 3D rose crochet table runner pattern uses cotton-blend yarn, 3.5–4 mm hooks, modular lace panels, layered roses, and appliqué foliage. The intermediate-to-advanced reconstruction targets approximately 40 × 140 cm, providing a formal dining-table centerpiece without covering the full tabletop.
The instructions below are an original photo-inspired reconstruction based on visible structure; published patterns cited later are used only for sizing, gauge, and material benchmarks.
The Design: What Makes This Rose Runner Different
The photograph separates structural lace from dimensional botanical work. An ivory runner carries three central diamond panels and a pointed openwork border, while substantial roses and leaves sit only at the two ends. That arrangement keeps the middle low enough for table settings while concentrating height where it does not interfere with plates. Each rose needs several progressively larger petal layers; the outer petals spread nearly flat while the center remains tightly cupped. Dark olive and burgundy leaves then bridge the transition between flower and lace. This 3D rose crochet table runner pattern also uses a dense center spine inside otherwise open lace so the long runner resists lengthwise stretching. A common failure is sewing a heavy rose directly to chain mesh. Without a reinforced attachment area, the lace elongates and the flower begins to sag.
Project Info at a Glance
| Skill Level | Time | Finished Size | Hook | Best For |
|---|---|---|---|---|
| Intermediate–Advanced | Reconstruction estimate: 18–25 hours | Reconstruction target: 38–42 × 135–145 cm | 3.5 mm lace; 4 mm flowers/leaves | Dining tables, wedding tables, formal floral centerpieces |
Published runner dimensions provide useful scale references. Ellen Gormley’s Sunbeam Bruges Lace Table Runner is documented at approximately 21.6 × 137 cm blocked, using sport-weight cotton blend and a 3.75 mm hook. A current handmade rose runner measures approximately 40 × 140 cm. Those benchmarks support the reconstruction target while the greater width here accounts for the large floral end arrangements.
Materials and Tools
Yarn
- Warm ivory — sport/DK cotton or cotton blend — reconstruction estimate: 320–380 g
- Deep burgundy — DK/worsted cotton blend — reconstruction estimate: 220–280 g
- Dark olive green — DK/worsted cotton blend — reconstruction estimate: 90–120 g
- Dark wine — DK/worsted cotton blend — reconstruction estimate: 60–80 g
The quantities are reconstruction estimates rather than published consumption for the photographed object. For comparison, the published Sunbeam runner uses approximately 634 yards / 580 m of sport-weight cotton blend for a blocked 21.6 × 137 cm runner. A separate 2026 cotton table-runner pattern uses 150 g for a 30 × 90 cm piece before fringe.
Tools
- 3.5 mm crochet hook for ivory lace
- 4 mm crochet hook for roses and foliage
- Tapestry needle
- Blocking mats
- Rust-resistant blocking pins
- Stitch markers
- Scissors
- Measuring tape
Abbreviations
- MR — magic ring
- ch — chain
- sl st — slip stitch
- sc — single crochet
- hdc — half double crochet
- dc — double crochet
- tr — treble crochet
- sp — space
- st/sts — stitch/stitches
- RS — right side
- WS — wrong side
An invisible decrease is worked through the front loops of two adjacent stitches before completing one single crochet; this flat lace-and-appliqué construction does not require decreases.
Pattern — Step by Step
Ivory Diamond Center Motif — Make 3
Yarn: warm ivory. Hook: 3.5 mm. Each motif is worked as a square and rotated 45 degrees during assembly.
R1: Ch 4 and join to form a ring. Ch 3, 2 dc in ring, ch 3; *3 dc, ch 3* ×3 in ring. Join. (12 dc; four ch-3 corners)
R2: Sl st to first corner. Work (ch 3, 2 dc, ch 3, 3 dc) in corner, ch 2; *(3 dc, ch 3, 3 dc) in next corner, ch 2* ×3. Join. (24 dc)
R3: Sl st to corner. Work (ch 3, 2 dc, ch 3, 3 dc) in corner, ch 2, 3 dc in side ch-2 sp, ch 2. Repeat around, working the same corner group in each corner. Join. (36 dc)
R4: Work the established corner group in each corner. Across each side work ch 2, 3 dc in next ch-2 sp, ch 2, 3 dc in next ch-2 sp, ch 2. Join. (48 dc)
R5: Work the established corner group. Across each side work three 3-dc groups separated by ch 2. Join. (60 dc)
R6: Work the established corner group. Across each side work four 3-dc groups separated by ch 2. Join. (72 dc)
Fasten off and block each motif to approximately 22 × 22 cm.
Creating the Central Diamond Spine
Rotate all three motifs so one corner points upward and one downward.
Arrange them in a vertical line.
Join the lower corner region of the first diamond to the upper corner region of the second using ivory slip stitches. Repeat between the second and third motifs.
The three diamonds should form a central structure approximately 60–64 cm long after overlap and joining.
This dense central section corresponds to the geometric blocks visible along the photographed runner’s middle.
Side Lace Foundation
Join ivory at the left corner of the first diamond.
Row 1: Ch 6, sc in the next available ch-2 space; *ch 5, sc in next ch-2 sp* across the exposed side of the diamond.
Continue across the joined diamond sequence, maintaining one ch-5 loop between successive side spaces.
Fasten off at the final outer corner.
Repeat along the opposite side.
Second Lace Row
Join in the first ch-5 loop.
Row 2: Ch 3, 2 dc in same loop, ch 3, sc in next loop; *ch 3, 3 dc in next loop, ch 3, sc in next loop* across.
Fasten off.
Repeat on the opposite long side.
Third Lace Row
Join at the first 3-dc group.
Row 3: Ch 1, sc in center dc of group, ch 5, sc in next ch-3 space, ch 5; repeat across, alternating anchor points between the 3-dc groups and intervening spaces.
Fasten off.
Repeat on the opposite side.
Fourth Lace Row
Join at the first ch-5 loop.
Row 4: Work (sc, ch 3, 3 dc, ch 3, sc) in first loop; sl st in next loop. Repeat this two-loop sequence across.
Fasten off.
Repeat on the second side.
The lace should now extend approximately 8–9 cm from each side of the diamond spine.
End Extension — Make 2
The large roses require a stronger base than the open side lace.
Join ivory at the outer point of one end diamond.
Row 1: Ch 3, work 4 dc into the point space. (5 dc)
Row 2: Ch 3, turn, dc in first st, dc in next 3 sts, 2 dc in final st. (7)
Row 3: Ch 3, turn, dc in first st, dc across, 2 dc in final st. (9)
Row 4: Repeat established increase. (11)
Row 5: Repeat. (13)
Row 6: Repeat. (15)
Row 7: Repeat. (17)
Row 8: Repeat. (19)
Row 9: Repeat. (21)
Row 10: Ch 3, turn, dc across without increases. (21)
Row 11: Repeat Row 10. (21)
Row 12: Repeat Row 10. (21)
Fasten off.
Repeat at the opposite end.
These compact triangular-to-rectangular end platforms sit largely beneath the flowers and distribute their weight into the runner.
Large Burgundy 3D Rose — Make 2
Yarn: deep burgundy. Hook: 4 mm. Reconstruction target: 22–25 cm across after shaping.
Ravelry’s 3D Crochet Rose by LisaAuch Crochet documents Aran-weight yarn with a 4 mm hook for a large three-dimensional rose, providing a useful material benchmark for these end flowers.
Rose Center
R1: 6 sc in MR. Join. (6)
R2: *Sc in next st, 5 dc in next st* ×3. Join.
Roll these three sections slightly inward to establish the rose center.
Petal Layer 2
Behind the first layer, create five ch-3 loops evenly around the center.
Into each loop work:
Sc, hdc, 3 dc, hdc, sc.
Five petals complete.
Petal Layer 3
Create seven ch-4 loops behind Layer 2.
Into each loop work:
Sc, hdc, dc, 3 tr, dc, hdc, sc.
Seven petals complete.
Petal Layer 4
Create nine ch-5 loops.
Into each loop work:
Sc, hdc, 2 dc, 3 tr, 2 dc, hdc, sc.
Nine petals complete.
Petal Layer 5
Create eleven ch-6 loops behind Layer 4.
Into each loop work:
Sc, hdc, 2 dc, 5 tr, 2 dc, hdc, sc.
Eleven petals complete.
Petal Layer 6
Create thirteen ch-7 loops.
Into each loop work:
Sc, hdc, 2 dc, 2 tr, 5 tr in center of loop, 2 tr, 2 dc, hdc, sc.
Fasten off with a 70 cm tail.
Shape the innermost petals vertically, the middle petals at approximately 45 degrees, and the final two layers nearly horizontal.
Optional Reinforcement Disc — Make 2
Large flowers exert considerable load on lace. Crochet one concealed burgundy disc behind each rose.
R1: 12 dc in MR. (12)
R2: 2 dc in each stitch. (24)
R3: (Dc, 2 dc in next) ×12. (36)
R4: (2 dc, 2 dc in next) ×12. (48)
R5: (3 dc, 2 dc in next) ×12. (60)
Fasten off.
Sew the rose foundation to this disc before attaching the flower to the runner. The disc remains concealed beneath the outer petals.
Dark Olive Large Leaf — Make 10
The photographed arrangements use broad pointed leaves around each rose.
With dark olive and the 4 mm hook, ch 22.
Starting in the second chain, work into the next 20 chains, leaving the final chain for the tip:
Sl st in 1, sc in 2, hdc in 3, dc in 4, tr in 7, dc in 2, hdc in 1. (20)
Work 5 sc in the final chain.
Working along the opposite side, mirror the 20-stitch sequence:
Hdc in 1, dc in 2, tr in 7, dc in 4, hdc in 3, sc in 2, sl st in 1. (20)
Fasten off with a 35 cm tail.
Each leaf contains 20 side stitches + 5 tip stitches + 20 opposite-side stitches = 45 stitches.
Dark Wine Large Leaf — Make 6
Repeat the large leaf instructions using dark wine yarn.
The photographed end clusters alternate green foliage with burgundy-toned leaves, allowing the floral arrangement to extend farther across the lace without introducing another color family.
Leaf Vein
With matching or slightly lighter yarn, join at the leaf base.
Surface sl st along the visible foundation-chain ridge toward the tip.
Stop approximately 1 cm before the pointed end.
Fasten off without pulling the vein tight.
A published 2025 Ravelry leaf appliqué uses #4 yarn, a 5 mm hook, and finishes at approximately 4 × 8 cm; another related leaf appliqué finishes around 3 × 8 cm. The larger leaves here are intentionally scaled upward to balance a 22–25 cm rose.
Small Olive Leaf — Make 8
Ch 14.
Beginning in the second chain, work into the next 12 chains, leaving the final chain for the tip:
Sl st in 1, sc in 2, hdc in 2, dc in 3, tr in 2, dc in 1, hdc in 1. (12)
Work 5 sc in the final chain.
Mirror the 12-stitch sequence along the opposite side.
Fasten off with a 25 cm tail.
Arranging the First Rose Cluster
Place one large rose over the reinforced end platform.
Before sewing the flower down, position five large olive leaves around it.
Place three dark wine leaves between selected green leaves.
Add four small olive leaves closer to the flower base.
The arrangement should extend approximately 35–40 cm across at its widest point.
Pin every component before sewing.
Arranging the Second Rose Cluster
Repeat the same quantities at the opposite end.
Rotate the foliage arrangement approximately 180 degrees rather than duplicating every leaf angle exactly.
Both flowers should remain centered on the runner’s longitudinal axis.
Measure from each flower center to the nearest runner end. Keep the difference within approximately 1 cm.
Sewing the Leaves to the Lace
Attach each large leaf at its base first.
Run a second line of concealed stitches along approximately 5–7 cm of the center vein.
Leave the outer third of the leaf free.
For the small leaves, attach the lower half and leave the pointed end raised.
This method distributes the appliqué weight while preserving dimensional foliage.
Sewing the Roses
Place each reinforcement disc over the solid end platform.
Sew around the outer portion of the disc at approximately 2 cm intervals.
Add six longer stitches through the central disc and underlying dense crochet.
Do not attach the outer rose petals to the ivory runner.
The petals must remain free to produce the layered profile visible in the photograph.
Pointed Ivory Perimeter
Join ivory at one end beside the floral cluster.
Work one sc in each available solid stitch and one sc in each chain-space anchor around the runner.
Where the existing side lace forms a ch-5 loop, work:
(Sc, ch 3, 3 dc, ch 3, sc) into the loop.
In the next loop work one sl st.
Repeat this two-loop sequence along the exposed perimeter.
At the central point of each end, work:
Sc, ch 3, 5 dc, ch 4, sl st in first ch, 5 dc, ch 3, sc.
Join and fasten off.
The repeated shells create the small pointed/scalloped silhouette visible around the ivory lace.
Blocking the Lace
Block the ivory foundation before attaching the flowers whenever possible.
Pin the center diamonds first.
Next pin corresponding points on the two long edges.
Measure the width at the top, center, and bottom. Keep those three measurements within 5 mm of one another.
Allow the runner to dry fully before adding the rose clusters.
Assembly
- Crochet three ivory diamond motifs, block each to approximately 22 cm square, rotate them 45 degrees, and join them into one centered longitudinal spine.
- Build four rows of open ivory lace along both long sides, keeping corresponding chain loops aligned across the runner.
- Add one reinforced ivory end extension to each end of the diamond spine and block the complete foundation to approximately 38–42 cm wide.
- Crochet two six-layer burgundy roses and two concealed reinforcement discs, then shape the petal layers from upright centers to nearly horizontal outer petals.
- Make ten large olive leaves, six large wine leaves, and eight small olive leaves, checking the foundation-chain counts before working the mirrored second sides.
- Arrange five olive leaves, three wine leaves, and four smaller leaves around each end platform, keeping the foliage clear of the central dining area.
- Sew each large leaf through its base and 5–7 cm of center vein, leaving the outer third free to preserve dimensional texture.
- Sew each rose to its reinforcement disc, attach the disc securely to the dense ivory end platform, and leave every outer petal unattached.
- Work the pointed ivory perimeter around all exposed lace, matching the shell sequence on both long sides and emphasizing the two end points.
- Weave every tail through at least 5 cm of matching crochet, reshape both floral clusters, and complete a final light blocking of the exposed ivory lace.
The finished runner combines a low ivory lace center with two raised burgundy rose arrangements, sixteen large pointed leaves, eight smaller leaves, and a scalloped perimeter.
7 Technical Tips
- The center spine twists: block all three diamond motifs to the same 22 cm measurement before joining. A 5 mm difference between consecutive diamonds becomes visible as a bend along the runner’s longitudinal axis.
- The lace narrows toward one end: count the ch-5 loops on both sides after every lace row. One omitted loop shifts every subsequent shell and can remove several centimeters from the final edge.
- The rose pulls the lace downward: attach the flower through a reinforcement disc rather than directly into chain mesh. A 22–25 cm layered rose concentrates too much weight for isolated ch-5 loops.
- The outer petals collapse into the foliage: keep approximately 2–3 cm between the rose foundation and the first secured section of each large leaf. Crowding the leaf bases under the petals pushes the outer rose layers upward irregularly.
- The large leaf twists: verify 20 stitches on each side of the foundation plus five stitches at the tip. Consuming the final foundation chain before the turn removes the intended tip anchor and produces an asymmetric leaf.
- The scalloped border ruffles: maintain one shell for every two established lace loops. Adding a shell to every loop approximately doubles the required edge circumference and forces the runner to wave.
- The two end arrangements look unbalanced: measure each flower center from the nearest runner tip and keep the measurements within 1 cm. Equal flower placement matters more than duplicating every individual leaf angle.
Why the Runner Uses a Reinforced Center
Large three-dimensional crochet flowers are substantially heavier than ordinary flat appliqués. The reference image places them over dense end sections rather than suspending their full weight from the most open mesh.
The same principle appears in contemporary floral table-runner construction: structural foundation work and dimensional appliqués are treated as separate layers. This reconstruction extends that approach by adding concealed flower discs and dense end platforms.
The result allows the central lace to remain visually open without making it responsible for supporting the entire botanical arrangement.
Published Table Runner Size Benchmarks
Ellen Gormley’s published Sunbeam Bruges Lace Table Runner uses sport-weight Premier Cotton Fair, a 3.75 mm hook, and 634 yards / 580 m. Its blocked dimensions are approximately 8.5 × 54 inches / 21.6 × 137 cm, with a documented gauge of 16 double crochets per 4 inches.
A current handmade crochet rose runner is listed at approximately 55 × 14 inches / 140 × 40 cm and uses classic cotton crochet thread. That size is particularly close to the overall proportions reconstructed from the supplied photograph.
Published 3D Rose Benchmark
LisaAuch Crochet’s 3D Crochet Rose on Ravelry specifies Aran-weight yarn and a 4 mm hook for its large rose option. The pattern is documented as three-dimensional, one-piece, and worked flat before shaping.
The rose instructions in this article use an independently designed layered-loop construction, but the published yarn and hook specifications support using a 4 mm hook for substantial decorative roses.
Published Leaf Benchmarks
Dani Joan’s 2025 Ravelry leaf uses Aran yarn and a 5 mm hook, with a finished size of approximately 4 × 8 cm and 4–6 yards of yarn.
Uma M Natarajan’s leaf appliqué uses worsted yarn and a 3.5 mm hook, with a published gauge of four stitches and four rows per inch. These references demonstrate that worsted-weight foliage can retain enough structure for raised appliqué work.
Rose Leaf Construction Reference
Loopara’s rose leaf uses a foundation-chain construction worked along both sides of the chain, with varied stitch heights and a multi-stitch tip. Its published version measures approximately 4 × 3 cm in 4-ply cotton with a 2 mm hook.
The large leaves here use the same general botanical principle—short stitches at the base, taller stitches through the center, and a concentrated tip—but are independently scaled for the oversized flowers.
Why the Flowers Stay at the Ends
The center of a functional dining-table runner benefits from remaining relatively flat. Tall flowers in that area can interfere with serving dishes, candle holders, or place settings.
Concentrating the roses at the ends creates the same dramatic botanical effect while preserving a usable central lace section.
The supplied image reinforces that hierarchy. The eye meets a large rose cluster first, travels through the repeating ivory geometry, then reaches the second floral anchor.
Why Burgundy Works with Ivory Lace
The deep flower color provides enough value contrast for the individual petal layers to remain visible against pale lace. Dark olive foliage separates the burgundy bloom from the ivory background.
The additional wine leaves repeat the flower color at a lower height. That prevents the end arrangement from appearing as one isolated red circle surrounded only by green.
If substituting colors, preserve similar value differences between flower, foliage, and foundation.
Making a Shorter Runner
Use two central diamonds instead of three.
Remove the corresponding side-lace section and keep both floral end constructions unchanged.
The finished length should decrease by approximately 18–22 cm, depending on overlap and blocking.
Retain both reinforcement platforms because the rose attachment method does not change with runner length.
Making a Longer Runner
Add one additional 22 cm diamond to the central spine.
Continue the side lace across the added motif using the same four-row sequence.
After joining and blocking, expect approximately 18–22 cm of additional finished length rather than the full 22 cm because adjacent diamond points overlap slightly.
This modular method is preferable to stretching the existing lace.
Making a Narrower Runner
Omit the fourth side-lace row.
The center diamonds remain unchanged while the openwork field loses several centimeters on each side.
Keep the pointed perimeter, but attach it directly to Row 3.
Before attaching flowers, verify that the large end leaves still fit within the intended table width.
Making Smaller Roses
Stop after Petal Layer 5.
The flower will retain its layered structure but lose the thirteen-petal outer round.
Reduce the reinforcement disc by omitting R5, leaving a 48-dc disc.
Smaller flowers are useful for narrow tables where a 22–25 cm bloom would extend beyond the runner foundation.
Making the Roses Fuller
Do not add random extra petals between completed layers.
Instead, increase the final loop count systematically from thirteen to fifteen while distributing the loops evenly around the foundation.
Keep the outer petals broad and relatively flat. A large rose reads more naturally when the increase in fullness occurs around the circumference rather than through excessive vertical height.
Correcting a Rose That Looks Like a Spiral
Increase the distinction between petal layers.
The inner petals should stand nearly vertical, while the outer two layers should be pressed outward at the base.
Tack the lower edges of selected middle petals to the reinforcement disc if they collapse inward.
A rose with every petal at the same angle loses the layered bloom structure visible in the photograph.
Correcting a Rose That Is Too Flat
Lift the center and second layer before altering the outer petals.
Pass a concealed burgundy thread through the bases of the first five to eight petals and draw them slightly inward.
Secure the thread underneath the reinforcement disc.
Leave the final two layers untouched so the flower retains a broad footprint.
Correcting Leaf Curl
Count both sides before blocking.
The large leaf requires exactly 20 stitches per side plus five at the tip. The smaller leaf requires 12 per side plus five at the tip.
If the arithmetic is correct, wet block the leaf with the central foundation chain pinned straight. Do not stretch one side farther than the other.
Correcting Uneven Lace Points
Pin every major border point before pinning the smaller scallops.
Measure from the center spine to corresponding left and right points.
Keep the difference below approximately 5 mm.
If one shell remains noticeably shorter after blocking, remake that repeat rather than stretching its chain spaces beyond their natural length.
Yarn Planning
Make one complete diamond, one rose, one large leaf, and one section of side lace before purchasing supplemental yarn.
Weigh each sample independently.
Multiply the diamond weight by three, rose weight by two, large-leaf weight by sixteen, and small-leaf weight by eight. Add the measured lace and border requirement, then include approximately 15% for tails, swatching, tension differences, and repairs.
This sample-based method is more dependable than applying yardage from a narrow published lace runner directly to a wide runner with oversized floral appliqués.
Care and Storage
Follow the yarn manufacturer’s care label. Support the roses from underneath when moving a wet runner because saturated appliqués become considerably heavier.
Dry the foundation flat. Reshape the petal layers and leaf points while damp, but do not pin the outer rose petals completely flat.
For storage, roll the runner loosely around a clean tube with the floral arrangements protected by tissue. Folding directly through a large rose can permanently crease the outer petals.
Sources
Ravelry — Sunbeam Bruges Lace Table Runner — sport-weight cotton blend, 3.75 mm hook, 634 yards, 16-dc gauge, and 8.5 × 54 inch blocked-size benchmark.
Etsy — Crochet Rose Table Runner by Gebeya — contemporary cotton-thread rose runner measuring approximately 55 × 14 inches / 140 × 40 cm.
Ravelry — 3D Crochet Rose by LisaAuch Crochet — Aran-weight yarn, 4 mm hook, and large three-dimensional rose reference.
Ravelry — Leaf by Dani Joan — Aran yarn, 5 mm hook, 4–6 yards, and approximately 4 × 8 cm finished leaf benchmark.
Ravelry — Crochet Leaf Applique by Uma M Natarajan — worsted yarn, 3.5 mm hook, and published appliqué gauge reference.
Loopara — Crochet Rose Leaf — two-sided foundation-chain construction, shaped tip, and approximately 4 × 3 cm fine-cotton leaf benchmark.
Kotona Living — Crocheted Table Runner — 150 g cotton yarn, 3 mm hook, 30 × 90 cm finished-size benchmark, and documented lace gauge.
Ravelry — Pineapple Table Runner by Better Homes and Gardens — traditional modular lace runner measuring 16 × 62 inches with 4.5-inch motifs.
Conclusion
The end flowers determine the engineering of this runner, so finish and weigh one rose before committing to the complete lace foundation. Block the three ivory diamonds first, keep corresponding chain loops equal, and attach each 22–25 cm flower through a concealed reinforcement disc rather than unsupported mesh. Your next step is to make one 22 cm diamond and confirm its blocked measurement before repeating the center modules. Save this 3D rose crochet table runner pattern to Pinterest or share the completed centerpiece on Instagram with #BurgundyRoseLaceRunner. For these oversized end clusters, would you keep the secondary leaves burgundy as pictured or make every surrounding leaf dark olive? “`0









