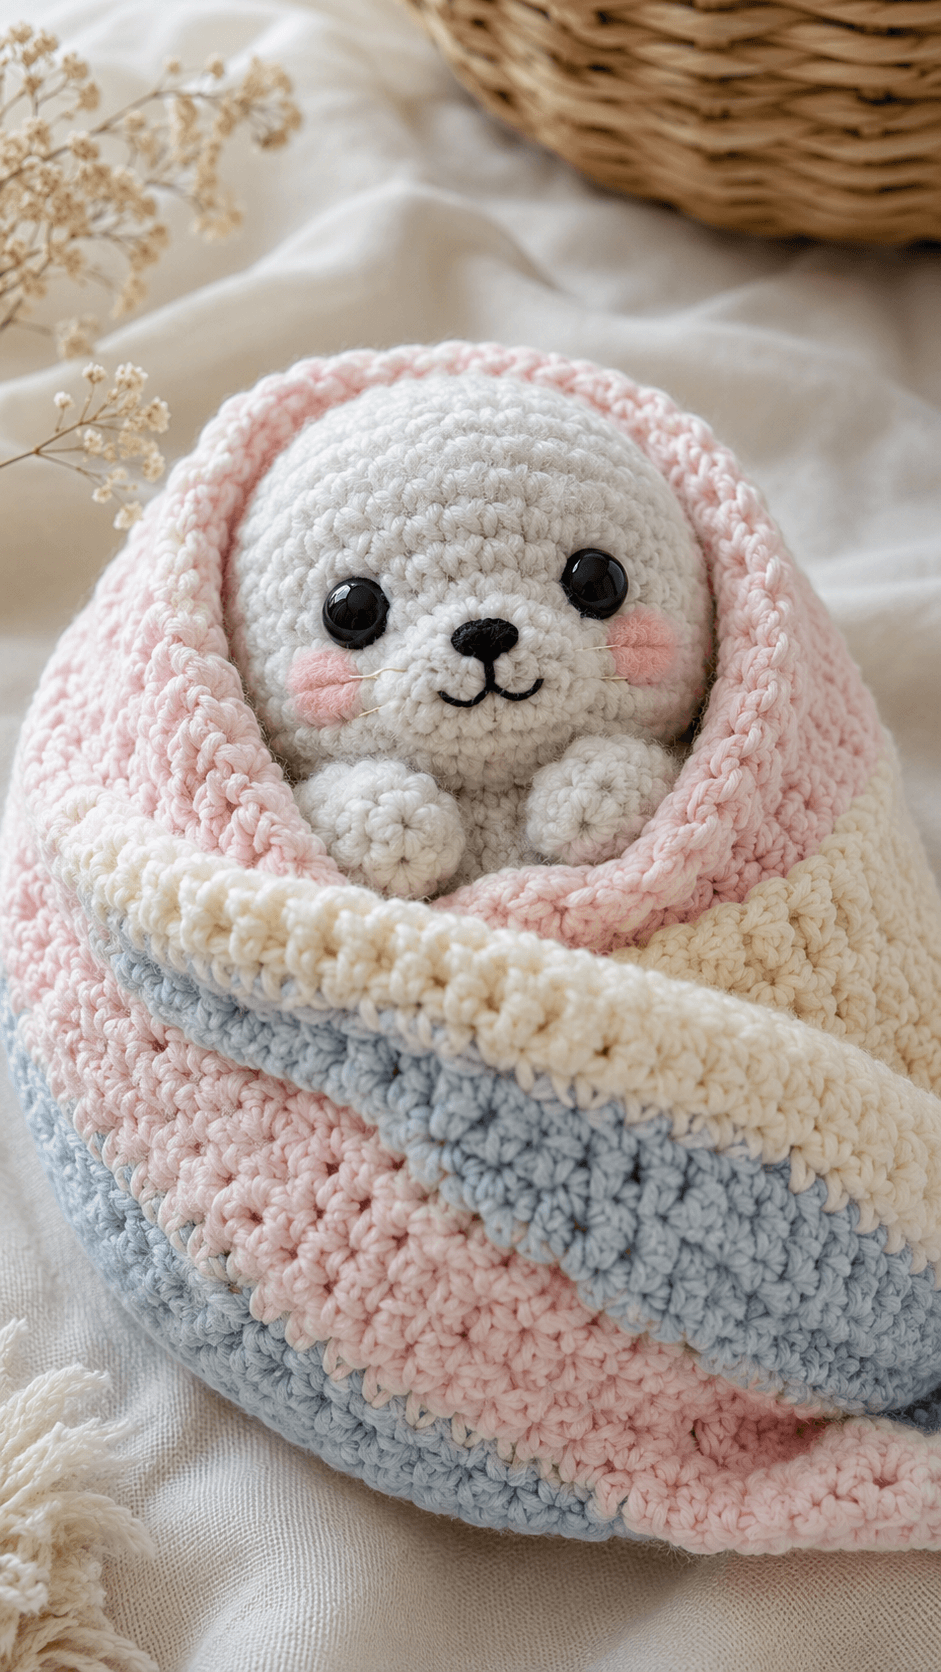
A rabbit stops reading as a rabbit the moment the face gets too flat for the muzzle. This bunny lovey crochet pattern keeps the nose forward, the paws tucked high, and the swaddle blanket deep enough to frame the head without swallowing it. Use cotton yarn, a small amigurumi hook, and intermediate shaping. The result works as a baby gift, photo prop, or nursery shelf piece.
The Design: What Makes This Bunny Different
This is not a flat security blanket with a toy sewn to the center. The swaddle changes the silhouette first. The bunny sits low inside a folded cocoon, so the visible head has to stay compact while the blanket carries most of the volume. That is why the head uses a small plateau and the body stays short. Too much torso length pushes the face upward and breaks the tucked baby pose.
The muzzle also matters more here than on a standing rabbit. In a baby bunny amigurumi, the cheeks and nose need forward projection or the face disappears into the blanket rim. The front paws are attached high and close together for the same reason. Many crochet bunny comforter patterns leave the arms too low, which makes the character look seated instead of wrapped. This version keeps the paws under the chin line and uses long ears tucked behind the swaddle so the profile stays soft.
Project Info at a Glance
| Skill Level | Time | Finished Size | Hook | Best For |
|---|---|---|---|---|
| Intermediate | 5–7 hours | Approx. 14 cm bunny, blanket scaled to a compact swaddle | 3.5 mm for toy, 4.0 mm for blanket | Baby shower gift, nursery decor, spring display |
Materials and Tools
Yarn
- White — DK or light worsted cotton — about 50–65 g — Paintbox Cotton DK or Lion Brand 24/7 Cotton style substitute
- Soft Pink — DK or light worsted cotton — about 25–35 g — for blanket and inner wrap
- Pale Blue — DK or light worsted cotton — about 20–30 g — for blanket stripe
- Cream — DK or light worsted cotton — about 20–30 g — for blanket border
- Black — small amount — for nose and mouth embroidery
- Blush Pink — very small amount or brushed yarn — for cheek patches
Tools
- Hook 3.5 mm for bunny parts
- Hook 4.0 mm for swaddle blanket
- 8–10 mm safety eyes or embroidered eyes for infant-safe version
- Stuffing
- Yarn needle
- Stitch markers
- Pins or clips
Abbreviations
MR / sc / inc / dec / sl st / ch / BLO / FLO / hdc / dc.
Invisible decrease is used on the head, body, and paws because the white yarn shows every reduction line.
Pattern — Step by Step
Work in a continuous spiral unless noted. Counts are shown in brackets at the end of each round.
Head (Make 1)
Yarn: white — Standard amigurumi math adapted to the photo
R1: 6 sc in MR (6)
R2: inc ×6 (12)
R3: (sc, inc) ×6 (18)
R4: (2 sc, inc) ×6 (24)
R5: (3 sc, inc) ×6 (30)
R6–R10: sc around (30)
R11: (3 sc, dec) ×6 (24)
Insert eyes between R7 and R8, spaced 6 stitches apart. Stuff firmly.
R12: (2 sc, dec) ×6 (18)
R13: (sc, dec) ×6 (12)
R14: dec ×6 (6)
Fasten off. Leave a 25 cm tail.
Muzzle (Make 1)
Yarn: white
R1: 6 sc in MR (6)
R2: inc ×6 (12)
R3: sc around (12)
R4: (4 sc, inc, inc, 4 sc) (14)
Lightly stuff before sewing. Embroider nose and mouth after attachment.
Fasten off. Leave a 20 cm tail.
Body (Make 1)
Yarn: white — Small plateau for tucked swaddle pose
R1: 6 sc in MR (6)
R2: inc ×6 (12)
R3: (sc, inc) ×6 (18)
R4: (2 sc, inc) ×6 (24)
R5: (3 sc, inc) ×6 (30)
R6–R8: sc around (30)
R9: (3 sc, dec) ×6 (24)
R10: sc around (24)
R11: (2 sc, dec) ×6 (18)
Stuff only the lower half firmly. Keep the upper body slightly softer so it sits into the blanket.
R12: (sc, dec) ×6 (12)
Fasten off. Leave a 25 cm tail.
Arms / Front Paws (Make 2)
Yarn: white
R1: 6 sc in MR (6)
R2: inc ×6 (12)
R3–R4: sc around (12)
R5: (sc, dec) ×4 (8)
R6–R7: sc around (8)
Stuff the paw only. Leave the upper section flat for easier sewing.
Fasten off. Leave a 20 cm tail.
Back Legs (Make 2)
Yarn: white
R1: 6 sc in MR (6)
R2: inc ×6 (12)
R3–R4: sc around (12)
R5: (sc, dec) ×4 (8)
Lightly stuff. These sit mostly hidden inside the swaddle.
Fasten off. Leave a 20 cm tail.
Ears (Make 2)
Yarn: white
Ch 9.
Row 1: Starting in 2nd ch from hook, sc 7, 3 sc in last ch. Working on opposite side of chain: sc 6, inc in last st (18)
Row 2: ch 1, do not turn, sc around (18)
Row 3: sc 7, dec, sc 7, dec (16)
Row 4: sc around (16)
Flatten without stuffing. Sew low behind the head so they disappear into the blanket edge.
Fasten off. Leave a 22 cm tail.
Cheek Patches (Make 2)
Yarn: blush pink
R1: 6 sc in MR (6)
R2: inc ×6 (12)
Fasten off. Leave a 10 cm tail.
Swaddle Blanket Base (Make 1)
Yarn: soft pink — Source inspiration from bunny lovey blanket sizing norms, shaped here as a wrap rather than a square
Ch 31.
Row 1: sc in 2nd ch from hook and across (30)
Row 2: ch 1, turn, sc across (30)
Row 3: ch 1, turn, inc, 28 sc, inc (32)
Row 4: ch 1, turn, sc across (32)
Row 5: ch 1, turn, inc, 30 sc, inc (34)
Row 6: ch 1, turn, sc across (34)
Row 7: ch 1, turn, inc, 32 sc, inc (36)
Row 8–16: ch 1, turn, sc across (36)
Do not fasten off.
Swaddle Color Bands (Continue on Blanket)
Yarn: pale blue, soft pink, cream
Row 17–20: change to pale blue, sc across (36)
Row 21–24: change to soft pink, sc across (36)
Row 25–28: change to cream, sc across (36)
Do not fasten off.
Swaddle Border and Fold Band (Make 1 continuous finish)
Yarn: cream
Round 1: ch 1, work sc evenly around entire blanket, placing 3 sc in each corner. Join with sl st.
Round 2: ch 1, BLO sc around. Join with sl st.
The BLO round creates the thicker folded lip visible in the photo. Steam block lightly if the edge rolls.
Fasten off. Leave a 25 cm tail.
Inner Hood Curve (Make 1)
Yarn: soft pink
Ch 26.
Row 1: hdc in 2nd ch from hook and across (25)
Row 2: ch 1, turn, dec, 21 hdc, dec (23)
Row 3: ch 1, turn, hdc across (23)
Row 4: ch 1, turn, dec, 19 hdc, dec (21)
This piece is sewn inside the upper wrap to build the deep pink hood framing the face.
Fasten off. Leave a 25 cm tail.
Assembly
- Sew the muzzle to the center of the head, placing it low enough to leave room for rounded cheeks under the eyes.
- Embroider the black nose at the upper center of the muzzle and add the mouth directly below it.
- Attach the cheek patches slightly below and outside each eye, then trim or brush them for a softer blush effect if desired.
- Sew the ears to the sides of the head, starting lower than the crown so they fall backward into the swaddle line.
- Sew the head to the top of the body with the chin tilted very slightly down.
- Attach the front paws high on the body so they meet or nearly meet under the muzzle.
- Sew the back legs low on the body. Keep them angled forward so the bunny stays compact inside the wrap.
- Stitch the inner hood curve to the upper third of the swaddle blanket, centered along the top edge.
- Set the bunny on the lower center of the blanket and tack the body in place with a few secure stitches through the lower torso only.
- Wrap one blanket side across the front, overlap the second side, and tack both folds at the base and side seams so the face remains fully visible.
The finished piece should hold a deep cocoon shape with the bunny framed inside rather than lying flat on the blanket.
7 Technical Tips
- Place the eyes before the head closes below 24 stitches. Installing them later can stretch the white fabric and distort the muzzle alignment by one full stitch column.
- Do not overstuff the body. A body diameter larger than the blanket opening makes the front folds flare outward instead of wrapping inward.
- Keep the muzzle lightly stuffed. Overfilling it pushes the embroidered nose too far forward and makes the face read more like a bear than a rabbit.
- Pin the paws before sewing and check their height against the bottom of the muzzle. If they sit more than 1 round lower than the muzzle base, the tucked baby pose weakens.
- Sew the ears below the top centerline, not on it. High ear placement makes the silhouette vertical, while this photo style needs the ears to disappear into the swaddle curve.
- Use a larger hook for the blanket than for the toy parts. Matching hook sizes across both sections often makes the wrap too stiff to fold cleanly over the front.
- Weave every blanket tail through at least 6 dense stitches along the border. Loose ends show first on cream edging because the fold line is handled every time the piece is moved.
Conclusion
This bunny lovey crochet pattern depends on proportion more than ornament. Keep the head compact, the muzzle forward, the paws high, and the swaddle deep enough to frame the face without flattening it. That sequence produces the wrapped baby-bunny look from the photo instead of a standard rabbit plush with a blanket underneath. The next step is to crochet the head and one blanket panel first, then test the overlap before committing to final assembly. Share the finished piece on Pinterest and Instagram with #BunnyLoveyPattern. Did you keep the ears fully tucked into the swaddle, or let them show above the pink hood edge?









