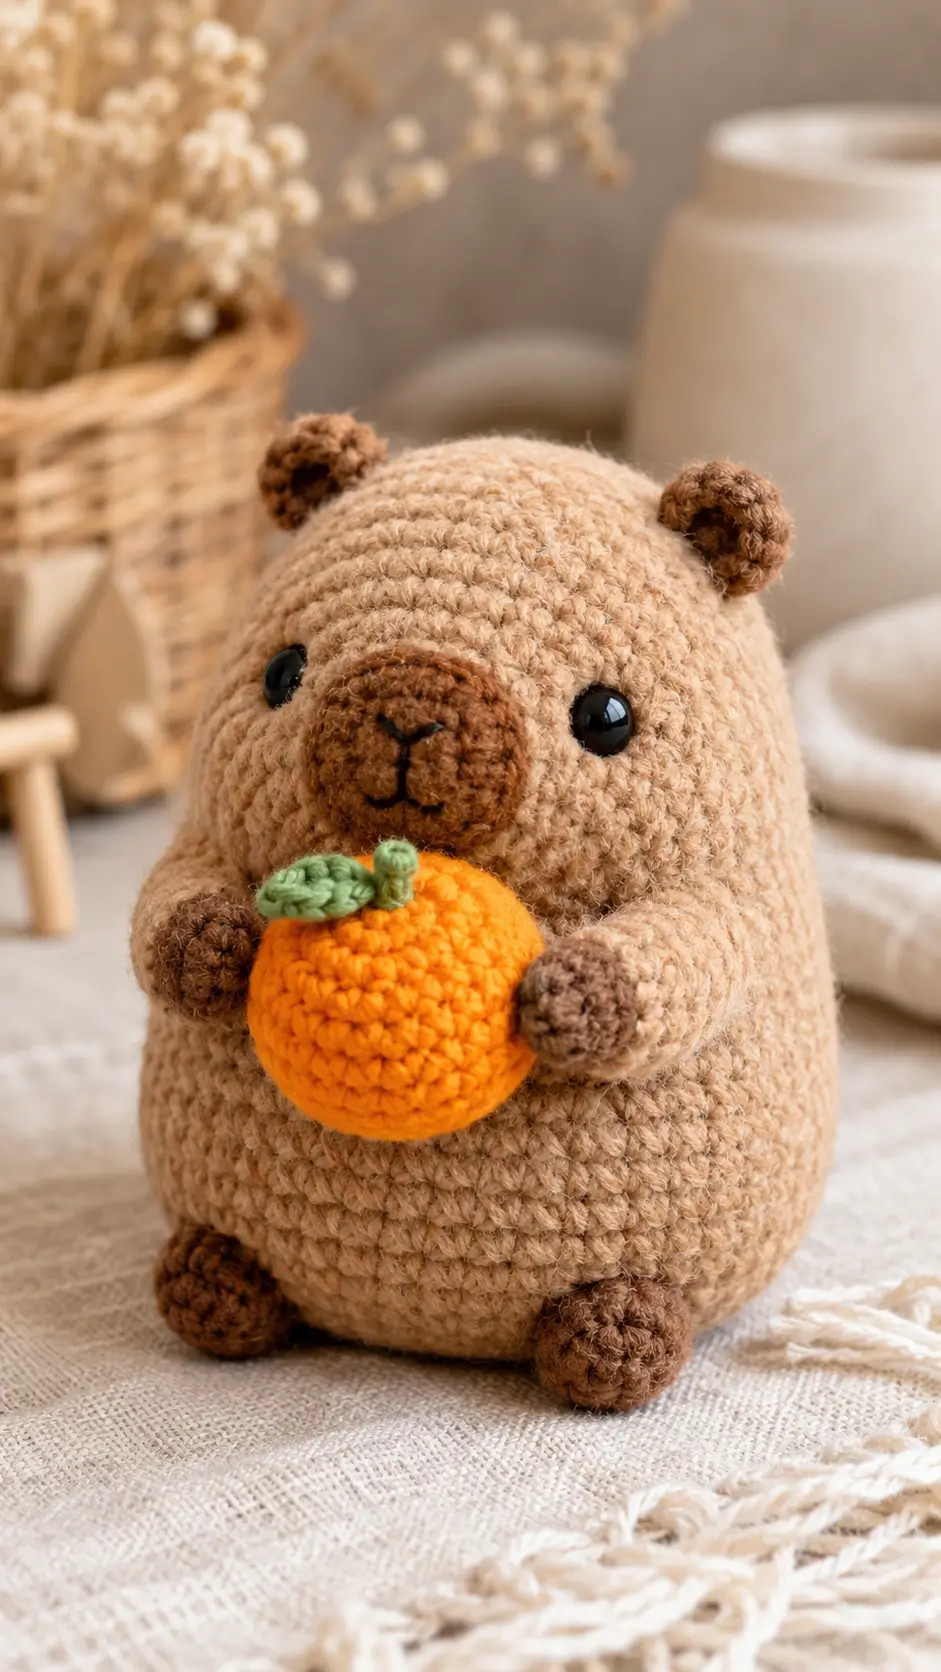
A bear holding a pumpkin only reads clearly when the snout projects farther than the paws. This bear with pumpkin crochet pattern builds that forward face first, then keeps the body compact enough for the pumpkin to stay centered in the silhouette. Use DK or light worsted yarn, a small hook, and firm stuffing. The finished plush works as autumn shelf decor instead of a loose, floppy toy.
The Design: What Makes This Bear Different
This bear is built as a near-column, not a classic teddy with a separate neck and wide belly. That decision matters because the pumpkin has to sit forward between the paws without the whole figure tipping. A short oval body with a flat lower curve gives the plush weight at the base and keeps the front clean.
The muzzle is also larger than many small-bear patterns. That is deliberate. On a crochet bear holding pumpkin design, the accessory already occupies the center front. If the snout stays too flat, the face gets visually pushed backward and the paws start to dominate. Here the muzzle is stitched as a separate padded disk so the nose line stays visible above the pumpkin.
The ears are small, tight, and high. Large ears would pull the character toward cub proportions, while this photo reads as a compact autumn bear. A common mistake in any pumpkin bear amigurumi is placing the paws too low. Once that happens, the accessory looks dropped instead of held.
Project Info at a Glance
| Skill Level | Time | Finished Size | Hook | Best For |
|---|---|---|---|---|
| Intermediate | 5–7 hours | Approx. 18 cm tall | 2.75 mm to 3.25 mm | Autumn decor, gift toppers, shelf display |
Materials and Tools
Yarn
- Light tan — DK or light worsted — about 45–60 g — for head and body
- Dark brown — DK or light worsted — about 15–20 g — for muzzle, paws, feet, ears
- Orange — DK or light worsted — about 15–20 g — for pumpkin
- Green — small amount — for leaf and stem
- Black — small amount — for nose and mouth embroidery
- Beige or tan — very small amount — for optional cheek patches
Tools
- Hook 2.75 mm or 3.0 mm
- 8–10 mm safety eyes
- Stuffing
- Yarn needle
- Stitch markers
- Pins or clips
Abbreviations
MR / sc / inc / dec / sl st / ch / BLO / FLO / hdc / dc.
Use invisible decrease on the visible shaping rounds because standard decreases leave a ridge on tightly worked bear fabric.
Pattern — Step by Step
Work in a continuous spiral unless noted. Counts are shown in brackets at the end of each round.
Head (Make 1)
Yarn: light tan — source structure adapted from standard 30-st bear head math and public bear references
R1: 6 sc in MR (6)
R2: inc ×6 (12)
R3: (sc, inc) ×6 (18)
R4: (2 sc, inc) ×6 (24)
R5: (3 sc, inc) ×6 (30)
R6-R10: sc around (30)
R11: (3 sc, dec) ×6 (24)
Insert eyes between R7 and R8, spaced 6 stitches apart. Stuff firmly.
R12: (2 sc, dec) ×6 (18)
R13: (sc, dec) ×6 (12)
R14: dec ×6 (6)
Fasten off. Leave a 25 cm tail.
Body (Make 1)
Yarn: light tan — compact upright body for the photo silhouette
R1: 6 sc in MR (6)
R2: inc ×6 (12)
R3: (sc, inc) ×6 (18)
R4: (2 sc, inc) ×6 (24)
R5: (3 sc, inc) ×6 (30)
R6-R11: sc around (30)
R12: (3 sc, dec) ×6 (24)
R13: sc around (24)
R14: (2 sc, dec) ×6 (18)
Stuff very firmly at the base. Keep the upper third slightly softer so the paws can curve inward.
R15: (sc, dec) ×6 (12)
Fasten off. Leave a 25 cm tail.
Arms / Front Paws (Make 2)
Yarn: dark brown for paw tip, then light tan
R1: 6 sc in MR with dark brown (6)
R2: inc ×6 (12)
R3: sc around (12)
Change to light tan.
R4: BLO sc around (12)
R5: (sc, dec) ×4 (8)
R6-R10: sc around (8)
Stuff the paw section only. Keep the upper arm flat.
Fasten off. Leave a 22 cm tail.
Back Legs (Make 2)
Yarn: dark brown for foot tip, then light tan
R1: 6 sc in MR with dark brown (6)
R2: inc ×6 (12)
R3-R4: sc around (12)
Change to light tan.
R5: (sc, dec) ×4 (8)
R6-R8: sc around (8)
Stuff lightly. Flatten slightly before sewing.
Fasten off. Leave a 20 cm tail.
Ears (Make 2)
Yarn: dark brown
R1: 6 sc in MR (6)
R2: inc ×6 (12)
R3: sc around (12)
Flatten without stuffing.
Fasten off. Leave a 15 cm tail.
Muzzle / Snout (Make 1)
Yarn: dark brown
R1: 6 sc in MR (6)
R2: inc ×6 (12)
R3: (sc, inc) ×6 (18)
R4: sc around (18)
Lightly stuff before sewing. Embroider nose and mouth after attachment.
Fasten off. Leave a 22 cm tail.
Cheek Patches (Make 2)
Yarn: beige or light tan
R1: 6 sc in MR (6)
R2: inc ×6 (12)
These are optional and very subtle. Skip them for a cleaner bear face, or place them partly under the muzzle edge for extra roundness.
Fasten off. Leave a 10 cm tail.
Pumpkin (Make 1)
Yarn: orange
R1: 6 sc in MR (6)
R2: inc ×6 (12)
R3: (sc, inc) ×6 (18)
R4: (2 sc, inc) ×6 (24)
R5: (3 sc, inc) ×6 (30)
R6-R9: sc around (30)
R10: (3 sc, dec) ×6 (24)
R11: (2 sc, dec) ×6 (18)
Stuff firmly. Keep the shape round, not oval.
R12: (sc, dec) ×6 (12)
R13: dec ×6 (6)
Thread a long strand of orange yarn through the center top and bottom several times to create soft pumpkin segments.
Fasten off. Leave a 20 cm tail.
Pumpkin Stem (Make 1)
Yarn: green
R1: 4 sc in MR (4)
R2-R3: sc around (4)
Fasten off. Leave a 12 cm tail.
Pumpkin Leaf (Make 1)
Yarn: green
Ch 6.
Row 1: starting in 2nd ch from hook, sl st, sc, hdc, sc, sl st.
Work along opposite side of chain: sl st, sc, hdc, sc, sl st.
Fasten off. Leave a 12 cm tail.
Assembly
- Sew the muzzle to the lower front of the head, centered between the eye positions and extending slightly below them.
- Embroider the nose at the center of the muzzle and stitch a short vertical line plus a shallow mouth curve beneath it.
- Add the cheek patches under the outer edges of the muzzle only if you want a slightly fuller face.
- Sew the ears high on the head, roughly aligned with the outer edges of the eyes.
- Attach the head to the body with the face tilted forward by a few degrees rather than pointing straight up.
- Sew the back legs low on the body so the bear sits level and the foot tips remain visible from the front.
- Attach the front paws high on the chest and angle them inward so both hands meet around the pumpkin.
- Sew the stem to the pumpkin top and attach the leaf off-center beside it.
- Position the pumpkin between the paws and tack it first to one paw, then the other, then add two hidden stitches to the body for stability.
- Check the front view and adjust the paw angle if the pumpkin hides the mouth line.
The finished bear should stand visually upright, hold the pumpkin at chest level, and keep the full face visible above the accessory.
7 Technical Tips
- If the head is stuffed softer than the body, the snout sinks backward once the pumpkin is attached. Keep the head dense enough that the muzzle projects at least 1 cm past the eye line.
- Count the body plateau carefully. Losing one stitch before the decrease rounds can twist the lower silhouette and make one foot sit higher than the other.
- Place the paws before closing all their tails. A difference of even 2 stitches in height is obvious because the pumpkin is a centered object.
- Keep the pumpkin firmly stuffed. A soft pumpkin collapses under the paws and turns the bear into a hugging pose instead of a holding pose.
- Use invisible decreases on the orange pumpkin as well as the bear. Standard decreases on bright yarn create visible notches that break the round fruit shape.
- Pin the ears before sewing and view them from above. Ears that sit too far forward make the head look narrower and shorten the forehead visually.
- Weave the pumpkin attachment tails through at least 5 internal stitches in two directions. That accessory is the first part to loosen because the paws add pressure from both sides.
Conclusion
This bear with pumpkin crochet pattern depends on front-view balance more than complex shaping. Keep the muzzle forward, the body compact, the paws high, and the pumpkin centered. That combination gives the finished plush the same calm upright look as the photo instead of a rounded teddy with a loose accessory. Crochet the head and pumpkin first, test the scale in your hand, then match the body to that proportion before final assembly. Share the result on Pinterest and Instagram with #BearWithPumpkinPattern. Did your pumpkin sit closer to the muzzle, or did you leave more chest space between the paws and the face?









