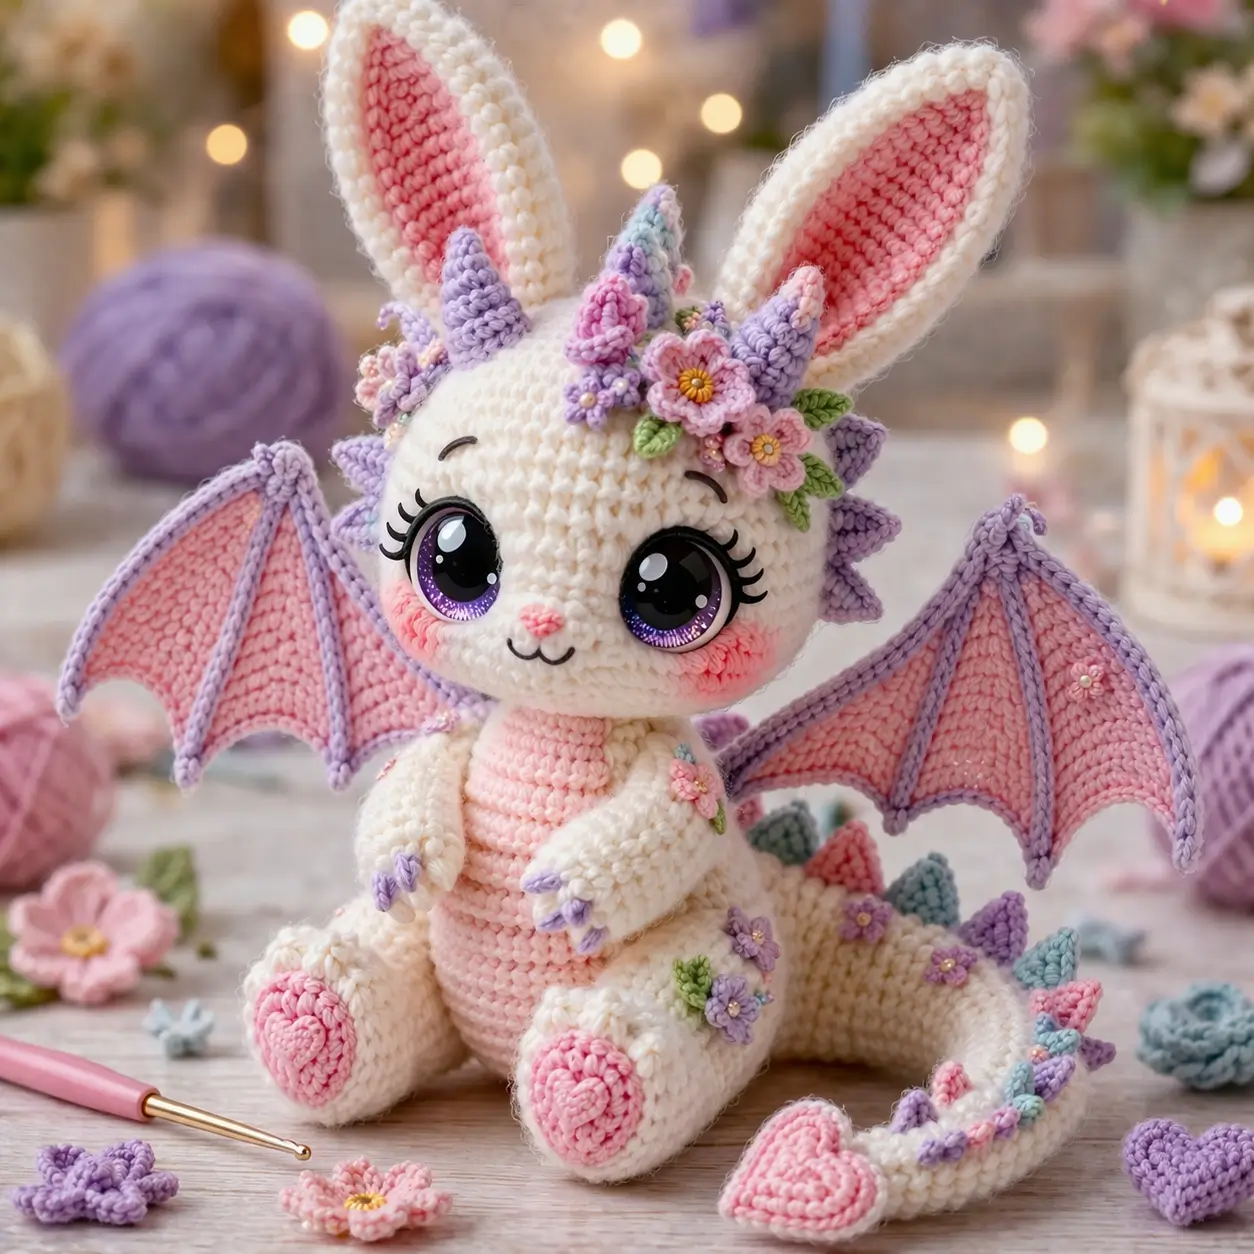
Rabbit ears on a dragon shift the center of gravity upward. This bunny dragon amigurumi crochet pattern counters that with aran-weight yarn, a 3.75 mm hook, a compact seated body, and wide feet, producing a fantasy plush based on the photo with a long-form size reference around 40.64 cm in comparable published work. It suits an intermediate maker and works well as a spring display piece or market-table standout.
The Design: What Makes Bunny Dragon Different
The structure matters more here than surface decoration. You need the neck short, the belly panel centered, and the feet oversized enough to hold the torso in a seated tilt. Otherwise the ears pull the head backward and the wings read as an afterthought. In the finished plush, the ear height and wing span create the silhouette first; the flowers only finish it.
A second decision is contrast. The cream shell, blush belly, and lavender wing frame do different jobs: body color holds the character together, pink softens the reptile read, and lavender marks the fantasy points. That balance is why a floral bunny dragon crochet design can still look anatomical instead of ornamental. A common failure mode in a dragon bunny crochet pattern is placing the wings too low on the side seam. That collapses the shoulder line and makes the neck look longer than it is.
Project Info at a Glance
| Skill Level | Time | Finished Size | Hook | Best For |
|---|---|---|---|---|
| Intermediate | 10–14 hrs | 40.64 cm long × 20.32 cm wide in a verified comparable bunny-dragon pattern; photo build reads smaller when seated | 3.75 mm | Display plush, spring gift, fantasy nursery décor |
Comparable published bunny-dragon reference: MapleWall Crafts Ravelry.
Materials and Tools
Yarn
- Cream / soft white — aran — about 110 g — Red Heart Super Saver or similar aran acrylic/cotton blend reference weight
- Blush pink — aran — about 45 g — same weight family
- Lavender — aran — about 20 g — same weight family
- Pastel blue — aran — scraps for tail spikes
- Leaf green — aran — scraps for leaves
- Yellow / deeper pink — aran — tiny scraps for flower centers
Tools
- Hook 3.75 mm
- Safety eyes 18–20 mm for the photo-matched look; note that verified bunny-dragon examples span 12 mm to 30 mm depending on yarn scale
- Stuffing
- Yarn needle
- Stitch markers
- Pins
- Soft blush or pink pastel if you want the photo finish
Abbreviations
MR = magic ring
sc = single crochet
inc = increase
dec = invisible decrease
sl st = slip stitch
ch = chain
BLO = back loop only
FLO = front loop only
hdc = half double crochet
Invisible decrease is used on visible shaping rounds so the head, belly, and limbs keep a tighter surface line than a standard two-together.
Pattern — Step by Step
Continuous spiral unless noted. This is an original photo-matched draft, not a transcription of another designer’s rounds.
Head (Make 1)
Yarn: cream — Source: photo analysis + standard amigurumi math
R1: 6 sc in MR (6)
R2: inc x6 (12)
R3: (sc, inc) x6 (18)
R4: (2 sc, inc) x6 (24)
R5: (3 sc, inc) x6 (30)
R6: (4 sc, inc) x6 (36)
R7–R12: sc around (36)
R13: (4 sc, dec) x6 (30)
R14: (3 sc, dec) x6 (24)
Insert safety eyes between R9 and R10, about 8 sts apart. Add stuffing.
R15: (2 sc, dec) x6 (18)
R16: (sc, dec) x6 (12)
R17: dec x6 (6)
Fasten off. Leave 20 cm tail.
Body (Make 1)
Yarn: cream, then blush panel overlay — Source: photo analysis + standard amigurumi math
R1: 6 sc in MR (6)
R2: inc x6 (12)
R3: (sc, inc) x6 (18)
R4: (2 sc, inc) x6 (24)
R5: (3 sc, inc) x6 (30)
R6: (4 sc, inc) x6 (36)
R7–R11: sc around (36)
R12: BLO sc around (36)
R13–R15: sc around (36)
R16: (4 sc, dec) x6 (30)
R17: (3 sc, dec) x6 (24)
Stuff firmly at base, lighter at upper body.
R18: (2 sc, dec) x6 (18)
R19: (sc, dec) x6 (12)
R20: dec x6 (6)
Fasten off. Leave 25 cm tail.
Belly Panel (Make 1)
Yarn: blush pink — Source: photo analysis
Ch 7.
Row 1: sc in 2nd ch from hook and across (6)
Row 2: ch 1, turn, inc, 4 sc, inc (8)
Row 3: ch 1, turn, sc across (8)
Row 4: ch 1, turn, inc, 6 sc, inc (10)
Row 5: ch 1, turn, sc across (10)
Row 6: ch 1, turn, inc, 8 sc, inc (12)
Row 7–13: ch 1, turn, sc across (12)
Fasten off. Leave 20 cm tail.
Arms / Front Legs (Make 2)
Yarn: cream, lavender claw tips — Source: photo analysis + standard amigurumi math
With lavender:
R1: 6 sc in MR (6)
Change to cream.
R2: inc x6 (12)
R3–R7: sc around (12)
R8: (4 sc, dec) x2 (10)
R9–R12: sc around (10)
Stuff lower half only.
Flatten and sc through both sides 5 sts to close.
Fasten off. Leave 18 cm tail.
Back Legs (Make 2)
Yarn: pink sole, cream upper leg — Source: photo analysis + standard amigurumi math
With pink:
R1: 6 sc in MR (6)
R2: inc x6 (12)
R3: (sc, inc) x6 (18)
R4: BLO sc around (18)
Change to cream.
R5–R6: sc around (18)
R7: (4 sc, dec) x3 (15)
R8: sc around (15)
R9: (3 sc, dec) x3 (12)
R10–R12: sc around (12)
Stuff foot firmly, leg lightly.
Flatten and sc through both sides 6 sts to close.
Fasten off. Leave 20 cm tail.
Ears — Outer (Make 2)
Yarn: cream — Source: photo analysis + standard amigurumi math
Ch 10. Crochet around both sides of the chain.
R1: starting in 2nd ch from hook, 8 sc, 3 sc in last ch, work opposite side 7 sc, inc (20)
R2: inc, 7 sc, 3 inc, 7 sc, 2 inc (26)
R3: sc around (26)
R4: inc, 11 sc, 2 inc, 11 sc, inc (30)
R5–R10: sc around (30)
Fasten off. Leave 20 cm tail.
Ears — Inner (Make 2)
Yarn: blush pink — Source: photo analysis
Ch 8.
Row 1: sc in 2nd ch from hook and across (7)
Row 2: ch 1, turn, inc, 5 sc, inc (9)
Row 3: ch 1, turn, sc across (9)
Row 4: ch 1, turn, inc, 7 sc, inc (11)
Row 5–8: ch 1, turn, sc across (11)
Fasten off. Leave 15 cm tail.
Sew to outer ear, then pinch base before attaching to head.
Wings (Make 2)
Yarn: pink membrane, lavender edging/bones — Source: photo analysis + separate dragon accessory shaping reference
With pink:
Row 1: ch 9, sc in 2nd ch from hook and across (8)
Row 2: ch 1, turn, dec, 4 sc, dec (6)
Row 3: ch 1, turn, sc across (6)
Row 4: ch 1, turn, dec, 2 sc, dec (4)
Row 5: ch 1, turn, sc across (4)
Row 6: ch 1, turn, dec, dec (2)
Fasten off first panel.
Make 3 panels like this and join side by side with lavender slip-stitch seams.
Edging: work 1 round/row of lavender sc around the outside edge, placing (sl st, ch 2, sl st) at each lower point for a scalloped membrane line.
Leave 18 cm tail on top corner for sewing.
Horns (Make 2)
Yarn: lavender — Source: photo analysis + dragon horn reference
R1: 6 sc in MR (6)
R2: sc around (6)
R3: inc x6 (12)
R4–R5: sc around (12)
Fasten off. Leave 12 cm tail.
Stuff lightly.
Back Spikes (Make 7)
Yarn: lavender for neck/body, pastel blue/lavender mix for tail — Source: photo analysis + dragon spike reference
R1: 6 sc in MR (6)
R2: sc around (6)
R3: inc x6 (12)
R4: sc around (12)
Fasten off. Leave 10 cm tail.
Do not stuff.
Tail (Make 1)
Yarn: cream — Source: photo analysis + standard amigurumi math
R1: 6 sc in MR (6)
R2: inc x6 (12)
R3–R6: sc around (12)
R7: (sc, inc) x6 (18)
R8–R10: sc around (18)
R11: (4 sc, dec) x3 (15)
R12–R18: sc around (15)
R19: (3 sc, dec) x3 (12)
R20–R26: sc around (12)
Stuff more at base, less toward tip. Curve while stuffing.
Fasten off. Leave 25 cm tail.
Heart Tail Tip (Make 2)
Yarn: pink — Source: photo analysis
First bump:
R1: 6 sc in MR (6)
R2: inc x6 (12)
R3: sc around (12)
Fasten off.
Second bump: repeat, do not fasten off.
Join to first bump.
R4: 12 sc around first bump, 12 sc around second bump (24)
R5: sc around (24)
R6: (2 sc, dec) x6 (18)
R7: (sc, dec) x6 (12)
Flatten.
Fasten off. Leave 18 cm tail.
Cheek Patches (Make 2)
Yarn: blush pink — Source: photo analysis
R1: 6 sc in MR (6)
R2: inc x6 (12)
R3: (sc, inc) x6 (18)
Fasten off. Leave 12 cm tail.
Flower Crown — Large Flowers (Make 3)
Yarn: pink petals, yellow center — Source: photo analysis
Center:
R1: 6 sc in MR (6), sl st to join.
Change to pink.
Petals: (ch 3, 2 dc in next st, ch 3, sl st in same st) x5 around.
Fasten off. Leave 12 cm tail.
Flower Crown — Small Flowers (Make 5)
Yarn: lavender or pink — Source: photo analysis
R1: 5 sc in MR, sl st to join.
Petals: (ch 2, 2 hdc in next st, ch 2, sl st in same st) x5.
Fasten off. Leave 10 cm tail.
Leaves (Make 8)
Yarn: green — Source: photo analysis
Ch 5.
Work: sl st, sc, hdc, sc in chain; rotate and work opposite side sc, hdc, sc.
Fasten off. Leave 8 cm tail.
Tiny Body Flowers (Make 4)
Yarn: lavender/pink with yellow knot center — Source: photo analysis
R1: 5 sc in MR.
Add tiny picot-style petals or leave flat and embroider center.
Fasten off. Leave 8 cm tail.
Claws (Optional Surface Add-On, 12 total)
Yarn: lavender — Source: photo analysis
Ch 3, sl st back down.
Fasten off. Leave 6 cm tail.
Assembly
- Sew the head to the body with the neck opening centered over the top body decrease ring.
- Sew the belly panel down the front center line from chin level to lower belly.
- Place the eyes between R9 and R10 of the head, then attach the cheek patches slightly below and outside the eye line.
- Embroider the nose in pink and the mouth in dark thread before side details go on.
- Sew the ears on top of the head, slightly angled outward, then place the horns in front of the crown line.
- Attach the arms at upper belly height so the paws rest inward toward the panel.
- Sew the back legs low and wide so the toy keeps a seated stance without rocking.
- Attach the wings high on the back seam, roughly one round below the head join, with the upper edge tilted backward.
- Sew the tail to the rear body, add the heart tip, then stitch the back spikes from crown to tail in descending size or color order.
- Add the flower crown, leaves, and tiny body flowers, pinning first to keep symmetry across the face and tail. The build is complete when the plush sits without wing drag and the ears remain balanced.
7 Technical Tips
- Mark the head center before adding ears. A 2-stitch drift at the crown makes one rabbit ear read forward and the other sideways.
- Pack the feet harder than the neck. Firm stuffing in the lower 60% of each back leg keeps the seated angle stable after the heavy ears go on.
- Use invisible decrease on all visible taper rounds. Standard decreases leave corners that show up on cream yarn, especially around the jaw and tail tip.
- Insert eyes before the head closes past 24 stitches. Waiting until the 18-st round makes the washer placement harder and can distort the cheek line.
- Pin the wings one round below the head seam, not at mid-body. Lower placement makes the shoulder look dropped and narrows the silhouette from the front.
- Weave floral tails into the head from multiple directions. One straight pass under the crown loosens quickly because the flowers sit near the ear base and get bumped.
- Shape the tail while stuffing, not after. Put more fill in the first 8–10 rounds and almost none in the last third so the heart tip can curl inward instead of sticking straight out.
Conclusion
This bunny dragon amigurumi crochet pattern works because the silhouette is solved first: short neck, wide seated base, oversized ears, high wings, and a tail that does not pull the toy backward. From there, the floral crown and pastel spikes read cleanly instead of cluttered. The next step is practical. Build the head and one ear first, test the scale in your yarn, then commit to the full set of accessories. When you finish, post one front view and one side view for Pinterest and Instagram so the wing placement is visible. Hashtag: #BunnyDragonBloom. One question remains useful during finishing: should your bunny dragon keep symmetrical flowers, or does one heavier crown side match this character better?









