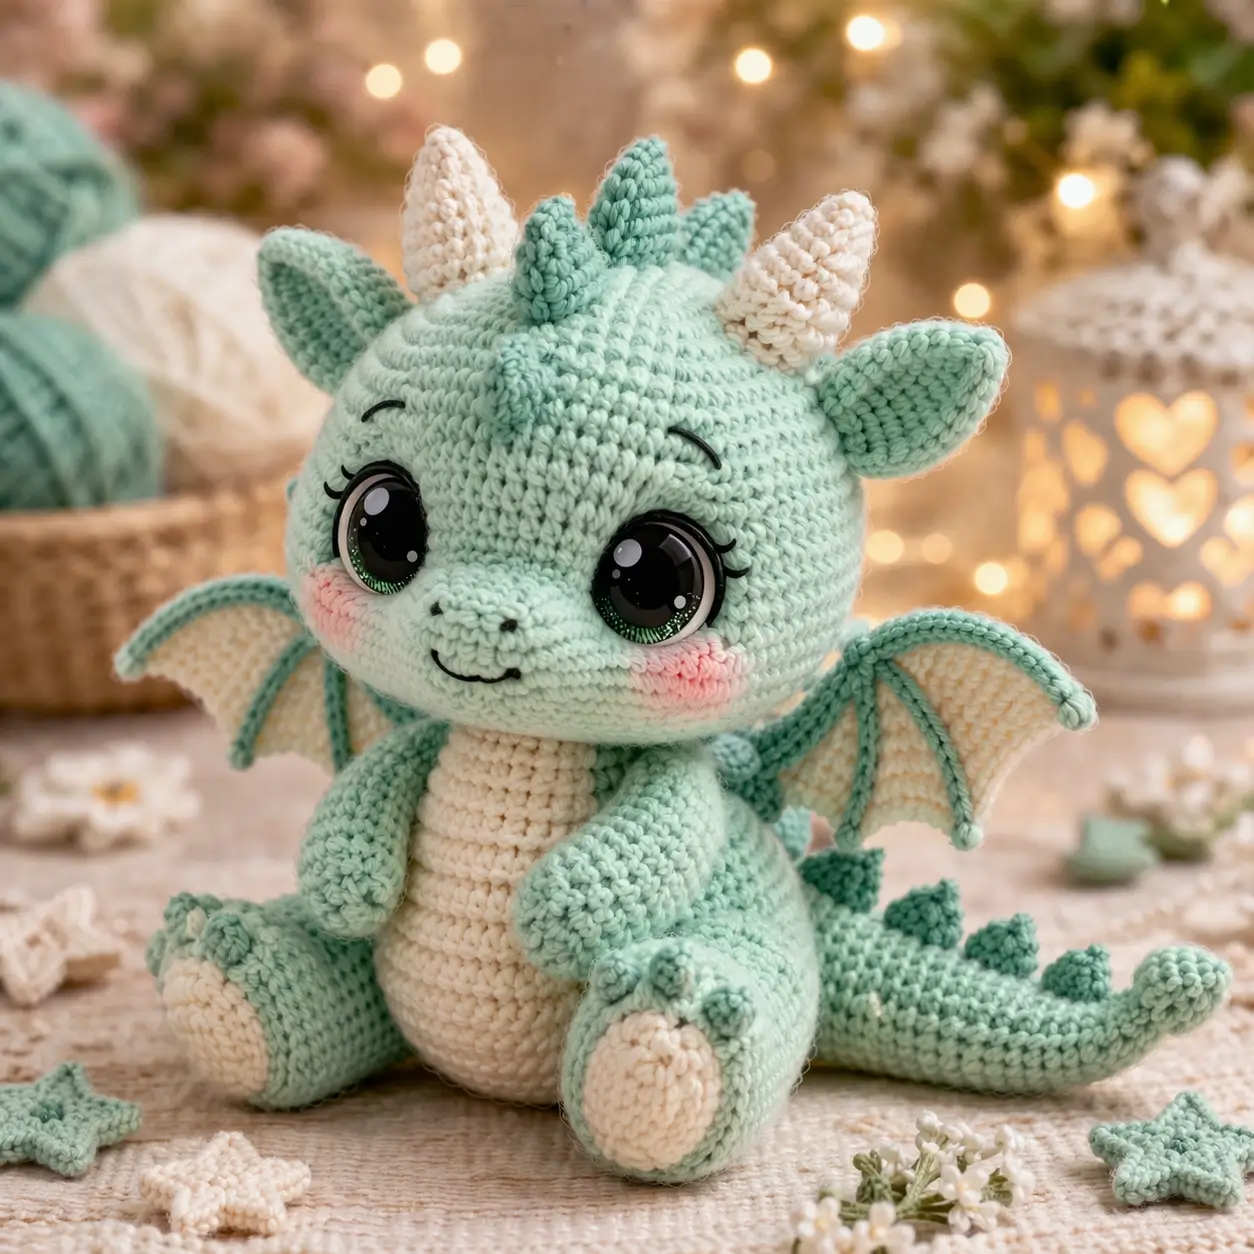
Dragon wings collapse first. That is the main structural issue in a dragon amigurumi crochet pattern built for a seated baby shape. This version uses worsted yarn, a 4.0 mm hook, and a compact medium-size body that finishes in the small seated range seen in comparable published dragon patterns. It suits an intermediate maker who needs a display plush for nursery shelves, fantasy gifts, or market tables.
The Design: What Makes This Dragon Different
This dragon is built around head dominance. The head is intentionally oversized, because the photo shows a plush with a broad forehead, short snout, and eye area that occupies more visual space than the torso. That changes balance. The body must stay oval and weighted low, not tall and narrow.
Wing proportion matters next. Many free baby dragon amigurumi patterns use narrow wings that read as decorative tabs. Here, the wings need a visible inner membrane and a firm outer edge, otherwise the toy loses its dragon silhouette in profile. The tail also carries more identity than usual. In this seated dragon amigurumi style, the tail is not only decorative; it acts as a rear stabilizer.
A common mistake with this character type is spacing the eyes too high and the snout too low. That creates a lizard face, not a baby dragon face. The brows, blush patches, and forehead spikes all depend on that face map staying compact.
Project Info at a Glance
| Skill Level | Time | Finished Size | Hook | Best For |
|---|---|---|---|---|
| Intermediate | 8–10 hours | approx. 16–18 cm seated | 4.0 mm | Shelf plush, gift make, fantasy nursery decor |
Finished size is based on verified comparable dragon patterns and adjusted to the photo-matched build range.
Materials and Tools
Yarn
- Mint green — worsted weight — approx. 110–130 g — Hobbii Friends Cotton 8/8, Brava Worsted, or similar
- Cream — worsted weight — approx. 35–45 g — same yarn line for belly, horns, wing membranes, foot pads
- Dark mint/teal — worsted weight — approx. 15–20 g — spikes and wing fingers
- Soft pink — small amount — blush patches
- Black embroidery thread — small amount — mouth, brows, nostrils, lashes
Tools
- Hook 4.0 mm
- Safety eyes 12 mm for a smaller comparable build; use larger eyes only if scaling up the pattern
- Polyester stuffing
- Yarn needle
- Stitch markers
- Pins
- Optional fabric blush or pastel
Abbreviations
MR = magic ring
sc = single crochet
inc = increase
dec = invisible decrease
sl st = slip stitch
ch = chain
BLO = back loop only
FLO = front loop only
Use invisible decrease on all shaping rounds that narrow the head, body, limbs, and tail. It reduces ridging on a smooth plush surface.
Pattern — Step by Step
Continuous spiral unless noted. This is an original photo-based draft using standard amigurumi math.
Head (Make 1)
Yarn: mint green — Source: Standard amigurumi math
R1: 6 sc in MR (6)
R2: inc x6 (12)
R3: (sc, inc) x6 (18)
R4: (2 sc, inc) x6 (24)
R5: (3 sc, inc) x6 (30)
R6: (4 sc, inc) x6 (36)
R7: (5 sc, inc) x6 (42)
R8: (6 sc, inc) x6 (48)
R9: (7 sc, inc) x6 (54)
R10: (8 sc, inc) x6 (60)
R11-R18: sc around (60)
R19: (8 sc, dec) x6 (54)
R20: (7 sc, dec) x6 (48)
R21: (6 sc, dec) x6 (42)
R22: (5 sc, dec) x6 (36)
Insert safety eyes between R14 and R15, about 11 sts apart. Begin stuffing firmly.
R23: (4 sc, dec) x6 (30)
R24: (3 sc, dec) x6 (24)
R25: (2 sc, dec) x6 (18)
R26: (sc, dec) x6 (12)
R27: dec x6 (6)
Stuff very firmly through R24. Flatten the lower face slightly with extra stuffing behind the snout area.
Fasten off. Leave 20 cm tail.
Snout (Make 1)
Yarn: mint green — Source: Standard amigurumi math
R1: ch 5, starting in 2nd ch from hook: sc 3, 3 sc in last ch, working on opposite side sc 2, inc (10)
R2: inc, sc 2, inc x3, sc 2, inc x2 (16)
R3: sc around (16)
R4: sc around (16)
Lightly stuff. Embroider two nostrils before sewing.
Fasten off. Leave 18 cm tail.
Body (Make 1)
Yarn: cream for belly-front panel effect begins later; main body mint green — Source: Standard amigurumi math
R1: 6 sc in MR (6)
R2: inc x6 (12)
R3: (sc, inc) x6 (18)
R4: (2 sc, inc) x6 (24)
R5: (3 sc, inc) x6 (30)
R6: (4 sc, inc) x6 (36)
R7-R11: sc around (36)
R12: (4 sc, dec) x6 (30)
R13-R15: sc around (30)
R16: (3 sc, dec) x6 (24)
R17-R18: sc around (24)
R19: (2 sc, dec) x6 (18)
R20: sc around (18)
Stuff firmly at the base and medium-firm at the upper body. The lower body should stay wider than the neck join.
Fasten off. Leave 22 cm tail.
Belly Panel (Make 1)
Yarn: cream — Source: Standard amigurumi math
R1: ch 7, starting in 2nd ch from hook: sc 5, 3 sc in last ch, sc 4 on opposite side, inc (14)
R2: inc, sc 4, inc x3, sc 4, inc x2 (20)
R3: sc around (20)
R4: sc around (20)
R5: (3 sc, dec) x4 (16)
R6: sc around (16)
Fasten off. Leave 18 cm tail.
Arms / Front Legs (Make 2)
Yarn: mint green — Source: Standard amigurumi math
R1: 6 sc in MR (6)
R2: (sc, inc) x3 (9)
R3-R7: sc around (9)
R8: (sc, dec) x3 (6)
R9-R10: sc around (6)
Stuff lower half only. Flatten top opening before sewing.
Fasten off. Leave 18 cm tail.
Back Legs (Make 2)
Yarn: mint green — Source: Standard amigurumi math
R1: 6 sc in MR (6)
R2: inc x6 (12)
R3: (sc, inc) x6 (18)
R4-R5: sc around (18)
R6: (4 sc, dec) x3 (15)
R7: sc around (15)
R8: (3 sc, dec) x3 (12)
R9: sc around (12)
Stuff the foot area firmly and the upper leg lightly. Keep the front of the foot rounded.
Fasten off. Leave 20 cm tail.
Foot Pads (Make 2)
Yarn: cream — Source: Standard amigurumi math
R1: 6 sc in MR (6)
R2: inc x6 (12)
R3: (sc, inc) x6 (18)
Fasten off. Leave 15 cm tail.
Ears (Make 2)
Yarn: mint green — Source: Standard amigurumi math
R1: 4 sc in MR (4)
R2: inc x4 (8)
R3: (sc, inc) x4 (12)
R4: sc around (12)
R5: (2 sc, inc) x4 (16)
R6: sc around (16)
Fold base flat. Do not stuff.
Fasten off. Leave 16 cm tail.
Horns (Make 2)
Yarn: cream — Source: Standard amigurumi math
R1: 4 sc in MR (4)
R2: sc around (4)
R3: (sc, inc) x2 (6)
R4-R5: sc around (6)
R6: (2 sc, inc) x2 (8)
R7-R8: sc around (8)
Stuff lightly.
Fasten off. Leave 16 cm tail.
Wings (Make 2)
Yarn: cream membrane, dark mint edging/fingers — Source: Original shaping based on common dragon wing structure in published tutorials
With cream:
R1: 6 sc in MR (6)
R2: inc x6 (12)
R3: (sc, inc) x6 (18)
R4: (2 sc, inc) x6 (24)
R5: sc around (24)
Flatten into a semicircle. Fasten off cream. Join dark mint at edge.
Border/Fingers:
Row 1: sc 8, ch 5, sl st back along ch 4, sc 4, ch 5, sl st back along ch 4, sc 4, ch 5, sl st back along ch 4, sc 4 (24 + fingers)
Do not stuff. Pin first to check angle before sewing.
Fasten off. Leave 20 cm tail.
Forehead and Back Spikes (Make 7)
Yarn: dark mint/teal — Source: Standard amigurumi math with placement informed by published dragon spike layouts
For 3 larger spikes:
R1: 4 sc in MR (4)
R2: (sc, inc) x2 (6)
R3: sc around (6)
R4: (2 sc, inc) x2 (8)
R5: sc around (8)
For 4 smaller spikes:
R1: 4 sc in MR (4)
R2: (sc, inc) x2 (6)
R3: sc around (6)
Stuff the large spikes lightly. Leave the small spikes unstuffed.
Fasten off. Leave 12 cm tails.
Tail (Make 1)
Yarn: mint green — Source: Standard amigurumi math
R1: 6 sc in MR (6)
R2: sc around (6)
R3: (2 sc, inc) x2 (8)
R4-R5: sc around (8)
R6: (3 sc, inc) x2 (10)
R7-R8: sc around (10)
R9: (4 sc, inc) x2 (12)
R10-R15: sc around (12)
R16: (4 sc, dec) x2 (10)
R17-R18: sc around (10)
Stuff lightly at base only. Curve the tip during assembly.
Fasten off. Leave 20 cm tail.
Cheek Patches (Make 2)
Yarn: soft pink — Source: Standard amigurumi math
R1: 6 sc in MR (6)
R2: inc x6 (12)
Fasten off. Leave 12 cm tail.
Eye Highlights / Optional Felt Whites (Make 2)
Yarn: white felt or embroidery detail — Source: Original finishing option
Cut small crescents or embroider tiny white highlights if not using printed safety eyes.
Claw Tufts (Optional, Make 4 sets)
Yarn: dark mint — Source: Original finishing option
Embroider three short claw marks on each foot if a sharper dragon read is needed.
Assembly
- Sew the snout to the lower center of the head, spanning roughly R15-R20.
- Sew the head to the body so the lower head rests slightly forward, not vertically centered.
- Sew the belly panel to the front of the body from neck base to lower torso.
- Attach the back legs low on the body, aligned so the plush sits without rocking.
- Sew the foot pads to the front of each back leg.
- Attach the arms at upper-body level, slightly angled inward toward the belly.
- Sew the ears to the sides of the head and the horns just inside them.
- Add the spikes from forehead to tail, using the largest three on the head and upper back.
- Attach the wings at the upper back, with the outer edge tilting slightly upward.
- Sew the tail to the back base, add cheek patches, then embroider the mouth, brows, lashes, and nostrils.
The piece is complete when it can sit flat with the tail and legs acting as rear support.
7 Technical Tips
- Mark the eye line before stuffing the head fully. A missed eye line by even 1 round pushes the face upward and makes the snout look too short.
- Stuff the lower body firmer than the neck. A soft base causes the dragon to tip forward once the oversized head is attached.
- Use invisible decreases on every closing round. Standard decreases leave visible corners on mint yarn, especially around the head and tail.
- Pin both wings before sewing either one permanently. A mismatch of even 5 mm makes the seated pose look twisted from the front.
- Keep wing membranes flat and unstuffed. Extra bulk in the membrane curls the wings inward and hides the span.
- Weave spike tails through at least 3 stitch paths. Short tail anchoring lets the head spikes lean backward after handling.
- Place cheek patches outside the eye centers, not below them. If they sit too low, the snout area looks wide and the face loses its compact baby-dragon proportions.
Conclusion
A photo-matched dragon amigurumi crochet pattern depends less on novelty and more on control. The eye line, wing angle, forehead spikes, and body weight all have to agree with each other. Build the face first, then stabilize the pose with the back legs and tail before final sewing. For publishing, add process photos for the wing border and spike placement because those are the two sections most likely to stop a reader. Share the finished dragon on Pinterest and Instagram with #MintBabyDragon. One question remains useful for revisions: should this dragon keep the broad baby snout, or would a slightly longer muzzle read better with the same horn spacing?









