Introduction
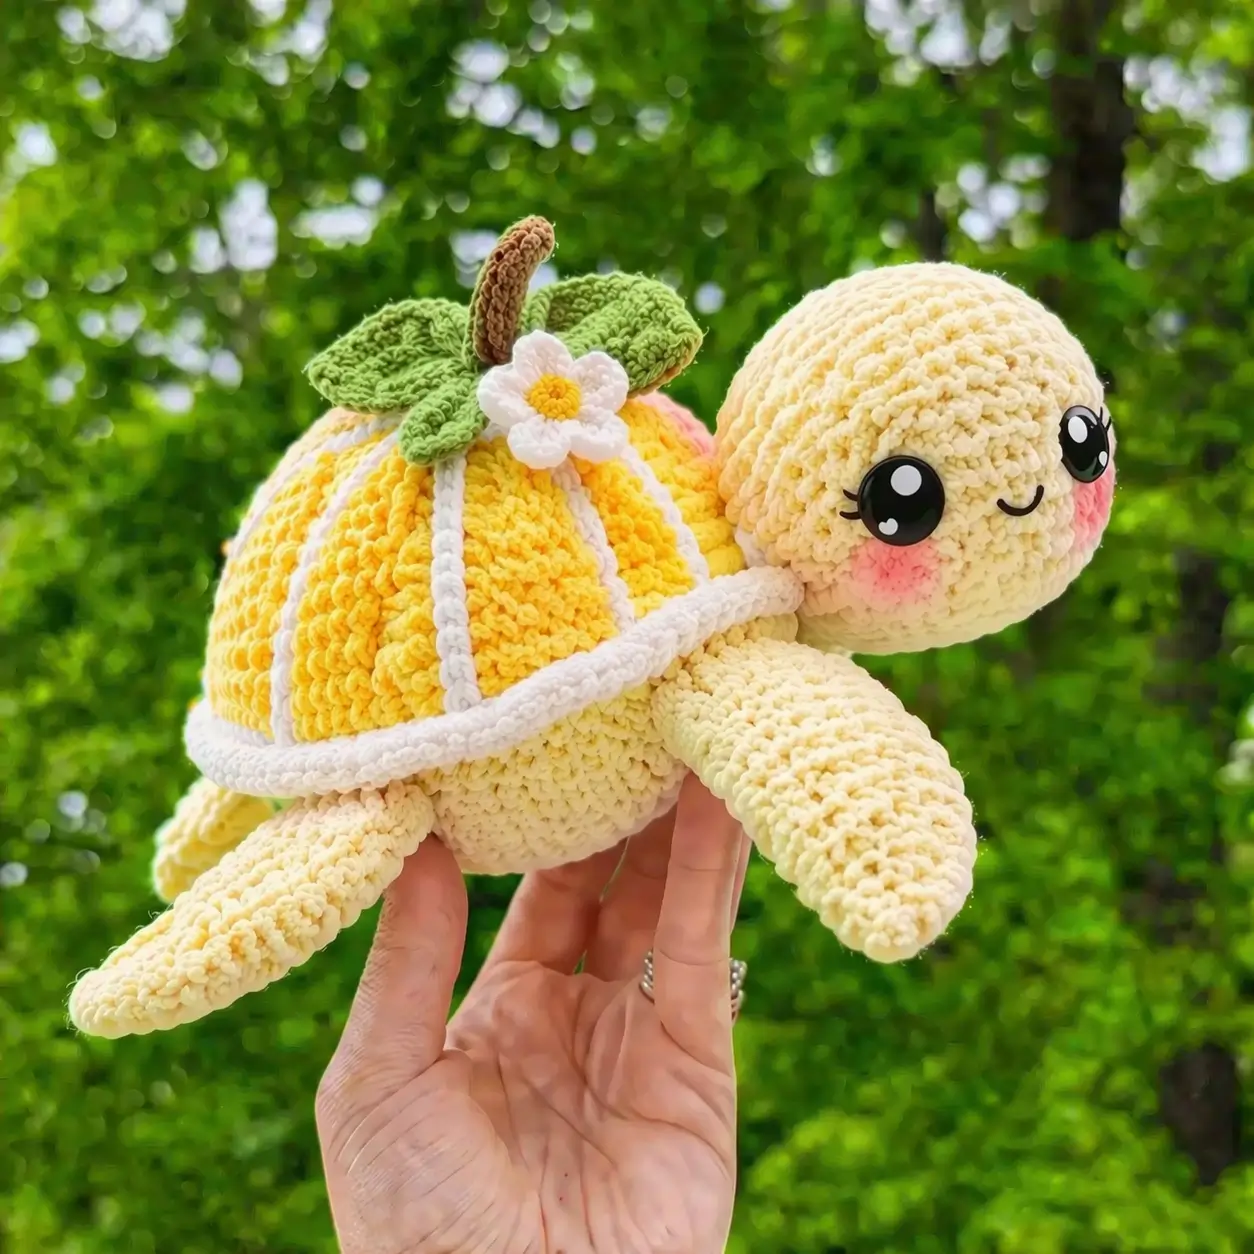
A lemon turtle needs shell ribs that read as citrus wedges before they read as a carapace. This lemon turtle amigurumi crochet pattern uses plush yarn, a 6 mm hook, and a small-body construction sized for quick assembly. Finished examples in this niche range from pocket-size plush to much larger display pieces depending on yarn choice. A maker would choose this version for market prep, shelf display, or gift sewing that favors visible shape over complex stitch variety.
The Design: What Makes Lemon Turtle Different
The shell is the first design problem. A regular turtle dome is not enough here because the surface has to suggest citrus sections. White raised lines solve that by dividing the yellow shell into wedge panels. A second decision is the broad rim around the shell base. That edge visually separates the “fruit slice” top from the soft body underneath, which keeps the turtle silhouette readable from the side.
Proportion matters more than realism. The head is enlarged, the flippers are tapered, and the shell sits higher than a natural sea turtle shell. That shift helps the plush hold its cartoon balance. Many fruit turtle amigurumi designs also add garnish elements on top; in this case, leaves, stem, and flower are not optional decoration but part of the concept.
A common mistake is flattening the shell too early. Then the project reads as a plain plush turtle with yellow stripes instead of a lemon slice turtle.
Project Info at a Glance
| Skill Level | Time | Finished Size | Hook | Best For |
|---|---|---|---|---|
| Easy–Intermediate | 3–5 hours | Approx. 12–16 cm tall in plush yarn | 6 mm | Markets, display plush, themed gifts |
Materials and Tools
Yarn
- Cream / pale yellow plush yarn — super bulky — about 80–100 g — chenille-style blanket yarn
- Bright yellow plush yarn — super bulky — about 40–60 g — chenille-style blanket yarn
- White plush yarn — super bulky — about 25–35 g — chenille-style blanket yarn
- Leaf green plush yarn — super bulky — about 10–15 g — chenille-style blanket yarn
- Brown plush or cotton yarn — small amount — for stem
- Pink yarn or blush thread — small amount — for cheeks
Tools
- Hook 6 mm
- Safety eyes 10 mm for a compact plush, or size up visually if your head grows larger
- Stuffing
- Yarn needle
- Stitch markers
- Black embroidery thread for mouth
- Pins for placement
Abbreviations
- MR = magic ring
- sc = single crochet
- inc = increase
- dec = invisible decrease
- sl st = slip stitch
- ch = chain
- BLO = back loop only
- FLO = front loop only
Invisible decrease reduces bulk on plush yarn and keeps the closing rounds smoother than a standard two-together.
Pattern — Step by Step
Continuous spiral unless noted. Counts in brackets.
Head (Make 1)
Yarn: cream
R1: 6 sc in MR (6)
R2: inc x6 (12)
R3: (sc 1, inc) x6 (18)
R4: (sc 2, inc) x6 (24)
R5: (sc 3, inc) x6 (30)
R6-R10: sc around (30)
R11: (sc 3, dec) x6 (24)
R12: (sc 2, dec) x6 (18)
Insert safety eyes between R7 and R8, about 7 sts apart. Add stuffing.
R13: (sc 1, dec) x6 (12)
R14: dec x6 (6)
Embroider smile centered between the eyes and one round lower.
Fasten off. Leave a 20 cm tail.
Body (Make 1)
Yarn: cream
R1: 6 sc in MR (6)
R2: inc x6 (12)
R3: (sc 1, inc) x6 (18)
R4: (sc 2, inc) x6 (24)
R5: (sc 3, inc) x6 (30)
R6-R8: sc around (30)
R9: (sc 3, dec) x6 (24)
R10: (sc 2, dec) x6 (18)
Stuff firmly but keep the lower belly slightly flatter than the shell.
R11: (sc 1, dec) x6 (12)
R12: dec x6 (6)
Fasten off. Leave a 20 cm tail.
Front Flippers (Make 2)
Yarn: cream
R1: 6 sc in MR (6)
R2: (sc 1, inc) x3 (9)
R3-R7: sc around (9)
R8: (sc 1, dec) x3 (6)
R9-R11: sc around (6)
Light stuffing only through the first half; keep the tip soft and tapering.
Fasten off. Leave a 15 cm tail.
Back Flippers (Make 2)
Yarn: cream
R1: 6 sc in MR (6)
R2: (sc 1, inc) x3 (9)
R3-R5: sc around (9)
R6: (sc 1, dec) x3 (6)
R7-R8: sc around (6)
Fasten off. Leave a 15 cm tail.
Shell Base (Make 1)
Yarn: white
R1: 6 sc in MR (6)
R2: inc x6 (12)
R3: (sc 1, inc) x6 (18)
R4: (sc 2, inc) x6 (24)
R5: (sc 3, inc) x6 (30)
R6: (sc 4, inc) x6 (36)
R7-R9: sc around (36)
Fasten off. Leave a 25 cm tail.
Shell Segments Cover (Make 1)
Yarn: bright yellow
R1: 6 sc in MR (6)
R2: inc x6 (12)
R3: (sc 1, inc) x6 (18)
R4: (sc 2, inc) x6 (24)
R5: (sc 3, inc) x6 (30)
R6: (sc 4, inc) x6 (36)
R7-R8: sc around (36)
Fasten off. Leave a 25 cm tail.
Shell Rim Cord (Make 1)
Yarn: white
Ch 40.
Row 1: starting in second ch from hook, sl st across (39)
Fasten off. Leave a 20 cm tail.
Citrus Segment Lines (Make 5)
Yarn: white
Ch 14.
Row 1: starting in second ch from hook, sl st across (13)
Make five. Leave tails for sewing.
Tail (Make 1)
Yarn: cream
R1: 4 sc in MR (4)
R2-R3: sc around (4)
Fasten off. Leave a 10 cm tail.
Leaves (Make 2)
Yarn: green
Ch 8.
Row 1: starting in second ch from hook, sc 1, hdc 2, dc 2, hdc 1, sc 1.
Work on opposite side of chain: sc 1, hdc 1, dc 2, hdc 2, sc 1.
Sl st to first st.
Fasten off. Leave a 15 cm tail.
Stem (Make 1)
Yarn: brown
Ch 7.
Row 1: starting in second ch from hook, sc across (6)
Row 2-R4: ch 1, turn, sc across (6)
Roll lightly into a short tube and sew.
Flower (Make 1)
Yarn: white and yellow
With yellow:
R1: 6 sc in MR (6)
Fasten off.
With white, join in any stitch of yellow center:
Petal 1: ch 3, 2 dc in next st, ch 3, sl st in same st
Repeat around for 5 petals.
Fasten off. Leave a 15 cm tail.
Cheek Patches (Make 2)
Yarn: pink
R1: 6 sc in MR (6)
These can be replaced with blush embroidery if less bulk is preferred.
Leave a 10 cm tail.
Assembly
- Sew the head to the front third of the body, angling it slightly upward.
- Attach the front flippers level with the neck seam, one on each side.
- Sew the back flippers slightly behind the body midpoint.
- Attach the tail at the rear center seam.
- Place the yellow shell cover on top of the white shell base and tack the two layers together around the edge.
- Sew the five white citrus segment cords from the shell center outward, spacing them evenly like lemon wedges.
- Attach the white shell rim cord around the shell base edge.
- Sew the completed shell onto the upper body, keeping the rim level and the shell centered.
- Add the leaves, stem, and flower to the shell crown; place the flower slightly off-center for the same asymmetry seen in the photo.
- Sew or embroider the cheek patches, then weave in every tail inside the body or shell cavity.
The piece is complete when the shell sits evenly without rolling and the head projects forward rather than down.
7 Technical Tips
- Mark round starts from R1 on every major sphere. Plush yarn hides joins fast, and losing one stitch in a 36-stitch shell changes the wedge spacing by the time you add segment cords.
- Do not overstuff the head behind the eyes. Too much fill there pushes 10 mm eyes outward and makes the face look frog-like instead of turtle-like.
- Keep the body flatter than the shell. A body packed to full firmness lifts the shell rim and removes the lemon-slice profile from the side view.
- Place eyes before the final third of head stuffing. On plush yarn, safety-eye backs become difficult to snap once the fabric is under full tension.
- Use invisible decreases on all visible shaping rounds. Standard decreases make hard ridges, and those ridges show clearly on cream chenille.
- Pin all five shell dividers before sewing even one of them. Uneven spacing by as little as 5 mm makes the shell read as random stripes rather than citrus segments.
- Weave tails at least 4 cm through the shell or body interior. Short tail burying pulls loose under handling because plush fibers create more slip than cotton.
Conclusion
This build works because the shell is treated as fruit structure first and turtle structure second. The lemon turtle amigurumi crochet pattern above keeps the stitch math controlled, the body compact, and the topper accessories proportional to the dome. Next, swatch your chosen plush yarn with the 6 mm hook and confirm whether 10 mm eyes still suit the head width before making the full set. Share the finished turtle on Pinterest and Instagram with a top view, side view, and shell close-up so the citrus segmentation reads clearly. Use #LemonTurtlePattern. One question remains useful for makers comparing versions: did your shell need five wedge lines, or did six read more like a lemon slice?









