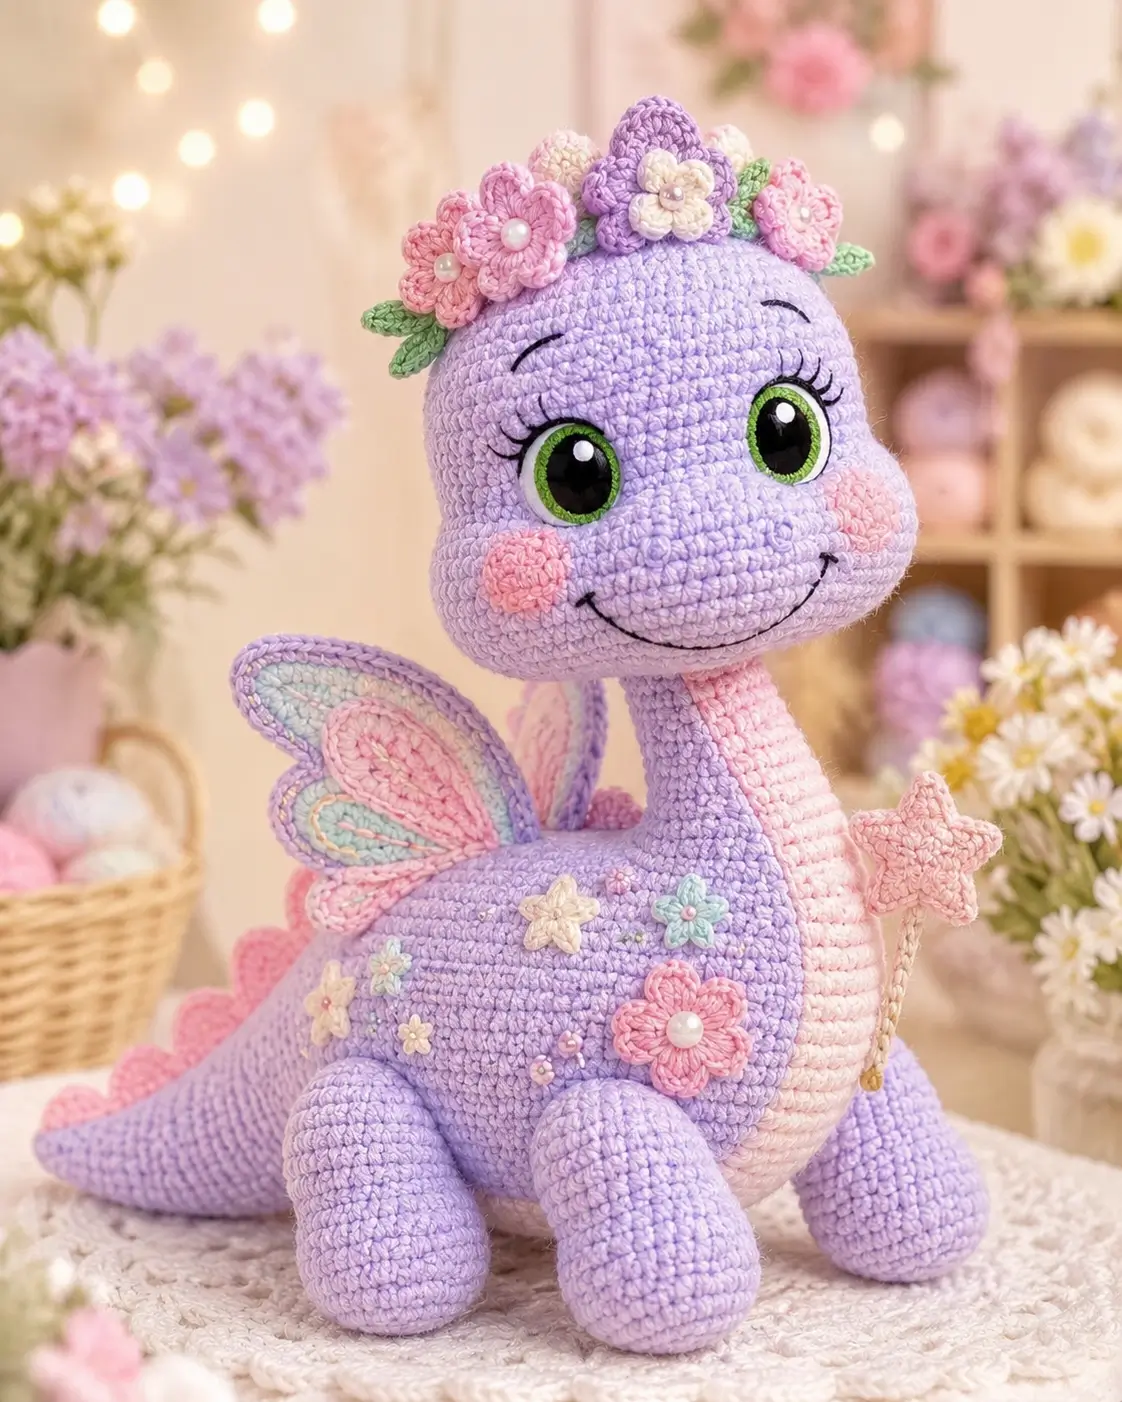
Butterfly wings on a dragon move the balance point behind the shoulder line; that drives this dragon amigurumi crochet pattern from the first round. Work it in worsted yarn with a 4 mm hook, felt-backed 12 mm eyes, and controlled stuffing for a 30–33 cm spring display plush. Intermediate shaping suits the long neck, and the wand turns the piece into a defined shelf project instead of a generic dinosaur variant.
The Design: What Makes This Dragon Different
You need three structural decisions to make this version read as a fairy dragon instead of a standard plush reptile. First, the neck stays narrow, then widens low into the body, because the oversized crowned head needs vertical support before it reaches the seated torso. Second, the crochet dragon wings sit behind the neck seam, not directly above the front legs; butterfly styling looks crowded when both features fight for the same anchor point. Third, the face uses a separate snout and flat cheek circles, because forward muzzle volume matters more here than spikes or horns. Most published dragon references lean toward a low-sew sitter, a wired-wing fantasy build, or a compact mini. That leaves a clear opening for a flower-crown profile in a fairy dragon crochet pattern. The common mistake is front-leg placement that starts too far forward and tips the toy off balance.
Project Info at a Glance
| Skill Level | Time | Finished Size | Hook | Best For |
|---|---|---|---|---|
| Intermediate | 10+ hours | 30–33 cm | 4.0 mm | Shelf display |
Materials and Tools
Yarn
- Lavender — worsted / #4 — ~80 g — Red Heart With Love, 24/7 Cotton, or similar
- Blush pink — worsted / #4 — ~35 g — same yarn line
- Mint green — worsted / #4 — ~15 g — same yarn line
- Cream — worsted / #4 — ~10 g — same yarn line
- Soft blue — worsted / #4 — ~10 g — optional wing insert color
- Black embroidery floss — small amount — eyelashes, brows, smile
- Green felt — scrap piece — eye backings
Tools
- Hook 4.0 mm
- 12 mm safety eyes
- Polyfill stuffing
- Tapestry needle
- Stitch markers
- Pins
- Fabric glue or tack stitch for felt circles
- Pearl beads or seed beads for flower centers, optional
Abbreviations
MR / sc / inc / dec / sl st / ch / BLO / hdc / dc / tr / FO
Use invisible decrease through the front loops only; the face and neck show every bar line on pale yarn.
Pattern — Step by Step
Continuous spiral unless noted.
Head (Make 1)
Yarn: Lavender — Standard amigurumi math
R1: 6 sc in MR [6]
R2: inc ×6 [12]
R3: (sc, inc) ×6 [18]
R4: (2 sc, inc) ×6 [24]
R5: (3 sc, inc) ×6 [30]
R6: (4 sc, inc) ×6 [36]
R7–R14: sc around [36]
R15: (4 sc, dec) ×6 [30]
R16: (3 sc, dec) ×6 [24]
Place the eyes between R10 and R11. Leave 10 visible stitches between the green felt circles.
R17: (2 sc, dec) ×6 [18]
Stuff firmly, but keep the lower face broad rather than rock hard.
R18: (sc, dec) ×6 [12]
R19: dec ×6 [6]
Fasten off. Leave a 30 cm tail.
Snout (Make 1)
Yarn: Lavender — Standard amigurumi math
R1: 6 sc in MR [6]
R2: inc ×6 [12]
R3: (sc, inc) ×6 [18]
R4–R5: sc around [18]
Lightly stuff the front edge only. The back edge should stay flatter for sewing.
Fasten off. Leave a 20 cm tail.
Neck (Make 1)
Yarn: Lavender — Standard amigurumi math
R1: 6 sc in MR [6]
R2: inc ×6 [12]
R3: (sc, inc) ×6 [18]
R4–R10: sc around [18]
R11: (2 sc, inc) ×6 [24]
R12–R14: sc around [24]
Stuff this part firmer than the body. The neck is the load-bearing column on this build.
Fasten off. Leave a 25 cm tail.
Body (Make 1)
Yarn: Lavender — Standard amigurumi math
R1: 6 sc in MR [6]
R2: inc ×6 [12]
R3: (sc, inc) ×6 [18]
R4: (2 sc, inc) ×6 [24]
R5: (3 sc, inc) ×6 [30]
R6: (4 sc, inc) ×6 [36]
R7–R12: sc around [36]
R13: (4 sc, dec) ×6 [30]
R14–R15: sc around [30]
R16: (3 sc, dec) ×6 [24]
R17–R18: sc around [24]
Stuff the lower half firmly and the top half slightly softer. Leave the 24-stitch opening unclosed for the neck.
Fasten off. Leave a 35 cm tail.
Front Legs (Make 2)
Yarn: Lavender — Standard amigurumi math
R1: 6 sc in MR [6]
R2: inc ×6 [12]
R3: (sc, inc) ×6 [18]
R4–R6: sc around [18]
R7: (sc, dec) ×6 [12]
R8–R10: sc around [12]
Stuff the foot and lower half only. A softer upper section makes sewing cleaner.
Fasten off. Leave a 25 cm tail.
Back Legs (Make 2)
Yarn: Lavender — Standard amigurumi math
R1: 6 sc in MR [6]
R2: inc ×6 [12]
R3: (sc, inc) ×6 [18]
R4–R7: sc around [18]
R8: (sc, dec) ×6 [12]
R9–R11: sc around [12]
Back legs are one round longer so the dragon sits with a slight chest lift.
Fasten off. Leave a 25 cm tail.
Tail (Make 1)
Yarn: Lavender — Standard amigurumi math
R1: 6 sc in MR [6]
R2: inc ×6 [12]
R3: (sc, inc) ×6 [18]
R4: (2 sc, inc) ×6 [24]
R5–R7: sc around [24]
R8: (2 sc, dec) ×6 [18]
R9–R11: sc around [18]
R12: (sc, dec) ×6 [12]
R13–R17: sc around [12]
R18: dec ×6 [6]
R19–R24: sc around [6]
Stuff only through R12. Leave the tip soft so it can rest on the table.
Fasten off. Leave a 35 cm tail.
Belly Panel (Make 1)
Yarn: Blush pink — Standard amigurumi math with oval base
Ch 13.
R1: Starting in 2nd ch from hook, 11 sc, 3 sc in last ch, working on opposite side 10 sc, inc in last ch [26]
R2: inc, 10 sc, 3 inc, 10 sc, 2 inc [32]
R3–R8: sc around [32]
Fasten off. Leave a 25 cm tail.
Butterfly Wings (Make 2 finished wings)
Yarn: Lavender, blush pink, mint, soft blue — Custom flat pieces
Large Outer Lobe (make 2 in lavender)
Row 1: ch 9, starting in 2nd ch from hook: sc, hdc, dc, dc, tr, dc, hdc, sc [8]
Large Insert Lobe (make 2 in mint or soft blue)
Row 1: ch 8, starting in 2nd ch from hook: sc, hdc, dc, tr, dc, hdc, sc [7]
Small Outer Lobe (make 2 in lavender)
Row 1: ch 7, starting in 2nd ch from hook: sc, hdc, dc, dc, hdc, sc [6]
Small Insert Lobe (make 2 in blush pink)
Row 1: ch 6, starting in 2nd ch from hook: sc, hdc, dc, hdc, sc [5]
Sew one small outer lobe over the lower half of one large outer lobe. Then sew the matching insert lobes centered inside each outer lobe to make 2 finished butterfly wings.
Fasten off. Leave 20 cm tails on the outer lobes.
Back Scallops (Make 1 strip)
Yarn: Blush pink — Custom flat trim
Ch 31.
Row 1: Starting in 2nd ch from hook, [sl st, sc, hdc, 2 dc in next ch, hdc, sc] ×5 [35 worked sts]
This strip runs from the neck base to the tail tip. Stretch it slightly while pinning so the scallops open evenly.
Fasten off. Leave a 20 cm tail.
Cheek Patches (Make 2)
Yarn: Blush pink — Standard amigurumi math
R1: 6 sc in MR [6]
R2: inc ×6 [12]
R3: (sc, inc) ×6 [18]
Fasten off. Leave a 15 cm tail.
Five-Petal Flowers (Make 8–10 total)
Yarn: Blush pink and cream — Custom flat appliqué
Large Flowers (make 4)
R1: 5 sc in MR [5]
R2: [ch 2, 2 dc in next st, ch 2, sl st in same st] ×5 [5 petals]
Small Flowers (make 4–6)
R1: 5 sc in MR [5]
R2: [ch 1, 2 hdc in next st, ch 1, sl st in same st] ×5 [5 petals]
Add pearl or bead centers after sewing. Keep the crown flowers slightly cupped rather than fully flat.
Fasten off. Leave 10 cm tails.
Leaves (Make 6)
Yarn: Mint green — Custom flat appliqué
Row 1: ch 7, starting in 2nd ch from hook: sl st, sc, hdc, dc, hdc, sc [6]
Fasten off. Leave a 10 cm tail.
Star Wand (Make 1)
Yarn: Cream for star, beige or pink for handle — Custom flat accessory
Star Front (make 1)
R1: 5 sc in MR [5]
R2: [ch 2, dc in next st, ch 2, sl st in same st] ×5 [5 points]
Star Back (make 1)
R1: 5 sc in MR [5]
R2: [ch 2, dc in next st, ch 2, sl st in same st] ×5 [5 points]
Handle (make 1)
Row 1: ch 16, sl st in 2nd ch from hook and across [15]
Sew the handle between the two stars. Light stuffing is optional but not needed.
Fasten off. Leave a 20 cm tail on one star.
Assembly
- Sew the snout to the lower center of the head, spanning roughly R10 to R16 on the face.
- Attach the cheek patches under the outer thirds of the eyes, one to each side of the snout.
- Embroider the smile first, then add nostrils, eyelashes, and brows so the face stays balanced.
- Sew the neck into the 24-stitch opening at the top of the body, keeping the seam centered between the future front legs.
- Attach the head to the narrow top of the neck with a slight forward tilt of about 10 degrees.
- Pin and sew the back legs low on the body sides, then place the front legs one round lower than the neck seam and about 6 stitches apart.
- Sew the tail to the back center of the body and tack the tip so it touches the surface.
- Stitch the back scallop strip from the neck base to the tail tip, then add the belly panel from chin to lower body front.
- Sew the wings behind the neck seam, angled slightly outward, then place flowers and leaves around the crown area and scatter a few flowers on the body flank.
- Attach the wand to the right body side or tuck it behind the front leg with two anchoring stitches, then weave in all ends.
The finished dragon should sit on four legs with the tail base acting as the stabilizing fifth contact point.
7 Technical Tips
- Mark the eye line at head round 10. If that marker shifts by even 1 stitch, the snout seam will read off-center once the cheeks go on.
- Pack the neck firmer than the body. A soft neck collapses under the crowned head and creates a backward lean within a few hours on display.
- Insert the eyes before head round 17. Forcing felt-backed eyes through stuffed fabric can stretch the socket by 2–3 mm and wrinkle the face.
- Use invisible decreases on every visible taper. Standard decreases leave horizontal bars that show immediately on pale lavender yarn.
- Pin the front legs about 6 stitches apart. Wider spacing makes the chest sag, while tighter spacing forces the toy to rock forward.
- Stuff only the first 12 rounds of the tail. A fully packed tail behaves like a lever and can lift one back leg off the table.
- Weave every flower tail with at least four direction changes. A single straight weave can loosen when the crown is handled or dusted.
Conclusion
Choose the eye backing, wing colors, and crown layout before you start the head, because placement drives this build more than raw stitch difficulty. Work the body first if you want a fast proportion check, then match the neck angle to the way the plush sits on the table. Next step: crochet the head and snout tonight, dry-fit the crown tomorrow, and lock the leg spacing before final sewing. When the piece is done, pin one front view and one side-wing view to Pinterest, then post the same pair on Instagram with #PastelFlowerDragon. That gives readers the two angles most useful for a dragon amigurumi crochet pattern. Would you keep the largest blossom centered, or shift it above the left eye to clear the wing line?









