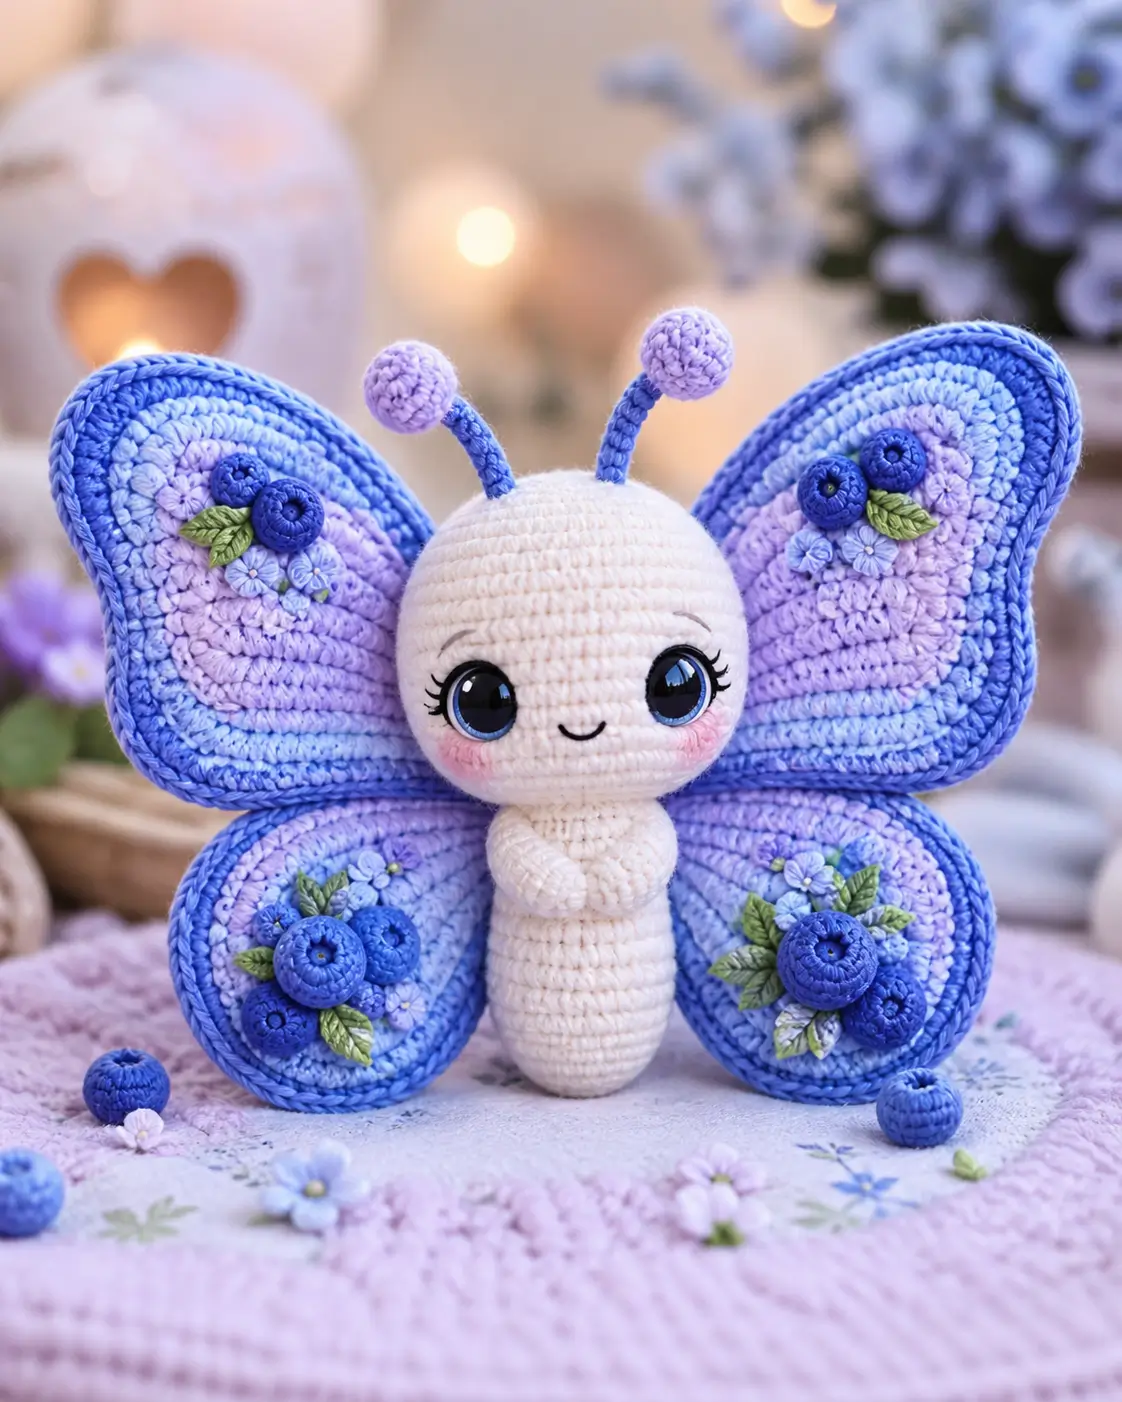
Butterfly wings have scales, so this butterfly amigurumi crochet pattern treats color as layered surface work, not stripes. You will make a cream head and body, four blue-lavender wings, antennae, cheek patches, and raised berry-flower appliqués. Finished size is about 18 cm tall with a 29 cm wingspan using DK/light worsted cotton and a 2.75 mm hook. Skill level: upper-beginner to intermediate; the wide wings make a stable shelf piece.
The Design: What Makes Blueberry Wing Different
Real butterfly proportions put the visual weight in the wings, while the body stays narrow. This blue butterfly amigurumi uses that rule by giving the head a 42-stitch plateau and the body a slimmer 30-stitch plateau. Four separate crochet butterfly wings are sewn behind the body instead of one flat panel, which keeps the upper and lower wing curves readable. The berry appliqués sit on the wings after assembly, not before, because their position depends on the final wing angle. A common mistake in a butterfly plush crochet pattern is making the body too wide; that turns the insect shape into a doll shape and hides the wing span.
Project Info at a Glance
| Skill Level | Time | Finished Size | Hook | Best For |
|---|---|---|---|---|
| Upper-beginner to intermediate | 5–6 hours | 18 cm tall; 29 cm wingspan | 2.75 mm | Display doll, nursery shelf, spring market table |
Materials and Tools
Yarn
- Ivory / cream — DK/light worsted cotton or cotton-acrylic — 35 g — suggested: YarnArt Jeans, Paintbox Cotton DK, or similar.
- Lavender — DK/light worsted — 25 g — used for wing centers and antenna tips.
- Pale blue — DK/light worsted — 20 g — used for wing bands.
- Royal blue — DK/light worsted — 25 g — used for wing borders, stems, and berries.
- Leaf green — DK/light worsted — 3 g — used for flat leaves.
- Blush pink — DK/light worsted or embroidery floss — 2 g — used for cheek patches.
- Black embroidery thread — small amount — used for mouth and lashes.
Tools
- 2.75 mm crochet hook
- 12 mm safety eyes
- Polyester stuffing
- Tapestry needle
- Locking stitch markers
- Straight pins
- Scissors
- Optional display wire for antennae only; skip wire for toys handled by small children.
Abbreviations
MR = magic ring; sc = single crochet; inc = 2 sc in one stitch; dec = invisible decrease; sl st = slip stitch; ch = chain; BLO = back loop only; FLO = front loop only.
For invisible decrease, insert the hook through the front loops of the next two stitches, yarn over, and complete one sc so the reduction sits inside the fabric.
Pattern — Step by Step
Work in a continuous spiral unless a part says rows. Counts appear in parentheses. This butterfly amigurumi crochet pattern uses standard 6-stitch amigurumi shaping for round pieces.
Head (Make 1)
Yarn: ivory — Source: standard amigurumi math; comparable head/body patterns use 6-stitch growth.
R1: 6 sc in MR (6)
R2: inc ×6 (12)
R3: (1 sc, inc) ×6 (18)
R4: (2 sc, inc) ×6 (24)
R5: (3 sc, inc) ×6 (30)
R6: (4 sc, inc) ×6 (36)
R7: (5 sc, inc) ×6 (42)
R8–R14: sc around (42)
R15: (5 sc, dec) ×6 (36)
R16: (4 sc, dec) ×6 (30)
R17: (3 sc, dec) ×6 (24)
Insert 12 mm safety eyes between R10 and R11, 8 stitches apart. Place the smile between R13 and R14 before the hole becomes small.
R18: (2 sc, dec) ×6 (18)
R19: (1 sc, dec) ×6 (12)
Stuff firmly, shaping the cheeks with your thumbs as the fill goes in.
R20: dec ×6 (6)
Fasten off. Close the hole and leave a 25 cm tail for sewing.
Body (Make 1)
Yarn: ivory — Source: standard amigurumi math.
R1: 6 sc in MR (6)
R2: inc ×6 (12)
R3: (1 sc, inc) ×6 (18)
R4: (2 sc, inc) ×6 (24)
R5: (3 sc, inc) ×6 (30)
R6–R12: sc around (30)
R13: (3 sc, dec) ×6 (24)
R14–R15: sc around (24)
R16: (2 sc, dec) ×6 (18)
R17–R18: sc around (18)
R19: (1 sc, dec) ×6 (12)
Stuff the body more firmly at the base than at the neck. A narrow neck keeps the head from tilting forward.
R20: dec ×6 (6)
Fasten off. Close the base and leave a 35 cm tail for sewing to the head.
Arms / Front Legs (Make 2)
Yarn: ivory — Source: standard tube construction.
R1: 6 sc in MR (6)
R2–R8: sc around (6)
Do not stuff. Flatten the opening so the arms sit folded across the front.
Fasten off. Leave a 20 cm tail on each arm.
Upper Wings (Make 2)
Yarn: lavender, pale blue, royal blue — Source: flat spiral panel based on standard 6-stitch increase math.
R1: with lavender, 6 sc in MR (6)
R2: inc ×6 (12)
R3: (1 sc, inc) ×6 (18)
R4: change to pale blue, (2 sc, inc) ×6 (24)
R5: (3 sc, inc) ×6 (30)
R6: change to royal blue, (4 sc, inc) ×6 (36)
R7: (5 sc, inc) ×6 (42)
R8: sc around in BLO (42)
R9: sc around (42)
R10: sl st around loosely (42)
Do not stuff. Pin each panel into a tall oval with the outer top edge slightly higher than the inner edge.
Fasten off. Leave a 45 cm tail for sewing.
Lower Wings (Make 2)
Yarn: lavender, pale blue, royal blue — Source: flat spiral panel based on standard 6-stitch increase math.
R1: with lavender, 6 sc in MR (6)
R2: inc ×6 (12)
R3: (1 sc, inc) ×6 (18)
R4: change to pale blue, (2 sc, inc) ×6 (24)
R5: (3 sc, inc) ×6 (30)
R6: change to royal blue, (4 sc, inc) ×6 (36)
R7: sc around in BLO (36)
R8: sl st around loosely (36)
Do not stuff. Shape each lower wing as a rounder oval, shorter than the upper wing.
Fasten off. Leave a 40 cm tail for sewing.
Antennae (Make 2)
Yarn: lavender for knob, royal blue for stem — Source: standard amigurumi sphere plus narrow tube.
R1: with lavender, 6 sc in MR (6)
R2: inc ×6 (12)
R3: sc around (12)
R4: dec ×6 (6)
Add a pea-sized amount of stuffing to the knob. Change to royal blue for the stem.
R5–R12: sc around (6)
Optional display version: insert a short covered wire into the stem before sewing.
Fasten off. Leave a 20 cm tail.
Cheek Patches (Make 2)
Yarn: blush pink — Source: flat circle using standard amigurumi math.
R1: 6 sc in MR (6)
R2: inc ×6 (12)
Sl st to first stitch.
Fasten off. Leave a 15 cm tail for sewing, or use the patch as a template for blush embroidery.
Blueberry Appliqués (Make 10)
Yarn: royal blue — Source: small amigurumi sphere.
R1: 6 sc in MR (6)
R2: inc ×6 (12)
R3: sc around in BLO (12)
R4: dec ×6 (6)
Stuff only the larger berries. Leave some berries flat so the wing does not become heavy.
Fasten off. Close the hole and embroider a small dark-blue center stitch on top.
Tiny Flowers (Make 12)
Yarn: pale blue and ivory — Source: flat MR appliqué.
R1: 6 sc in MR (6)
R2: in each stitch, ch 2 and sl st in the same stitch to form 6 petals (6 petals)
Fasten off. Leave a 12 cm tail for sewing to the wings.
Leaves (Make 14)
Yarn: leaf green — Source: flat chain appliqué.
Ch 6.
Row 1: sl st in 2nd ch from hook, sc, hdc, sc, sl st; ch 1, turn to the opposite side of the chain and repeat the same sequence (10 edge stitches)
Fasten off. Leave a 10 cm tail for sewing.
Loose Blueberries Prop (Make 3)
Yarn: royal blue — Source: small amigurumi sphere.
R1: 6 sc in MR (6)
R2: inc ×6 (12)
R3–R4: sc around (12)
R5: dec ×6 (6)
Stuff lightly so the berries keep a round profile on a display surface.
Fasten off. Close the hole and weave in the tail.
Assembly
- Sew the head to the narrow end of the body with the body tail; place the seam across R18–R20 of the head.
- Attach the body so the front center of the abdomen lines up under the embroidered smile.
- Sew the cheek patches below the eyes, centered between R13 and R15.
- Embroider the mouth with black thread across 3 stitches, then add three lash stitches at the outer side of each eye.
- Fold each arm flat and sew it to the upper body between R4 and R8, crossing the tips at the center front.
- Pin the upper wings behind the head first; the inner edges should touch behind the neck.
- Pin the lower wings under the upper wings with a 1 cm overlap, then sew through all wing layers and the back of the body.
- Sew the antennae to the top of the head between R4 and R6, spaced 7 stitches apart.
- Place blueberry clusters on the wings after pinning: one large berry near each upper outer wing, two berries on the lower left wing, and one main berry cluster on the lower right wing.
- Sew flowers and leaves around the berries, weave all tails through the wing backs, and set the loose berry props beside the finished toy.
The butterfly is complete when the body stands upright and all four wing tips rest evenly behind it.
7 Technical Tips
- Stitch marker drift: The head marker may lean left after R10 if your tension twists the spiral. Keep the marker at the back neck line and add one plain sc shift only before starting R15.
- Stuffing firmness: Under-stuffing the 42-stitch head creates eye dents and a flat crown. Add fill until the head springs back, then stop 5 mm before the closing hole.
- Invisible decrease bumps: A visible jaw ridge appears when both loops are caught during decreases. Work every head decrease through FLO only from R15 to R20.
- Eye placement timing: Installing eyes after R17 can crack stitches or trap the washer in stuffing. Set 12 mm eyes between R10 and R11 with an 8-stitch gap before closing the head.
- Wing pinning failure: Sewing the wings without pins often makes one upper wing sit 1–2 cm higher than the other. Pin the upper wings at a 45-degree angle first, then add the lower wings under them.
- DK cotton split plying: A sharp hook can split pale cotton during R8 BLO wing edging. Rotate the hook slightly downward and keep each BLO stitch the same height as the previous round.
- Tail weaving measurement: Short tails pull out of flat appliqués during handling. Leave at least 10–12 cm on flowers and 15 cm on cheek patches, then weave through three separate stitch paths.
Conclusion
This design works because the wide panels carry the color while the ivory body stays narrow. Keep the face simple, then spend the extra time on the berries, tiny leaves, and wing borders; those details make the photo readable from across a table. Your next step is to crochet one upper wing first and check the curve before making the second panel. For a cleaner market sample, make both upper wings on the same day so the tension matches. Save the finished butterfly amigurumi crochet pattern image to Pinterest, then post your version on Instagram with #BlueberryWingButterfly. Did you place the blueberry cluster higher on the upper wings, or closer to the lower-wing seam?









