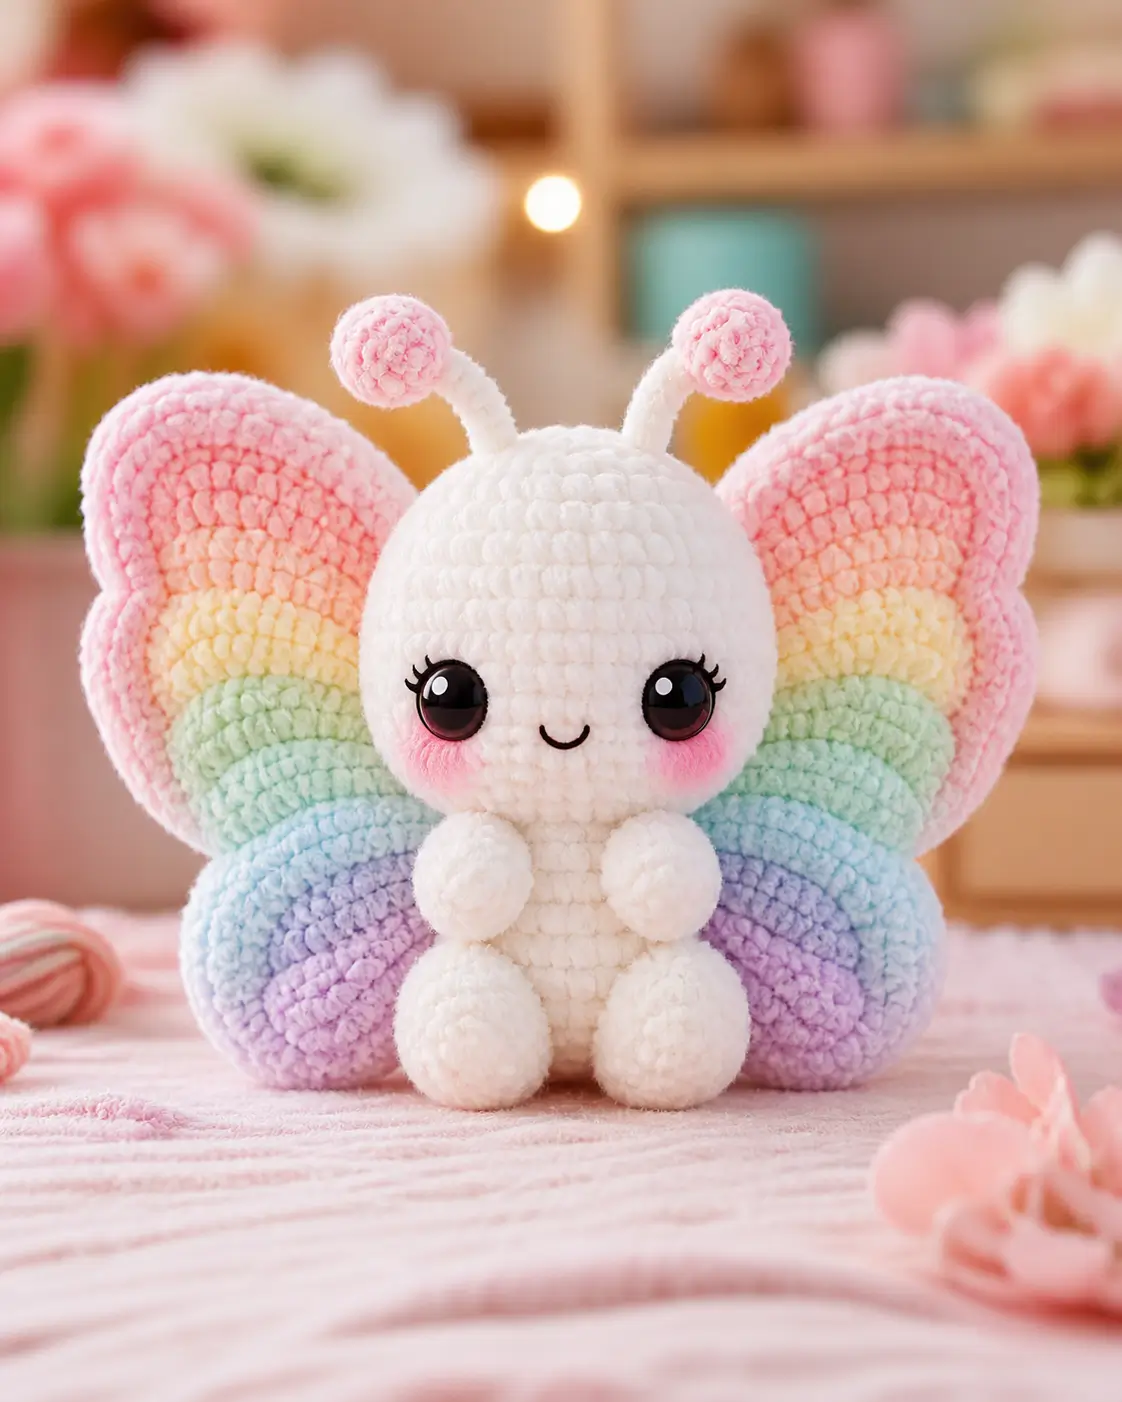
Butterfly wings are not one surface; this pastel toy needs four soft lobes hiding inside two rainbow panels. This butterfly amigurumi crochet pattern uses chunky chenille, a 5 mm hook, 16 mm safety eyes, and a 23 cm finished height. Work it as an intermediate plush for shelf display or a nursery photo prop, with firm shaping so the wings stay open behind the body.
The Design: What Makes This Rainbow Butterfly Different
The main design problem is weight distribution. A rainbow butterfly amigurumi has wide wings behind a small upright body, so the body cannot be a narrow tube. It needs a rounded 36-stitch base, short back legs, and a head large enough to balance the wing span from the front view. The second decision is lobe separation. Real butterfly wings read as four sections, so this plush butterfly crochet pattern builds upper and lower wing lobes, then joins them into two panels. The third decision is face timing. The eyes go in before the head closes because chenille does not tolerate repeated eye removal. A common mistake is sewing only the top of each wing to the back. That creates droop. The wing seam must run vertically down the body.
Project Info at a Glance
| Skill Level | Time | Finished Size | Hook | Best For |
|---|---|---|---|---|
| Intermediate | 5–6 hours | 23 cm sitting height | 5.0 mm | Chenille plush, spring display, nursery photos |
Materials and Tools
Yarn
- White / cream — #6 super bulky chenille — 65–75 g — Premier Parfait Chunky-style plush yarn.
- Pastel pink — #6 super bulky chenille — 18–25 g — outer wing bands and antenna tips.
- Peach — #6 super bulky chenille — 8–10 g — upper wing transition band.
- Soft yellow — #6 super bulky chenille — 8–10 g — middle wing band.
- Mint green — #6 super bulky chenille — 8–10 g — middle wing band.
- Sky blue — #6 super bulky chenille — 8–10 g — lower wing band.
- Lavender — #6 super bulky chenille — 8–10 g — lower wing band.
- Blush pink — DK cotton or velvet scrap — 2 g — cheek patches.
- Black embroidery thread — small amount — smile and eyelashes.
Tools
- 5.0 mm crochet hook
- 16 mm black safety eyes
- Polyester stuffing
- Yarn needle
- Stitch markers
- Pins
- Scissors
Abbreviations
MR = magic ring; sc = single crochet; inc = 2 sc in the same stitch; dec = invisible decrease; sl st = slip stitch; ch = chain; BLO = back loop only; st = stitch; R = round.
Invisible dec uses the front loops of the next two stitches to remove bulk without leaving a visible ridge.
Pattern — Step by Step
Work in a continuous spiral unless a part states otherwise. Counts appear in brackets at the end of every round.
Head (Make 1)
Yarn: white / cream. Source: standard amigurumi math checked against 42-stitch plush head shaping.
R1: 6 sc in MR (6)
R2: inc ×6 (12)
R3: (sc, inc) ×6 (18)
R4: (2 sc, inc) ×6 (24)
R5: (3 sc, inc) ×6 (30)
R6: (4 sc, inc) ×6 (36)
R7: (5 sc, inc) ×6 (42)
R8–R13: sc around (42)
Insert 16 mm safety eyes between R10 and R11, 8 stitches apart. The eyes should sit slightly below the horizontal center of the head.
R14: (5 sc, dec) ×6 (36)
R15: (4 sc, dec) ×6 (30)
R16: (3 sc, dec) ×6 (24)
Start firm stuffing. Add small pieces, not one large wad.
R17: (2 sc, dec) ×6 (18)
R18: (sc, dec) ×6 (12)
R19: dec ×6 (6)
Fasten off. Thread the tail through front loops of R19, pull closed, and bury the tail inside the head.
Body (Make 1)
Yarn: white / cream. Source: standard amigurumi math with a 36-stitch medium body plateau.
R1: 6 sc in MR (6)
R2: inc ×6 (12)
R3: (sc, inc) ×6 (18)
R4: (2 sc, inc) ×6 (24)
R5: (3 sc, inc) ×6 (30)
R6: (4 sc, inc) ×6 (36)
R7–R11: sc around (36)
R12: (4 sc, dec) ×6 (30)
R13: (3 sc, dec) ×6 (24)
R14–R15: sc around (24)
Stuff the lower body firmly. Keep the neck area dense so the head does not wobble forward.
R16: (2 sc, dec) ×6 (18)
R17: (sc, dec) ×6 (12)
R18: dec ×6 (6)
Fasten off. Close the remaining stitches and leave a 35 cm tail for sewing the body to the head.
Front Arms (Make 2)
Yarn: white / cream. Source: standard small oval limb math.
R1: 6 sc in MR (6)
R2: inc ×6 (12)
R3: (sc, inc) ×6 (18)
R4–R6: sc around (18)
R7: (sc, dec) ×6 (12)
R8: dec ×6 (6)
Stuff lightly. Overstuffed arms push away from the front of the body.
Fasten off. Leave a 25 cm tail for sewing.
Back Legs (Make 2)
Yarn: white / cream. Source: standard oval limb math.
R1: 6 sc in MR (6)
R2: inc ×6 (12)
R3: (sc, inc) ×6 (18)
R4: (2 sc, inc) ×6 (24)
R5–R7: sc around (24)
R8: (2 sc, dec) ×6 (18)
R9: (sc, dec) ×6 (12)
Stuff the toe end firmly and leave the open edge soft enough to flatten against the body.
Fasten off. Leave a 30 cm tail for sewing.
Upper Wing Lobes (Make 2)
Yarn: lavender, sky blue, mint, yellow, peach, pastel pink. Source: standard flattened lobe math with rainbow color changes.
R1: lavender, 6 sc in MR (6)
R2: lavender, inc ×6 (12)
R3: sky blue, (sc, inc) ×6 (18)
R4: mint, (2 sc, inc) ×6 (24)
R5: soft yellow, (3 sc, inc) ×6 (30)
R6: peach, (4 sc, inc) ×6 (36)
R7–R9: pastel pink, sc around (36)
R10: pastel pink, (4 sc, dec) ×6 (30)
R11: pastel pink, (3 sc, dec) ×6 (24)
Do not stuff. Flatten the lobe with the color bands facing forward.
Fasten off. Leave a 45 cm tail for joining to the lower wing lobe.
Lower Wing Lobes (Make 2)
Yarn: lavender, sky blue, mint, yellow, peach, pastel pink. Source: standard smaller flattened lobe math.
R1: lavender, 6 sc in MR (6)
R2: sky blue, inc ×6 (12)
R3: mint, (sc, inc) ×6 (18)
R4: soft yellow, (2 sc, inc) ×6 (24)
R5: peach, (3 sc, inc) ×6 (30)
R6–R7: pastel pink, sc around (30)
R8: pastel pink, (3 sc, dec) ×6 (24)
R9: pastel pink, (2 sc, dec) ×6 (18)
Do not stuff. Flatten each lobe and align the narrower end toward the body.
Fasten off. Leave a 45 cm tail.
Wing Panel Join (Make 2 Panels)
Yarn: tails from upper and lower lobes. Source: photo-based assembly shaping.
Place one upper lobe above one lower lobe with their inner edges touching. Sew through both flattened layers for 6 stitches along the inner join. The outer edges should form a soft scallop, with the upper lobe slightly larger than the lower lobe.
Repeat for the second panel. Leave the long inner tails attached for sewing the panels to the back of the butterfly.
Antennae (Make 2)
Yarn: pastel pink for the bobble, white / cream for the stem. Source: standard bobble-and-stem amigurumi math.
R1: pastel pink, 6 sc in MR (6)
R2: inc ×6 (12)
R3: sc around (12)
R4: dec ×6 (6)
Stuff the bobble with a small pinch only.
R5: change to white / cream, sc around (6)
R6–R11: sc around (6)
Fasten off. Leave a 30 cm tail for sewing. For display-only pieces, a short chenille stem can be inserted before closing; omit wire for toys handled by young children.
Cheek Patches (Make 2)
Yarn: blush pink DK cotton or velvet scrap. Source: standard flat circle math.
R1: 6 sc in MR (6)
R2: inc ×6 (12)
Sl st to close. Fasten off with a 20 cm tail.
Smile and Eyelashes
Yarn: black embroidery thread. Source: photo-based face detail.
Embroider a shallow U-shaped smile centered 2 rounds below the eyes. Add three short eyelash stitches to the outer side of each eye. Keep each lash under 8 mm so the face stays round rather than pointed.
Mini Yarn Ball Photo Prop (Make 1 Optional)
Yarn: peach or pastel pink. Source: prop visible in the reference photo.
R1: 6 sc in MR (6)
R2: inc ×6 (12)
R3: (sc, inc) ×6 (18)
R4–R6: sc around (18)
R7: (sc, dec) ×6 (12)
R8: dec ×6 (6)
Fasten off and close. Wrap a contrasting scrap strand around the ball in three directions and tack the strand ends with a needle.
Assembly
- Sew the head to the body through a full 18-stitch circle, matching the front center of the head to the front center of the body.
- Add extra stuffing into the neck gap before closing the final 4 stitches of the head-body seam.
- Attach the cheek patches just outside the eyes, between R12 and R14 of the head.
- Sew the front arms to the upper body, 2 rounds below the head seam, with 5 stitches between them.
- Sew the back legs to the lower front body between R5 and R8, angled outward for a sitting pose.
- Pin both wing panels to the back before sewing; upper lobes should start just below the head seam.
- Sew each wing panel down a vertical 7 cm line along the inner edge, not only at the top.
- Attach antennae between R3 and R5 of the head, spaced 5 stitches apart.
- Check that the butterfly sits upright; add two hidden stitches from each back leg into the body if it tips backward.
- Place the optional yarn ball prop beside the finished plush for photos, not as a sewn toy part.
The finished plush measures about 23 cm tall when worked with #6 chenille and a 5.0 mm hook.
7 Technical Tips
- Marker drift: A drifting marker can place the eyes off center by one full stitch column. Move the marker to the back every 3 rounds during the head plateau.
- Stuffing firmness: A soft neck creates a forward head tilt under the weight of the wings. Pack small pieces into the head-body join until the seam resists light pressure.
- Invisible decrease: A normal decrease leaves six raised bumps on the white face closure. Use front-loop invisible decreases on R14–R19 of the head.
- Eye placement timing: Safety-eye washers cannot be moved cleanly after chenille has been stretched. Place 16 mm eyes between R10 and R11 with 8 stitches between them before starting R14.
- Velvet tension: Loose chenille loops can worm out at color changes on the wings. Keep each color change snug and tie the old and new tails once on the wrong side.
- Wing pinning: Wings sewn only through the upper lobe will sag after handling. Pin a 7 cm vertical seam along the inner edge of each wing before sewing.
- Tail weaving: Chenille tails shorter than 15 cm shed and pull loose. Leave 25–45 cm tails and weave each one through at least three stitch paths.
Conclusion
Check the butterfly from the front before trimming tails: the upper wing lobes should rise behind the head, the lower lobes should frame the legs, and the antenna bobbles should sit level. The next step is blocking the wing panels with pins for 20 minutes so the pastel bands read as clean arcs. Save this butterfly amigurumi crochet pattern to Pinterest, then post the finished plush on Instagram with the front view and back wing seam visible. Use the hashtag #RainbowButterflyAmigurumi. Which wing band would you change first on this butterfly: the pink outer edge, the mint center, or the lavender lower lobe?









