Introduction
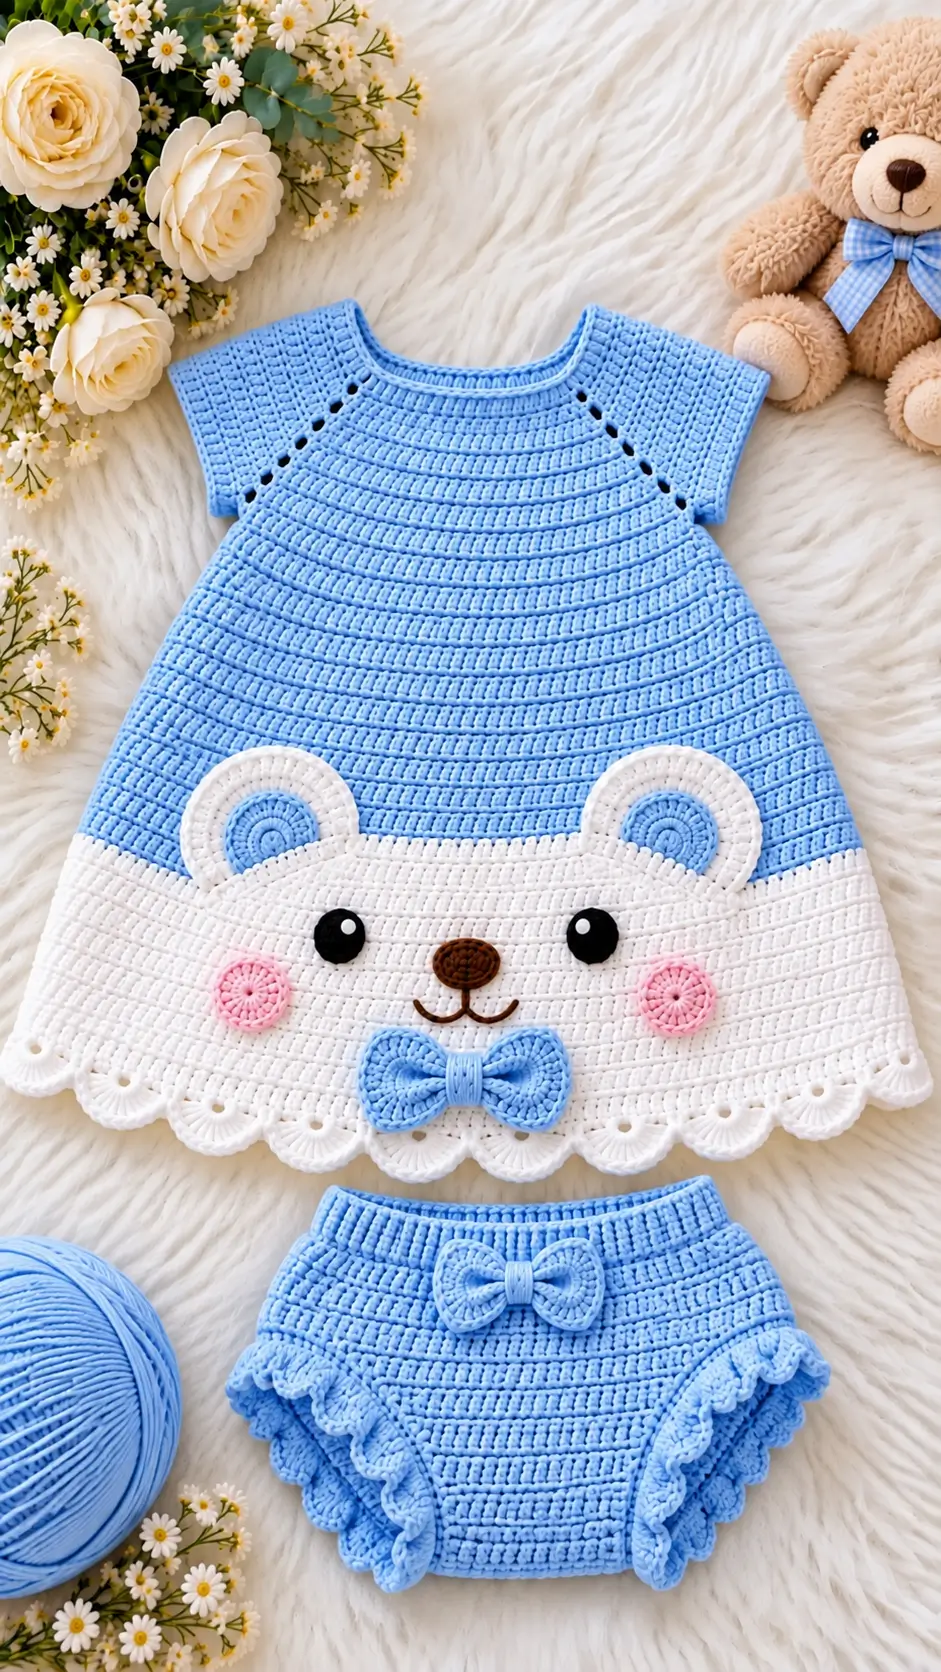
A bear with blue inner ears, pink circular cheeks and a bow under its chin needs three separate facial color zones before its silhouette reads correctly. This bear amigurumi crochet pattern converts those details from the photographed baby garment into a 12 cm stuffed bear using DK yarn, a 2.5 mm hook and intermediate-level shaping. Its compact scale makes it practical for testing color combinations without consuming a full skein.
The Design: What Makes the Blue Bow Bear Different
The head reaches a 36-stitch plateau, giving the small bear amigurumi enough width for two eyes, cheek circles and a centered muzzle without producing an oversized sphere. Blue inner-ear circles repeat the garment color rather than introducing another neutral.
Pink cheek patches sit below and outside the eyes, while the blue bow creates a strong center point beneath the muzzle. The body remains narrower than the head so the crochet teddy bear keeps the proportions visible in the source motif.
A frequent construction error is attaching round ears too low. That widens the face horizontally and can make the finished head read as a mouse rather than a bear.
Project Info at a Glance
| Skill Level | Time | Finished Size | Hook | Best For |
|---|---|---|---|---|
| Intermediate | 4–6 hours | Approx. 12 cm | 2.5 mm | Small display bear, nursery decoration |
The finished measurement can vary according to yarn choice, crochet tension and stuffing density.
Materials and Tools
Yarn
- White — DK/light — approx. 35 g — smooth cotton or cotton-acrylic DK
- Baby blue — DK/light — approx. 6 g — matching yarn construction
- Pink — DK/light — approx. 2 g — smooth cotton or cotton blend
- Brown — DK/light — approx. 1 g — nose and mouth details
- Black — small amount — optional embroidery yarn
Tools
- 2.5 mm crochet hook
- Two 6 mm safety eyes
- Polyester stuffing
- Yarn needle
- Stitch markers
- Pins
- Scissors
Safety note: If the finished bear is intended for a child under three years old, embroidered eyes are preferable to detachable plastic safety eyes.
Abbreviations
- MR — Magic ring
- sc — Single crochet
- inc — 2 single crochet in one stitch
- dec — Single crochet decrease
- sl st — Slip stitch
- ch — Chain
- BLO — Back loop only
For an invisible decrease, insert the hook through the front loops of the next two stitches, yarn over and complete one single crochet through both.
Blue Bow Teddy Bear Pattern — Step by Step
Work in a continuous spiral unless otherwise stated. Place a stitch marker in the first stitch of each round and move it upward as the work progresses.
Head
Yarn: White
R1: 6 sc in MR (6)
R2: inc ×6 (12)
R3: (sc, inc) ×6 (18)
R4: (2 sc, inc) ×6 (24)
R5: (3 sc, inc) ×6 (30)
R6: (4 sc, inc) ×6 (36)
R7: sc around (36)
R8: sc around (36)
R9: sc around (36)
R10: sc around (36)
R11: sc around (36)
R12: sc around (36)
R13: sc around (36)
Install the 6 mm safety eyes between R9 and R10, approximately 7 stitches apart. Check the face from the front before securing the washers.
R14: (4 sc, dec) ×6 (30)
R15: (3 sc, dec) ×6 (24)
R16: (2 sc, dec) ×6 (18)
Stuff the head evenly. Add small pieces of stuffing gradually to maintain the rounded shape.
R17: (sc, dec) ×6 (12)
R18: dec ×6 (6)
Fasten off. Leave approximately 15 cm of yarn and close the remaining opening through the front loops.
Body
Yarn: White
R1: 6 sc in MR (6)
R2: inc ×6 (12)
R3: (sc, inc) ×6 (18)
R4: (2 sc, inc) ×6 (24)
R5: (3 sc, inc) ×6 (30)
R6: (4 sc, inc) ×6 (36)
R7: sc around (36)
R8: sc around (36)
R9: sc around (36)
R10: sc around (36)
R11: sc around (36)
R12: (4 sc, dec) ×6 (30)
R13: sc around (30)
R14: (3 sc, dec) ×6 (24)
R15: sc around (24)
R16: (2 sc, dec) ×6 (18)
Stuff the lower body firmly enough to create a stable sitting base.
R17: sc around (18)
R18: (sc, dec) ×6 (12)
R19: dec ×6 (6)
Fasten off. Leave a 20 cm yarn tail.
Arms / Front Legs — Make 2
Yarn: White
R1: 6 sc in MR (6)
R2: inc ×6 (12)
R3: sc around (12)
R4: sc around (12)
R5: (sc, dec) ×4 (8)
R6: sc around (8)
R7: sc around (8)
R8: sc around (8)
R9: sc around (8)
Stuff only the lower two-thirds. Keep the shoulder end relatively flat for easier attachment.
Fasten off. Leave a 20 cm sewing tail.
Back Legs — Make 2
Yarn: White
R1: 6 sc in MR (6)
R2: inc ×6 (12)
R3: (sc, inc) ×6 (18)
R4: sc around (18)
R5: sc around (18)
R6: (sc, dec) ×6 (12)
R7: sc around (12)
R8: sc around (12)
R9: dec ×6 (6)
Stuff before completing R9. Place slightly more filling in the foot than near the attachment point.
Fasten off. Leave a 20 cm sewing tail.
Outer Ears — Make 2
Yarn: White
R1: 6 sc in MR (6)
R2: inc ×6 (12)
R3: (sc, inc) ×6 (18)
R4: sc around (18)
Do not stuff. Flatten each ear lightly.
Fasten off. Leave a 20 cm sewing tail.
Inner Ears — Make 2
Yarn: Baby blue
R1: 6 sc in MR (6)
R2: inc ×6 (12)
Join with sl st. Fasten off and leave a 15 cm tail.
Sew one blue circle centrally onto each white outer ear before attaching the ears to the head.
Muzzle
Yarn: White
R1: 6 sc in MR (6)
R2: inc ×6 (12)
R3: (sc, inc) ×6 (18)
Join with sl st. Fasten off and leave a 20 cm sewing tail.
The muzzle should remain flat around its perimeter. A very small amount of stuffing can be placed underneath the center to create projection.
Brown Nose
Yarn: Brown
R1: 6 sc in MR (6)
R2: inc ×6 (12)
Join with sl st and fasten off, leaving a 15 cm tail.
Pinch the circle slightly while sewing to create a horizontal oval. Use brown yarn to embroider a short vertical line beneath the nose followed by two curved mouth lines.
Pink Cheek Patches — Make 2
Yarn: Pink
R1: 6 sc in MR (6)
R2: inc ×6 (12)
Join with sl st.
Fasten off and leave a 15 cm sewing tail. Keep the circles flat and do not add stuffing.
Tail
Yarn: White
R1: 6 sc in MR (6)
R2: inc ×6 (12)
R3: sc around (12)
R4: dec ×6 (6)
Add a small amount of stuffing before closing.
Fasten off. Leave a 15 cm sewing tail.
Blue Bow
Yarn: Baby blue
Ch 9.
Row 1: Starting in second ch from hook, 8 sc (8)
Row 2: ch 1, turn, 8 sc (8)
Row 3: ch 1, turn, 8 sc (8)
Row 4: ch 1, turn, 8 sc (8)
Row 5: ch 1, turn, 8 sc (8)
Fasten off and weave in the working tail.
Bow Center Band
Ch 5.
Row 1: Starting in second ch from hook, 4 sc (4)
Row 2: ch 1, turn, 4 sc (4)
Fasten off with a 15 cm tail.
Pinch the larger rectangle in the center. Wrap the smaller band around the pinched section and stitch the band closed at the back. Shape both sides evenly before attaching the bow to the bear.
Assembly
- Position the head centrally over the body’s upper opening. Sew around the neck twice so the head remains stable.
- Pin both ears high on the head, approximately between R3 and R7. Keep the blue inner-ear circles facing forward.
- Center the muzzle beneath the eyes. Its upper edge should sit near the eye line without covering either eye.
- Sew the brown nose over the center of the muzzle. Embroider the vertical nose line and two curved mouth sections.
- Position each pink cheek outside the muzzle and slightly below the corresponding eye. Count rounds from the crown to keep both patches level.
- Attach the arms to opposite sides of the upper body. Match the attachment round on both sides before sewing.
- Pin the back legs near the bottom of the body. Place the bear on a flat surface and adjust the legs until the body sits without tipping backward.
- Sew the tail at the center back. Position it low enough to touch or nearly touch the sitting surface.
- Center the blue bow directly beneath the head. Sew through the center band so the two bow loops retain their shape.
- Weave all remaining yarn tails through several internal stitches. Trim the excess yarn and reshape the stuffing by hand.
The completed bear should sit with both eyes level, symmetrical ears, evenly positioned cheeks and the blue bow centered beneath the muzzle.
7 Technical Tips for a Cleaner Teddy Bear
- Control stitch-marker drift. Spiral rounds naturally shift sideways as the head develops. Move the marker after the final stitch of every round and recount every increase and decrease round.
- Avoid overstuffing the head. Too much filling stretches the crochet fabric and exposes polyester through the stitch gaps. Stop adding stuffing when the 36-stitch section remains rounded without visible separation between stitches.
- Use invisible decreases on the head. Standard decreases can produce raised bars across the lower face. Work through the front loops during R14–R18 to reduce their visibility.
- Install the eyes before the main decrease rounds. Trying to fit washers after the head has been heavily stuffed restricts access to the posts. Position the 6 mm eyes between R9 and R10 before beginning R14.
- Watch tension across the head plateau. DK cotton makes changes in stitch height easy to see. If several consecutive stitches become noticeably taller, undo that section instead of tightening the following round to compensate.
- Pin both ears before sewing either one. Attaching the first ear immediately can leave the second one a complete round higher or lower. Position both approximately between R3 and R7 and inspect the head from the front before stitching.
- Do not cut structural yarn tails beside the knot. Short tails can migrate through the fabric as the toy is handled. Weave each structural tail through at least 3 cm of internal crochet before trimming it.
Conclusion
Before making a second bear, measure the finished head, body and sitting height and record the amount of yarn actually consumed. Those measurements provide a more reliable reference for reproducing the same gauge and proportions. This bear amigurumi crochet pattern is built around four identifying details from the original design: a white bear, blue inner ears, pink circular cheeks and a centered blue bow. Keep those elements when testing alternative yarn colors. Save the finished project to Pinterest or share it on Instagram with #BlueBowTeddyBear. For the next version, which detail would you change first: the diameter of the blue inner ears or the position of the pink cheeks?









