Introduction
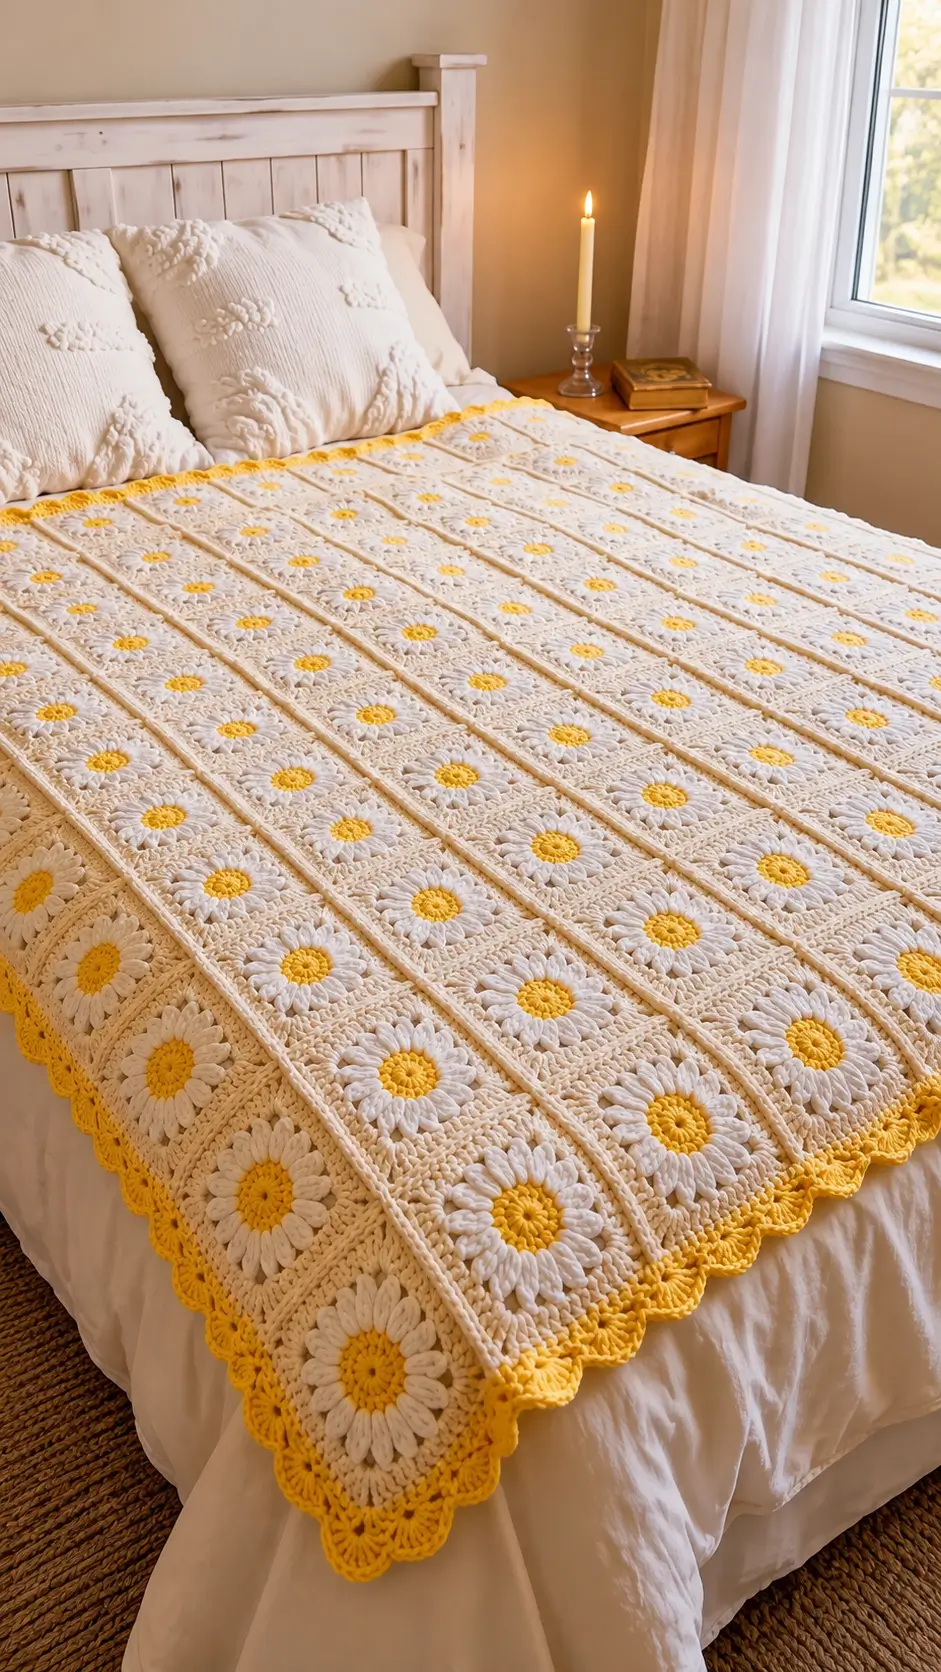
A daisy loses its recognizable shape when the petals disappear into the square behind it. This daisy granny square blanket avoids that problem with a yellow center, raised white petals and a quiet cream background. Use #4 worsted yarn and a 5 mm hook for an intermediate-level modular project; comparable patterns produce squares around 10–13 cm wide. The modular format also makes the blanket practical to resize for a bed.
The Design: What Makes This Daisy Blanket Different
The photographed blanket depends on separation between three layers: yellow center, white petals and cream background. That hierarchy matters. If the petal and background rounds are worked at identical height and tension, the flower becomes visually flat.
The second structural decision is the restrained joining method. Narrow cream joins divide the crochet daisy granny squares without introducing another dominant color. A third decision appears at the perimeter: yellow returns only for the scalloped border, connecting the outside edge to every flower center.
A common mistake in a flower granny square blanket is allowing the raised petal round to pull inward. The square then cups after the background rounds are added. Keep the petal bases controlled and block every motif to one measurement before joining. The maker gets a much more regular grid when the individual modules agree before assembly.
Project Info at a Glance
| Skill Level | Time | Finished Size | Hook | Best For |
|---|---|---|---|---|
| Intermediate | 25–40 hours, depending on size | Reference: 91 × 91 cm | 5.0 mm | Baby blanket, lap blanket, scalable bed throw |
The 91 × 91 cm reference dimension and 5 mm hook are documented for a published worsted-weight daisy blanket. Your finished dimensions will depend on yarn, tension, square count and border width.
Materials and Tools
Yarn
For the photo-inspired palette, keep the number of colors low.
- Warm cream — #4 worsted — approximately 700–1,400 g depending on finished dimensions — suggested type: smooth acrylic or acrylic blend.
- White — #4 worsted — approximately 400–900 g — used for the raised daisy petals.
- Mustard yellow — #4 worsted — approximately 150–300 g — used for flower centers and the outer border.
Yarn quantities are planning estimates for this scalable version. Make one complete square and weigh it before purchasing yarn for a large bed blanket. Multiplying the weight of one square by the required motif count gives a more reliable project estimate.
Tools
- 5.0 mm (H-8) crochet hook
- Tapestry needle
- Scissors
- Locking stitch markers
- Blocking mats
- Rust-resistant blocking pins
- Tape measure
No stuffing or safety eyes are required for this blanket.
Abbreviations
- MR — magic ring
- sc — single crochet
- hdc — half double crochet
- dc — double crochet
- tr — treble crochet
- sl st — slip stitch
- ch — chain
- st/sts — stitch/stitches
- sp — space
- YO — yarn over
- FO — fasten off
An invisible decrease belongs to three-dimensional amigurumi shaping and is not required for this flat modular blanket.
Daisy Granny Square Blanket Pattern — Step by Step
Pattern note: This is a photo-inspired original motif designed around the visible characteristics of the blanket: yellow centers, dimensional white petals, cream square backgrounds and a yellow scalloped border.
Daisy Center
Yarn: mustard yellow
R1: Make an MR. Ch 3, then work 11 dc into the ring. Join with a sl st to the top of the beginning ch-3. Treat the starting chain as the first dc for 12 positions total.
Pull the magic ring firmly closed.
Fasten off and weave the yellow tail toward the center rather than carrying it across the area where the white petals will be worked.
White Petal Round
Yarn: white
Join white in any stitch of the yellow center.
R2: Ch 1. Work one raised petal cluster into the same stitch, then ch 1. Repeat one petal cluster followed by ch 1 in each remaining center stitch. Join with a sl st.
Petal count: 12.
To form each raised petal cluster, yarn over and work 4 dc into the indicated stitch. Remove the working loop from the hook. Insert the hook through the top of the first dc, pick up the dropped loop and pull it through.
Do not pull the final loop excessively tight. Compressing the cluster changes the petal from a broad raised shape into a small knot.
Fasten off.
Cream Squaring Round
Yarn: warm cream
Join the cream yarn in a ch-1 space between two white petals.
R3: Ch 3 and work 2 dc in the same space, ch 1. Work 3 hdc in the next petal space, ch 1. Work 3 hdc in the next space, ch 1.
In the next space work 3 dc, ch 2, 3 dc, ch 1. This establishes a corner.
Continue around the flower, distributing two side groups between each corner group. Establish four evenly positioned corners.
Join with a sl st.
Check the motif before continuing. All four sides must contain the same sequence of stitch groups. Unequal distribution at this stage creates a diamond-shaped or twisted finished square.
Outer Square Round
Yarn: warm cream
R4: Slip stitch to the nearest ch-1 space. Ch 3 and work 2 dc in that space, then ch 1.
Work 3 dc, ch 1 in each ordinary space across the side.
At every ch-2 corner, work 3 dc, ch 2, 3 dc, ch 1.
Repeat this sequence around all four sides.
Join with a sl st.
Fasten off if the square has reached the required measurement.
Optional Fifth Round for Larger Squares
Yarn: warm cream
Add this round when a larger motif is required for a bed-size blanket.
R5: Join cream yarn in any corner. Ch 3, then work 2 dc, ch 2, 3 dc into the same corner.
Work ch 1 followed by 3 dc in each ch-1 space across the side. Place ch 1 between each 3-dc group.
At the next corner work 3 dc, ch 2, 3 dc.
Continue around all four sides using the same sequence.
Join with a sl st and fasten off.
Leave approximately 15 cm of yarn tail when the tail will be incorporated into your joining method. Otherwise, weave the tail into matching-color stitches before blocking.
Blocking the Daisy Squares
Block one completed motif before deciding how many squares the blanket requires. Measure it only after the yarn has settled into its blocked dimensions.
A square measuring approximately 12.5 cm would require about seven motifs to span 87.5 cm before allowing for joins and the border. Eight motifs would cover approximately 100 cm before those additions.
For a larger bed blanket, construct one complete test row. Measure the joined row rather than multiplying the width of an individual unjoined square. The joining technique can alter the final dimensions.
Once the target measurement is established, block every motif to the same width and height. Matching square dimensions are more important than forcing a predetermined motif count.
Joining the Daisy Granny Squares
Yarn: warm cream
Place all blocked motifs on a large flat surface with the right sides facing upward. Arrange the daisies into the required rectangular grid.
Check every flower before joining. A rotated or misplaced motif is considerably harder to correct once several rows have been connected.
For a narrow seam similar to the photographed blanket, use a flat slip-stitch joining method.
Position two neighboring squares together and work through corresponding edge loops. Make one slip stitch for each matching stitch or space along the edges.
Keep the joining stitches loose. Tight slip stitches shorten the seam and cause the blanket to gather between motif columns.
Complete all vertical joins first. Rotate the assembled strips and work the horizontal joins.
At every four-square intersection, check that the corners meet without a bulky knot or open hole.
Cream Border Foundation
Yarn: warm cream
Join the cream yarn at any outer corner.
Border R1: Ch 1 and sc evenly around the complete blanket. Work 3 sc into each corner.
Distribute the stitches consistently along every motif edge. Opposite sides should contain comparable stitch counts.
Join with a sl st.
Lay the blanket flat before starting the decorative border. A rippled edge indicates too many foundation stitches. An edge that curls inward indicates too few.
Correct the foundation round rather than expecting the decorative shells to hide a significant tension problem.
Yellow Scalloped Border
Yarn: mustard yellow
Join yellow yarn at a corner.
Border R2: Ch 1 and sc in the same stitch. Skip 2 sts, work 5 dc in the next stitch, skip 2 sts, then sc in the next stitch.
Repeat the shell sequence around the blanket.
Approaching a corner, check the remaining stitch count before making the final shell. Adjust the spacing slightly when necessary so the corner contains a centered scallop rather than half of a shell.
Continue around all four sides.
Join with a sl st to the first sc.
Fasten off and weave in the remaining yarn tail.
Assembly
- Block the motifs first. Pin every finished square to one target width and height before constructing the blanket.
- Sort the squares. Remove any motif that differs enough in tension to distort the grid. Reblock or remake it before proceeding.
- Lay out the full rectangle. Position every daisy right side up and check that the yellow flower centers form straight rows and columns.
- Mark the rows. Attach a removable stitch marker to the first square of every row so the planned arrangement cannot be accidentally reversed.
- Join the vertical columns. Maintain identical tension along every seam and avoid shortening the square edges with tight slip stitches.
- Join the horizontal rows. Check each four-square intersection before continuing. Thick seam crossings create raised bumps in the finished blanket.
- Measure the assembled blanket. Record the width and length before adding the border. These measurements make a second version easier to calculate.
- Work the cream foundation edge. Correct minor stitch-distribution differences in this round rather than forcing the yellow shells to compensate.
- Add the yellow scallops. Maintain the five-dc shell sequence and keep the corner treatment visually centered.
- Weave and block. Secure the yarn tails in multiple directions, trim them, then block the completed blanket to straighten the motif grid and square the outside corners.
The completed construction consists of blocked floral modules, narrow cream joins and one contrasting yellow scalloped perimeter.
7 Technical Tips for a Cleaner Daisy Blanket
- Mark difficult round beginnings. A one-space shift when starting the cream background moves all four corners away from their intended positions. Place a stitch marker at the beginning of the round until the square structure becomes obvious.
- Count all 12 petals. Eleven or thirteen petals changes the spacing available for the four cream corners. Count the completed white clusters before cutting the yarn.
- Measure after blocking. With #4 yarn and a 5.0 mm hook, complete one entire sample before calculating blanket dimensions. Measuring an unblocked motif can give an inaccurate square count.
- Control petal tension. Pulling the popcorn closure too tightly makes the petals narrow and can cause the center to cup. Keep each closure firm enough to hold its shape without drawing the yellow center inward.
- Pin eight reference points. When blocking, pin all four corners and the midpoint of all four sides. Even a 5 mm curve on each motif edge becomes conspicuous across a long row of joined squares.
- Check joining tension every few squares. A tight slip-stitch seam can shorten a row even when every individual motif measures correctly. Place the joined strip flat after two or three additions and compare both long edges.
- Hide tails inside matching colors. Weave each yarn end through at least 5 cm of structurally secure stitches before reversing direction. Keep yellow ends inside yellow stitches and white ends inside the petals so contrasting tails do not show through the motif.
Finishing and Sizing the Blanket
The easiest way to resize this daisy crochet blanket is to change the number of squares rather than alter the flower itself. Once one blocked motif and one joined test row have been measured, calculate the number required for the desired width and length.
A baby blanket needs substantially fewer motifs than the bed-size arrangement visible in the photograph. For a lap blanket, add rows until the piece covers the intended seated length. A bed throw requires enough additional width for the desired side drop.
Do not calculate yarn from blanket dimensions alone. Crochet density, raised petals, seam construction and border depth all affect consumption. Weighing a finished sample square provides a stronger estimate.
For example, if one completed motif weighs 24 g and the layout requires 64 motifs, the squares alone require approximately 1,536 g of yarn. Add a reasonable allowance for joining, border work, gauge variation and swatching.
Color Placement
The three-color structure is one reason the photographed design remains visually organized despite the large number of flowers. Yellow appears in the center of every daisy and returns at the outside edge. White is restricted to the petals. Cream occupies the largest area and separates neighboring flowers.
Changing the background to another strong color produces a much more graphic result. For a version closer to the photograph, keep the cream background relatively low in contrast against the white petals while allowing the yellow centers to remain clearly visible.
Use the same yellow yarn for the centers and scalloped edge when exact repetition is wanted. A slightly darker border can also be used when more perimeter definition is required.
Final Measurements and Care
Measure the blanket after the final blocking rather than immediately after the border is completed. Record the overall width, overall length, individual blocked square size and number of motifs.
Care instructions must follow the yarn manufacturer’s label. Acrylic, cotton and wool yarns can require different washing temperatures and drying methods, so the fiber actually used in the project determines the appropriate treatment.
After washing, reshape the blanket so the motif columns remain straight. Avoid stretching individual scallops farther than their neighboring shells because inconsistent border tension becomes visible along a long bed edge.
Conclusion
The finished grid depends more on repeatability than complicated shaping: make one sample motif, block it, record its dimensions and only then calculate the required square count. Use a 5 mm hook and #4 yarn as the starting combination, then adjust for your gauge before buying the full yarn quantity. For the photographed appearance, retain white petals, mustard centers, a warm-cream field and a matching yellow scalloped edge. Save the finished daisy granny square blanket to Pinterest and share your version on Instagram with #DaisyGrannySquareBlanket. Before making the full set, decide one detail: should the border match the flower centers exactly, or use a deeper mustard for stronger edge definition?









