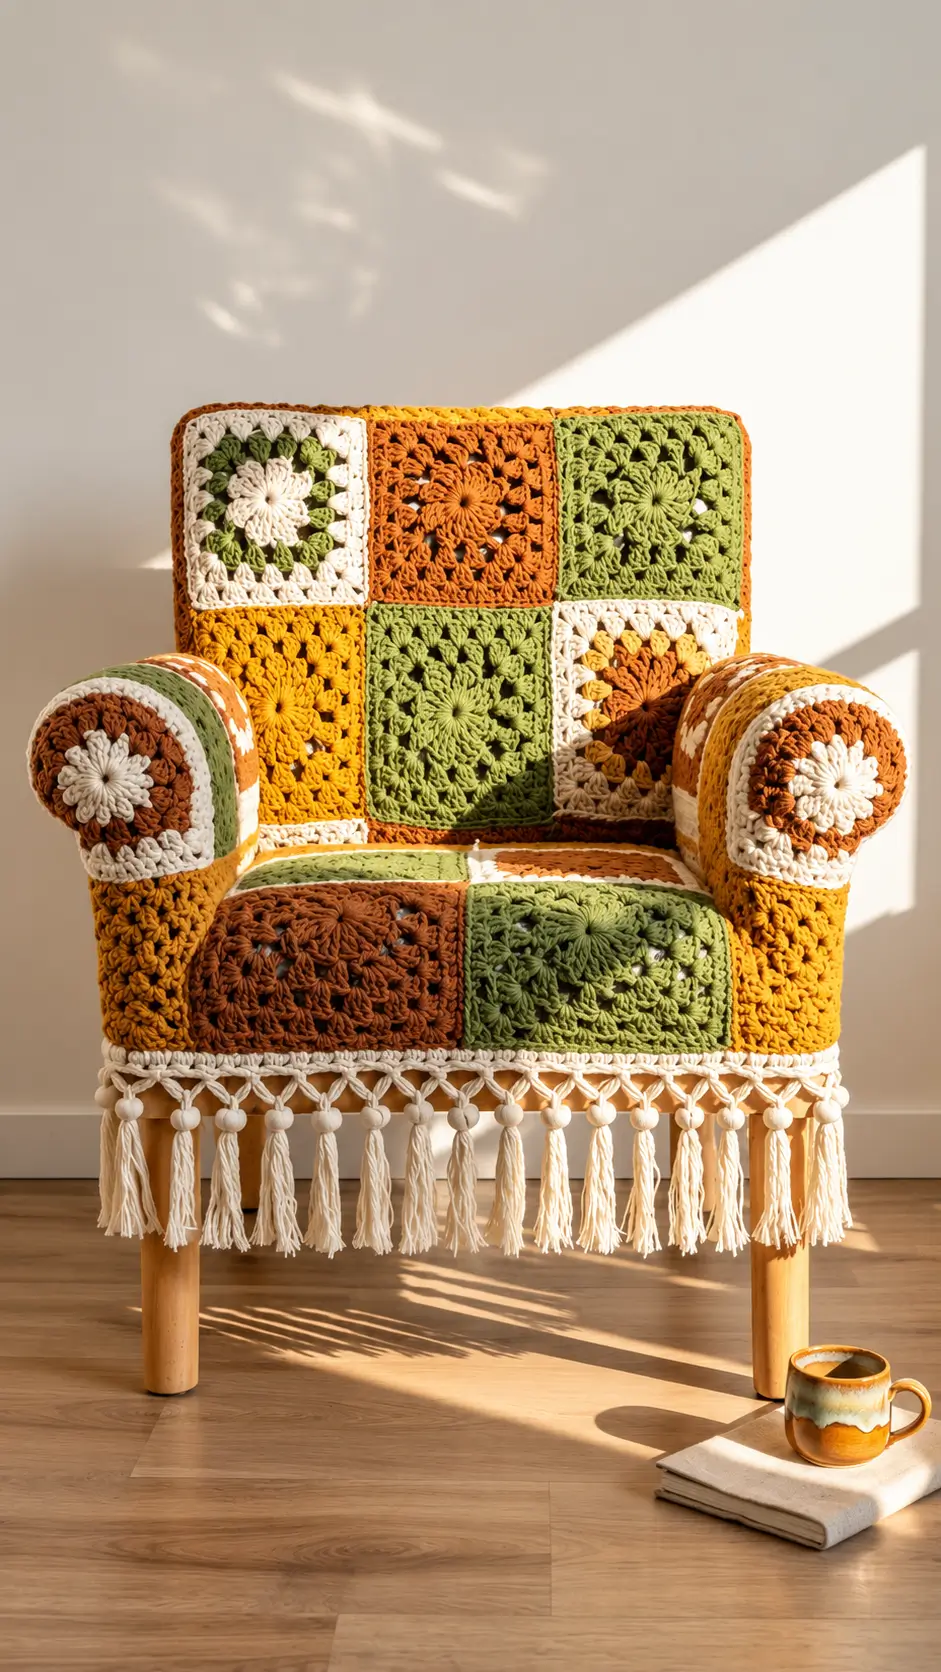
A flower square that lies flat on a blanket has a second job on an armchair: it must bend cleanly over the seat, back, and rounded arms. This crochet granny square chair cover uses modular floral and classic squares in olive green, rust, mustard, brown, and cream. Worked with medium-weight yarn, the project suits intermediate crochet skills. Its modular construction also makes individual worn sections easier to repair or replace.
The Design: What Makes This Granny Square Chair Cover Different
The chair combines several crochet structures rather than covering every surface with an identical motif. Floral granny squares dominate the backrest, seat, and upper arms, while denser crochet forms the lower side panels. This distinction has a practical purpose. Open granny clusters bend readily around upholstered surfaces, while tighter stitches give the sides more stability.
Rounded armrests create another construction problem. A single large rectangle can buckle when forced over the curve, so smaller joined motifs create several flexible seam lines instead. Cream borders separate the earthy olive, mustard, rust, and brown sections while also giving the motifs consistent joining edges.
A common mistake when making a granny square chair cover pattern is joining every motif before checking the actual furniture. Block the squares first, arrange complete panels, and test their dimensions against the chair before permanent assembly.
Project Info at a Glance
| Skill Level | Time | Finished Size | Hook | Best For |
|---|---|---|---|---|
| Intermediate | Varies by chair size | Custom fitted | 4 mm reference | Armchairs and accent chairs |
Materials and Tools
Yarn
- Olive or sage green medium-weight yarn — main floral and seat color
- Rust or caramel medium-weight yarn — backrest and arm motifs
- Mustard medium-weight yarn — accent squares and side panels
- Dark brown medium-weight yarn — contrasting seat and arm motifs
- Cream medium-weight yarn — flowers, borders, joining, and fringe
Calculate yarn requirements from a finished sample rather than estimating solely from the photograph. Crochet one complete square, block it, and weigh it. Multiply that weight by the required number of motifs, then add approximately 15 percent for seams, borders, swatching, and finishing.
Tools
- 4 mm crochet hook
- Yarn needle
- Locking stitch markers
- Measuring tape
- Blocking mats
- Rust-resistant blocking pins
- Scissors
- Kitchen scale
- Removable clips or pins
Abbreviations
- MR — magic ring
- ch — chain
- sc — single crochet
- hdc — half double crochet
- dc — double crochet
- tr — treble crochet
- sl st — slip stitch
- sp — space
- st/sts — stitch/stitches
- rep — repeat
Invisible decreases are not required for this project because the shaping comes from motif placement, panel dimensions, borders, and joining.
Measure the Chair Before Crocheting
Measure the furniture before deciding how many granny squares to make. Record the width and height of the front of the backrest, the seat width and depth, each arm from the inside edge to the outside edge, the outside side-panel dimensions, and the desired length of the lower drop.
Next, crochet one complete granny square using the selected yarn and hook. Wash or block the sample using the same method planned for the finished chair cover. Measure the square from edge to edge without stretching it.
For example, if the blocked square measures 12 cm and the usable backrest width measures 60 cm, five motifs span approximately 60 cm before allowing for the chosen joining method. When the chair measurement falls between whole motifs, adjust the outer border instead of stretching the squares.
This measurement-first method is important because upholstered chairs differ substantially in seat depth, back width, arm thickness, and curvature.
Pattern — Step by Step
The crochet chair cover is assembled from separate motifs and rectangular panels. Complete and block a sample motif before producing the full set so every section can be calculated from its actual finished dimensions.
Floral Granny Square
Use cream for the flower and olive, rust, mustard, or brown for the surrounding square.
Round 1: With the flower color, make an MR. Ch 3, then work 11 dc into the ring. Join with a sl st to the top of the beginning ch-3. (12 dc)
Round 2: Ch 1. Work (sc, ch 3, sc) around the next stitch to form a petal loop. Repeat around, spacing six loops evenly around the center. Join with sl st. (6 petal loops)
Round 3: Sl st into the first ch-3 loop. Work (sc, hdc, 3 dc, hdc, sc) into the loop. Repeat in each remaining loop. Join with sl st. (6 petals)
Change to the selected background color.
Round 4: Attach yarn behind a petal. Ch 3. Work dc groups between the petals, using taller stitches where required to change the circular flower into a four-sided shape. At each of four evenly spaced corner positions, work (2 dc, ch 2, 2 dc). Join with sl st.
Round 5: Sl st to the nearest corner space. Ch 3, 2 dc, ch 2, 3 dc in the same corner. Work 3 dc into each side space. In every corner, work (3 dc, ch 2, 3 dc). Join with sl st.
Round 6: Continue the established granny-square structure. Work one 3-dc cluster in each side space and (3 dc, ch 2, 3 dc) in every corner. Join with sl st.
Fasten off and weave in all ends. Block the finished motif to the selected square measurement.
Classic Granny Square
Use olive, mustard, rust, dark brown, and cream in alternating combinations.
Round 1: Make an MR. Ch 3 and work 2 dc into the ring, ch 2. Work (3 dc, ch 2) three more times. Join with sl st. The round contains four 3-dc groups and four corner spaces.
Round 2: Sl st into the first corner. Ch 3, 2 dc, ch 2, 3 dc in the same corner. Ch 1. Work (3 dc, ch 2, 3 dc) in each remaining corner, with ch 1 between corners. Join with sl st.
Round 3: Sl st to the first corner. Work (ch 3, 2 dc, ch 2, 3 dc) in the corner. Ch 1, 3 dc in the next side space, ch 1. Continue around, working (3 dc, ch 2, 3 dc) in every corner. Join.
Round 4: Work one 3-dc cluster in every side ch-1 space. Work (3 dc, ch 2, 3 dc) in each corner, placing ch 1 between clusters. Join.
Round 5: Repeat the established expansion, adding one additional side cluster per side. Continue until the classic granny square matches the blocked dimensions of the floral squares.
Fasten off and weave in the ends.
Dense Side Panels — Make 2
The lower outside portions of the photographed chair use a denser crochet fabric. Rectangular panels work well here because they reduce the number of seams in areas where a decorative motif is unnecessary.
Foundation: Chain until the foundation reaches the required panel width without stretching.
Row 1: Hdc in the second chain from the hook and in each chain across. Turn.
Row 2: Ch 1. Hdc in each stitch across. Turn.
Row 3: Ch 1. Work hdc through the back loop of each stitch across. Turn.
Row 4: Ch 1. Hdc in each stitch across. Turn.
Repeat Rows 3 and 4 until the panel reaches the measured height of the chair side.
Place a stitch marker in the first and last stitch of each row. Missing an edge stitch will gradually narrow the rectangular panel.
Fasten off and leave a long tail for joining.
Armrest Panels — Make 2
Measure from the inside edge of the seat, across the top of the arm, and down to the desired outside stopping point. Arrange blocked granny squares along this measurement without stretching them.
Join enough motifs to create one strip for each arm. Smaller motifs work particularly well on rounded upholstered arms because every seam provides another point where the crochet fabric can change direction.
If an arm panel is slightly too narrow, add a border rather than pulling the motifs sideways.
Border Round 1: Attach cream yarn at one corner. Ch 1 and sc evenly around the entire arm panel. Work 3 sc into each outer corner. Join with sl st.
Border Round 2: Ch 1. Sc in each stitch around, again working 3 sc into each corner. Join.
Fasten off and leave a long joining tail.
Backrest Panel
Arrange the blocked floral and classic squares on a flat surface before joining them. Distribute olive, rust, cream, mustard, and brown across the panel rather than stacking identical colors in vertical columns.
Build a rectangle matching the measured width and height of the chair back. Check the complete arrangement against the furniture before sewing the final row.
If the backrest becomes slightly narrower near the top, compensate with border width or narrow side strips. Stretching the lower squares to match the upper width can distort the flower motifs.
Join adjacent motifs with cream yarn. A slip-stitch join gives a visible seam, while a sewn mattress-style join creates a flatter surface.
Seat Panel
The seat receives more abrasion and movement than the backrest. Select firm, evenly blocked motifs for this area and avoid squares with noticeably loose centers.
Arrange enough motifs to cover the seat from the backrest junction to the front edge. Check the width between the armrests before joining.
Join the squares into one rectangular seat panel. Place the panel on the chair and confirm that it rests flat without substantial excess fabric.
Attach yarn at a corner and work one round of sc around the completed seat panel. Place 3 sc in each corner. This border creates a stable edge for attaching the seat to the backrest, arms, and front section.
Front Drop
Measure vertically from the front edge of the seat to the desired lower border. The drop can be constructed from granny squares or a dense rectangular panel.
For a denser version, chain to the required width.
Row 1: Hdc in the second chain from the hook and each chain across. Turn.
Row 2: Ch 1 and hdc across. Turn.
Repeat Row 2 until the piece reaches the required length.
Fasten off and attach the upper edge securely to the front of the seat panel.
Cream Lower Border
Attach cream yarn along the bottom edge of the front and side sections.
Row 1: Ch 1 and sc evenly across. Turn.
Row 2: Ch 1 and sc in every stitch across. Turn.
Row 3: Ch 1 and sc in every stitch across.
Fasten off.
The dense cream band creates a stable foundation for the tassel fringe and helps distribute the weight of the hanging yarn.
Tassel Fringe
Cut equal lengths of cream yarn. For a finished tassel of approximately 12 cm, begin with strands slightly longer than 24 cm because the strands are folded in half during attachment.
Group several strands and fold them at the midpoint. Insert the crochet hook through a stitch in the cream lower border. Pull the folded midpoint through the stitch to form a loop, then pass the loose ends through that loop.
Tighten the knot against the border.
Repeat at equal intervals along the lower edge. Use the same number of strands in every tassel so the fringe has consistent density.
Do not make the final trim while the cover is lying flat. Put the completed cover on the chair first, allow the tassels to hang naturally, and then trim the lower edge to an even length.
Joining the Granny Squares
A crochet furniture cover places different types of stress on its seams. Backrest joins experience mostly vertical tension, seat joins receive compression and sideways movement, and armrest seams repeatedly bend around curved upholstery.
For a visible raised seam, place two motifs with their wrong sides together. Attach cream yarn at one corner and slip stitch through corresponding stitches of both squares. Continue evenly across the edge.
For a flatter seam, place the motifs right sides together and sew through corresponding edge stitches with a yarn needle.
Whichever method you choose, avoid pulling the joining yarn tighter than the crochet fabric. An overly tight seam shortens the joined edge and creates ridges between otherwise flat squares.
Assembly
- Block every floral and classic granny square to the selected dimensions and allow all pieces to dry completely.
- Arrange and join the backrest motifs into a panel matching the measured chair back.
- Join the seat motifs separately and test the finished seat panel directly on the chair.
- Pin the backrest temporarily to the seat and check the angle where the chair back meets the cushion.
- Join the backrest and seat only after both panels lie flat without pulling the motifs out of shape.
- Assemble the two armrest strips and position their central motifs over the highest points of the upholstered arms.
- Attach each arm panel to the seat and back sections, checking alignment after each major seam.
- Add the dense outside side panels and front drop, filling minor gaps with crochet borders rather than stretching existing squares.
- Work the cream lower border around the exposed lower edge and attach the tassel fringe at equal intervals.
- Weave all remaining yarn tails through several stitches on the wrong side, place the cover on the chair, and trim the fringe to its final length.
The finished crochet chair cover should rest against the upholstery without requiring stretched motifs to maintain its position.
7 Technical Tips for a Better Fit
- Mark panel orientation before joining. A granny square may appear symmetrical while its color sequence is not. Put a locking marker in the top-left corner of every assembled panel before moving it.
- Block before calculating the motif count. A difference of only 5 mm per square becomes 2.5 cm across five motifs. Using unblocked measurements can therefore create an incorrectly sized backrest.
- Check every corner angle. Crowded corner stitches can make a granny square cup upward, while insufficient expansion pulls it toward a diamond shape. A blocked corner should sit close to 90 degrees.
- Watch joining tension. A seam tighter than the motif edge produces a raised ridge and reduces the panel width. Lay each newly joined strip flat before attaching another row.
- Use longer weaving tails on the seat. Tails only 2–3 cm long can work loose under repeated friction. Weave longer ends through several stitches and change direction at least once.
- Pin the arm panels before sewing. Moving an arm strip by even half a motif can place the main flower away from the top of the arm. Mark the highest point of each arm before positioning the panel.
- Trim the fringe after fitting. Equal tassels on a flat table can appear uneven once the front panel curves around the furniture. Fit the entire cover first and use a measured horizontal reference for the final trim.
How to Adjust the Pattern for Your Chair
Calculate the number of motifs from their finished blocked dimensions. Divide each chair measurement by the width of one blocked square. The result gives the approximate number of motifs required for that surface.
For example, a 60 cm backrest divided by a 12 cm square gives five motifs across. A 66 cm backrest with the same motifs falls between five and six squares. In that situation, five motifs plus wider side borders can produce a cleaner fit than forcing six motifs into the available space.
Apply the same calculation separately to the seat, backrest, and arms. Do not assume that a chair accommodating five squares across its back will also accommodate five across its seat.
When a dimension falls between whole motifs, use narrow crochet filler strips or additional border rounds. Changing hook size midway through the project can alter both motif dimensions and fabric density, making neighboring sections behave differently.
Color Placement for the Patchwork Effect
The chair design depends heavily on controlled color placement. Rust, mustard, and dark brown create the deeper visual blocks. Olive green separates those warm colors, while cream appears repeatedly in flowers, borders, and joining sections.
Make the required motifs before permanent assembly whenever possible. Arrange them on the floor in the approximate shape of the chair panel and photograph the proposed layout.
Look for accidental vertical columns of one color, clusters of identical motifs, or too many dark squares concentrated on one side. Rearrange individual motifs before joining.
The flower centers do not need identical color sequences. Variation creates the patchwork character visible in the design. Keeping the joining or border color consistent gives those varied motifs a common framework.
Care and Fit
Follow the washing instructions supplied with the selected yarn. Wash and dry a sample motif before cleaning the complete cover so any dimensional change is known in advance.
After washing, reshape the crochet chair cover while damp. Check the backrest corners, front seat edge, and arm panels because those areas show dimensional changes most clearly.
If the finished cover repeatedly moves forward, inspect the seat dimensions before adding ties. A seat panel that is too short can pull the backrest downward, while an oversized seat panel can bunch beneath the user and shift toward the front.
Individual granny squares can also be replaced if a high-wear section becomes damaged. Carefully open the surrounding seams, make a replacement motif to the same blocked dimensions, and sew it into the existing panel.
Conclusion
A fitted crochet granny square chair cover depends on accurate furniture measurements and consistent blocked motifs. Start by making one floral square, block it, record its exact dimensions, and use that measurement to calculate the backrest, seat, arm, and side layouts. Assemble those sections independently before making the final joins so fitting problems can be corrected without opening the entire cover. Once complete, save the project to Pinterest or share the finished chair on Instagram with #GrannySquareChairCover. For the next step, measure the usable width of your chair back and divide it by the width of one blocked square. Would you place the large cream flower at the center of the backrest or offset it?









