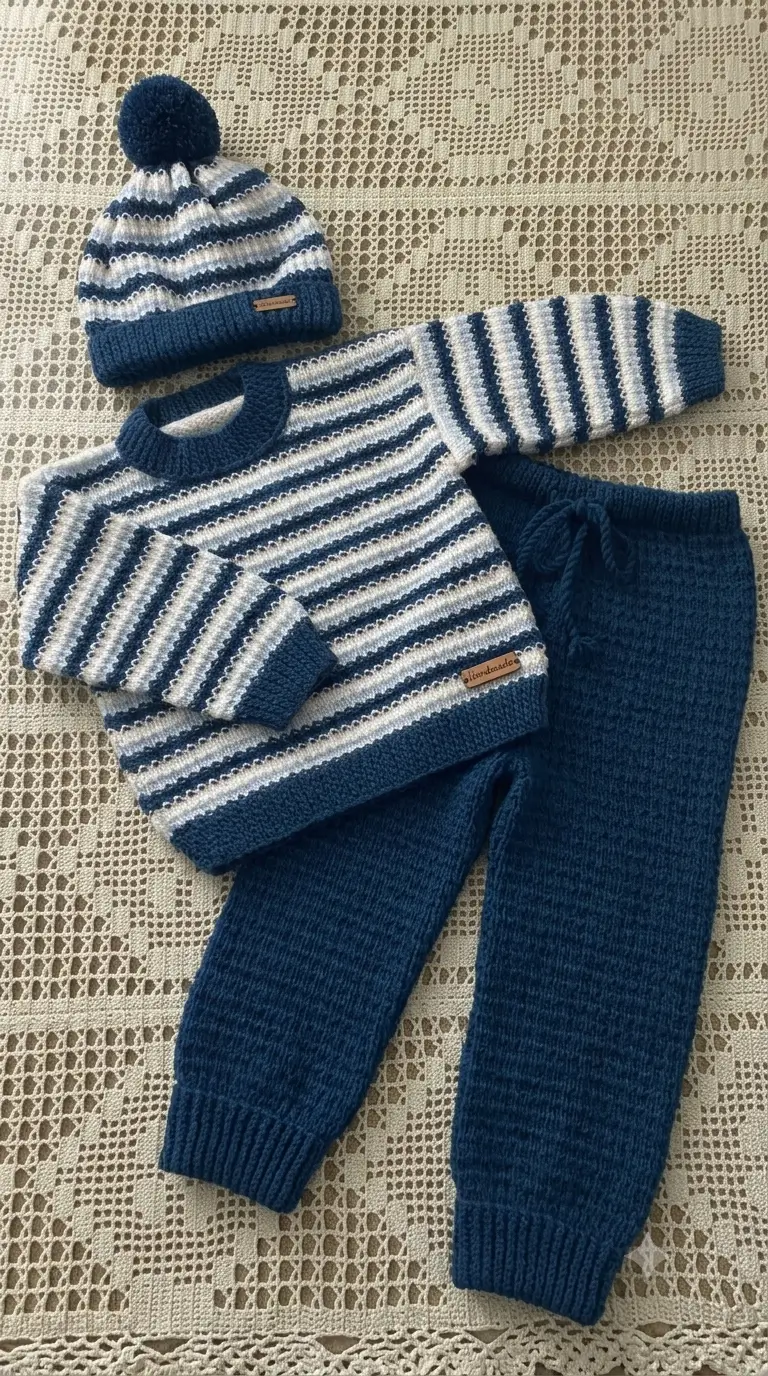
The narrow navy stripes on this baby sweater continue across both sleeves, while the matching trousers deliberately drop the stripes altogether. This striped baby sweater knitting pattern builds that contrast into a 3–6 month layette using DK yarn and 3.25–4 mm needles. The finished sweater targets a 51–52 cm chest and suits an intermediate knitter. Making all four pieces from two colors also reduces leftover partial balls.
The Design: What Makes This Blue Layette Different
The sweater carries the strongest visual pattern, so its navy-and-white sequence runs across the body and sleeves while deep navy ribbing anchors the neck, cuffs and hem. That arrangement prevents narrow stripes from competing with every edge.
The pants use solid navy instead. Structurally, that matters: shaping at the crotch and legs remains visually clean rather than breaking a horizontal stripe sequence. The matching hat repeats the blue and white baby sweater palette, while a solid pom-pom returns the main color to the crown.
A common mistake with a striped baby knitting pattern is treating stripe height as more important than gauge. It is not. A two-row stripe that measures differently after washing can shift sleeve and body proportions. Work and wash a gauge swatch before calculating finished length.
Project Info at a Glance
| Skill Level | Time | Finished Size | Needles | Best For |
|---|---|---|---|---|
| Intermediate | Approx. 14–20 hours for set | 51–52 cm sweater chest | 3.25 mm + 4 mm | 3–6 month layette |
The 51.5 cm benchmark is consistent with published sizing for a 3–6 month striped baby sweater. Gauge, rather than the age label alone, controls the finished dimensions.
Materials and Tools
Yarn
Use smooth, machine-washable DK yarn that produces 22 stitches per 10 cm after washing.
- Deep navy DK yarn — approximately 200 g for the complete set.
- White DK yarn — approximately 100 g for stripes and contrast work.
These quantities are working estimates for this photo-inspired set rather than measurements extracted from the photographed garments. Actual yarn consumption depends on gauge, fiber, garment dimensions and stripe placement.
Tools
- 4 mm knitting needles for stockinette sections
- 3.25 mm knitting needles for ribbing
- 4 mm circular needle, optional for the hat
- Stitch markers
- Tapestry needle
- Stitch holders or waste yarn
- Pom-pom maker, approximately 5 cm
- Measuring tape
- Scissors
- Washable blocking mat
No safety eyes, stuffing or crochet hook are required.
Abbreviations
- CO — cast on
- BO — bind off
- K — knit
- P — purl
- st/sts — stitch/stitches
- RS — right side
- WS — wrong side
- K2tog — knit two together
- SSK — slip, slip, knit
- M1 — make one
- St st — stockinette stitch
- K1, P1 rib — alternate one knit and one purl stitch
Stockinette worked flat means knit every RS row and purl every WS row.
Gauge and Stripe Sequence
Work 22 sts × approximately 30 rows = 10 × 10 cm in stockinette on the larger needles after washing. Check both stitch and row gauge before beginning the garments.
For the photo-inspired stripe sequence, use:
- Rows 1–4: White
- Rows 5–6: Navy
- Rows 7–10: White
- Rows 11–14: Navy
Repeat the sequence while maintaining the required garment length. The photographed sweater contains subtle texture around some transitions; a plain stockinette version gives more predictable gauge.
Striped Baby Sweater Knitting Pattern
Sweater Back
Yarn: navy and white DK.
With 3.25 mm needles and navy, CO 56 sts.
Rows 1–10: Work K1, P1 rib.
Change to 4 mm needles.
Begin the stripe sequence and work in stockinette until the piece measures approximately 17 cm from the cast-on edge.
For the armholes, BO 3 sts at the beginning of the next 2 rows. 50 sts remain.
Decrease 1 st at each edge on the next two RS rows. 46 sts remain.
Continue without shaping until the armhole measures approximately 10 cm.
For the shoulders, BO 12 sts at the beginning of the next 2 rows. Place the remaining 22 neck sts on a holder.
Sweater Front
Work as for the back through the armhole shaping until the armhole measures approximately 6 cm.
Work 16 sts, BO the center 14 sts, then work the remaining 16 sts.
Shape each side separately.
At each neck edge, decrease 1 st on the next four RS rows. 12 shoulder sts remain on each side.
Continue until the front matches the back length.
BO 12 shoulder sts on each side.
The wider neckline opening shown in the photographed garment is important for a baby pullover. Do not reduce the neck opening simply to make the collar appear tighter.
Sleeves — Make 2
With 3.25 mm needles and navy, CO 30 sts.
Work 10 rows in K1, P1 rib.
Change to 4 mm needles and begin the same stripe sequence used on the body.
Increase 1 st at each end of every sixth row until 42 sts are on the needle.
Continue until the sleeve measures approximately 15 cm from the cuff.
For the sleeve cap, BO 3 sts at the beginning of the next 2 rows. 36 sts remain.
Decrease 1 st at each end of every RS row six times. 24 sts remain.
BO 3 sts at the beginning of the next 4 rows. 12 sts remain.
BO the remaining stitches.
Matching the stripe sequence between the two sleeves matters more than forcing every sleeve stripe to align exactly with the body after seaming.
Neckband
Sew both shoulder seams.
With 3.25 mm needles and navy, pick up approximately 64–68 sts evenly around the neckline.
Work K1, P1 rib for approximately 2.5 cm.
BO in rib without pulling the edge tight.
The finished opening should pass over the intended baby’s head without requiring the neck seam to be stretched aggressively.
Knitted Baby Pants Pattern
The pants use solid navy rather than stripes, creating the strong color block visible in the photographed set. Ribbing forms both the ankle cuffs and waistband.
Leg Pieces — Make 2
With 3.25 mm needles and navy, CO 32 sts.
Work K1, P1 rib for 16 rows.
Change to 4 mm needles.
Work stockinette, increasing 1 st at each end every eighth row until 40 sts are reached.
Continue until the leg measures approximately 21 cm from the cast-on edge.
For crotch shaping, increase 1 st at each end on the next 3 RS rows. 46 sts.
Continue in stockinette until the piece measures approximately 31 cm.
Change to 3.25 mm needles.
Work K1, P1 rib for approximately 4 cm.
BO loosely.
Make the second piece identically.
Sew the inner-leg seams first, then join the crotch seams. Fold the waistband inward if an enclosed waistband channel is preferred.
Drawstring
Using navy yarn, make an 80–90 cm knitted I-cord or firmly twisted cord.
Thread it through the waistband channel and center both ends at the front.
Safety note: long functional cords can present a hazard on infant clothing. An enclosed elastic waistband is a safer practical alternative, with any visible tie kept short and decorative rather than functional.
Striped Baby Pom-Pom Hat
With 3.25 mm needles and navy, CO 72 sts.
Work K1, P1 rib for approximately 4 cm.
Change to 4 mm needles.
Work the navy-and-white stripe sequence until the hat measures approximately 11 cm above the folded brim.
Crown Shaping
Decrease 1: *K7, K2tog* across.
Work one row or round even.
Decrease 2: *K6, K2tog* across.
Work one row or round even.
Continue the same progression, reducing the number of knit stitches between decreases until reaching *K1, K2tog*.
Final decrease: K2tog across.
Cut the yarn, thread it through the remaining stitches and pull the crown closed. Secure the yarn on the inside.
Make an approximately 5 cm navy pom-pom and attach it securely through the crown with several passes of yarn.
Striped Baby Mittens
The photographed set uses simple thumbless mittens, keeping the construction compact while repeating the sweater and hat stripe sequence.
Mittens — Make 2
With 3.25 mm needles and navy, CO 28 sts.
Work K1, P1 rib for 10 rows.
Change to 4 mm needles.
Work the stripe sequence until the mitten measures approximately 7 cm from the cast-on edge.
Switch to navy for the tip.
Decrease row 1: Work decreases evenly across the row.
Next WS row: Purl.
Decrease row 3: Distribute 4 decreases evenly.
Next WS row: Purl.
Continue reducing evenly until approximately 8 sts remain.
Cut a 20 cm yarn tail. Thread it through the remaining stitches, pull closed and secure.
Sew the side seam using mattress stitch.
Repeat for the second mitten, checking that its stripe sequence begins at exactly the same point.
Assembly
- Block the sweater pieces to the calculated measurements before joining them.
- Sew the sweater shoulders with mattress stitch or firm backstitch.
- Attach the neckband and check that its edge remains elastic.
- Pin each sleeve cap into its armhole with the sleeve midpoint aligned to the shoulder seam.
- Sew the sleeves in before closing the sleeve and side seams.
- Join each pants inner-leg seam, matching the cuff edges exactly.
- Sew the pants crotch from the center front through the center back.
- Finish the waistband, then insert the chosen elastic or drawstring system.
- Close the hat and mitten seams if they were worked flat, then attach the pom-pom securely.
- Weave every yarn tail through several wrong-side stitches, wash according to the yarn label and block to the final measurements.
The completed layette consists of one striped pullover, one pair of solid navy pants, one striped pom-pom hat and two matching mittens.
7 Technical Tips for a Cleaner Baby Layette
- Control stripe jogs. A one-row displacement at the round join produces a visible step on the hat. If working in the round, keep the color-change point at the back and use the same joining method for every stripe.
- Check gauge after washing. A change from 22 to 24 stitches per 10 cm makes a nominal 51 cm sweater noticeably narrower. Measure a washed swatch at least 15 cm wide rather than relying on a tiny sample.
- Watch the neck opening. Binding off the neckband too tightly can prevent the sweater from passing comfortably over the baby’s head. Keep the ribbed bind-off elastic and compare the opening with a correctly fitting garment.
- Match both sleeves. Starting the second sleeve one stripe later creates visible asymmetry. Write down the exact color and row number used immediately after finishing the first cuff.
- Avoid crotch puckering. Pulling mattress stitch too tightly at the pants intersection creates a hard ridge. Join the leg seams first, pin the crotch at several points and sew using consistent tension.
- Secure the pom-pom. A pom-pom attached with a single loose yarn pass can detach. Pass the attachment yarn through the crown several times and check the attachment regularly.
- Weave stripe tails securely. Cutting a color-change tail immediately beside the final stitch can allow the stripe edge to loosen during washing. Weave each tail several centimetres through same-color stitches on the wrong side before trimming.
Sizing and Yarn Substitution
Baby age labels should be treated as a starting point rather than an exact measurement. This version targets a finished sweater chest of approximately 51–52 cm. Measure the intended wearer or compare the dimensions with a sweater that currently fits.
Yarn substitution requires matching both gauge and fabric behavior. Finding another ball marked DK does not automatically produce the same finished dimensions.
Fiber composition also changes elasticity and drape. Superwash wool, cotton blends and acrylic baby yarn can behave differently after washing. The photograph itself cannot establish the original fiber content, so select a washable yarn appropriate for the garment’s intended use.
Why the Stripe Placement Works
The sweater contains the strongest pattern in the set. White occupies enough surface area to break up the dark navy, while navy still forms the major boundaries at the collar, cuffs and lower edge.
The pants reverse that balance. Solid navy creates a large uninterrupted section below the sweater and prevents the entire outfit from becoming a series of competing horizontal lines.
The hat acts as a smaller repeat of the pullover. Navy and white return in narrow bands, while the solid brim and pom-pom frame the stripes.
The mittens repeat the same structure at the smallest scale. Their navy tips also connect visually with the sweater cuffs, trouser cuffs and hat brim.
This controlled color placement makes the project more specific than a generic baby layette knitting pattern. The four pieces are coordinated through repetition rather than by placing identical stripes on every garment.
Finishing the Blue and White Baby Layette
Check the washed gauge first, then knit the sweater before beginning the accessories because its finished dimensions establish the scale for the rest of the set. Keep a written record of every color change so both sleeves and mittens repeat in the same order.
After assembly, measure the chest, sleeve length, hat circumference and waistband before final blocking. Save the finished striped baby sweater knitting pattern project to Pinterest with a clear front-view image, and share the completed layette on Instagram with #BlueStripeBabyLayette.
For another version, decide one construction detail before casting on: would you keep the trousers solid navy as photographed, or carry the white stripe pattern onto the trouser cuffs?









