Introduction
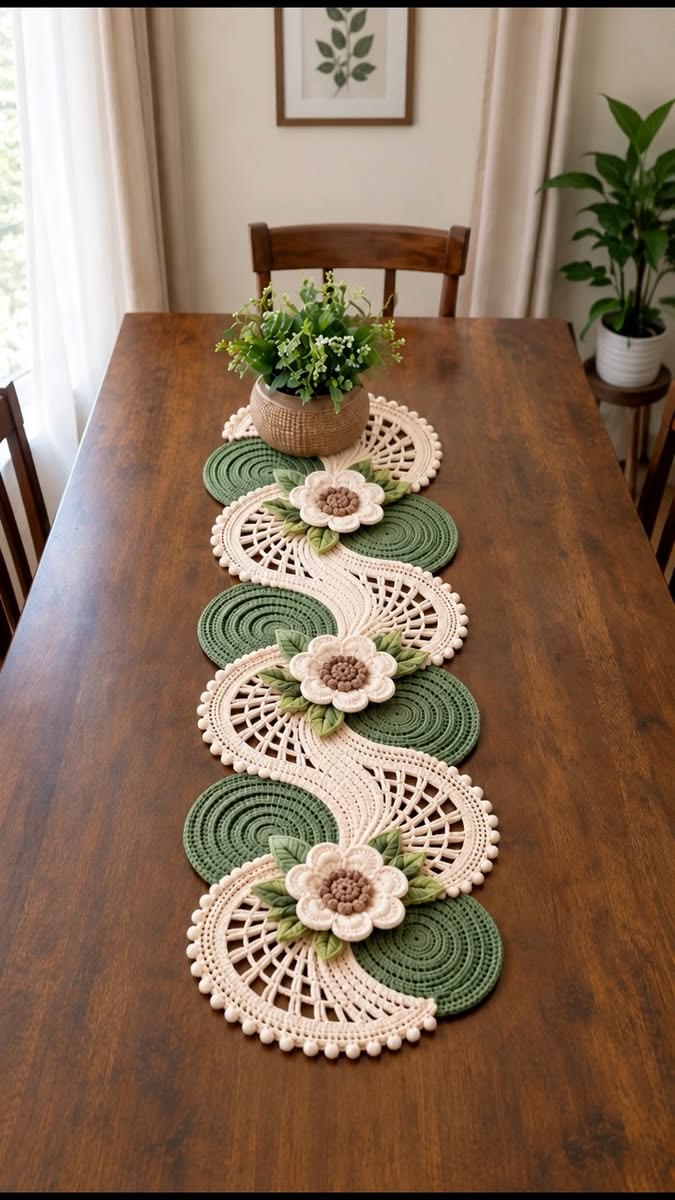
Three raised cream flowers have to sit exactly where green circles and ivory lace intersect or this runner loses its repeating S-shaped rhythm. This crochet flower table runner pattern uses cotton yarn, circular green panels, open lattice sections, layered flowers and pointed leaves. The modular construction suits an intermediate crocheter and makes the finished length adjustable for different dining tables.
The Design: What Makes This Floral Table Runner Different
This runner is not constructed as one long rectangle. Repeated green circles alternate from side to side while ivory crochet sections curve through the center, producing the flowing shape visible in the design.
Open chain-space lattice prevents the cream sections from becoming visually heavy. Raised flowers cover selected motif intersections, and several green leaves extend behind every flower. The result is a green and cream crochet table runner with substantial surface texture but enough open space to expose the tabletop underneath.
The main construction risk is distortion at the motif joins. If one green circle is attached even 1–2 cm too high or low, the center line begins to wander. Make the major components separately, block them to matching measurements, and pin the complete arrangement before sewing.
Project Info at a Glance
| Skill Level | Construction | Suggested Width | Hook | Best For |
|---|---|---|---|---|
| Intermediate | Modular motifs | Approx. 28–35 cm | 3.5–4 mm reference | Dining tables and sideboards |
The exact dimensions of the photographed runner cannot be measured from the image. A practical target is approximately 28–35 cm wide, with the length controlled by the number of repeated motif sections.
Materials and Tools
Yarn
- Ivory or cream — DK cotton or cotton-blend — approximately 180–250 g depending on finished length.
- Sage green — DK cotton or cotton-blend — approximately 120–180 g for circular panels and leaves.
- Taupe or light brown — DK cotton — approximately 15–25 g for flower centers.
- Light olive green — optional — approximately 20–30 g for contrasting leaves.
Cotton is particularly useful for table crochet because it produces defined stitches and responds well to blocking. Buy sufficient cream and green yarn from matching dye lots if the runner will contain several repeated sections.
Tools
- 3.5–4 mm crochet hook
- Stitch markers
- Yarn needle
- Blocking pins
- Blocking mats
- Scissors
- Flexible measuring tape
Abbreviations
- MR — magic ring
- ch — chain
- sl st — slip stitch
- sc — single crochet
- hdc — half double crochet
- dc — double crochet
- tr — treble crochet
- inc — increase
- st/sts — stitch/stitches
- sp — chain space
- rep — repeat
- R/Rnd — round
Pattern Notes
- US crochet terminology is used throughout.
- The runner is assembled from separate motifs rather than worked as one continuous rectangle.
- Make and block all green circles to the same diameter before assembly.
- Chain spaces form the open lattice sections.
- Flowers and leaves are attached after the principal runner sections are joined.
- Increase or reduce the finished length by changing the number of repeated modules.
Crochet Flower Table Runner Pattern
Sage Green Circular Panel
Make 6 for the three-flower version shown. Yarn: sage green.
R1: 12 dc in MR. Join with sl st. (12)
R2: ch 3, dc in same st, 2 dc in each remaining st around. Join. (24)
R3: ch 3, 2 dc in next st, (dc in next st, 2 dc in next st) around. Join. (36)
R4: ch 3, dc in next st, 2 dc in next st, (dc in next 2 sts, 2 dc in next st) around. Join. (48)
R5: ch 3, dc in next 2 sts, 2 dc in next st, (dc in next 3 sts, 2 dc in next st) around. Join. (60)
R6: ch 3, dc in next 3 sts, 2 dc in next st, (dc in next 4 sts, 2 dc in next st) around. Join. (72)
R7: ch 1, sc in each st around. Join. (72)
Fasten off and weave in the tail.
The panel must lie completely flat. If it cups upward, the increase rate is too low for your tension. If the edge ripples, the increase rate is too high.
Optional Larger Green Panel
If your yarn produces circles smaller than required, add another expansion round.
R8: ch 3, dc in next 4 sts, 2 dc in next st, (dc in next 5 sts, 2 dc in next st) around. Join. (84)
R9: sc around. (84)
Fasten off.
Ivory Curved Base Section
Make 3 for a runner with three focal flowers. Yarn: ivory.
The photographed ivory components resemble broad crescents rather than complete circles. A practical reconstruction begins as a semicircular expansion.
Row 1: 6 dc in MR. Turn. (6)
Row 2: ch 3, dc in same st, 2 dc in each st across. Turn. (12)
Row 3: ch 3, dc in same st, (dc in next st, 2 dc in next st) across. Turn. (18)
Row 4: ch 3, dc in next st, 2 dc in next st, (dc in next 2 sts, 2 dc in next st) across. Turn. (24)
Row 5: ch 3, dc in next 2 sts, 2 dc in next st, (dc in next 3 sts, 2 dc in next st) across. Turn. (30)
Continue the same proportional increase principle until the solid curved section reaches the required radius.
Open Lattice Section
Continue with ivory.
Row 1: ch 4, skip 1 st, dc in next st, (ch 2, skip 2 sts, dc in next st) across. Turn.
Row 2: ch 4, dc in next dc, (ch 2, dc in next dc) across. Turn.
Row 3: repeat Row 2 while adding chain spaces at the outer edge as necessary to maintain the curved shape.
Row 4: repeat the lattice structure.
The lattice should remain open and flat. Do not tighten the chain stitches; short chain spaces pull the crescent inward and make blocking difficult.
Ivory Outer Border
Yarn: ivory.
Work one round or row of sc evenly around the exposed curved edge of the ivory section.
On the next pass, work a decorative repeat such as:
*sc in next 3 sts, ch 3, sl st into first ch to form a small picot; repeat from * along the curved edge.
For the more pronounced rounded edging visible in the photograph, substitute a small puff or bobble for each picot.
Bobble-Style Outer Trim
Yarn: ivory.
Work along the outside curve only.
Repeat: sc in next 3 sts, work one small 4-dc bobble in next st, sc in next 3 sts.
Continue across the outer edge. Adjust the number of sc stitches between bobbles slightly if required so the final spacing remains visually even.
Fasten off.
Large Layered Cream Flower
Make 3. Yarn: taupe and cream.
Flower Center
Yarn: taupe.
R1: 6 sc in MR. (6)
R2: inc × 6. (12)
R3: (sc, inc) × 6. (18)
R4: work small bobbles or puff stitches around to create the raised center texture. (18 working positions)
Fasten off, leaving a sewing tail.
Inner Cream Petals
Yarn: cream.
Join cream behind the taupe center.
R1: *ch 4, work 2 tr in the same attachment area, ch 4, sl st into the next attachment point; repeat around to form evenly spaced petals.
Keep every petal approximately equal in height.
Outer Cream Petals
Work behind the first petal layer.
R1: create chain spaces behind the inner petals.
R2: in each chain space work (sc, hdc, 3 dc, hdc, sc).
Repeat around.
Fasten off, leaving approximately 30 cm for attachment.
The outer petals should extend beyond the first layer without covering the entire taupe center.
Pointed Crochet Leaves
Make approximately 15–18 leaves. Use sage and light olive green.
Foundation: ch 11.
Beginning in the second ch from hook:
Side 1: sl st, sc, hdc, dc in next 4 ch, hdc, sc, 3 sc in final ch.
Rotate the foundation chain and work along the unused loops on the opposite side.
Side 2: sc, hdc, dc in next 4 sts, hdc, sc, sl st.
Fasten off, leaving a sewing tail.
For a longer leaf, begin with ch 13 and add two additional dc stitches along each side.
Leaf Vein
Surface crochet a line of slip stitches from the base toward the point, or embroider the central vein with matching yarn.
Do not pull this strand tightly. Excessive tension folds the leaf lengthwise instead of producing the shallow raised vein visible in the design.
Building One Runner Module
Each major repeat contains two sage-green circles, one ivory curved section, one large flower and approximately five leaves.
Lay one green circle to the left of the center line and the next circle to the right. Their inner edges should overlap or meet the ivory section sufficiently to create a stable joining area.
Place the cream lattice crescent diagonally between them. The next module reverses the arrangement, producing the alternating S-shaped movement.
Do not sew yet.
Add one large flower over the central intersection. Arrange three to six leaves behind it, pointing them outward rather than stacking all leaf tips in the same direction.
Extending the Runner
For a shorter centerpiece, make two flower modules. For the long dining-table version shown in the photograph, use approximately three principal flower modules and six green circles.
A longer runner can use four or five flower modules. Add one corresponding pair of green circles and another ivory section for each extension.
Lay every component on a flat surface before assembly. Measure from the center of one flower to the center of the next and keep that distance consistent throughout the runner.
Joining the Green Circles
Use matching green yarn where the join will remain visible against a green panel. Work through stitches near the edge rather than sewing across the face of the circle.
Join only the section hidden beneath the cream component or flower whenever possible. This keeps the remainder of the green circle visually independent.
Do not pull the sewing yarn hard enough to create a ridge.
Attaching the Ivory Lace Sections
Pin the ivory section over the adjoining green circles.
Use ivory yarn and small whip stitches along the solid crochet portions. Avoid sewing directly across large open chain spaces because the thread can become visible against the tabletop.
Check the runner after every module. It should remain flat without twisting along its center line.
Attaching the Leaves
Arrange the leaves before installing the flower because the flower will hide their lower ends.
Position approximately five leaves around each focal point. Mix the two green shades if using both colors.
Sew the bottom third of each leaf to the runner while leaving the outer portion relatively free. This preserves the raised botanical effect.
Secure every yarn tail on the reverse side.
Attaching the Layered Flowers
Center each flower over the junction between the ivory and green sections.
Pin at four points before sewing. Measure the spacing between consecutive flower centers and correct the placement before making permanent stitches.
Sew through the underside of the outer flower layer rather than through the visible face of every petal.
Leave the outer third of each petal unattached so the flower retains its dimensional construction.
Assembly
- Block all sage-green circular panels to matching diameters.
- Block the ivory curved sections separately and open every lattice space with pins.
- Arrange the green circles in an alternating left-right sequence down the center of the table.
- Position each ivory section between the corresponding pair of green circles.
- Measure the complete runner and correct the center line before joining any motifs.
- Sew the green and ivory structural sections together using matching yarn.
- Arrange approximately five leaves at each flower position and attach their lower sections.
- Center one layered cream flower over every leaf cluster and pin it at four points.
- Sew each flower securely while leaving the outer portions of the petals free.
- Weave in all remaining tails, damp-block the assembled runner and allow it to dry completely on a flat surface.
The completed runner should lie flat with alternating green circular panels, open ivory crescents, raised leaf clusters and evenly spaced cream flowers.
7 Technical Tips for a Flat Floral Table Runner
- Measure every green circle before assembly. A diameter difference greater than approximately 5 mm becomes noticeable when two circles sit opposite each other. Block all circles to one template measurement.
- Do not tighten the lattice chains. Short chain spaces pull the ivory sections inward and cause the outer border to curl. Keep the chain stitches relaxed and measure the curved section after every two lattice rows.
- Mark the center of every motif. A flower shifted by 1–2 cm disrupts the repeating center line. Use removable markers before pinning the flowers permanently.
- Block before joining. Trying to correct six differently sized circles after assembly can distort the connecting lace. Shape the individual components first and perform only a final light blocking after assembly.
- Attach only the lower third of each leaf. Sewing to the leaf tip makes the botanical cluster look flat. Leave approximately two-thirds of the leaf free from the background.
- Keep bobble spacing consistent. One extra or missing stitch between border bobbles produces visible crowding near the end of a crescent. Mark the quarter points of the curved border before adding the trim.
- Check the runner every 20–25 cm during assembly. A small directional error compounds across several modules and can produce a curved finished runner. Place a measuring tape or straight reference line beside the center while sewing.
How to Adjust the Table Runner Length
Modular construction makes length adjustment easier than changing a conventional row-based table runner. One principal module consists of a flower junction, an ivory curved section and the associated green panels.
For a small coffee-table centerpiece, use one or two focal flowers. A medium dining-table runner can use three. Longer tables can accommodate four or more repeats.
Do not simply add empty chain sections between completed modules. Extra spacing changes the visual rhythm and weakens the structure. Repeat the complete motif sequence instead.
Choosing Yarn for This Crochet Table Runner
DK cotton gives the circular panels enough structure to remain flat while still allowing the open lattice to drape naturally. A cotton-blend yarn can also work, but highly elastic fibers may make the circles difficult to block consistently.
Sage green and warm ivory create the principal contrast in this design. Taupe centers keep the flowers from disappearing against the cream lace, while a second lighter green adds depth to the leaf clusters.
If a finer thread is used, the finished motifs become smaller and more delicate. Increase the number of modules rather than forcing a fine-yarn motif to match dimensions intended for DK cotton.
Blocking the Finished Runner
Blocking is a structural step for this design because the runner combines solid circles with open chain-space lace.
Dampen the completed runner according to the yarn manufacturer’s care instructions. Place it on blocking mats and establish a straight center line first.
Pin the green circles into symmetrical shapes. Next, open the ivory lattice sections without stretching them beyond their natural dimensions. Adjust the bobble edging last.
Allow the runner to dry completely before removing the pins. Steam should only be used when appropriate for the selected fiber.
Finishing the Crochet Flower Table Runner
Set the finished runner on a flat surface and inspect the repeating line from one end rather than looking only at individual motifs. The green circles should alternate consistently from side to side, the ivory lattice should maintain its curved rhythm, and every layered flower should cover a structural junction without hiding the surrounding leaves.
For your first version, complete one green circle, one ivory crescent, one flower and five leaves before producing the remaining motifs. That sample establishes the actual dimensions produced by your yarn and tension. Once those measurements are fixed, repeat the components for the full crochet flower table runner pattern. Share the finished centerpiece on Pinterest or Instagram with #GreenFloralTableRunner. Would you keep the sage-and-ivory palette or replace the cream flowers with another color? “`1









