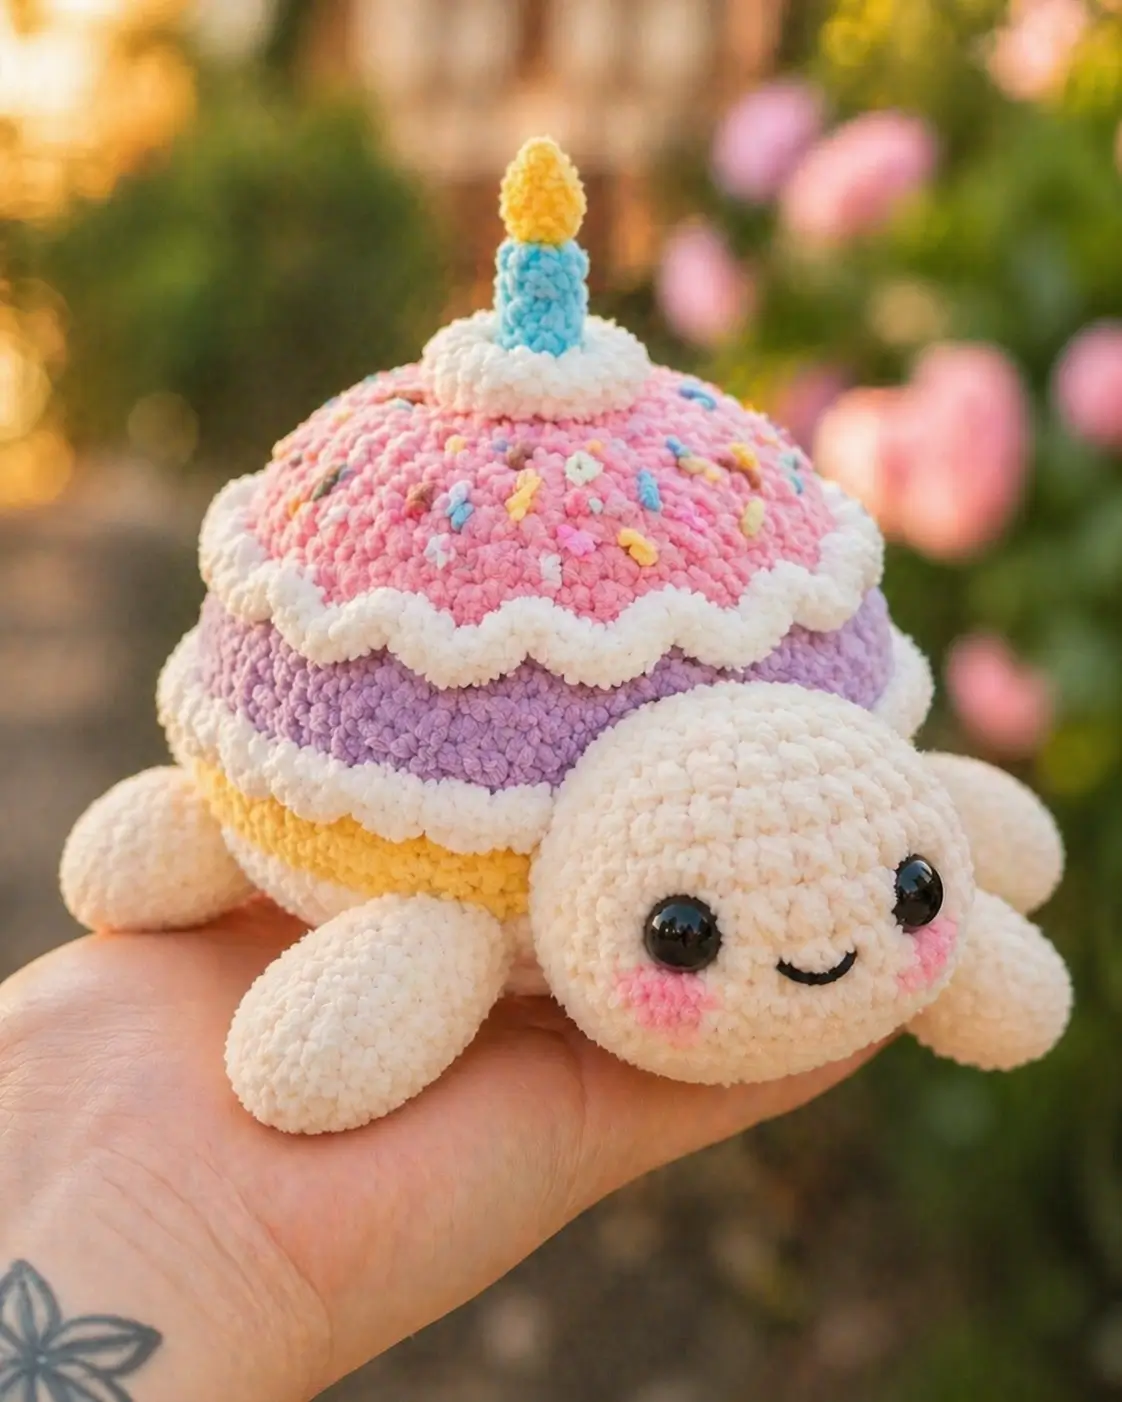
A turtle shell sits low by nature, so a candle on top changes the whole engineering problem. This birthday cake turtle amigurumi crochet pattern is built for plush chenille yarn, a 5 mm hook, and a hand-sized finish of about 15 cm, with intermediate construction and a practical use as a birthday-desk plush or cake-table prop.
The Design: What Makes This Turtle Different
The shell has to read as cake first and turtle second. That means the lower body stays compact while the shell layers do the visual work: a yellow base band, a lavender middle band, a pink top dome, and two frosting trims. You see the silhouette immediately. Then the candle takes over. You place it on a flat icing disc because a direct insert into a rounded dome tends to lean or twist over time, especially in plush chenille. A second structural choice matters just as much: the head is oversized relative to the body, which keeps the toy in the kawaii range rather than a realistic sea-turtle profile. Makers often miss the transition between shell and frosting trim. The result is a puffball with legs, not a cake turtle crochet pattern. That is where clean band spacing and a controlled birthday cake sea turtle pattern silhouette matter most.
Project Info at a Glance
| Skill Level | Time | Finished Size | Hook | Best For |
|---|---|---|---|---|
| Intermediate | 1–2 hours | 15 cm | 5 mm | Birthday display plush |
Published plush cake-turtle references currently place this niche at roughly 15 cm, 1–2 hours, and 4.5–5 mm hooks, while a smaller Ravelry version exists in sport yarn at 12 cm with a 2.0 mm hook.
Materials and Tools
The photographed build reads as chunky chenille rather than DK cotton, so the material plan below follows the plush branch of current cake-turtle references: chenille or plush yarn, 5 mm hook, and about 12 mm eyes for the turtle version rather than the smaller 9 mm DK setup. Main-yardage benchmarks for similar plush turtles land around 130 g main and 40 g contrast.
Yarn
- Cream / ivory — plush chenille — 130 g total working allowance — Bernat Blanket-style main body yarn
- Pink — plush chenille — 20 g — top cake dome
- Lavender — plush chenille — 15 g — middle band
- Yellow — plush chenille — 15 g — lower cake band
- White — plush chenille — 25 g — frosting trims and icing disc
- Blue — plush chenille or velvet — 8 g — candle
- Yellow-orange — plush chenille or velvet — 3 g — flame
- Pastel scraps — embroidery or fine chenille offcuts — minimal — sprinkles and blush
Tools
- Hook 5 mm
- 12 mm safety eyes
- Polyester stuffing
- Yarn needle
- Stitch markers
- Black embroidery floss for smile
- Pink blush yarn or pastel chalk for cheeks
Abbreviations
MR / sc / inc / dec / sl st / ch / BLO / FLO / hdc / dc
Invisible decrease is worked through the front loops of the next two stitches so the outside line stays cleaner on plush yarn.
Pattern — Step by Step
Continuous spiral unless noted. This is an original photo-matched pattern draft, not a transcription of any paid PDF. Head/body shaping follows standard six-stitch amigurumi geometry and was cross-checked against current turtle and cake references before drafting.
Head (Make 1)
Yarn: cream
- R1: 6 sc in MR (6)
- R2: inc x6 (12)
- R3: (sc, inc) x6 (18)
- R4: (2 sc, inc) x6 (24)
- R5: (3 sc, inc) x6 (30)
- R6: (4 sc, inc) x6 (36)
- R7: sc around (36)
- R8: sc around (36)
- R9: sc around (36)
- R10: sc around (36)
- Insert safety eyes between R8 and R9, 9 sts apart. Add light stuffing now.
- R11: (4 sc, dec) x6 (30)
- R12: (3 sc, dec) x6 (24)
- R13: (2 sc, dec) x6 (18)
- R14: (sc, dec) x6 (12)
- R15: dec x6 (6)
Fasten off. Leave 25 cm tail.
Body (Make 1)
Yarn: cream
- R1: 6 sc in MR (6)
- R2: inc x6 (12)
- R3: (sc, inc) x6 (18)
- R4: (2 sc, inc) x6 (24)
- R5: (3 sc, inc) x6 (30)
- R6: (4 sc, inc) x6 (36)
- R7: sc around (36)
- R8: sc around (36)
- R9: (4 sc, dec) x6 (30)
- R10: (3 sc, dec) x6 (24)
- Stuff lightly. Keep the body more pancake-flat than ball-round.
- R11: (2 sc, dec) x6 (18)
- R12: (sc, dec) x6 (12)
- R13: dec x6 (6)
Fasten off. Leave 25 cm tail.
Front Flippers (Make 2)
Yarn: cream
- R1: 6 sc in MR (6)
- R2: inc x6 (12)
- R3: (sc, inc) x6 (18)
- R4: sc around (18)
- R5: sc around (18)
- R6: sc around (18)
- Stuff only the lower half so the flipper stays broad, not cylindrical.
Fasten off. Leave 20 cm tail.
Back Flippers (Make 2)
Yarn: cream
- R1: 6 sc in MR (6)
- R2: inc x6 (12)
- R3: (sc, inc) x6 (18)
- R4: sc around (18)
- R5: sc around (18)
Fasten off. Leave 18 cm tail.
Tail (Make 1)
Yarn: cream
- R1: 6 sc in MR (6)
- R2: sc around (6)
Fasten off. Leave 12 cm tail.
Fold into a tiny cone before sewing.
Yellow Cake Band (Make 1)
Yarn: yellow
- R1: 6 sc in MR (6)
- R2: inc x6 (12)
- R3: (sc, inc) x6 (18)
- R4: (2 sc, inc) x6 (24)
- R5: (3 sc, inc) x6 (30)
- R6: (4 sc, inc) x6 (36)
- R7: (5 sc, inc) x6 (42)
- R8: sc around (42)
- R9: sc around (42)
Fasten off. Leave 35 cm tail.
Do not stuff. This is a wrap layer for the shell.
Lavender Middle Band (Make 1)
Yarn: lavender
- R1: 6 sc in MR (6)
- R2: inc x6 (12)
- R3: (sc, inc) x6 (18)
- R4: (2 sc, inc) x6 (24)
- R5: (3 sc, inc) x6 (30)
- R6: (4 sc, inc) x6 (36)
- R7: (5 sc, inc) x6 (42)
- R8: sc around (42)
- R9: sc around (42)
- R10: sc around (42)
Fasten off. Leave 35 cm tail.
Pink Top Dome (Make 1)
Yarn: pink
- R1: 6 sc in MR (6)
- R2: inc x6 (12)
- R3: (sc, inc) x6 (18)
- R4: (2 sc, inc) x6 (24)
- R5: (3 sc, inc) x6 (30)
- R6: (4 sc, inc) x6 (36)
- R7: (5 sc, inc) x6 (42)
- R8: sc around (42)
- R9: sc around (42)
- R10: sc around (42)
Fasten off. Leave 35 cm tail.
Add a whisper of stuffing only if the top collapses.
Lower Frosting Trim (Make 1)
Yarn: white
- Ch 43.
- Row 1: starting in 2nd ch from hook, (sl st, hdc, 2 dc in next ch, 2 dc in next ch, hdc, sl st, sl st); repeat 6 times total (48).
Fasten off. Leave 30 cm tail.
Upper Frosting Trim (Make 1)
Yarn: white
- Ch 43.
- Row 1: starting in 2nd ch from hook, (sl st, hdc, 2 dc in next ch, 2 dc in next ch, hdc, sl st, sl st); repeat 6 times total (48).
Fasten off. Leave 30 cm tail.
Top Icing Disc (Make 1)
Yarn: white
- R1: 6 sc in MR (6)
- R2: inc x6 (12)
- R3: (sc, inc) x6 (18)
- R4: (2 sc, inc) x6 (24)
Fasten off. Leave 20 cm tail.
Candle (Make 1)
Yarn: blue
- R1: 6 sc in MR (6)
- R2: sc around BLO (6)
- R3: sc around (6)
- R4: sc around (6)
- R5: sc around (6)
- R6: sc around (6)
- Stuff very lightly so the tube stays upright.
Fasten off. Leave 18 cm tail.
Flame (Make 1)
Yarn: yellow-orange
- Ch 4.
- Row 1: sl st in 2nd ch from hook, sc in next ch, hdc in last ch (3).
Fasten off. Leave 12 cm tail.
Cheek Patches (Make 2)
Yarn: pink
- R1: 6 sc in MR (6)
- R2: inc x6 (12)
Fasten off. Leave 10 cm tail.
Flatten completely.
Sprinkles (Make 12–16)
Yarn: pastel scraps
- Cut 12–16 short strands about 1.5 cm long.
- Anchor each strand with one small straight stitch across the pink dome.
- Mix white, yellow, blue, and lavender.
- Fasten all tails on the inside of the dome.
Assembly
- Sew the head to the front third of the body so the muzzle tilts slightly upward.
- Add the two cheek patches below the eyes, keeping the inner edge about 1 stitch away from the smile area.
- Embroider the smile in black, centered between the cheeks and one round below the eye line.
- Sew the front flippers to each side of the body, slightly behind the head seam.
- Sew the back flippers near the rear third of the body, angled outward more than the front pair.
- Sew the tail at the back center, low enough that it peeks from under the shell.
- Center the yellow cake band on the body top and tack it down around its lower edge only.
- Place the lower frosting trim above the yellow band, then attach the lavender middle band and sew the upper frosting trim at its top edge.
- Center the pink top dome on the lavender band, add the sprinkle embroidery, sew on the white icing disc, then stitch the candle to the disc and the flame to the candle top.
- Check symmetry from front, side, and top, then weave in every remaining tail inside the body or shell layers.
The piece is complete when the candle stands vertical and both frosting trims read as two separate shell tiers.
7 Technical Tips
- Mark round 1 on every sphere. Losing the start point on a 36-stitch head usually shifts eye placement by 1–2 stitches, and that is enough to skew the face.
- Keep head stuffing at medium density. Overstuffing pushes the eye posts outward and makes 12 mm eyes look too prominent on a 15 cm turtle.
- Use invisible decreases on all visible shaping rounds. Standard decreases leave small steps in chenille, especially on R11–R15 of the head.
- Install eyes before the head drops below 24 stitches. Trying to force washers into a nearly closed plush head can stretch the fabric and distort the cheek area.
- Do not fully stuff the flippers. A flipper packed to the seam turns into a peg and loses the soft paddle shape visible in the photo.
- Pin the cake bands before sewing. The yellow ring should stay visibly exposed at the bottom by roughly 0.8–1 cm or the cake layering disappears.
- Anchor the candle through disc and dome, not dome alone. One extra pass through all three layers cuts the lean that shows up after a few shelf moves.
Conclusion
The real job in a birthday cake turtle amigurumi crochet pattern is proportion control. Keep the body compact, let the shell layers do the height work, and give the candle a flat base so it stays upright. Next step: crochet the head first, test the eye spacing, then commit to the shell palette after you see the face size in hand. When you finish, post one top view on Pinterest and one front view on Instagram so the frosting tiers and expression both read clearly. Use #BirthdayCakeTurtle. One question before you pick colors: do you want the candle centered exactly on the shell peak, or shifted slightly back to make the turtle face read sooner?









