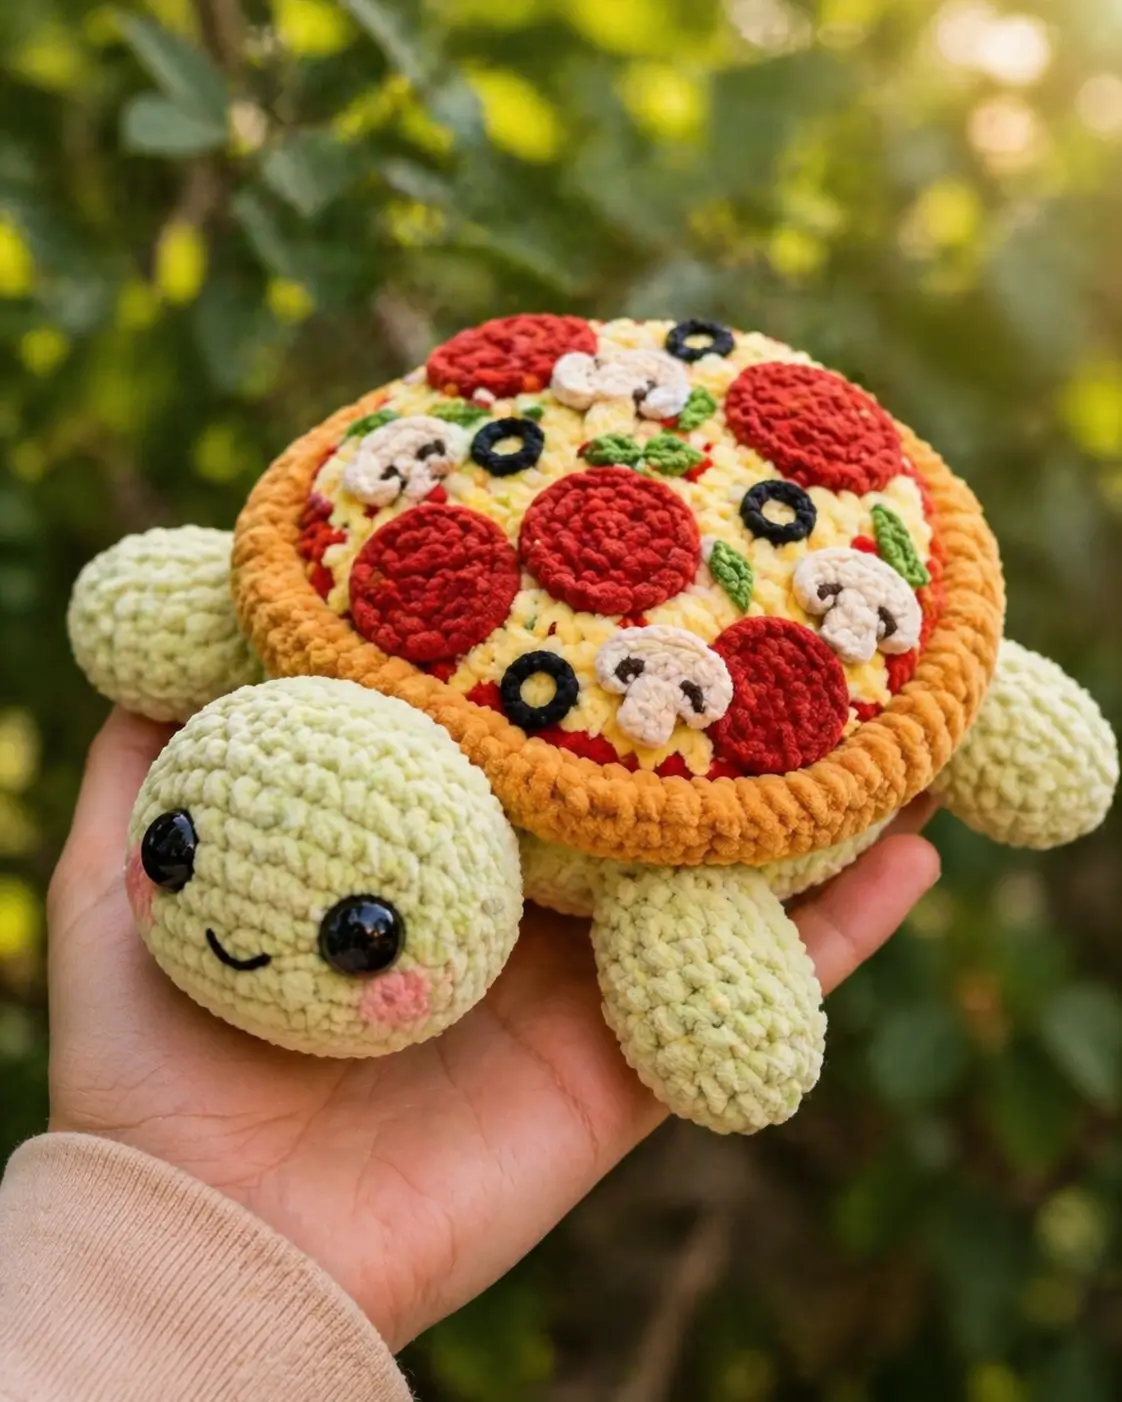
A pizza-shell turtle fails when the crust reads as a second carapace, so this pizza turtle amigurumi crochet pattern separates shell height from rim height. Work it in super bulky chenille with a 7 mm hook, 20 mm eyes, and a 25 cm by 12 cm target size. The skill level is advanced beginner. The practical use is display stock for food-animal market tables.
The Design: What Makes This Pizza Turtle Different
Three design choices control this crochet pizza turtle. First, the pizza disk is built wider than the belly, because a real turtle shell projects past the legs and the photo shows the crust overhanging every limb. Second, toppings stay flat and separate: pepperoni circles, olive rings, mushroom caps, and small green leaves. Thick stacked appliqués push the shell forward and make the turtle tip. Third, the head remains round but smaller than the shell; this keeps the pizza shell as the visual center.
Many makers place the crust flush with the body edge, then the shell looks like a brown tire instead of food. In this turtle amigurumi pattern, the raised rim sits one row above the cheese round. The main gap in many pizza turtle patterns is topping placement: the animal is clear, but the pizza structure is not always explained.
Project Info at a Glance
| Skill Level | Time | Finished Size | Hook | Best For |
|---|---|---|---|---|
| Advanced beginner | Multi-part plush session | 25 cm × 12 cm | 7 mm | Food-animal display, market table sample |
Materials and Tools
Yarn
- Pale green turtle body — 6-weight super bulky chenille — 35–40 g
- Cheese yellow shell top — 6-weight super bulky chenille — 20–25 g
- Golden tan crust — 6-weight super bulky chenille — 20–25 g
- Red pepperoni and sauce accents — 6-weight chenille — 5–8 g
- Cream mushrooms — 6-weight chenille — 3–5 g
- Black olive rings — 6-weight chenille or worsted held double — 2–3 g
- Green basil pieces — 6-weight chenille or worsted held double — 2–3 g
- Pink cheek patches — small scrap — 1–2 g
Tools
- 7 mm crochet hook
- 20 mm black safety eyes
- Polyester stuffing
- Yarn needle
- Locking stitch markers
- Pins
- Scissors
- Black embroidery yarn for smile
- Brown embroidery yarn for mushroom marks
Safety eyes and small appliqué parts are not suitable for children under 3.
Abbreviations
- MR = magic ring
- sc = single crochet
- inc = increase, 2 sc in one stitch
- dec = invisible single crochet decrease
- sl st = slip stitch
- ch = chain
- BLO = back loop only
- FLO = front loop only
- st = stitch
Invisible decrease: insert the hook under the front loops of the next 2 stitches, yarn over, pull through both front loops, yarn over, and finish the single crochet.
Pattern — Step by Step
Work in a continuous spiral unless noted. Counts are written at the end of every round. The main shell uses a 42-stitch large plateau; smaller appliqués use flat circle math.
Head — Make 1
Yarn: pale green
R1: 6 sc in MR (6)
R2: inc ×6 (12)
R3: (sc, inc) ×6 (18)
R4: (2 sc, inc) ×6 (24)
R5: (3 sc, inc) ×6 (30)
R6: (4 sc, inc) ×6 (36)
R7–R10: sc around (36)
Insert 20 mm safety eyes between R8 and R9, 7 stitches apart. Place the smile center 2 rounds below the eye line.
R11: (4 sc, dec) ×6 (30)
R12: (3 sc, dec) ×6 (24)
R13: (2 sc, dec) ×6 (18)
Stuff firmly at the cheeks and lightly at the neck opening.
R14: (sc, dec) ×6 (12)
R15: dec ×6 (6)
Fasten off. Leave a 25 cm tail.
Body Underside — Make 1
Yarn: pale green
R1: 6 sc in MR (6)
R2: inc ×6 (12)
R3: (sc, inc) ×6 (18)
R4: (2 sc, inc) ×6 (24)
R5: (3 sc, inc) ×6 (30)
R6: (4 sc, inc) ×6 (36)
R7: (5 sc, inc) ×6 (42)
R8–R10: sc around (42)
R11: (5 sc, dec) ×6 (36)
R12: (4 sc, dec) ×6 (30)
R13: (3 sc, dec) ×6 (24)
Stuff the outer edge first, then press the center flatter than the rim.
R14: (2 sc, dec) ×6 (18)
R15: (sc, dec) ×6 (12)
R16: dec ×6 (6)
Fasten off. Leave a 30 cm tail for joining the pizza shell.
Pizza Cheese Shell Disk — Make 1
Yarn: cheese yellow
R1: 6 sc in MR (6)
R2: inc ×6 (12)
R3: (sc, inc) ×6 (18)
R4: (2 sc, inc) ×6 (24)
R5: (3 sc, inc) ×6 (30)
R6: (4 sc, inc) ×6 (36)
R7: (5 sc, inc) ×6 (42)
R8–R9: sc around (42)
Fasten off. Leave a 35 cm tail.
Raised Crust Ring — Make 1
Yarn: golden tan
R1: Join tan yarn through FLO of Shell Disk R9 and sc around (42)
R2: BLO sc around (42)
R3: sc around (42)
R4: sl st around loosely (42)
Fasten off. Leave a 40 cm tail and do not pull the rim tight.
Front Legs / Front Flippers — Make 2
Yarn: pale green
R1: 6 sc in MR (6)
R2: inc ×6 (12)
R3: (sc, inc) ×6 (18)
R4–R7: sc around (18)
R8: (sc, dec) ×6 (12)
R9–R10: sc around (12)
R11: dec ×6 (6)
Fasten off. Leave a 20 cm tail on each front flipper.
Back Legs / Back Flippers — Make 2
Yarn: pale green
R1: 6 sc in MR (6)
R2: inc ×6 (12)
R3–R6: sc around (12)
R7: dec ×6 (6)
Fasten off. Leave an 18 cm tail on each back flipper.
Shell Side Flaps — Make 2
Yarn: pale green
R1: 6 sc in MR (6)
R2: inc ×6 (12)
R3: (sc, inc) ×6 (18)
R4: sc around (18)
Flatten the circle into a half-moon with wrong sides together.
R5: sc through both layers across the open edge (9)
Fasten off. Leave a 20 cm tail.
Tiny Tail — Make 1
Yarn: pale green
R1: 6 sc in MR (6)
R2–R3: sc around (6)
Fasten off. Do not stuff. Leave a 15 cm tail.
Cheek Patches — Make 2
Yarn: soft pink
R1: 6 sc in MR (6)
R2: inc ×6 (12)
sl st to first stitch (12)
Fasten off. Leave a 15 cm tail on each patch.
Pepperoni Discs — Make 5
Yarn: red
R1: 6 sc in MR (6)
R2: inc ×6 (12)
R3: (sc, inc) ×6 (18)
sl st to first stitch (18)
Fasten off. Leave a 15 cm tail on each pepperoni.
Olive Rings — Make 4
Yarn: black
R1: ch 10, sl st to first ch to form a ring (10)
R2: 12 sc around the chain ring (12)
sl st to first stitch (12)
Fasten off. Leave a 12 cm tail. Keep the center hole open.
Mushroom Caps and Stems — Make 4
Yarn: cream, plus brown embroidery yarn
Cap:
R1: 6 sc in MR (6)
R2: inc ×6 (12)
sl st to first stitch (12)
Stem:
Row 1: ch 4, sc in 2nd ch from hook and next 2 ch (3)
Fold the cap slightly over the stem. Add two short brown stitches on the cap after sewing.
Basil Leaves / Green Topping Pieces — Make 6
Yarn: green
R1: ch 5, starting in 2nd ch from hook: sc, hdc, hdc, sc; rotate and work along the opposite side: sc, hdc, hdc, sc (8)
sl st into the first sc (8)
Fasten off. Leave a 12 cm tail.
Red Sauce Dots — Make 6
Yarn: red
R1: 6 sc in MR (6)
sl st to first stitch (6)
Fasten off. Leave a 10 cm tail.
Assembly
- Sew the head to the front edge of the body underside with the eyes facing slightly upward.
- Center the body underside under the pizza shell and pin the 42-stitch edges together.
- Stitch the pizza shell to the body around R8–R10, keeping the crust rim above the seam.
- Sew the cheek patches between the smile curve and lower outside edge of each eye.
- Attach the front flippers on both sides of the head, angled forward by 20–30 degrees.
- Attach the back flippers near the rear third of the body, angled outward under the crust.
- Sew the shell side flaps between front and back flippers so the pizza disk does not sag.
- Attach the tiny tail at the back center under the crust.
- Place pepperoni first, then mushrooms, olives, basil leaves, and sauce dots; sew each topping through the cheese layer only.
- Weave every yarn tail through the underside, then trim after one final tension check.
The finished turtle has a flat green underside, raised pizza shell, visible topping layer, and four stable flippers.
7 Technical Tips
- Stitch marker drift: If the marker moves 1 stitch left or right during the 42-stitch shell rounds, the crust seam will twist toward one flipper. Reset the marker after every increase round.
- Stuffing firmness: The head should compress by about 3–5 mm when pressed at the cheeks. Overstuffing pushes 20 mm eyes outward and creates gaps around the washers.
- Invisible decrease gaps: A normal decrease leaves a visible notch on chenille during the 42 → 36 and 36 → 30 rounds. Use front-loop invisible decreases on every body closing round.
- Eye placement timing: Lock the eyes after R10 of the head and before R11 begins. Late eye placement forces the washers into stuffed fabric and can skew the smile.
- Velvet tension: Make a 10 sc by 10 round tube with the 7 mm hook before the head. If stuffing shows through, drop to 6.5 mm for all green parts.
- Topping pinning: Keep pepperoni at least 1 round inside the tan crust. A pepperoni sewn into the rim makes the crust curl upward.
- Tail weaving: Leave no finishing tail shorter than 12 cm on toppings. Short chenille tails can slide out after handling, especially under olive rings and basil leaves.
Conclusion
This build works because the turtle and pizza are treated as separate structures. The head, body, and flippers supply the animal silhouette; the cheese disk, raised crust, and toppings supply the food read. Make one sample first in the listed 6-weight chenille, then adjust only the topping count on later versions. Keep the shell at 42 stitches for the 25 cm scale. Save this pizza turtle amigurumi crochet pattern to Pinterest, post the finished shell angle on Instagram, and tag it with #PizzaTurtle. Which topping changes the turtle’s silhouette most on your version: the front pepperoni or the side mushrooms?









