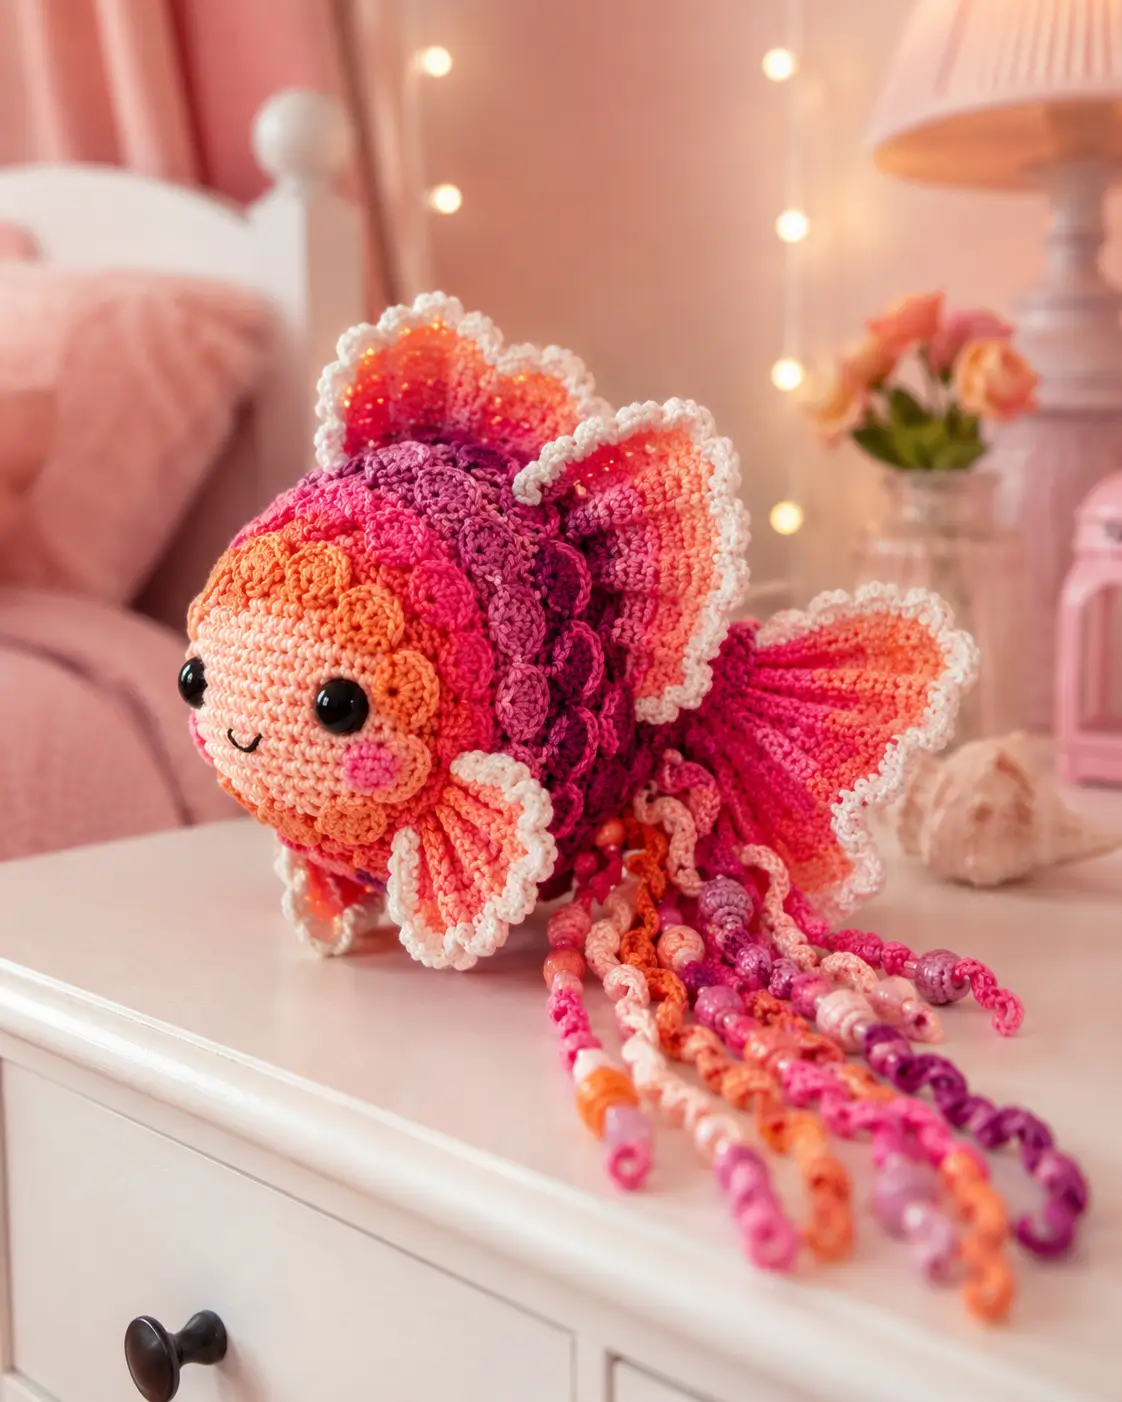
Introduction
A halfmoon betta is built on one problem: a tiny blunt body has to carry fins wider than the fish itself. This betta fish amigurumi crochet pattern uses worsted cotton, a 3.5 mm hook, 12 mm safety eyes, and a 20 cm photo-scale finish. You should treat it as intermediate because the shaping is simple, but the layered fins and bead strands demand measured placement. It works as a desk display or aquarium-themed gift.
The Design: What Makes This Betta Different
The design starts with a closed 36-stitch head rather than a long tube, because the photo fish has a rounded face and a short mouth line. A 36-stitch body follows, then narrows into a tail base that can carry the fan without sagging. Layered semicircle scales sit over the body so the color shift reads as armor, not random stripes. That is the main difference from a small crochet betta fish pattern. The maker then adds separate fin panels: pectoral fins for width, upright fins for height, and a pleated tail for the Siamese fighting fish amigurumi silhouette. A common mistake is placing the tail too low. That pulls the fish backward and hides the body curve. Bettas are known for varied color and strong finnage, so the structure has to support both. Source
Project Info at a Glance
| Skill Level | Time | Finished Size | Hook | Best For |
|---|---|---|---|---|
| Intermediate | 5–7 hours | 20 cm long × 10 cm high | 3.5 mm | Display fish, nursery shelf, aquarium-themed decor |
The size follows Hobbii’s 20 cm by 10 cm betta benchmark; the hook and eye choices align with worsted betta listings using 3.5–4.0 mm hooks and 8–12 mm safety eyes. Source
Materials and Tools
Yarn
- Peach/coral — worsted/aran — 30 g — Paintbox Cotton Aran, Lily Sugar’n Cream, or similar
- Hot pink — worsted/aran — 20 g — body shading and tail
- Magenta/purple — worsted/aran — 15 g — scale plates
- Orange — worsted/aran — 10 g — face scallops and fin shading
- Cream — worsted/aran — 10 g — ruffled edging
- Bright pink — worsted/aran — 3 g — cheek patches
For yardage planning, Ravelry’s Pisces Betta lists 50–60 yd of worsted yarn for a 5 in fish, while Hooked by Kati lists one 10 g sport mini skein for a smaller betta. This photo-scale version uses more surface parts, so the yarn plan above adds margin for fins, scales, and edging. Source
Tools
- Hook 3.5 mm
- 12 mm black safety eyes
- Polyester stuffing
- Yarn needle
- Stitch markers
- Sewing pins
- Embroidery needle
- Black embroidery floss
- Assorted beads, 5–8 mm, for display-only strands
Abbreviations
MR = magic ring / sc = single crochet / inc = increase / dec = decrease / sl st = slip stitch / ch = chain / BLO = back loop only / picot = ch 2, sl st into first ch.
Invisible decrease means working through the front loops of the next 2 stitches before completing one sc, which reduces the raised bar on the face and body.
Pattern — Step by Step
Continuous spiral unless noted. Count every round before moving on.
Head – Make 1
Yarn: peach/coral — Source: Standard amigurumi math
R1: 6 sc in MR (6)
R2: inc ×6 (12)
R3: (sc, inc) ×6 (18)
R4: (2 sc, inc) ×6 (24)
R5: (3 sc, inc) ×6 (30)
R6: (4 sc, inc) ×6 (36)
R7–R12: sc around (36)
R13: (4 sc, dec) ×6 (30)
R14: (3 sc, dec) ×6 (24)
Place safety eyes between R9 and R10, 8 stitches apart. Stuff the head firmly enough that the eye washers do not tilt.
R15: (2 sc, dec) ×6 (18)
R16: (sc, dec) ×6 (12)
R17: dec ×6 (6)
Fasten off. Leave 25 cm tail.
Body – Make 1
Yarn: hot pink, with optional magenta changes from R10 onward — Source: Standard amigurumi math
R1: 6 sc in MR (6)
R2: inc ×6 (12)
R3: (sc, inc) ×6 (18)
R4: (2 sc, inc) ×6 (24)
R5: (3 sc, inc) ×6 (30)
R6: (4 sc, inc) ×6 (36)
R7–R16: sc around (36)
R17: (4 sc, dec) ×6 (30)
R18: sc around (30)
R19: (3 sc, dec) ×6 (24)
R20: sc around (24)
R21: (2 sc, dec) ×6 (18)
R22: sc around (18)
R23: (sc, dec) ×6 (12)
R24: dec ×6 (6)
Fasten off. Leave 35 cm tail for joining.
Pectoral Front Fins – Make 2
Yarn: orange or coral, cream edge — Source: Photo-based flat fin shaping
Worked flat in turned rows.
Ch 5.
R1: starting in second ch from hook, 4 sc (4)
R2: ch 1, turn, inc, 2 sc, inc (6)
R3: ch 1, turn, inc, 4 sc, inc (8)
R4: ch 1, turn, inc, 6 sc, inc (10)
R5: ch 1, turn, sc across (10)
Edging: with cream, work (sc, picot) ×10 along the curved outer edge (10 picots).
Fasten off. Leave 18 cm tail.
Upright Display Fins – Make 2
Yarn: hot pink or coral, cream edge — Source: Standard flat panel shaping; comparable betta patterns use fin panels Source
Ch 7.
R1: starting in second ch from hook, 6 sc (6)
R2: ch 1, turn, inc, 4 sc, inc (8)
R3: ch 1, turn, inc, 6 sc, inc (10)
R4: ch 1, turn, inc, 8 sc, inc (12)
R5: ch 1, turn, inc, 10 sc, inc (14)
R6: ch 1, turn, sc across (14)
Edging: with cream, work (sc, picot) ×14 along the two tall outer edges (14 picots).
Fasten off. Leave 25 cm tail.
Tail Fan – Make 1
Yarn: hot pink, magenta, cream edge — Source: Photo-based tail fan; checked against published betta fin-row construction Source
Ch 9.
R1: starting in second ch from hook, 8 sc (8)
R2: ch 1, turn, inc, 6 sc, inc (10)
R3: ch 1, turn, inc, 8 sc, inc (12)
R4: ch 1, turn, inc, 10 sc, inc (14)
R5: ch 1, turn, inc, 12 sc, inc (16)
R6: ch 1, turn, inc, 14 sc, inc (18)
R7: ch 1, turn, inc, 16 sc, inc (20)
Edging: with cream, work (sc, picot) ×20 across the outer fan edge (20 picots).
Fold the 8-stitch base into 3 small pleats before sewing. Do not stuff.
Fasten off. Leave 35 cm tail.
Dorsal Scale Plates – Make 12
Yarn: magenta, hot pink, orange mix — Source: Standard amigurumi math
R1: 6 sc in MR (6)
R2: inc ×6 (12)
R3: (sc, inc) ×6 (18)
R4: sl st in BLO around (18)
Flatten each circle into a semicircle. Sew only the straight folded edge so the rounded edge lifts slightly.
Fasten off. Leave 15 cm tail on each plate.
Face Scallops – Make 6
Yarn: orange — Source: Standard amigurumi math
R1: 6 sc in MR (6)
R2: inc ×6 (12)
R3: sl st around (12)
Use these as small overlapping cheek-side scales around the lower head.
Fasten off. Leave 12 cm tail.
Cheek Patches – Make 2
Yarn: bright pink — Source: Standard amigurumi math
R1: 6 sc in MR (6)
R2: inc ×6 (12)
Sl st to first stitch (12).
Do not stuff. Pull the center tight so the patch stays flat.
Fasten off. Leave 15 cm tail.
Ventral Streamer Fins – Make 2
Yarn: cream or orange — Source: Photo-based lower fin detail
Ch 13.
R1: starting in second ch from hook, 12 sl st (12)
R2: ch 1, turn, 12 sl st in BLO (12)
These narrow fins sit under the head and point backward.
Fasten off. Leave 15 cm tail.
Beaded Tail Strands – Make 8
Yarn: hot pink, coral, orange, magenta; beads optional — Source: Photo-based accessory
Pre-string 4–6 beads per strand.
R1: ch 30 (30)
R2: starting in second ch from hook, 29 sl st, sliding one bead up after every 5th sl st (29)
For a child-safe version, replace beads with 5-sc bobbles and stitch all cords firmly to the tail base.
Fasten off. Leave 20 cm tail.
Mouth Embroidery
Yarn: black embroidery floss — Source: Photo-based facial detail
Place one small V-shaped mouth between R10 and R12 of the head. Each side of the V should be about 1 cm long. Knot inside the head area before final assembly, or bury the thread through the stuffing if the head is already closed.
Assembly
- Sew the closed head to the widest end of the body, matching head R15–R17 to body R1–R4.
- Pin the body so the tail base points slightly upward, not flat against the table.
- Sew the cheek patches under the eyes, centered 2 rounds below the eye line.
- Add the orange face scallops in a crescent along each side of the head.
- Sew the pectoral front fins to body R6–R9, one on each side, with cream edging facing outward.
- Place the upright display fins on upper body R8–R14 and angle them 20–30 degrees backward.
- Sew the 12 dorsal scale plates in overlapping rows from body R7 to R17.
- Attach the tail fan to the narrowed body end, stitching through every pleat twice.
- Sew the ventral streamer fins under the head at the body join.
- Tie or sew the 8 beaded strands to the underside of the tail base, then bury all yarn tails.
The fish is complete when all fin bases are anchored and no loose strand ends remain visible.
7 Technical Tips
- Stitch marker drift: If the marker shifts more than 2 stitches by R12 of the body, the scale row will spiral to one side. Move the marker to the true first stitch at the start of each round.
- Stuffing firmness: A soft head will cave around 12 mm eye washers. Pack stuffing in 1 cm pieces and stop when the head springs back with only a shallow thumb dent.
- Invisible decrease ridges: A raised bar across R15–R17 will show on the peach face. Work decreases through front loops only and place the final closure on the underside.
- Eye placement timing: Safety eyes should be tested after R14, before the head is closed. An 8-stitch gap gives a round face; a 6-stitch gap makes the fish look cross-eyed.
- Velvet tension: Velvet yarn grows gaps when tension changes by even 2 mm between stitches. Drop to a 3.0 mm hook for velvet, and reduce stuffing pressure so the nap does not ladder.
- Pinning fins: A tail pinned below body R20 will drag on the surface. Pin the pleated base across R18–R21 and check the side profile before sewing.
- Tail weaving: Cream picot edging peels back if the tail is woven only once. Weave each cream tail through three directions: edge, base, and back through the same color field.
Conclusion
This build works best when the head stays compact and the fin surfaces carry the visual weight. Pin the scallop plates before sewing, then check the silhouette from the side: the upper fins should read taller than the head, and the tail should finish wider than the body. For the next step, make one test tail in scrap yarn and adjust the cream picot edge before cutting final colors. Share the finished betta on Pinterest and Instagram with #BettaFishAmigurumi. When you post, ask this specific check: do the bead strands trail behind the tail like a betta’s ventral filaments, or do they pull the fish backward? Save this betta fish amigurumi crochet pattern for the final color plan.









