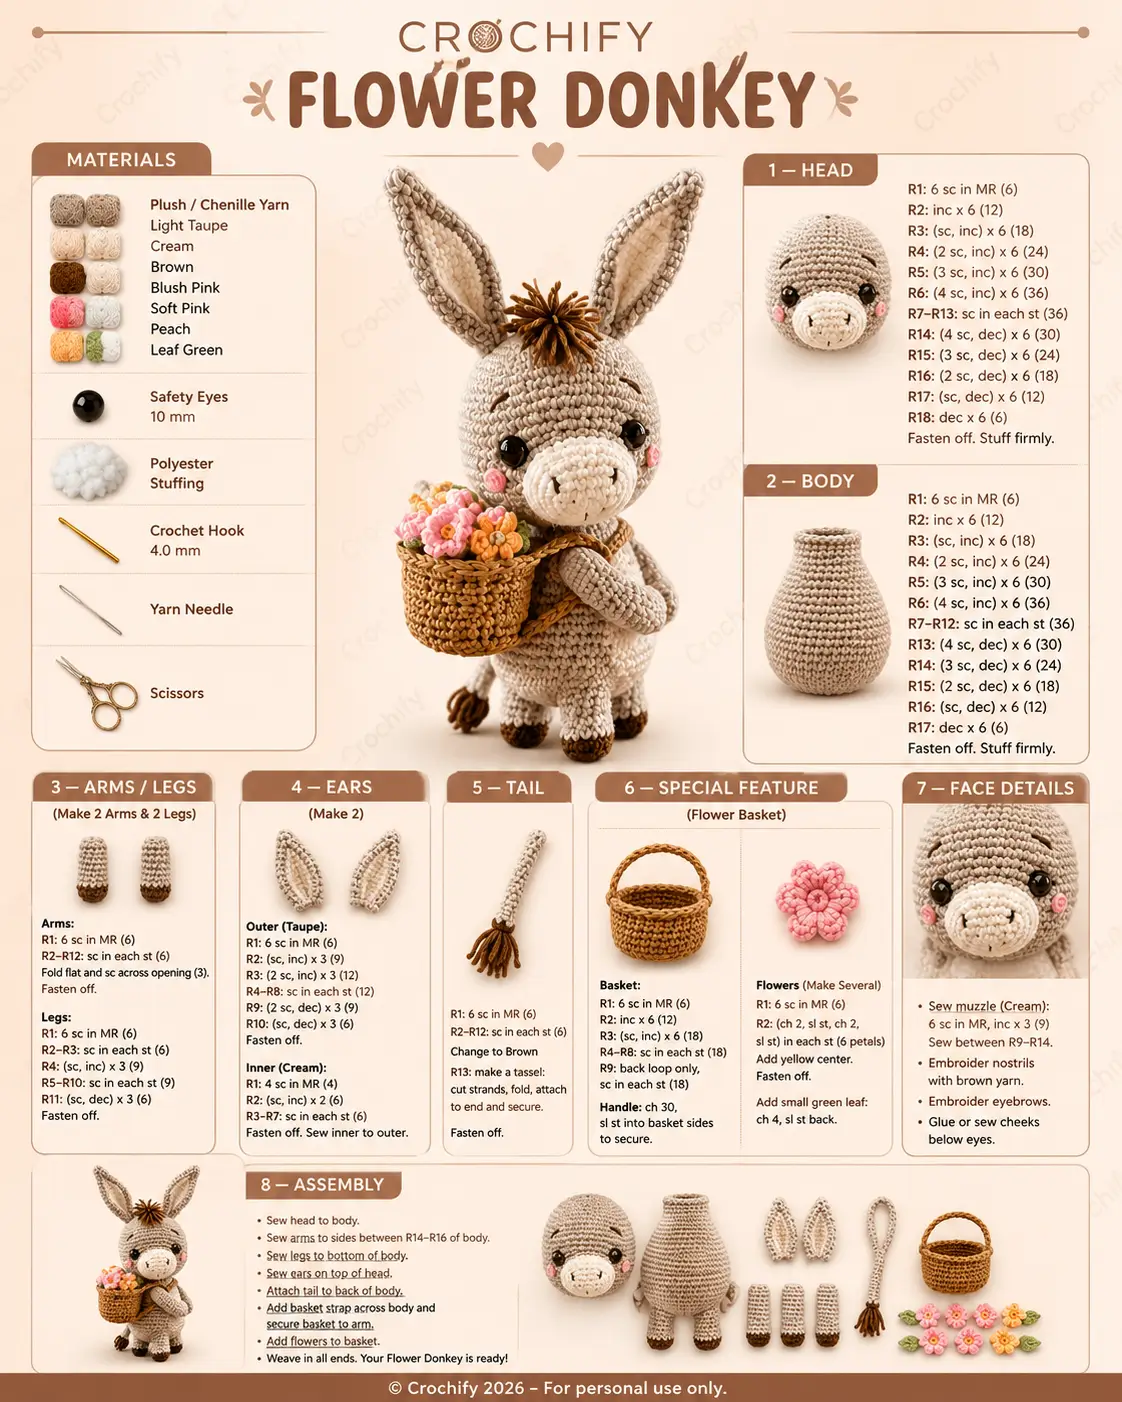
A donkey face fails fast when the muzzle sits too high; the whole head starts reading as a horse. This flower donkey amigurumi crochet pattern uses plush yarn, a 4.0 mm hook, 10 mm safety eyes, and a seated size close to 20 cm. The build suits an intermediate maker who wants a shelf piece, nursery prop, or spring market sample with a clear accessory story.
The Design: What Makes Flower Donkey Different
The first structural decision is the muzzle. A donkey needs a broad oval that sits lower on the face than a horse muzzle, otherwise the profile length takes over. The second is the ears. They stay long, narrow, and upright, with a separate inner panel that keeps the front edge defined instead of collapsing into the head. Third comes the basket strap. It changes the silhouette from plain farm animal to crochet donkey with basket, and it also explains the tucked arm position seen in the reference.
Most donkey tutorials online stop at a standard plush body with ears and tail. Fewer address the floral accessory, and fewer still show the stitch logic in a compact format. That is the gap this donkey amigurumi pattern fills. A common mistake is overstuffing the head before attaching the muzzle. Then the cream piece bulges outward, pushes the eyes wider apart, and the flower donkey loses its soft front view.
Project Info at a Glance
| Skill Level | Time | Finished Size | Hook | Best For |
|---|---|---|---|---|
| Intermediate | 4–6 hours | approx. 20 cm seated | 4.0 mm | display plush, nursery shelf, spring gift |
Time and size are aligned with similar plush donkey pattern listings; hook size is taken from published donkey pattern materials.
Materials and Tools
Yarn
- Light Taupe — plush/chenille look — about 100 g main usage — any soft neutral chenille
- Cream — plush/chenille look — scrap to 20 g — muzzle and ear inserts
- Brown — plush/chenille look — scrap to 15 g — hooves, mane, tail tassel, basket strap
- Blush Pink — plush/chenille look — small scrap — cheeks
- Soft Pink — plush/chenille look — small scrap — flowers
- Peach — plush/chenille look — small scrap — flowers
- Leaf Green — plush/chenille look — small scrap — leaves
Tools
- Hook 4.0 mm
- 10 mm safety eyes
- Polyester stuffing
- Yarn needle
- Stitch markers
- Scissors
Published donkey patterns commonly use DK or light worsted with 3.5–4.0 mm hooks, while plush builds of this scale land around 20 cm seated. The reference image uses chenille-style yarn and 10 mm eyes, which fits the medium plush category.
Abbreviations
- MR = magic ring
- sc = single crochet
- inc = 2 sc in one stitch
- dec = single crochet decrease
- sl st = slip stitch
- ch = chain
- BLO = back loop only
Use invisible decrease for the outer visible sections of the head and body so the decrease rounds do not create open ladders.
Pattern — Step by Step
Continuous spiral unless noted. Stitch counts follow the reference image and standard amigurumi math.
Head (Make 1)
Yarn: Light Taupe
R1: 6 sc in MR (6)
R2: inc x6 (12)
R3: (sc, inc) x6 (18)
R4: (2 sc, inc) x6 (24)
R5: (3 sc, inc) x6 (30)
R6: (4 sc, inc) x6 (36)
R7-R13: sc in each st (36)
R14: (4 sc, dec) x6 (30)
R15: (3 sc, dec) x6 (24)
R16: (2 sc, dec) x6 (18)
R17: (sc, dec) x6 (12)
R18: dec x6 (6)
Insert eyes before closing. Place them symmetrically above the muzzle line.
Fasten off. Stuff firmly.
Body (Make 1)
Yarn: Light Taupe
R1: 6 sc in MR (6)
R2: inc x6 (12)
R3: (sc, inc) x6 (18)
R4: (2 sc, inc) x6 (24)
R5: (3 sc, inc) x6 (30)
R6: (4 sc, inc) x6 (36)
R7-R12: sc in each st (36)
R13: (4 sc, dec) x6 (30)
R14: (3 sc, dec) x6 (24)
R15: (2 sc, dec) x6 (18)
R16: (sc, dec) x6 (12)
R17: dec x6 (6)
Stuff as you go. Keep the lower third firmer than the neck opening.
Fasten off. Leave a tail for sewing.
Arms / Front Legs (Make 2)
Yarn: Brown then Light Taupe
R1: 6 sc in MR (6) in Brown
R2-R12: sc in each st (6), change to Light Taupe after the hoof section as desired
Fold flat and sc across opening (3)
Fasten off. Leave a tail for sewing.
Back Legs (Make 2)
Yarn: Brown then Light Taupe
R1: 6 sc in MR (6) in Brown
R2-R3: sc in each st (6)
R4: inc x3 (9)
R5-R10: sc in each st (9) in Light Taupe
R11: (sc, dec) x3 (6)
Stuff lightly through Round 8 only. The upper section stays flatter for easier attachment.
Fasten off. Leave a tail for sewing.
Ears — Outer (Make 2)
Yarn: Light Taupe
R1: 6 sc in MR (6)
R2: (sc, inc) x3 (9)
R3: (2 sc, inc) x3 (12)
R4-R8: sc in each st (12)
R9: (2 sc, dec) x3 (9)
R10: (sc, dec) x3 (6)
Fasten off. Leave a tail.
Ears — Inner (Make 2)
Yarn: Cream
R1: 4 sc in MR (4)
R2: (sc, inc) x2 (6)
R3-R7: sc in each st (6)
Fasten off. Sew each inner ear to one outer ear, then pinch the base slightly before attaching to the head.
Tail (Make 1)
Yarn: Light Taupe with Brown tassel
R1: 6 sc in MR (6)
R2-R12: sc in each st (6)
R13: change to Brown and finish the tube
Cut several brown strands, fold, and attach at the tip to form the tassel.
Fasten off. Leave a tail for sewing.
Muzzle / Snout (Make 1)
Yarn: Cream
R1: 6 sc in MR (6)
R2: inc x3 (9)
R3: sc in each st (9)
R4: sc in each st (9)
This is a shallow oval effect in the reference. Keep stuffing minimal or skip it entirely.
Fasten off. Leave a tail.
Cheek Patches (Make 2)
Yarn: Blush Pink
R1: 6 sc in MR (6)
R2: inc x6 (12)
Fasten off. Leave a short sewing tail.
Basket (Make 1)
Yarn: Brown
R1: 6 sc in MR (6)
R2: inc x6 (12)
R3: (sc, inc) x6 (18)
R4-R8: sc in each st (18)
R9: BLO sc in each st (18)
Handle: ch 30, then sl st each end to opposite basket sides to secure.
Fasten off. Weave the inside tails firmly.
Flowers (Make several)
Yarn: Soft Pink and Peach
R1: 6 sc in MR (6)
R2: (ch 2, sl st, ch 2, sl st) in each st around to form 6 petals
Fasten off. Add a tiny contrasting center if desired.
Leaves (Make several)
Yarn: Leaf Green
Ch 4, sl st back along the chain to shape a narrow leaf.
Fasten off. Leave a small tail for sewing into the basket cluster.
Mane / Forelock (Make 1 cluster)
Yarn: Brown
Cut multiple short brown strands. Latch or sew them into the crown line between the ears, then trim into a compact tuft.
Assembly
- Sew the head to the body.
- Sew the muzzle to the lower front of the head, centered between the eye line and chin.
- Insert and lock the 10 mm eyes before the head is fully closed, or sew around pre-set eyes if already installed.
- Embroider the nostrils on the muzzle with brown yarn.
- Embroider short curved eyebrows above the eyes.
- Sew the cheek patches below and slightly outside the eyes.
- Sew the ears to the top sides of the head and add the brown forelock between them.
- Sew the arms to the upper sides of the body and the back legs to the base for a stable standing pose.
- Sew the tail to the lower back.
- Attach the basket strap across the body, secure the basket near one arm, then stitch in the flowers and leaves.
The final piece should stand balanced, with the basket resting against the side rather than pulling the arm forward.
7 Technical Tips
- Mark the first stitch of every round on the head and body. Losing the round start on a 36-stitch plateau shifts the decrease lines and throws the muzzle off center by the time you close.
- Keep stuffing firmer in the lower body than the neck. A soft lower body makes the donkey sink backward once the basket is attached.
- Use invisible decrease on R14-R18 of the head and R13-R17 of the body. Standard decreases leave visible notches, and chenille yarn makes those gaps look larger than they are.
- Set the eyes before the final head decreases. On a medium plush donkey with 10 mm eyes, late insertion compresses the face and changes the spacing.
- Pin the muzzle before sewing and keep it below the midline. Even a 3–4 mm upward shift makes the donkey read longer-faced and less distinct.
- Do not overstuff the ears. These narrow pieces need a pinch at the base and a soft upper half or they will flare outward instead of standing upright.
- Weave basket and flower tails into the basket wall, not only into the appliqués. The accessory gets handled first, and shallow weaving lets the flowers twist out of position.
Conclusion
This flower donkey amigurumi crochet pattern works because the donkey markers stay clear: low muzzle, narrow upright ears, short bristled mane, and a compact tail tassel. The basket and flowers change the project from generic farm toy to display piece without adding difficult shaping. Next step: make the head and muzzle first, pin them together, and confirm the face reads as donkey before touching the accessory. When it is finished, post one front view for Pinterest and one side view for Instagram so the basket strap shows clearly. #FlowerDonkeyPattern What flower color combination would you place in this donkey’s basket after the peach and pink version?









