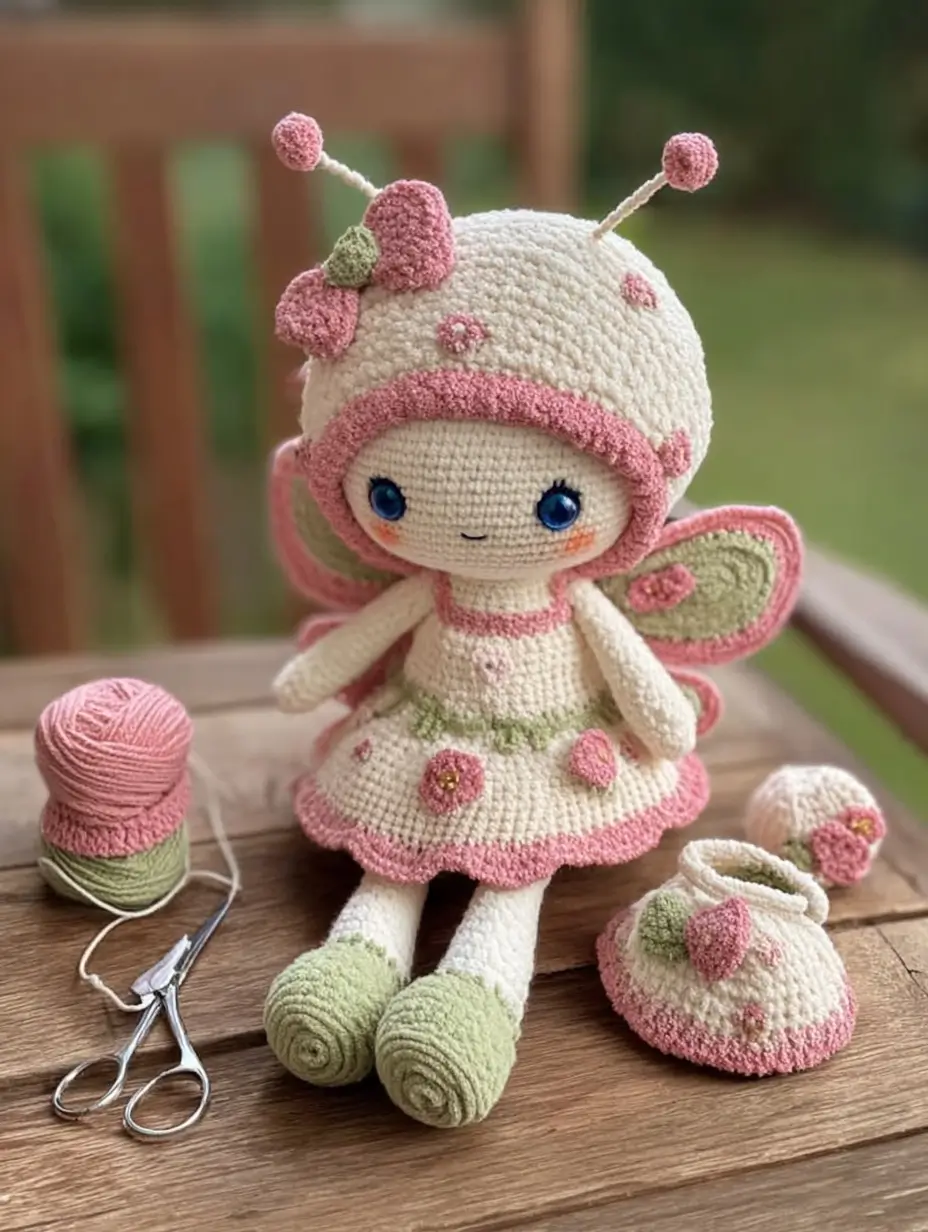
Butterflies need four visible wings; this doll shows only the rear pair, so the hood and skirt must carry the insect cues. This butterfly fairy doll amigurumi pattern uses sport cotton, a 2.5 mm hook, 10 mm safety eyes, and a 23 cm target height. The skill level is intermediate. Make it when you need a stable display doll with detachable photo props.
The Design: What Makes This Butterfly Fairy Doll Different
The hood is not treated as hair. It works as a rounded insect cap, so the stitch count stays wider than a tight bonnet and the pink brim frames the face instead of squeezing it. The wings sit behind the shoulder line, not at the waist, because a crochet butterfly doll collapses visually when the wings hang too low. The skirt also has a job: it repeats the pink border from the hood and ties the green shoes to the inner wing panels. A common maker mistake with an amigurumi fairy doll is making the antennae soft with yarn alone. This version uses a small crocheted ball on a firm stem so the profile reads as butterfly before the viewer sees the back.
Project Info at a Glance
| Skill Level | Time | Finished Size | Hook | Best For |
|---|---|---|---|---|
| Intermediate | Multi-session make | 23 cm | 2.5 mm | Display doll, spring shelf styling, nursery decor |
Comparable butterfly fairy patterns support the 23 cm target, sport cotton, and 2.5 mm hook choice. Similar butterfly doll sources also list 8–10 mm safety eyes, with 10 mm used for a 22 cm butterfly doll. Source: Ravelry.
Materials and Tools
Yarn
- Cream ivory — sport cotton — 50 g allowance — Schachenmayr Catania, YarnArt Jeans, or similar
- Dusty pink — sport cotton — 50 g allowance — for hood brim, skirt edge, antenna balls, spots, flowers
- Sage green — sport cotton — 50 g allowance — for shoes, belt, wing panels, leaves
- Black embroidery thread — small amount — for mouth and lashes
- Gold or yellow embroidery thread — small amount — for flower centers
Inci’s listing gives sport yarn, 250–300 m total yardage, and Catania at 125 m per 50 g; Lyubov Kholkina’s butterfly doll lists YarnArt Jeans at 160 m per 50 g and 10 mm safety eyes. Source: Ravelry.
Tools
- Hook 2.5 mm
- 10 mm safety eyes
- Polyester stuffing
- Yarn needle
- Stitch markers
- Pins
- Scissors
- Optional 1 mm craft wire for antenna stems
Abbreviations
MR = magic ring; sc = single crochet; inc = 2 sc in one stitch; dec = decrease; sl st = slip stitch; ch = chain; BLO = back loop only; FLO = front loop only; R = round or row. An invisible decrease is worked through front loops only to reduce pitting on the face, hood, body, and bag closures.
Pattern — Step by Step
Continuous spiral unless noted. The stitch counts below are an original photo-matched draft based on the uploaded doll and standard 6-stitch amigurumi shaping.
Head
Yarn: cream ivory — Source: Standard amigurumi math
R1: 6 sc in MR (6)
R2: inc ×6 (12)
R3: (sc, inc) ×6 (18)
R4: (2 sc, inc) ×6 (24)
R5: (3 sc, inc) ×6 (30)
R6: (4 sc, inc) ×6 (36)
R7: sc around (36)
R8: sc around (36)
R9: sc around (36)
R10: sc around (36)
R11: sc around (36)
R12: sc around (36)
R13: sc around (36)
R14: (4 sc, dec) ×6 (30)
R15: (3 sc, dec) ×6 (24)
R16: (2 sc, dec) ×6 (18)
R17: (sc, dec) ×6 (12)
R18: dec ×6 (6)
Insert eyes before R15, between R10 and R11, 8 stitches apart. Add light stuffing before R16, then firm the lower face before closing.
Fasten off. Leave 20 cm tail.
Body
Yarn: cream ivory — Source: Standard amigurumi math
R1: 6 sc in MR (6)
R2: inc ×6 (12)
R3: (sc, inc) ×6 (18)
R4: (2 sc, inc) ×6 (24)
R5: (3 sc, inc) ×6 (30)
R6: sc around (30)
R7: sc around (30)
R8: sc around (30)
R9: sc around (30)
R10: sc around (30)
R11: sc around (30)
R12: BLO sc around (30)
R13: (3 sc, dec) ×6 (24)
R14: sc around (24)
R15: (2 sc, dec) ×6 (18)
R16: (sc, dec) ×6 (12)
R17: dec ×6 (6)
Use the unused front loops from R12 for the skirt. Stuff the lower body firmly so the doll can sit without tipping backward.
Fasten off. Leave 25 cm tail.
Arms / Front Limbs
Make 2. Yarn: cream ivory — Source: Standard amigurumi math
R1: 6 sc in MR (6)
R2: inc ×6 (12)
R3: sc around (12)
R4: sc around (12)
R5: sc around (12)
R6: sc around (12)
R7: sc around (12)
R8: sc around (12)
R9: sc around (12)
R10: sc around (12)
R11: sc around (12)
R12: sc around (12)
Stuff the hand end only. Flatten the top edge across 6 stitches.
Fasten off. Leave 18 cm tail.
Back Legs and Shoes
Make 2. Yarn: sage green for shoe, cream ivory for leg — Source: Standard amigurumi math
R1: 6 sc in MR with sage green (6)
R2: inc ×6 (12)
R3: (sc, inc) ×6 (18)
R4: sc around (18)
R5: sc around (18)
R6: (sc, dec) ×6 (12)
R7: sc around (12)
R8: change to cream ivory, BLO sc around (12)
R9: sc around (12)
R10: sc around (12)
R11: sc around (12)
R12: sc around (12)
R13: sc around (12)
R14: sc around (12)
R15: sc around (12)
R16: sc around (12)
R17: sc around (12)
R18: sc around (12)
Stuff the shoe firmly and the leg lightly. Keep both feet angled forward before sewing.
Fasten off. Leave 22 cm tail.
Hood Cap
Yarn: cream ivory — Source: Standard amigurumi math
R1: 6 sc in MR (6)
R2: inc ×6 (12)
R3: (sc, inc) ×6 (18)
R4: (2 sc, inc) ×6 (24)
R5: (3 sc, inc) ×6 (30)
R6: (4 sc, inc) ×6 (36)
R7: sc around (36)
R8: sc around (36)
R9: sc around (36)
R10: sc around (36)
R11: sc around (36)
R12: sc around (36)
R13: sc around (36)
Do not close the hood. Test it over the head; it should cover the crown and sides while leaving the lower face open.
Fasten off. Leave 30 cm tail.
Pink Hood Brim
Yarn: dusty pink — Source: Standard row shaping
R1: ch 39, starting in second ch from hook, 38 sc (38)
R2: ch 1, turn, 38 sc (38)
R3: ch 1, turn, 38 sl st (38)
Sew the brim around the front edge of the hood, starting below one cheek and ending below the other.
Fasten off. Leave 25 cm tail.
Flower Skirt
Yarn: cream ivory and dusty pink — Source: Standard amigurumi math
Attach cream ivory to a front loop from Body R12.
R1: sc around in FLO (30)
R2: (4 sc, inc) ×6 (36)
R3: sc around (36)
R4: change to dusty pink, sc around (36)
R5: sl st around loosely (36)
Keep R5 loose so the edge does not pull the skirt upward. Add the green belt after the skirt is finished.
Fasten off. Weave in end.
Green Belt
Yarn: sage green — Source: Standard row shaping
R1: ch 32, starting in second ch from hook, 31 sc (31)
R2: ch 1, turn, 31 sl st (31)
Wrap above the skirt line and sew at the back.
Fasten off. Leave 18 cm tail.
Wings
Make 2. Yarn: dusty pink outer wing, sage green inner panel — Source: Standard amigurumi math; sizing checked against free butterfly fairy wing references. Source: Sweet Softies.
Outer wing:
R1: 6 sc in MR with dusty pink (6)
R2: inc ×6 (12)
R3: (sc, inc) ×6 (18)
R4: (2 sc, inc) ×6 (24)
R5: (3 sc, inc) ×6 (30)
R6: sc around (30)
R7: sc around (30)
R8: sc around (30)
R9: (3 sc, dec) ×6 (24)
R10: (2 sc, dec) ×6 (18)
R11: (sc, dec) ×6 (12)
R12: dec ×6 (6)
Do not overstuff. Flatten the wing slightly so it sits like a panel rather than a ball.
Fasten off. Leave 30 cm tail.
Inner green panel:
R1: 6 sc in MR with sage green (6)
R2: inc ×6 (12)
R3: (sc, inc) ×6 (18)
R4: sc around (18)
Pin the green panel to the outer wing before sewing. Keep a 1-round pink border visible.
Fasten off. Leave 20 cm tail.
Antennae
Make 2. Yarn: dusty pink and cream ivory — Source: Standard amigurumi math
Antenna ball:
R1: 6 sc in MR with dusty pink (6)
R2: inc ×6 (12)
R3: sc around (12)
R4: sc around (12)
R5: dec ×6 (6)
Stuff with a pea-sized amount of fiberfill.
Fasten off. Leave 15 cm tail.
Stem:
R1: ch 13 with cream ivory (13)
R2: starting in second ch from hook, 12 sl st (12)
For a fixed display doll, lay 1 mm craft wire beside the chain before stitching the stem to the hood.
Fasten off. Leave 18 cm tail.
Cheek Patches
Make 2. Yarn: dusty pink — Source: Standard flat circle
R1: 6 sc in MR (6)
R2: inc ×6 (12)
R3: sl st around (12)
Do not stuff. Sew flat under the eyes, slightly outside the mouth line.
Fasten off. Leave 15 cm tail.
Hood and Skirt Flower Appliqués
Make 5. Yarn: dusty pink, sage green, gold — Source: Standard small appliqué
Flower center:
R1: 6 sc in MR with gold (6)
Petals:
R2: join dusty pink, (sl st, ch 2, hdc, ch 2, sl st) in each stitch (6 petal repeats)
Leaf:
R1: ch 5 with sage green, starting in second ch from hook, sl st, sc, hdc, sl st (4)
Make three flowers for the hood and two for the skirt or bag. Use one leaf per large flower.
Fasten off. Leave 12 cm tails for sewing.
Pink Hood Spots
Make 5. Yarn: dusty pink — Source: Standard flat circle
Small spots, make 3:
R1: 6 sc in MR (6)
R2: sl st around (6)
Large spots, make 2:
R1: 6 sc in MR (6)
R2: inc ×6 (12)
Place spots unevenly across the hood, but keep them away from the antenna base.
Fasten off. Leave 10 cm tail on each.
Drawstring Bag
Yarn: cream ivory, dusty pink, sage green — Source: Standard amigurumi math
R1: 6 sc in MR with dusty pink (6)
R2: inc ×6 (12)
R3: (sc, inc) ×6 (18)
R4: (2 sc, inc) ×6 (24)
R5: change to cream ivory, BLO sc around (24)
R6: sc around (24)
R7: sc around (24)
R8: sc around (24)
R9: sc around (24)
R10: (2 sc, dec) ×6 (18)
R11: sc around (18)
R12: sc around (18)
R13: sl st around (18)
Drawstring:
R1: ch 40 with sage green (40)
Weave the chain through R12 spaces. Add one flower to the front of the bag.
Fasten off. Weave in end.
Assembly
- Sew the head to the closed top of the body, centered over the neck point.
- Fit the hood over the head and pin the pink brim below the cheeks.
- Sew the hood to the head with small stitches hidden under the brim.
- Add safety-eye lashes, the embroidered mouth, and both cheek patches.
- Sew the arms to the sides of the body, one round below the neck seam.
- Attach the legs to the lower body so the green shoes point forward.
- Sew the wings to the back between the shoulder line and belt line.
- Attach antenna stems to the hood, then sew the pink balls to the stem tips.
- Sew flowers and spots to the hood, skirt, wings, and bag.
- Add the green belt, tighten the bag drawstring, and hide every yarn tail.
The finished doll is a seated butterfly fairy with a hooded head, rear wings, flower skirt, long legs, and matching bag.
7 Technical Tips
- Eye placement failure mode: uneven gaze. Set the 10 mm eyes between R10 and R11 of the head with 8 stitches between posts before closing R15.
- Antenna failure mode: drooping stems. Use a 12-slip-stitch stem and add 1 mm craft wire only for display dolls not intended for small children.
- Stuffing failure mode: tilted sitting posture. Pack the lower body more firmly than the head, then keep the legs lightly stuffed from R9 upward.
- Wing failure mode: bulky back seam. Flatten each wing before sewing and keep the inner green panel at least one round inside the pink edge.
- Skirt failure mode: tight ruffle. Work the final pink slip-stitch round loosely; a tight R5 pulls the skirt into a bowl shape.
- Hood failure mode: covered face. Pin the brim first and leave the lower face open by at least 5 visible head rounds.
- Tail weaving failure mode: loose appliqués. Run each flower tail through the same backing stitch twice, then bury it 3 cm inside the hood or skirt.
Conclusion
This build depends on proportion control: a 36-stitch head, a smaller 30-stitch body, a firm hood, and wings placed high enough to read from the front. After sewing the main doll, check three points before styling photos: both antenna balls should sit above the hood curve, the green shoes should face forward, and the bag should not cover the skirt flowers. Save the final image to Pinterest and post the side view on Instagram so the wing placement is visible. Use #ButterflyFairyDoll. The final reference name for this post is butterfly fairy doll amigurumi pattern. Which hood detail should be larger on this butterfly fairy: the pink spots or the flower cluster?









