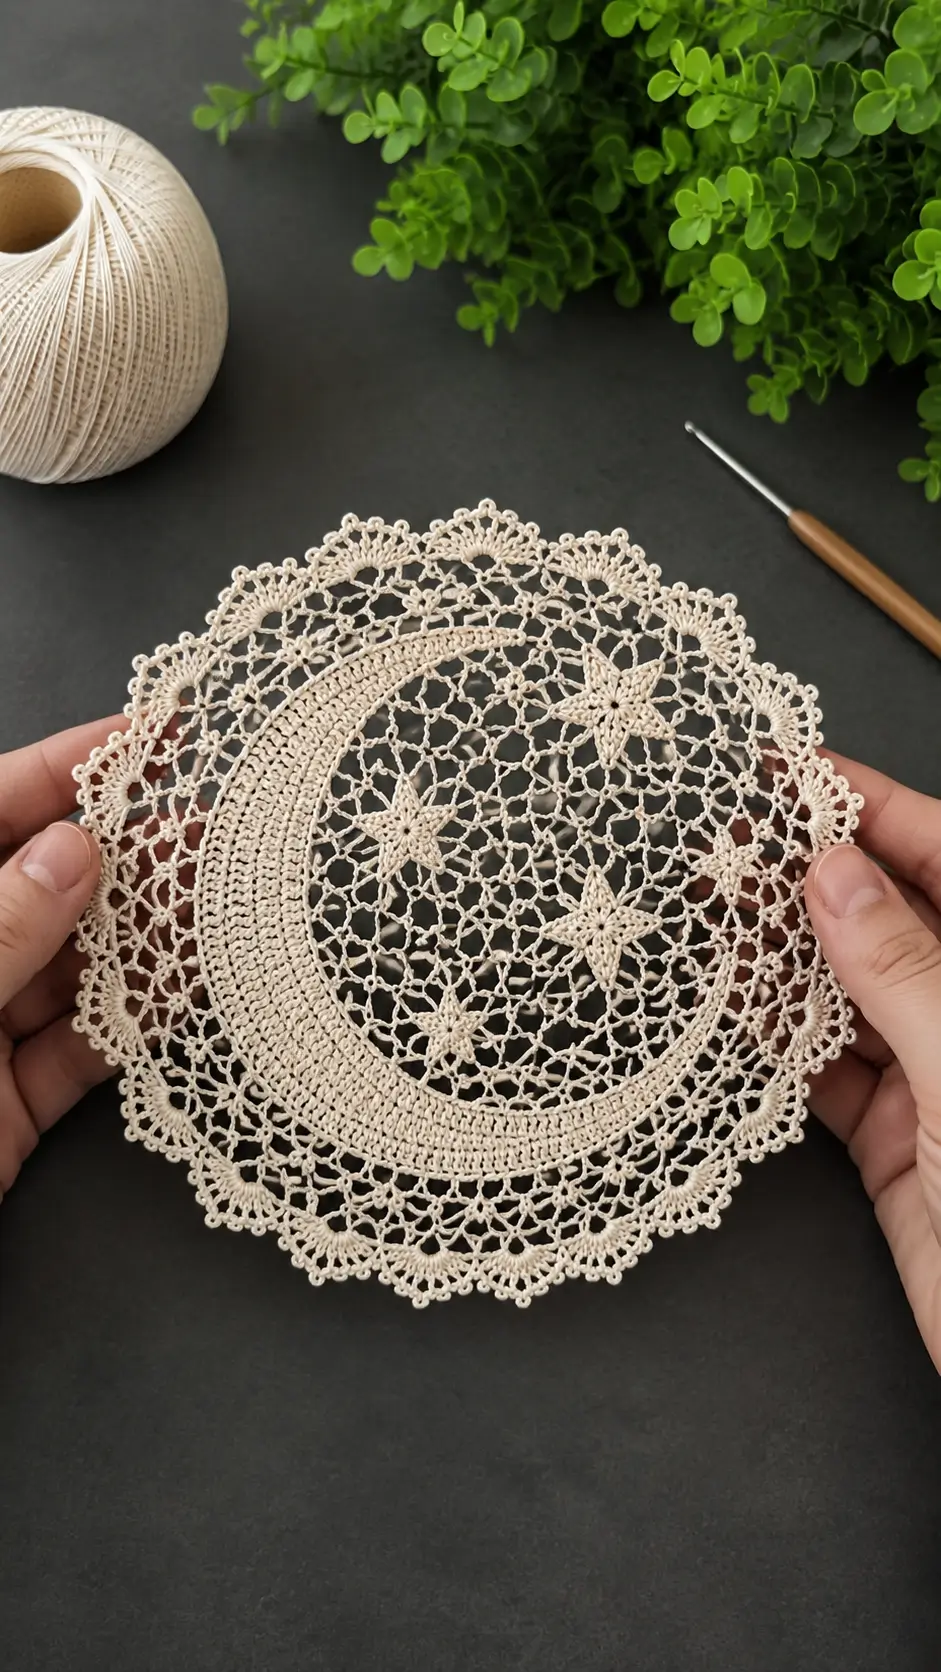
The crescent is the structural problem here. A round doily wants symmetry, but a crochet crescent moon doily pattern has to interrupt that balance without collapsing the lace field around it. This version uses size 10 cotton thread, a 1.75 mm hook, and intermediate thread-crochet techniques to produce a finished piece around 28 cm across. It works as a table mat, framed wall piece, or seasonal celestial decor.
The Design: What Makes This Moon Doily Different
A standard lace doily builds from the center out with evenly distributed repeats. This piece does not. The open mesh base carries most of the diameter, while the moon is added as a dense crescent overlay that crosses the field instead of replacing it. That choice matters because the solid moon gives visual weight and the net background keeps the full circle stable.
The second decision is star scale. One large star would flatten the composition. Several stars in mixed sizes keep the center active and stop the crescent moon lace doily from reading as empty negative space. Third, the edging stays light and picot-heavy rather than floral or shell-dense. A heavier border would compete with the moon silhouette. The common mistake with a moon doily crochet pattern is crowding the interior so much that the crescent outline disappears once blocked.
Project Info at a Glance
| Skill Level | Time | Finished Size | Hook | Best For |
|---|---|---|---|---|
| Intermediate | 6–8 hours | Approx. 28 cm across | 1.75 mm steel hook | Table decor, wall display, gift making |
Materials and Tools
Yarn
- Natural ecru or ivory crochet cotton thread — size 10 — about 100 yards total — mercerized cotton preferred
Tools
- 1.75 mm steel crochet hook
- Tapestry needle
- Fine rustproof pins
- Blocking board or padded towel
- Spray starch or water for wet blocking
- Small sharp scissors
Abbreviations
MR = magic ring, ch = chain, sl st = slip stitch, sc = single crochet, hdc = half double crochet, dc = double crochet, tr = treble crochet, sp = space, rep = repeat, rnd = round, beg = beginning, picot = ch 3 and sl st in first ch.
Use invisible joins where a clean edge is visible, but use standard joins on the mesh rounds where the seam will be hidden by the crescent or final blocking.
Pattern Notes
The base is worked in joined rounds. The crescent and stars are separate appliqués stitched onto the blocked mesh circle. Read the full section before starting. Thread crochet does not forgive late counting errors.
Pattern — Step by Step
Base Mesh Circle (Make 1)
Yarn: natural ecru thread
- Rnd 1: MR, ch 3, 15 dc in ring. Join. (16 sts)
- Rnd 2: Ch 5, skip 1 st, sc in next st; rep around, ending with ch 2, dc in first sc. (8 mesh arches)
- Rnd 3: Sl st into first arch, ch 1, work (sc, ch 5, sc) in each arch around. Join. (8 arches)
- Rnd 4: Sl st into next arch, ch 6, sc in next arch; rep around. (8 arches)
- Rnd 5: In each arch work (sc, ch 3, sc, ch 3, sc). Join. This creates split anchor points for the lattice.
- Rnd 6: Sl st to first center ch-3 sp, ch 5, sc in next center ch-3 sp; rep around. (16 arches)
- Rnd 7: Ch 6, sc in next arch; rep around.
- Rnd 8: Work (sc, ch 4, sc) in each arch.
- Rnd 9: Ch 5, sc in each center ch-4 sp around.
- Rnd 10: Ch 6, sc in each arch around.
- Rnd 11: Work (sc, ch 3, sc) in each arch around.
- Rnd 12: Ch 5, sc in each center gap around.
- Rnd 13: Ch 6, sc in next gap; rep around.
- Rnd 14: Work (sc, ch 4, picot, ch 4, sc) in every other arch; work (sc, ch 5, sc) in remaining arches.
- Rnd 15: Re-establish even mesh by working ch-5 arches all around.
- Rnd 16: Work (sc, ch 3, sc) in each arch around.
- Rnd 17: Ch 6, sc in next gap around.
- Rnd 18: Work (2 sc, picot, 2 sc) in each arch, with ch 3 between groups.
- Rnd 19: Ch 4 between each group, anchoring in each picot valley.
- Rnd 20: In each ch-4 sp work (sc, hdc, 3 dc, hdc, sc). This creates the soft outer scallop.
- Rnd 21: Between scallops, sl st; on each scallop edge work picot points evenly: sc, picot, sc, picot, sc. Fasten off.
Crescent Moon Appliqué (Make 1)
Yarn: natural ecru thread
- Ch 34.
- Row 1: Sc in 2nd ch from hook and across. Turn. (33)
- Row 2: Ch 1, inc, sc across to last 2 sts, inc. Turn. (35)
- Row 3: Ch 1, sc across. Turn.
- Row 4: Ch 1, inc, sc across to last 2 sts, inc. Turn. (37)
- Rows 5–8: Repeat the shaping sequence, increasing on every right-side row until the outer curve is broad and smooth. End at 41 sts.
- Inner cutout shaping: Skip 8 sts at one tip, join thread, then work short rows of sc across, decreasing 1 st at the inner edge every other row for 10 rows.
- Outer polishing round: Work sc evenly around the whole crescent, placing 3 sc at each tip and 2 sc together at the deepest inner curve if needed to stop rippling.
- Second edging round: Work reverse slip stitch or plain sl st evenly around for a firm outline. Fasten off with a 30 cm tail.
Pin the crescent over the left half of the base after blocking. The lower tip should sweep toward 4 o’clock, and the upper tip should finish near 10 o’clock.
Large Five-Point Star (Make 2)
- MR, ch 1, 10 sc in ring. Join.
- *Ch 6, sl st in 2nd ch from hook, sc in next, hdc in next, dc in next, sl st in next base st; rep from * 5 times.
- Fasten off with a 20 cm tail.
Medium Five-Point Star (Make 2)
- MR, ch 1, 10 sc in ring. Join.
- *Ch 5, sl st in 2nd ch, sc in next, hdc in next, sl st in next base st; rep from * 5 times.
- Fasten off.
Small Accent Star (Make 1)
- MR, ch 1, 10 sc in ring. Join.
- *Ch 4, sl st in 2nd ch, sc in next, sl st in next base st; rep from * 5 times.
- Fasten off.
Optional Hanging Loop (Make 1)
- Join thread at top back of doily.
- Ch 18, sl st to same join point.
- Work 20 sc over loop. Fasten off.
Assembly
- Block the base mesh circle first and let it dry flat.
- Place the crescent over the left half of the circle and pin both tips before pinning the center curve.
- Stitch the outer curve of the moon first with small whip stitches.
- Stitch the inner curve next, easing it into the mesh without drawing the lattice inward.
- Pin the largest star near the upper-right quadrant.
- Pin the second large star near the lower-right quadrant.
- Place the medium stars near the center-left and lower-center areas.
- Add the smallest star close to the right edge for visual spread.
- Weave all tails through dense stitches only, not open arches.
- Re-block the full piece with light tension on the scallops and leave flat until fully dry.
The doily is complete once the moon edge sits smooth and the outer scallops repeat at an even distance all around.
7 Technical Tips
- Count every mesh arch at rounds 6, 10, 15, and 17. One missed chain space will shift the scallops and the border will not close cleanly.
- Do not over-tighten the crescent appliqué. If the inner curve pulls the base inward by even 3–4 mm, the circle will buckle after blocking.
- Pin each scallop tip separately during blocking. Pinning only every third scallop produces a wavy edge instead of a crisp lace perimeter.
- Keep star tails at least 15 cm long. Short tails work loose faster on open mesh because they have fewer dense stitches available for anchoring.
- Use a steel hook that matches the thread. A hook that is too large opens the lattice unevenly and the moon edge loses definition.
- Stitch the moon to the base after the first block, not before. Sewing onto an unblocked circle often distorts the net and shifts the crescent off center.
- Steam lightly or wet block only. Heavy starch can flatten the picots so much that the outer edge reads blunt instead of pointed.
Conclusion
This crochet crescent moon doily pattern works because the dense moon sits against a light lattice rather than competing with it. Make the base, block it, then attach the celestial elements in layers. That order controls the shape better than trying to improvise placement at the end. After finishing, photograph it against a dark background for Pinterest and a close-up flat lay for Instagram. Use the tag #CrescentMoonDoily. One practical next step is to test the same pattern in white thread with metallic silver stars. Which star placement looks better to you for this moon: clustered near the inner curve or spread across the right half?









