Introduction
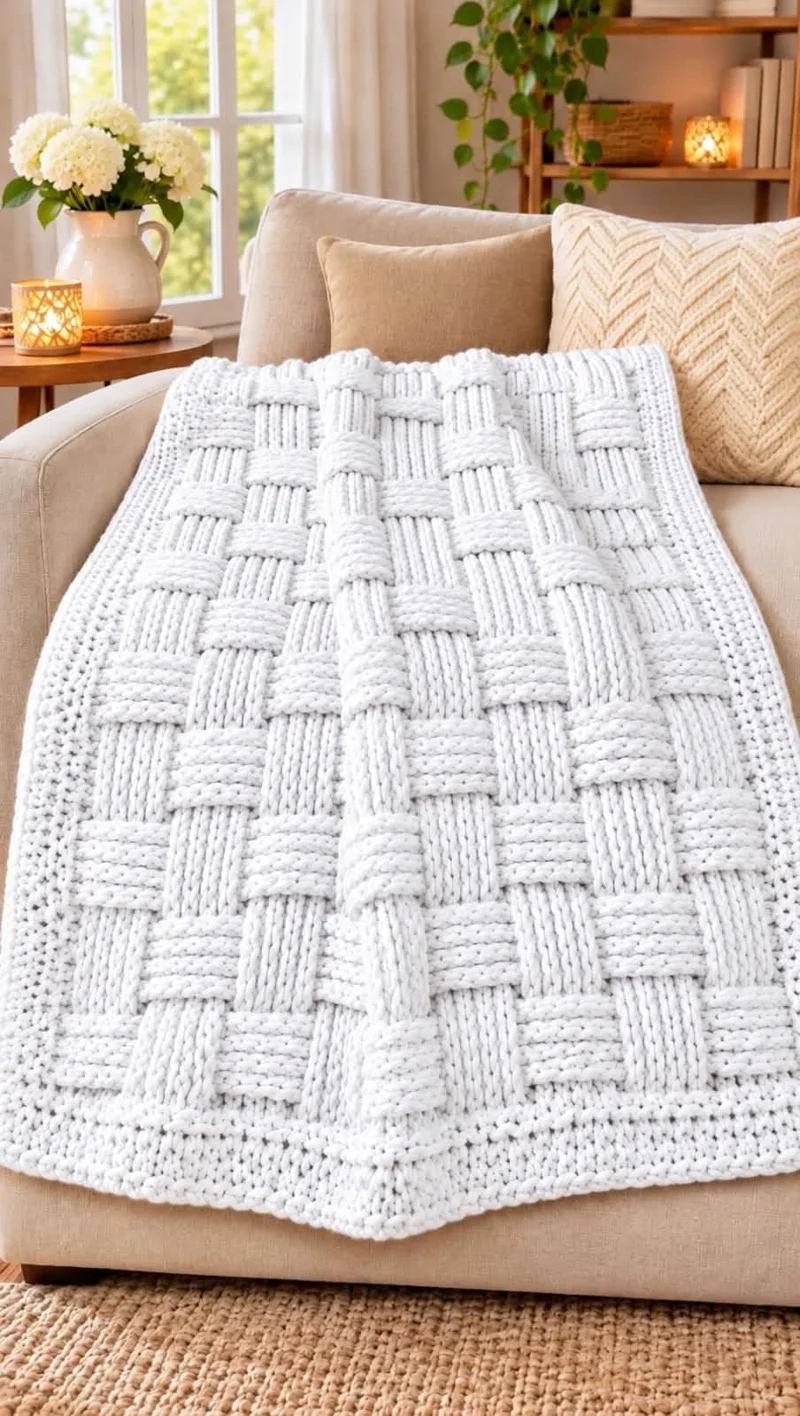
The raised squares of a basketweave blanket alternate direction, creating the appearance of thick yarn strips passing over and under one another. This free basketweave crochet blanket pattern uses super bulky yarn, front post double crochet, and back post double crochet to build that distinctive texture. Designed as a generous sofa throw, the project suits intermediate crocheters who want a practical blanket with a structured surface and a substantial decorative border.
The Design: What Makes This Basketweave Blanket Different?
The most noticeable feature of this chunky crochet blanket is its three-dimensional woven surface. Rather than changing yarn colors or joining individual squares, the design creates alternating raised and recessed sections within continuous rows.
Front post double crochet stitches bring selected columns forward, while back post double crochet stitches push adjacent columns toward the opposite side. Reversing their arrangement after a fixed number of rows produces the woven effect.
The blanket also includes a plain stitch at each edge. These stitches provide stable attachment points for the border and reduce distortion along the sides.
A common mistake when making a textured crochet blanket is changing the stitch sequence too early. This produces narrow horizontal bands rather than balanced blocks. The pattern below uses a six-row repeat, with three rows in each arrangement, so the texture remains consistent throughout the project.
Project Information at a Glance
| Project | Chunky Basketweave Crochet Blanket |
|---|---|
| Skill Level | Intermediate |
| Estimated Time | 15–25 hours, depending on tension and speed |
| Target Size | Approximately 127 × 145 cm (50 × 57 inches) |
| Yarn Weight | Super Bulky, Category 6 |
| Hook Size | 9 mm (US M/N) |
| Construction | Flat rows, worked back and forth |
| Stitch Pattern | Front and back post double crochet |
| Terminology | US crochet terms |
Size and material quantities are planning targets based on comparable published blanket designs, not measurements taken from the photograph. Make a gauge swatch before starting.
Materials and Tools
Yarn
- Main yarn: Ivory or soft white, super bulky weight (Category 6), approximately 2,400 g.
- Suggested yarn: Bernat Blanket Tweeds or another super bulky blanket yarn with similar gauge.
- Accent yarn: Not required. The photographed design uses a single main color.
- Estimated yardage: Approximately 1,720–1,760 yards (1,573–1,609 meters), including an allowance to be checked against your chosen border.
Choose yarn with a consistent thickness. Highly variable yarn can make individual basketweave blocks appear uneven, particularly where front post and back post stitches meet.
Tools
- 9 mm crochet hook, or the size needed to match gauge.
- Stitch markers for the first and last stitch of each row.
- Tapestry needle with an eye large enough for bulky yarn.
- Scissors for trimming yarn ends.
- Measuring tape for checking dimensions.
- Blocking mats, optional, for arranging the finished edges.
Gauge and Sizing
For the proposed super bulky yarn and 9 mm hook, begin by testing a basketweave gauge of approximately 8 stitches and 5 rows per 10 cm (4 inches). This is a published reference gauge for a comparable super bulky basketweave blanket, not a tested gauge for the original pattern below.
Make a swatch containing at least four complete stitch blocks across and two complete vertical pattern repeats. Measure the central area without stretching the fabric.
Post stitches consume more yarn and may pull the fabric inward compared with ordinary double crochet. A swatch worked entirely in plain double crochet will not predict the finished blanket width accurately.
If the fabric is too narrow, increase the hook size or add complete stitch repeats. If the fabric is too wide, try a smaller hook. Record the final gauge before calculating your foundation chain.
Crochet Abbreviations
- ch: Chain
- sc: Single crochet
- dc: Double crochet
- FPdc: Front post double crochet
- BPdc: Back post double crochet
- sl st: Slip stitch
- st: Stitch
- sts: Stitches
- rep: Repeat
- RS: Right side
- WS: Wrong side
Understanding the Basketweave Crochet Stitch
Front Post Double Crochet (FPdc)
Yarn over and insert the hook from front to back, then back to front around the vertical post of the indicated stitch. Yarn over and pull up a loop. Complete the double crochet by pulling through two loops twice.
The completed stitch projects toward the side of the fabric facing you.
Back Post Double Crochet (BPdc)
Yarn over and insert the hook from back to front, then front to back around the indicated stitch post. Pull up a loop and complete the double crochet normally.
This places the post behind the working surface and creates the recessed portion of the basketweave texture.
Both techniques work around the vertical post of the previous row rather than through the two top loops. Each completed post stitch counts as one stitch.
Free Basketweave Crochet Blanket Pattern
This original adaptation uses groups of three post stitches, arranged in alternating sections. The pattern is worked flat, turning at the end of every row.
Pattern Notes
- The foundation chain is a multiple of six, plus four.
- The starting chain for this sample is 100.
- The first three chains count as the first double crochet in Row 1.
- From Row 2 onward, the turning chain does not count as a stitch.
- Every row contains 98 stitches.
- The first and last stitch of every textured row are plain double crochet.
- Each textured row contains 96 post stitches, divided into 16 groups of six.
- Repeat the six-row texture sequence to reach the required length.
Step 1: Foundation Chain
Using the 9 mm crochet hook and ivory yarn, make a slip knot.
Foundation: Ch 100.
Keep the foundation chain relaxed. A tight chain can pull the lower edge inward and create a curved starting border.
Step 2: Foundation Row
Row 1: Dc in the fourth chain from the hook. Dc in each remaining chain across. (98 sts, including the initial turning chain.)
Ch 2 and turn.
Count the foundation row before continuing. The first three skipped chains form the first double crochet, so there are 97 worked double crochets plus the turning chain.
Step 3: First Basketweave Section
Row 2: Dc in the first stitch. *FPdc in each of the next 3 stitches, BPdc in each of the following 3 stitches.* Repeat from * to * 16 times in total. Dc in the final stitch. (98 sts)
Ch 2 and turn.
Row 3: Dc in the first stitch. *BPdc in each of the next 3 stitches, FPdc in each of the following 3 stitches.* Repeat 16 times. Dc in the final stitch. (98 sts)
Ch 2 and turn.
Row 4: Repeat Row 2. (98 sts)
Ch 2 and turn.
These three rows form the first half of the basketweave sequence. The raised columns stay aligned on the same physical face of the fabric despite turning the work.
Step 4: Reverse the Basketweave Blocks
Row 5: Dc in the first stitch. *BPdc in each of the next 3 stitches, FPdc in each of the following 3 stitches.* Repeat 16 times. Dc in the final stitch. (98 sts)
Ch 2 and turn.
Row 6: Dc in the first stitch. *FPdc in each of the next 3 stitches, BPdc in each of the following 3 stitches.* Repeat 16 times. Dc in the final stitch. (98 sts)
Ch 2 and turn.
Row 7: Repeat Row 5. (98 sts)
Ch 2 and turn.
The second half of the repeat reverses the raised and recessed areas. Together, Rows 2–7 form one complete basketweave pattern repeat.
Step 5: Continue the Blanket Body
Repeat Rows 2–7 until the blanket reaches the required length before adding the border.
For a reference sample containing 61 rows, work the foundation row followed by ten complete six-row repeats. This is a row-count example, not a guarantee of the finished dimensions.
Measure the blanket after several repeats. If the blocks are noticeably wider than they are tall, consider changing the number of rows in each section on a future project. Do not change the repeat midway through the current blanket unless you intend to introduce a visible design variation.
At the end of the final textured row, do not fasten off. Continue directly into the border.
How to Crochet the Blanket Border
The reference image shows a substantial white border surrounding the textured center. A multi-round single crochet edging provides a practical interpretation while keeping the raised basketweave pattern as the main visual feature.
Border Round 1: Establish a Clean Edge
Ch 1. Work single crochet stitches evenly along the first side of the blanket.
Place approximately two single crochets along the side of each double crochet row as an initial spacing guide. Adjust the spacing if the border begins to ripple or pull inward.
At each corner, work (sc, ch 2, sc) into the corner space.
Continue around all four sides, working one single crochet into each stitch along the top and foundation edges where appropriate.
Join with a slip stitch to the first single crochet.
Border Round 2: Add Structure
Ch 1. Work one single crochet into each stitch around the blanket.
At every corner chain-2 space, work (sc, ch 2, sc).
Join with a slip stitch to the first single crochet.
Keep the stitches consistent without pulling the yarn tightly. The edging should lie flat when placed on a table.
Border Round 3: Build Thickness
Repeat Border Round 2, maintaining the same corner treatment.
For a wider frame similar to the photographed blanket, work one or two additional rounds of single crochet.
After the final round, join with a slip stitch, cut the yarn, and pull the end through the final loop.
Leave approximately 15–20 cm of yarn for weaving in.
How to Adjust the Blanket Size
The basketweave stitch pattern is based on groups of six stitches, with one plain double crochet stitch at each side.
For this construction, the foundation chain must be a multiple of six plus four. Each additional six foundation chains adds one complete six-stitch repeat to the textured area.
| Foundation Chain | Stitches per Row | Six-Stitch Groups |
|---|---|---|
| 76 | 74 | 12 |
| 88 | 86 | 14 |
| 100 | 98 | 16 |
| 112 | 110 | 18 |
| 124 | 122 | 20 |
These stitch counts describe pattern repeats, not fixed blanket widths. Actual dimensions depend on yarn thickness, hook size, stitch tension, and the finished gauge.
To change the length, add or remove complete six-row repeats. Finish after Row 7 of the repeat sequence before starting the border.
Why Is My Basketweave Crochet Blanket Curling?
Curling usually results from tension differences between the foundation chain, post stitches, and border.
If the lower edge curves inward, the foundation chain may be too tight. Starting with a hook one size larger for the chain can help.
If the sides pull inward, the post stitches may be shorter or tighter than the plain edge stitches. Compare stitch height across a small swatch before changing hook size.
A rippling border often indicates too many stitches along the edges. Conversely, a border that pulls the blanket into a bowl shape may have too few stitches.
Correct the spacing before adding further border rounds. Additional rounds usually make an existing edging problem more visible.
Seven Technical Tips for a Better Basketweave Blanket
- 1. Mark the edge stitches. Losing the final stitch can reduce the row count from 98 to 97. Place a marker in the first and last stitch of each row until the edge positions become easy to identify.
- 2. Check the stitch count after each repeat. Accidentally skipping a post stitch can shift the entire woven pattern. Count 98 stitches at the end of every row and confirm that the central area contains 16 complete six-stitch groups.
- 3. Maintain consistent post-stitch height. Tight front post stitches can pull the raised blocks inward. Compare a 10 cm section of textured fabric against your gauge swatch before continuing.
- 4. Watch the turning chains. Counting a ch-2 turning chain as a stitch can introduce an unwanted extra stitch. In this pattern, the ch-2 used from Row 2 onward never counts toward the 98-stitch total.
- 5. Check the block reversal. Reversing the stitch arrangement after only two rows produces uneven rectangular sections. Complete all three rows of each half-repeat before switching the visible raised blocks.
- 6. Test the border spacing. Too many stitches along the row ends can create a wavy edge. Begin with approximately two single crochets per double crochet row end, then adjust based on how the fabric lies.
- 7. Secure bulky yarn tails carefully. Short ends may work loose because thick yarn has fewer stitches available to grip it. Leave 15–20 cm tails and weave each end through several neighboring stitches in more than one direction.
Finishing and Care Instructions
Lay the completed blanket on a clean, flat surface. Smooth the basketweave sections with your hands and check that the corners form approximately right angles.
Use a tapestry needle to weave the remaining yarn tails through the backs of several stitches. Reverse direction at least once to reduce the chance of the ends becoming loose during washing.
If the chosen yarn permits washing, follow the manufacturer’s care label. Polyester blanket yarn and wool-blend yarn can have very different washing and drying requirements.
Avoid pressing the raised basketweave surface with a hot iron. Heat and pressure can flatten the post stitches, while excessive heat can damage synthetic fibers.
When drying, support the weight of the blanket rather than hanging it from one edge. Heavy wet fabric can stretch under its own weight.
Frequently Asked Questions
Is the basketweave crochet stitch suitable for beginners?
The stitch is generally considered intermediate because it requires control of front post and back post double crochet. A crocheter familiar with ordinary double crochet can learn the technique by practicing a small swatch before starting a full blanket.
How much yarn do I need for a chunky basketweave blanket?
For a throw measuring approximately 127 × 145 cm, a comparable published pattern uses about 2,400 g of super bulky polyester yarn. Actual consumption varies with gauge, yarn construction, dimensions, and border width. Purchase additional yarn if the planned edging is especially deep.
Can I use worsted weight yarn instead of chunky yarn?
Yes, but the fabric will have a different thickness and the original stitch count will produce a smaller width. Make a gauge swatch and recalculate the foundation chain using the multiple-of-six-plus-four formula.
Is basketweave crochet reversible?
Front and back post stitches create texture on both sides of the fabric. The appearance may differ slightly between faces depending on the arrangement, but both sides remain decorative and functional.
What is the best hook size for a chunky crochet blanket?
A 9 mm hook is a reasonable starting point for the super bulky yarn specified here. Some other super bulky yarns require larger hooks, so follow the yarn label and adjust according to your basketweave gauge.
Why does basketweave crochet use more yarn?
Post stitches wrap around the vertical bodies of stitches rather than simply entering their top loops. The extra yarn path and denser raised texture can increase yarn consumption compared with a flat double crochet fabric of similar dimensions.
Conclusion
This basketweave crochet blanket pattern combines a repeated six-row texture with a continuous rectangular construction and a multi-round border. The main technical priorities are maintaining the correct 98-stitch count, reversing the post-stitch arrangement at the correct row, and controlling the tension of the foundation and edging.
Before making a second blanket, record the finished dimensions, yarn consumption, and gauge so the design can be reproduced accurately in another color or size. Save the completed project to Pinterest and share a photograph on Instagram using #ChunkyBasketweaveBlanket.
Would you keep the blanket entirely ivory, as shown in the reference photograph, or introduce a contrasting color in the outer border?








