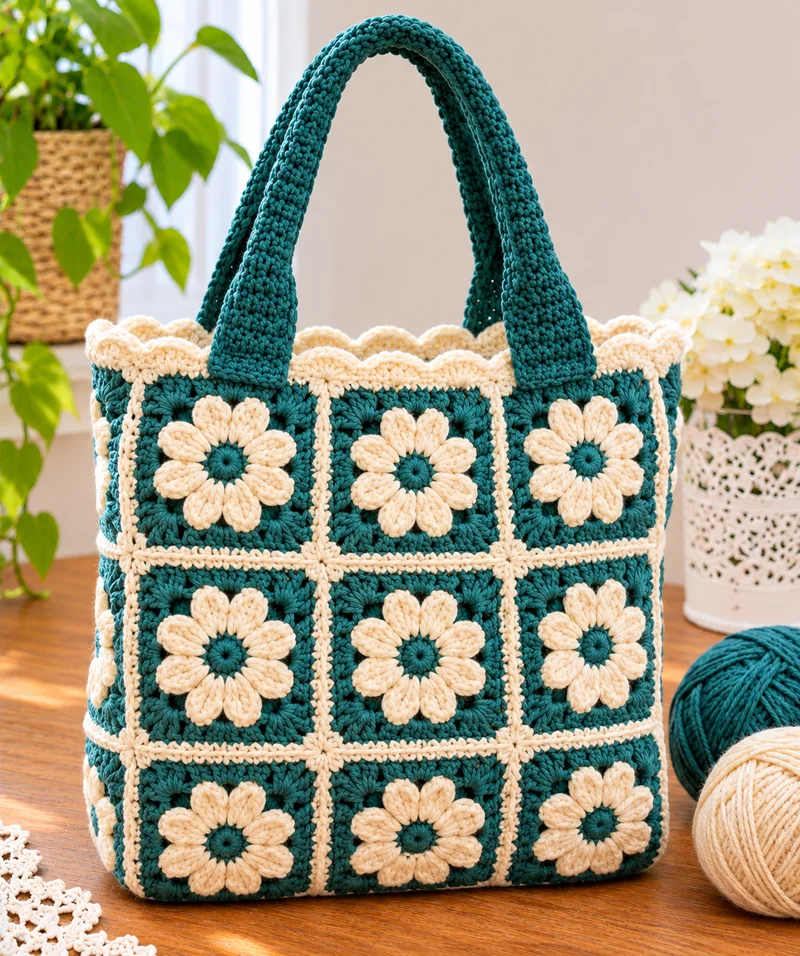
A daisy tote needs more than decorative petals: its square corners must remain stable under the weight of the handles. This crochet daisy granny square tote bag pattern combines raised cream flowers, deep teal backgrounds, and contrasting seams to create a structured everyday bag. Made with cotton yarn and a 4 mm crochet hook, the finished project measures approximately 30 cm wide and 30 cm tall, excluding the handles. The design is suitable for intermediate crocheters familiar with basic granny squares and joining techniques.
The Design: What Makes This Daisy Tote Bag Different?
This floral crochet tote bag uses individual daisy granny squares rather than a single continuous body. Each square begins with a teal center surrounded by eight cream petals. The background returns to teal, creating a defined floral motif without adding separate sewn-on flowers.
The cream joining seams form a visible grid across the front, back, sides, and base. This construction keeps the floral squares aligned while adding contrast between the teal panels.
Two wide crocheted handles distribute weight more effectively than narrow chain straps. A scalloped cream border completes the opening without requiring a zipper.
One common mistake when making a crochet granny square bag is joining squares with different dimensions. Even a small variation can produce uneven sides or a twisted base. Blocking every square to the same measurements before assembly helps prevent this problem.
Project Information at a Glance
| Project | Daisy Granny Square Tote Bag |
|---|---|
| Skill Level | Intermediate |
| Estimated Time | 12–16 hours |
| Finished Width | Approximately 30 cm |
| Finished Height | Approximately 30 cm |
| Bag Depth | Approximately 10 cm |
| Handle Length | Approximately 65 cm each |
| Crochet Hook | 4 mm |
| Yarn Weight | Medium-weight cotton, category 4 |
| Construction | 27 granny squares, joined panels, two handles |
Measurements, yarn quantities, and project time are estimates for this original photo-inspired pattern. Actual results depend on gauge and yarn choice.
Materials and Tools
Yarn
Choose a cotton yarn with good stitch definition. Cotton holds the shape of the petals and produces a relatively firm bag fabric.
- Deep teal cotton yarn: approximately 350–450 g, medium weight, for the square backgrounds, centers, and handles.
- Cream cotton yarn: approximately 200–250 g, medium weight, for the daisy petals, joining seams, and scalloped border.
Suggested yarn types include DROPS Paris, Paintbox Yarns Cotton Aran, or another cotton yarn of comparable thickness. These are alternatives rather than verified matches for the yarn in the photograph.
Tools
- 4 mm crochet hook
- Tapestry needle for joining and weaving ends
- Sharp scissors
- Stitch markers for handle positioning
- Measuring tape
- Blocking pins and mat
- Optional cotton fabric lining
Crochet Abbreviations
This pattern uses US crochet terminology.
- MR: Magic ring
- ch: Chain
- sc: Single crochet
- hdc: Half double crochet
- dc: Double crochet
- sl st: Slip stitch
- st: Stitch
- sp: Space
- rep: Repeat
- RS: Right side
- WS: Wrong side
- BLO: Back loop only
- puff st: Puff stitch
How to Make a Puff Stitch
Yarn over, insert the hook into the indicated stitch or space, yarn over, and pull up a loop. Repeat this action until five elongated loops have been drawn up, leaving seven loops on the hook. Yarn over and pull through all seven loops, then chain one to secure the puff.
Keep the pulled-up loops at approximately the height of a double crochet. Consistent loop height gives every petal a similar appearance.
Pattern – Step by Step
The bag is assembled from 27 floral squares: nine for the front, nine for the back, three for each side, and three for the bottom. The sample layout uses squares blocked to approximately 10 × 10 cm.
Work joined rounds for each square. The chain stitches used to begin a round count as a double crochet only where stated.
Step 1: Crochet the Daisy Flower Center (Make 27)
Yarn: Deep teal
Round 1: Make a magic ring. Work 8 sc into the ring. Pull tight and join with a sl st to the first sc. (8 sc)
Fasten off the teal yarn and weave in the center tail.
This small circular center creates the foundation for eight evenly spaced petals. The center should remain flat rather than forming a raised cone.
Step 2: Make the Cream Daisy Petals
Yarn: Cream
Join the cream yarn into any stitch from Round 1.
Round 2: In each of the eight teal stitches, work (puff st, ch 2). Join with a sl st to the top of the first puff. (8 puff stitches, 8 ch-2 spaces)
Fasten off and weave the cream tail behind the flower.
Each puff forms one rounded petal. Eight petals create the daisy shape shown in the reference design.
If the petals curl excessively, check the loop height and avoid pulling the closing chain too tightly. The flower should lie nearly flat before the background is added.
Step 3: Turn the Daisy into a Square
Yarn: Deep teal
Join the teal yarn in any ch-2 space between petals.
Round 3: Ch 3 (counts as first dc), work 2 dc, ch 2, and 3 dc in the same space to form the first corner. Work 3 dc in the next ch-2 space.
Repeat the following sequence three times: (3 dc, ch 2, 3 dc) in the next ch-2 space, then 3 dc in the following ch-2 space.
Join with a sl st to the top of the beginning ch 3. (36 dc, 4 corner ch-2 spaces)
The four corner groups transform the round flower into a square. Each side contains a central group of three double crochets between its corners.
Round 4: Sl st across to the nearest corner ch-2 space. Ch 3, work (2 dc, ch 2, 3 dc) in the corner.
Work 3 dc in each of the next two spaces between groups. In the next corner work (3 dc, ch 2, 3 dc).
Repeat around all four sides. Join with a sl st. (60 dc, 4 corner ch-2 spaces)
Round 5: Repeat the granny square expansion: work (3 dc, ch 2, 3 dc) in every corner and 3 dc in each of the three spaces along each side. Join with a sl st. (84 dc, 4 corner ch-2 spaces)
Fasten off, leaving a 15 cm yarn tail.
Measure the square. If it is smaller than the target 10 cm, another granny round may be added to every square. If it is larger, adjust the hook size or yarn choice before completing all 27 motifs.
Important: Make all squares with the same number of rounds and the same hook size.
Step 4: Block All 27 Granny Squares
Blocking is important for a bag constructed from multiple square motifs. Uneven edges become more noticeable after the cream joining seams are added.
- Lay each completed square on a blocking mat.
- Measure the width and height.
- Pin each corner to form a square measuring approximately 10 × 10 cm.
- Lightly dampen the cotton yarn or use a suitable steam-blocking method without pressing the raised petals.
- Allow every square to dry completely before removing the pins.
Check the center flowers after blocking. The petals should remain raised, while the teal background and corners should lie flat.
Assembling the Granny Square Bag
Step 5: Arrange the Front and Back Panels
Lay nine granny squares right side up in three rows of three squares.
Repeat for the back panel using another nine squares.
Arrange the flowers in the same orientation. This produces a consistent floral layout across the finished bag.
Use the remaining nine squares to form two side panels, each one square wide and three squares tall, plus a bottom panel three squares long and one square wide.
The finished layout is:
- Front panel: 3 × 3 squares
- Back panel: 3 × 3 squares
- Left side: 1 × 3 squares
- Right side: 1 × 3 squares
- Bottom: 3 × 1 squares
Step 6: Join the Granny Squares with Cream Yarn
Yarn: Cream
Use a visible single crochet seam to reproduce the contrasting grid effect.
Place two squares with their wrong sides together and the edges aligned.
Insert the hook through the corresponding outer loops of both squares. Join the cream yarn and work one single crochet through each matching stitch along the edge.
At the corners, work through the matching corner spaces without adding unnecessary increases.
Continue joining squares to create the front and back panels.
Repeat for both side panels and the bottom strip.
Keep the joining tension consistent. Tight seams pull the squares inward and reduce the overall dimensions of the bag.
For the most even appearance, join the squares horizontally first and then vertically.
Step 7: Construct the Bag Body
Place the front panel flat with the right side facing outward.
Attach the left side panel along the front panel’s left edge using the cream single crochet joining method.
Join the right side panel to the opposite edge.
Attach the back panel to the free edges of both side panels. The result is an open rectangular tube.
Position the three-square bottom panel underneath the tube.
Match its long edges to the front and back panels, and its short edges to the bottom edges of the side panels.
Join around the entire base using cream yarn.
Turn the bag right side out and check that all corners sit evenly.
The base should form a rectangle approximately 30 × 10 cm before the bag is filled.
Crochet the Wide Tote Bag Handles
Step 8: Make the First Handle
Yarn: Deep teal
The handles are crocheted separately and sewn securely to the upper edge of the bag.
Row 1: Ch 11. Starting in the second chain from the hook, work 10 sc. (10)
Row 2: Ch 1, turn, sc in each stitch across. (10)
Rows 3–100: Repeat Row 2. (10 stitches per row)
Measure the strap after Row 100. Continue or remove rows until it measures approximately 65 cm, allowing for your preferred shoulder drop.
Fasten off, leaving a 30 cm tail for sewing.
For additional firmness, the handle may be worked with a smaller hook or reinforced with a matching cotton tape sewn along its underside.
Step 9: Make the Second Handle
Repeat the first handle using the same yarn, hook size, and row count.
Measure both straps before attachment. The finished lengths should match within approximately 5 mm.
Different handle lengths cause the bag to tilt when carried.
Step 10: Attach the Handles
Lay the bag flat and mark the handle positions.
On the front panel, position the two strap ends approximately 7–8 cm inward from the left and right outer edges. Keep both ends at equal distances from the center.
Repeat on the back panel for the second handle.
Overlap each strap end with the inside of the bag opening by approximately 4 cm.
Using a tapestry needle and matching teal yarn, sew each end with a rectangular seam and diagonal reinforcement stitches.
Work through several rows of the bag fabric rather than attaching the strap to a single row of crochet.
Check that neither handle is twisted before sewing the final attachment point.
For heavier contents, reinforce the handle attachments through a fabric lining or additional interior crochet patch.
Adding the Cream Scalloped Border
The scalloped edge adds a decorative finish around the top of the bag.
Yarn: Cream
Join the yarn at a side seam on the top opening.
Border Round 1: Work sc evenly around the entire opening, placing one stitch in each available top-edge stitch. Adjust at the joins so the total stitch count is a multiple of six. Join with a sl st.
Border Round 2: Repeat *skip 2 stitches, work 5 dc in the next stitch, skip 2 stitches, sl st in the next stitch* around the opening.
Join with a sl st and fasten off.
Each five-double-crochet group forms one scallop.
If the edge begins to flare, reduce the number of stitches in the foundation round. If the opening pulls inward, distribute additional stitches evenly before working the scallops.
The cream scallops should sit above the teal squares without obscuring the top row of daisy flowers.
Optional Fabric Lining
A lining reduces stretching and prevents small objects from slipping through spaces in the crochet fabric.
Choose lightweight cotton fabric in cream, teal, or another coordinating color.
Cut a front and back rectangle, two side rectangles, and one base rectangle using the interior measurements of the completed bag. Add approximately 1 cm seam allowance to each edge.
Sew the pieces together to form a fabric bag with the same shape as the crochet exterior.
Fold the lining’s upper edge inward and press it flat.
Insert the lining into the crochet bag with wrong sides facing each other.
Hand-stitch the lining approximately 1 cm below the upper border, keeping the stitches hidden between the crochet loops.
Do not sew through the visible cream scallops. This allows the decorative edge to retain its shape.
7 Technical Tips for a Better Crochet Daisy Tote Bag
- Control square dimensions: A 5 mm size difference between squares can create visibly uneven panel seams. Block every motif to the same 10 cm target before joining.
- Maintain consistent petal height: Short puff-stitch loops make the cream petals appear compressed. Pull each loop to approximately double-crochet height before closing the puff.
- Prevent loose center rings: An unsecured magic ring can widen after repeated use. Weave the starting tail through several stitches in opposite directions to lock the center.
- Avoid distorted seams: Joining stitches that are tighter than the granny squares can pull the panels inward. Use a hook one size larger for the seams if necessary.
- Reinforce handle attachment: Sewing a strap through only one crochet row concentrates the load at that point. Attach each handle over approximately 4 cm of fabric with multiple reinforcement stitches.
- Check bag symmetry: Unequal side panels can make the base twist. Measure both side panels before attaching the bottom strip.
- Secure yarn tails: Short loose ends may work through the open crochet fabric during use. Weave each tail through at least 5 cm of neighboring stitches and change direction once.
How to Adjust the Size of the Bag
The modular construction makes this crochet flower tote bag adaptable to different dimensions.
Make a Smaller Bag
Use two columns and two rows of squares for the front and back panels.
Make matching two-square side panels and a two-square bottom panel. This creates a smaller bag suitable for lightweight personal items.
Reduce the handle length if the smaller bag will be carried by hand rather than over the shoulder.
Make a Larger Bag
Add a fourth column of granny squares to the front and back panels to increase the width.
Extend the bottom panel to four squares while keeping the side panels three squares tall.
For additional height, add a fourth row to the front, back, and side panels.
A larger bag requires stronger handle attachments and may benefit from a fabric lining with reinforced seams.
Adjust the Handle Length
For a shorter hand-held tote, reduce each handle to approximately 35–45 cm.
For a shoulder bag, aim for approximately 60–70 cm, depending on the desired drop and attachment overlap.
Measure the handles while the bag is empty and again after adding a light test load. Cotton crochet may lengthen under weight.
Color Variations for the Daisy Granny Square Tote
The teal and cream combination creates strong contrast between the petals and their background. Other combinations can be used without changing the crochet instructions.
Sage green and ivory: Use muted green for the centers, backgrounds, and handles, with ivory petals for a softer floral appearance.
Chocolate brown and beige: A darker background produces a more defined geometric grid, especially when the seams are worked in beige.
Dusty pink and white: White petals against a pink background create a lighter floral design.
Mustard yellow and cream: This combination gives the bag a warm retro-style palette.
Keep the flower centers darker than the petals to maintain visual separation. For the closest result to the reference photograph, use deep teal for the center and background, cream for the petals, and cream for the joining seams.
Care and Washing Instructions
Cotton crochet bags can lose their shape when washed aggressively, particularly when they contain raised puff stitches.
Check the yarn label before cleaning.
For hand washing, use cool water and a mild detergent. Avoid twisting or wringing the bag, as this can stretch the joins and handles.
Remove excess water by pressing the bag between clean towels.
Reshape the front, back, sides, and base while damp, then dry flat away from direct heat.
If the bag has a fabric lining, check that the lining and crochet yarn have compatible washing requirements.
Store the bag flat or lightly filled with tissue paper to help preserve its rectangular shape.
Frequently Asked Questions
How many granny squares do I need for this tote bag?
This pattern uses 27 granny squares. Nine squares form the front, nine form the back, three form each side, and three form the base.
What yarn works best for a crochet granny square tote bag?
Medium-weight cotton yarn is a practical choice because it provides stitch definition and has relatively little elasticity compared with many acrylic yarns. A cotton-blend yarn can also work, although the finished bag may stretch differently.
Can I make this bag without a lining?
Yes. The crochet construction can be used without a lining for lightweight items. A fabric lining is recommended when carrying small objects or items that could push through the spaces between stitches.
How do I stop crochet bag handles from stretching?
Use tight single crochet stitches, reinforce the handle attachment areas, and consider sewing cotton tape along the underside of each strap. Avoid attaching the handles to only one row of the bag opening.
Can beginners make this daisy granny square bag?
Crocheters who already know single crochet, double crochet, magic rings, and basic joining methods can follow the construction. The main challenges are producing consistent puff stitches, maintaining square dimensions, and attaching the handles securely.
Can I use acrylic yarn instead of cotton?
Acrylic yarn can be substituted if the gauge is similar, but the bag may stretch more when loaded. A lining and reinforced handles become especially useful when using a more elastic yarn.
Conclusion
This crochet daisy granny square tote bag pattern uses 27 floral motifs to create a structured rectangular bag with a contrasting cream grid and two wide teal handles. The raised puff-stitch petals provide the main decorative detail, while the joined panels establish the bag’s shape. Before using the finished tote, inspect the base seams, handle attachments, and woven yarn ends. Add a fabric lining if the bag will carry small or relatively heavy items. Save the finished project to Pinterest or share a photograph on Instagram using #DaisyGrannySquareTote. For your next version, would you keep the teal flower centers or change them to yellow for a more traditional daisy appearance?









