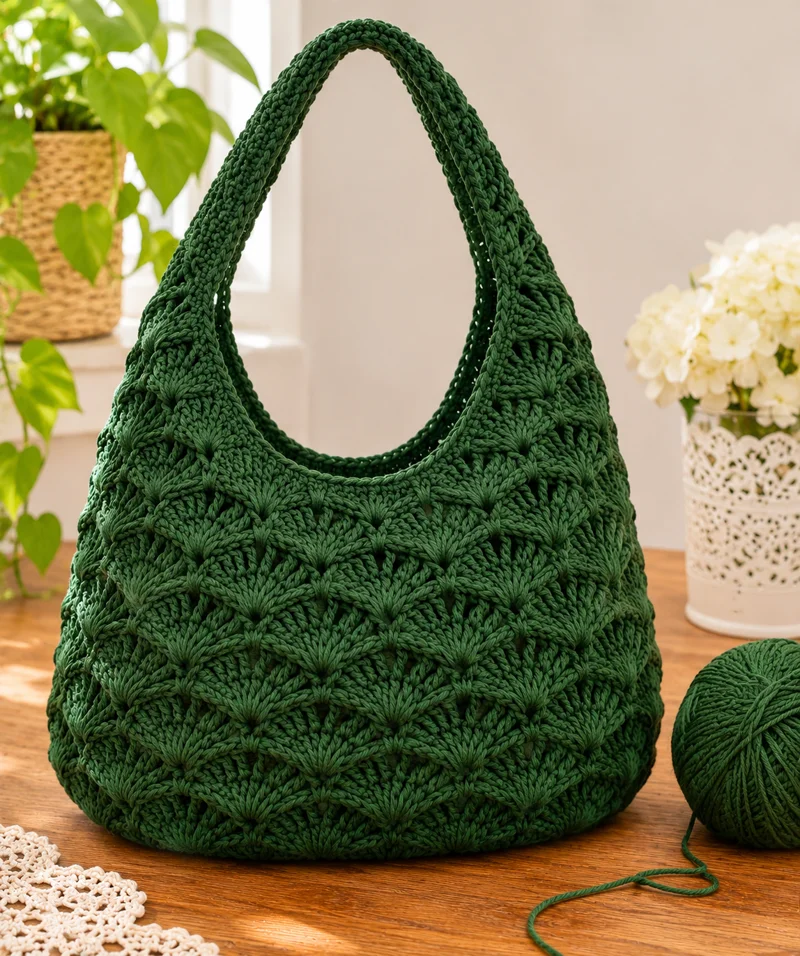
A forest green crochet hobo bag needs a firm base, flexible sides, and a shoulder strap that can support the weight of everyday items. This crochet hobo bag pattern uses a textured shell-inspired stitch, thick cotton yarn, and a reinforced handle to create a rounded, slouchy silhouette. The project is suitable for intermediate crocheters who can work increases, decreases, and textured stitch repeats.
The Design: What Makes This Crochet Hobo Bag Different
The defining feature of this bag is its repeating raised texture. The stitch pattern creates a series of overlapping fan-shaped motifs that add dimension to the forest green fabric. Unlike a flat crochet tote, the hobo silhouette depends on a rounded base and slightly tapered upper edges.
The body is worked in joined rounds from the bottom upward. A dense base supports the contents, while the textured upper section allows the bag to drape naturally. The wide handle is part of the bag itself: it rises from the upper edges as a continuation of the same shell-stitch fabric, forming one integrated piece.
One common mistake when making a textured crochet handbag is using a hook that produces fabric with large gaps. This can cause the bag to stretch excessively when filled. A smaller hook, combined with firm cotton yarn, produces a more stable structure.
This crochet shoulder bag pattern also includes instructions for reinforcing the handle and controlling the shape of the opening.
Project Information at a Glance
| Detail | Information |
|---|---|
| Skill Level | Intermediate |
| Estimated Time | 8–12 hours |
| Finished Width | Approximately 36 cm |
| Finished Height | Approximately 28 cm, excluding strap |
| Hook Size | 5 mm |
| Yarn | Bulky cotton cord or equivalent |
| Construction | Bottom-up, joined rounds |
| Best For | Everyday shoulder bag |
Measurements and quantities are proposed specifications for this original pattern, not verified measurements from the photograph. Finished dimensions depend on yarn, gauge, and tension. The stitch texture is an interpretation of the photographed bag rather than an exact reconstruction.
Materials and Tools
Yarn
- Forest green bulky cotton cord yarn: approximately 450–550 g for the main body and integrated handle.
- Matching forest green cotton yarn: approximately 20 g for reinforcing seams and finishing.
Choose a firm cotton cord with enough flexibility to form textured stitches. Cotton is preferable to highly elastic acrylic when the bag will carry heavier objects.
The required quantity depends on the yarn’s length per gram. Purchase yarn from the same dye lot to avoid visible color differences between the body and handle.
Tools
- 5 mm crochet hook, adjusted if needed to achieve firm fabric.
- Stitch markers for marking the beginning of rounds and side positions.
- Large tapestry needle for joining and weaving ends.
- Sharp scissors for cutting yarn.
- Measuring tape for checking dimensions.
- Optional fabric lining for additional interior support.
- Optional magnetic closure for securing the opening.
Crochet Abbreviations
- MR: Magic ring
- ch: Chain
- sc: Single crochet
- hdc: Half double crochet
- dc: Double crochet
- sl st: Slip stitch
- st: Stitch
- inc: Increase
- dec: Decrease
- BLO: Back loop only
- rep: Repeat
- RS: Right side
Instructions use US crochet terminology. A beginning chain does not count as a stitch unless stated otherwise.
Forest Green Crochet Hobo Bag Pattern – Step by Step
The bag consists of a flat oval base, a rounded lower body, a textured upper body, a shaped opening, and a reinforced shoulder strap. Work the base and body in joined rounds. Turn only where the instructions specify.
Part 1: Crochet the Oval Base
Yarn: Forest green bulky cotton cord.
Ch 31.
Round 1: Sc in the second ch from hook and in the next 28 ch. Work 3 sc in the last ch. Continue along the opposite side of the foundation chain, working 28 sc, then 2 sc in the final ch. Join with sl st. (62 sts)
Round 2: Ch 1. Sc in the next 29 sts, inc in each of the next 3 sts, sc in the next 28 sts, inc in each of the last 2 sts. Join. (67 sts)
Round 3: Ch 1. Sc in the next 29 sts, (sc, inc) 3 times, sc in the next 28 sts, (sc, inc) 2 times. Join. (72 sts)
Round 4: Ch 1. Sc in the next 29 sts, (2 sc, inc) 3 times, sc in the next 28 sts, (2 sc, inc) 2 times. Join. (77 sts)
Round 5: Ch 1. Sc in the next 29 sts, (3 sc, inc) 3 times, sc in the next 28 sts, (3 sc, inc) 2 times. Join. (82 sts)
Round 6: Ch 1. Sc in every st around. Join. (82 sts)
Check that the base lies flat. If it curls upward, the hook may be too small or the tension too tight. If the edges ripple, the fabric may be too loose.
The base should form an elongated oval. Its exact measurements will depend on the cord thickness and stitch gauge.
Part 2: Build the Lower Bag Body
Continue with forest green yarn.
Round 7: Ch 1. Sc in BLO of every st around. Join. (82 sts)
Round 8: Ch 1. Sc in every st around. Join. (82 sts)
Round 9: Ch 1. Sc in every st around. Join. (82 sts)
Round 10: Ch 1. Hdc in every st around. Join. (82 sts)
Round 11: Ch 1. Hdc in every st around. Join. (82 sts)
Round 12: Ch 1. Sc in every st around. Join. (82 sts)
The BLO round creates a defined fold between the bottom and side walls. Keep the foundation edge facing downward and check that the side fabric rises evenly.
Part 3: Create the Textured Shell Pattern
The photographed bag features closely packed raised motifs. The following shell-inspired repeat produces a textured surface with a similar visual direction, although the stitch structure is not an exact match.
For this section, work a preparation round to establish a multiple of six stitches.
Round 13: Ch 1. Sc in the next 40 sts, inc, sc in the next 40 sts, inc. Join. (84 sts)
Round 14: Ch 1. Repeat [sc in next st, skip 2 sts, 5 dc in next st, skip 2 sts] 14 times. Join with sl st to first sc. (84 sts: 14 sc and 70 dc)
Round 15: Ch 1. Sc in every st around. Join. (84 sts)
Round 16: Repeat Round 14. (84 sts)
Round 17: Repeat Round 15. (84 sts)
Round 18: Repeat Round 14. (84 sts)
Round 19: Repeat Round 15. (84 sts)
Round 20: Repeat Round 14. (84 sts)
Round 21: Repeat Round 15. (84 sts)
Round 22: Repeat Round 14. (84 sts)
Round 23: Repeat Round 15. (84 sts)
Round 24: Repeat Round 14. (84 sts)
Round 25: Repeat Round 15. (84 sts)
Round 26: Repeat Round 14. (84 sts)
Round 27: Repeat Round 15. (84 sts)
Each shell round maintains 84 stitches because every six-stitch repeat replaces six existing stitches with one single crochet and five double crochets.
Measure the body after Round 27. If the bag is shorter than the desired height, add complete pairs of shell and single-crochet rounds before shaping the upper edge.
Part 4: Shape the Upper Opening
The top opening should be narrower than the widest part of the bag. Controlled decreases produce a softer hobo silhouette without sharply folding the sides.
Round 28: Ch 1. Repeat [sc in next 12 sts, dec] 6 times. Join. (78 sts)
Round 29: Ch 1. Sc in every st around. Join. (78 sts)
Round 30: Ch 1. Repeat [sc in next 11 sts, dec] 6 times. Join. (72 sts)
Round 31: Ch 1. Sc in every st around. Join. (72 sts)
Round 32: Ch 1. Repeat [sc in next 10 sts, dec] 6 times. Join. (66 sts)
Round 33: Ch 1. Sc in every st around. Join. (66 sts)
Round 34: Ch 1. Sc in every st around. Join. (66 sts)
Fasten off and weave in the end.
Flatten the bag with the base centered. Place markers at the two side folds, approximately 33 stitches apart along each face. These markers identify the handle positions.
Part 5: Crochet the Integrated Shoulder Handle
Yarn: Forest green bulky cotton cord.
The handle is worked directly from the upper edge of the bag, as a continuation of the same shell-stitch fabric — it is not a separate piece. This matches the photographed bag, where the wide handle rises from the body as one integrated piece.
Mark two handle sections on opposite sides of the opening, each approximately 8 stitches wide, centered on the side folds marked earlier.
Working back and forth in rows, build each side of the handle upward in shell stitch, decreasing slightly at the edges so the handle narrows gently toward the top. Continue until each side measures approximately 25 cm from the opening.
Check that both sides are the same length before joining, so the bag hangs evenly.
Part 6: Join the Handle at the Top
Hold the two handle sides together at the top of the arch. Join with slip stitches through both layers, working across the full width of the handle.
Check that the join is flat and the handle is not twisted. Fasten off and weave in the end.
The finished handle should form a continuous arch above the bag. Test the shoulder drop before wearing the bag.
Part 7: Reinforce the Bag Opening
Join forest green yarn at the back of the opening.
Edging Round 1: Ch 1. Sc evenly around the opening, working one stitch into each stitch of the final body round. Join. (66 sts)
Edging Round 2: Ch 1. Sl st loosely in every st around. Join. (66 sts)
Fasten off and weave in the end.
This edging stabilizes the opening and helps limit stretching during use. Keep the slip stitches relaxed enough that the top edge does not pucker.
Optional Fabric Lining
A fabric lining can prevent small objects from passing through the textured stitch openings. It also reduces friction against the crochet fabric.
Place the finished bag flat on a piece of folded cotton fabric. Trace its outline, allowing approximately 1.5 cm for seams. Cut two matching pieces.
Sew the side and bottom seams with the right sides of the fabric facing each other. Leave the upper edge open.
Fold the top seam allowance inward and press it flat. Insert the lining into the crochet bag, matching the side seams and upper edges.
Hand-sew the lining to the inside of the opening with small stitches. Avoid pulling the thread through to the visible exterior of the crochet fabric.
A lining should follow the shape of the finished bag rather than forcing the crochet body into a different silhouette.
Assembly Instructions
- Inspect the base. Confirm that the oval bottom lies flat and the stitch tension is consistent.
- Shape the body. Position the bag upright and distribute the fabric evenly around the base.
- Check the textured rounds. Inspect the shell repeats for missed stitches or uneven spacing.
- Flatten the upper opening. Align the front and back panels before identifying the side attachment points.
- Mark the handle positions. Place markers at the opposite sides of the upper edge.
- Build the first handle side. Work upward from the marked section in shell stitch.
- Build the second handle side to the same length, then join both sides at the top. Match the first side and check for twisting.
- Reinforce the opening. Add the single-crochet and slip-stitch edging if it has not already been completed.
- Install the optional lining. Position it inside the bag and sew around the opening.
- Finish the bag. Weave in loose ends, inspect the handle join, and check the overall shape.
The completed bag should have a rounded base, textured sides, a curved opening, and a securely attached shoulder strap.
7 Technical Tips for a Better Crochet Hobo Bag
- Mark every round: Place a stitch marker in the first stitch of each round to prevent accidental shifts in the pattern. Losing the round beginning can misalign the textured shell repeats.
- Control the base tension: Check the oval base after Round 5 for curling or rippling. A distorted base can cause the entire bag to lean or twist.
- Check the shell stitch count: Every shell round must contain 14 complete repeats and 84 stitches. An incomplete repeat creates an uneven motif at the join.
- Maintain consistent decreases: Work the upper shaping decreases evenly around the bag. Concentrating decreases in one area produces an unwanted fold.
- Measure the handle before joining: Test the shoulder drop while holding both handle sides together. A handle that is too short may make the bag difficult to carry over a coat.
- Pin the handle sections: Mark both handle sections at equal heights before building them. Unequal handle sides cause the bag to hang at an angle.
- Weave ends through multiple directions: Thread each yarn tail through at least 5 cm of dense crochet fabric, then change direction. Short, unsecured ends may loosen under repeated use.
How to Adjust the Bag Size
Make a Wider Bag
Increase the length of the starting chain to create a longer oval base. Maintain the same general shaping method and adjust the stitch count before beginning the textured section.
The shell pattern requires a multiple of six stitches. After enlarging the base, add or decrease stitches evenly in the preparation round to establish the correct multiple.
Make a Taller Bag
Add more pairs of textured shell rounds and single-crochet rounds before beginning the upper shaping section. Each additional pair increases the height while preserving the stitch sequence.
Measure the bag regularly because bulky yarn can produce significant height changes with relatively few rounds.
Make a Longer Shoulder Strap
Continue working single-crochet rows until the desired length is reached. For a crossbody-style bag, additional length may be needed, but the strap should also be checked for stretching under load.
Make the Bag Firmer
Choose a less elastic yarn and work at a tighter gauge. A fabric lining can add support, but it should not compensate for loose crochet stitches or weak strap seams.
Common Crochet Bag Problems and Solutions
Why Does the Bag Stretch Too Much?
Stretching usually results from loose stitches, elastic yarn, or insufficient handle reinforcement. Cotton cord and firm single-crochet strap construction help reduce the problem.
Test the finished handle with a light load before using the bag for everyday items.
Why Is the Bottom Uneven?
An uneven base can result from inconsistent increases or variations in tension. Count the stitches at the end of each base round and check that the oval lies flat before continuing.
Why Are the Shell Stitches Misaligned?
Misalignment usually occurs when stitches are skipped incorrectly or the round join shifts. Count each six-stitch repeat carefully and use a marker to identify the beginning of the round.
Why Does the Opening Curl Inward?
Some inward shaping is intentional for a hobo bag. Excessive curling may indicate that the decreases are too concentrated or the final slip-stitch edging is too tight.
Care and Maintenance
Check the yarn label before washing. Cotton cord bags can become heavy when wet, so support the entire bag during cleaning rather than lifting it by the strap.
Spot-clean small marks with a damp cloth and mild detergent. If full washing is permitted by the yarn manufacturer, use a gentle method and avoid aggressive twisting.
Reshape the bag while damp and dry it flat on a clean towel. Do not hang a wet crochet bag by its handle, because the weight of the water may permanently stretch the handle.
Inspect the handle join periodically, particularly when the bag is used to carry books, bottles, or other heavy items.
Conclusion
This forest green crochet hobo bag combines a structured oval base with raised shell-inspired stitches and an integrated handle. The construction allows the lower section to support everyday items while the upper section retains the curved silhouette characteristic of hobo bags.
Before using the finished bag, check the handle join, confirm that all yarn ends are secure, and test the fabric with a light load. Add a cotton lining if smaller accessories will be carried regularly.
Save this crochet hobo bag pattern to Pinterest or share your finished version on Instagram using #ForestGreenCrochetHoboBag.
Would you keep the wide forest green handle, or make this hobo bag in another color?









