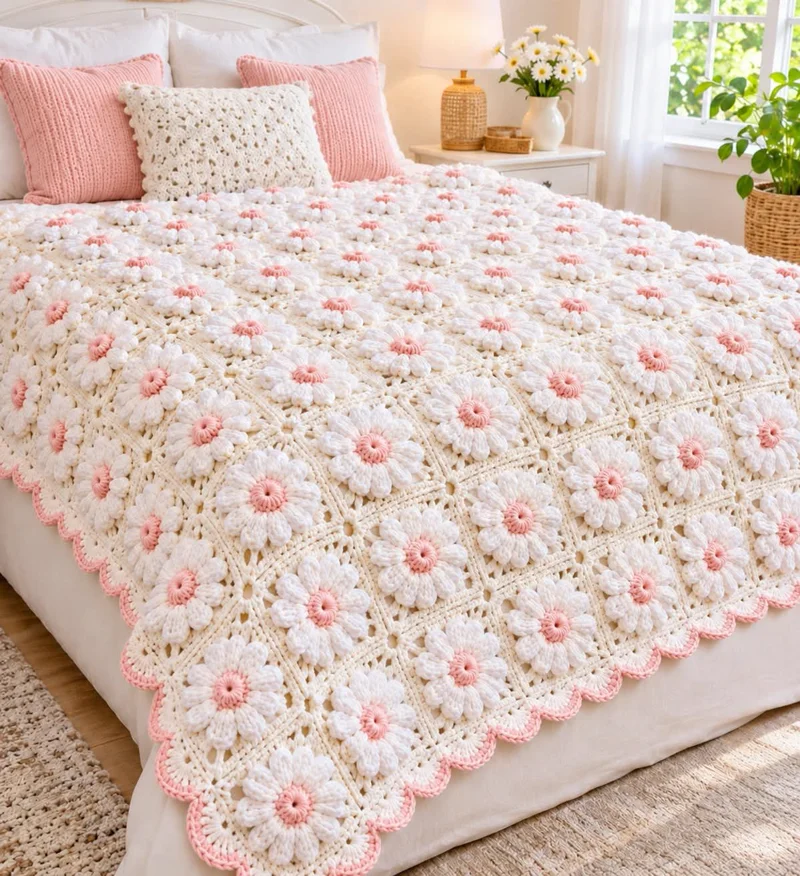
Pink-centered daisies need enough space between their raised petals to keep a crocheted blanket flat. This free crochet daisy blanket pattern combines white puff-stitch flowers, pale pink centers, ivory granny square backgrounds, and a scalloped border. The project uses worsted-weight yarn and a 4.5 mm crochet hook. Designed for intermediate crocheters, the modular construction allows you to adjust the blanket for a sofa, single bed, or larger bed covering.
The Design: What Makes This Daisy Blanket Different
The defining feature of this floral granny square blanket is the raised daisy positioned at the center of each square. Rather than working the petals as flat stitches, this design uses dimensional puff stitches to create a pronounced flower shape.
Three structural decisions control the finished appearance. First, the pink center remains relatively compact, allowing the white petals to form a balanced ring. Second, the ivory background creates open spaces around the flower, separating neighboring motifs. Third, the squares are joined with flat seams so the blanket can spread evenly across a mattress.
The scalloped edging repeats the rounded shape of the petals while adding a narrow pink accent. A common mistake when making a crochet daisy granny square blanket is tightening the puff stitches excessively. This pulls the center inward and can distort the surrounding square.
Project Information at a Glance
| Feature | Details |
|---|---|
| Skill Level | Intermediate |
| Construction | Individual floral granny squares |
| Suggested Hook | 4.5 mm (US 7) |
| Yarn Weight | Medium / Worsted Weight #4 |
| Target Square Size | Approximately 15 × 15 cm after blocking |
| Example Layout | 10 squares × 12 squares |
| Estimated Size Before Border | 150 × 180 cm |
| Estimated Working Time | 60–100 hours, depending on speed |
| Terminology | US Crochet Terms |
Measurements, time, and yarn quantities are planning estimates for this original adaptation. They are not measurements taken from the photographed blanket. Make and block one sample square before purchasing yarn for the complete project.
Materials and Tools
Yarn
Choose smooth, medium-weight yarn with consistent thickness. Acrylic, cotton blends, and easy-care wool blends are suitable options. All three colors should have similar fiber content and washing requirements.
- Ivory or Cream Worsted Yarn: Approximately 1,500–2,000 g for the square backgrounds, joining seams, and main border.
- White Worsted Yarn: Approximately 600–900 g for the raised daisy petals.
- Soft Pink Worsted Yarn: Approximately 200–350 g for the flower centers and decorative edging.
These amounts are provisional and include an allowance for variation. Actual consumption depends on gauge, puff-stitch height, yarn density, and the final number of squares. A yarn such as Lion Brand Basic Stitch or another washable worsted-weight alternative can be used.
Tools
- 4.5 mm crochet hook, or the size needed to achieve the desired gauge
- Tapestry needle for joining and weaving in ends
- Locking stitch markers for marking corners and repeat positions
- Sharp scissors
- Measuring tape
- Blocking mats and rust-resistant pins
Crochet Abbreviations
- MR: Magic ring
- ch: Chain
- sc: Single crochet
- hdc: Half double crochet
- dc: Double crochet
- tr: Treble crochet
- sl st: Slip stitch
- st: Stitch
- sp: Space
- inc: Increase
- dec: Decrease
- BLO: Back loop only
- rep: Repeat
- RS: Right side
- YO: Yarn over
An invisible decrease is made by inserting the hook through the front loops of two adjacent stitches before completing a single crochet; it is not required in the square pattern below.
Special Stitch: Four-Half-Double-Crochet Puff
The raised petals use a puff stitch formed from four incomplete half double crochets worked into the same stitch or space.
- Yarn over and insert the hook into the designated stitch.
- Yarn over and pull up a loop to the height of a half double crochet.
- Repeat the yarn-over, insert, and pull-up sequence three more times in the same stitch.
- With nine loops on the hook, yarn over and pull through all nine loops.
- Chain one to secure the puff stitch.
Keep each drawn-up loop at approximately the same height. Uneven loops produce petals with different thicknesses. The securing chain is part of the puff-stitch definition; any additional chains are specified separately in the pattern.
Free Crochet Daisy Granny Square Pattern
The following motif is worked in joined rounds with the right side facing. It uses eight dimensional petals, followed by an ivory granny square frame. The photograph shows a densely textured floral blanket, so this version recreates its color arrangement and raised-flower effect rather than claiming to duplicate every visible stitch.
Round 1: Pink Flower Center
Yarn: Soft Pink
Make a magic ring.
R1: Ch 3 (counts as first dc), work 7 dc into the ring. Join with a sl st to the top of the beginning ch 3. (8 dc)
Pull the ring closed firmly, leaving a small central opening if preferred for the decorative pink center.
Fasten off and leave a 10 cm yarn tail.
Round 2: Raised White Daisy Petals
Yarn: White
Join white yarn to any stitch from Round 1.
R2: Work one four-hdc puff stitch into the first stitch, then ch 1. Repeat this sequence in each remaining stitch around. Join with a sl st to the top of the first puff. (8 puff stitches and 8 additional ch-1 spaces)
Spread the petals outward with your fingers so the white stitches sit around the pink center.
Fasten off, leaving a 10 cm tail.
Round 3: Forming the Square
Yarn: Ivory
Join ivory yarn into any ch-1 space between petals.
R3: Ch 3 (counts as first dc), 2 dc, ch 2, 3 dc in the same space to form the first corner. Ch 1, skip the next petal space. In the following space, work (3 dc, ch 2, 3 dc). Ch 1 and skip the next petal space. Repeat until four corners have been completed. Join with a sl st to the top of the beginning ch 3. (24 dc, 4 corner ch-2 spaces, 4 side ch-1 spaces)
The four corner groups should sit evenly around the daisy. Each corner consists of two groups of three double crochets separated by two chains.
Round 4: Expanding the Ivory Background
Yarn: Ivory
Slip stitch across to the nearest corner ch-2 space.
R4: Ch 3 (counts as first dc), 2 dc, ch 2, 3 dc in the corner space. Ch 1, work 3 dc in the next side ch-1 space, ch 1. Work (3 dc, ch 2, 3 dc) in the next corner. Repeat around, working one 3-dc group in each side space and a complete corner group in every corner. Join with a sl st. (36 dc, 4 corner ch-2 spaces, 8 side ch-1 spaces)
The square should begin to lie flatter as the background expands.
Round 5: Final Granny Square Round
Yarn: Ivory
Slip stitch to the next corner space.
R5: Work (ch 3, 2 dc, ch 2, 3 dc) in the first corner. Ch 1. Work 3 dc in each side ch-1 space, placing ch 1 between groups. At every following corner, work (3 dc, ch 2, 3 dc). Continue around and join with a sl st to the top of the beginning ch 3. (48 dc, 4 corner ch-2 spaces, 12 side ch-1 spaces)
Fasten off and weave in the ends on the wrong side. Leave approximately 15 cm if you intend to use yarn tails during assembly.
Round 6: Stabilizing Edge
Yarn: Ivory
Join ivory yarn in any corner ch-2 space.
R6: Ch 1, work (2 sc, ch 2, 2 sc) in the first corner. Work 1 sc into each dc and each side ch-1 space along the next edge. Repeat the corner treatment at every corner and continue around. Join with a sl st to the first sc. (76 sc, 4 corner ch-2 spaces)
Each side contains 19 single crochet stitches between the corner chain spaces. The stabilizing round creates a defined edge for seaming and reduces stretching along the joins.
Fasten off and weave in the remaining ends.
How Many Granny Squares Do You Need?
The number of motifs depends on the size of the blocked squares and the intended blanket dimensions. A square measuring approximately 15 cm can be arranged into a range of useful layouts.
| Blanket Type | Layout | Square Count | Approximate Size Before Border |
|---|---|---|---|
| Small Throw | 6 × 8 | 48 | 90 × 120 cm |
| Large Throw | 8 × 10 | 80 | 120 × 150 cm |
| Bed Blanket | 10 × 12 | 120 | 150 × 180 cm |
| Large Bed Cover | 12 × 14 | 168 | 180 × 210 cm |
These calculations assume that every blocked motif measures 15 cm along each edge. Joining seams and the outer border may increase the finished dimensions.
For the pictured bedspread effect, a layout of 120 to 168 squares is a reasonable planning range, depending on mattress size and desired overhang. The photographed blanket cannot be measured accurately from the image alone.
How to Join the Daisy Granny Squares
A flat slip-stitch seam is suitable for this design because it keeps the joined squares relatively level while preserving the raised flower centers.
Flat Slip-Stitch Joining Method
- Block every completed granny square to the same dimensions.
- Arrange the squares into the selected number of rows and columns.
- Place two squares next to each other with their right sides facing upward.
- Insert the crochet hook through the corresponding inner loops of the edge stitches.
- Pull ivory yarn through both loops and complete a slip stitch.
- Continue matching stitches across the entire edge without pulling the seam tight.
- Join the remaining squares into complete rows.
- Connect the rows using the same slip-stitch method, matching every corner carefully.
- Weave in all joining tails on the wrong side.
- Lay the blanket flat and inspect the seams before beginning the decorative border.
The joined blanket should form a continuous rectangular panel with the daisy motifs facing upward.
Scalloped Crochet Border Pattern
The scalloped edging is an important part of the photographed design. It softens the square outline and adds repeated curved shapes along the outer edges. Ivory creates the main scallops, while pink highlights their outer tips.
Border Round 1: Foundation
Yarn: Ivory
Join yarn at any outer corner.
Ch 1 and work sc evenly around the blanket, placing 3 sc in each outer corner. Along each straight side, maintain an even stitch distribution and avoid adding extra stitches at every square junction.
Join with a sl st to the first sc.
If the border ripples, remove excess stitches. If it pulls inward, add stitches evenly rather than concentrating increases at the corners.
Border Round 2: Scalloped Shells
Yarn: Ivory
Work the shell repeat along each straight edge as follows:
*Skip 2 stitches, work 5 dc into the next stitch, skip 2 stitches, sc into the next stitch.* Repeat across the side.
Each shell repeat consumes six foundation stitches. Where a side does not divide evenly into six-stitch repeats, distribute the remaining stitches near the ends before working the final shell.
At each corner, work a larger shell of 7 dc into the corner stitch, adjusting adjacent spacing to prevent crowding.
Join with a sl st and fasten off.
Border Round 3: Pink Decorative Trim
Yarn: Soft Pink
Join pink yarn at the beginning of any scallop.
Work one slip stitch into the back loop of each stitch across the curved outer edge of the scallops. Continue around the entire blanket, maintaining relaxed tension.
For a more pronounced pink outline, substitute single crochet stitches for slip stitches. The single crochet version will produce a slightly wider decorative edge.
Fasten off and weave the yarn tail securely into the ivory stitches on the wrong side.
Seven Technical Tips for a Better Daisy Blanket
- Mark every corner: Place a stitch marker in each ch-2 corner space while making the first sample square. Missing a corner group changes the motif from a square into an uneven polygon.
- Control puff-stitch height: Draw each puff loop to approximately 10–12 mm, adjusting for your yarn. Inconsistent loop heights create irregular petals that can lean toward one side.
- Check the center tension: Keep the pink magic ring closed without pulling the surrounding double crochets inward. Excessive tension causes the flower center to pucker.
- Block to a fixed measurement: Pin each finished square to the same target dimensions, such as 15 × 15 cm. Differences of more than 5 mm can accumulate across long blanket rows.
- Match joining stitches: Insert the hook into corresponding stitches on both square edges. Skipping a stitch on one side produces a diagonal seam and may twist the joined motifs.
- Check border spacing: Count the available stitches before placing six-stitch shell repeats. Too many shells produce ruffling, while too few pull the blanket edges inward.
- Secure yarn tails: Weave each tail through at least 5 cm of neighboring stitches, then reverse direction. Short unsecured ends may work loose during washing or repeated handling.
Choosing the Right Yarn for a Floral Bedspread
Yarn selection affects both the weight of the finished blanket and the definition of the raised petals. A smooth worsted-weight yarn provides visible stitch structure without creating excessive bulk.
Acrylic yarn is a practical option for a large bedspread because it is generally washable and available in consistent dye lots. Cotton produces more clearly defined stitches but may make a large blanket heavier. Cotton-acrylic blends offer another option when a balance between structure and weight is required.
Use the same yarn weight for the pink centers, white petals, and ivory backgrounds. Mixing noticeably different thicknesses can make the flowers protrude unevenly or distort the granny square edges.
Before starting the complete project, make one motif using the selected yarn and hook. Wash and dry the sample according to the yarn label, then measure its final dimensions. Record the amount of yarn consumed by weighing the sample or its separate color components.
For more accurate purchasing estimates, multiply the yarn used per square by the required number of motifs and add approximately 10–15% for joining, edging, and finishing.
How to Keep the Blanket Flat
Raised floral motifs can create tension differences between the central flower and the surrounding granny square. The petals should remain dimensional, but the background must lie flat when placed on a table.
Check the first three squares before making the entire blanket. If the ivory background cups upward, the flower center may be too tight or the outer rounds may require a slightly larger hook. If the square waves along the edges, the outer stitches may be too loose.
Do not attempt to correct major stitch-count problems through blocking alone. Blocking can improve alignment, but it cannot reliably compensate for missing corner groups or excessive increases.
When the squares are complete, arrange them on a large flat surface before joining. Keep the orientation consistent so the corner spaces and seams align. This also makes it easier to identify squares with irregular dimensions.
Washing and Caring for the Finished Blanket
Always follow the washing instructions supplied with the selected yarn. For machine-washable fibers, use a gentle cycle and a mild detergent suitable for the material.
Place the blanket inside a large mesh laundry bag when possible to reduce friction against other garments. Avoid washing it with items that contain exposed zippers, hooks, or rough fasteners.
Dry the blanket flat when recommended by the yarn manufacturer. Support the entire fabric while wet, as a large crocheted bedspread can stretch under its own weight.
After washing, reshape the scalloped edging and check the joining seams. Raised petals may need minor hand adjustment to restore their original appearance.
Frequently Asked Questions
Can beginners make this crochet daisy blanket?
A crocheter familiar with double crochet, magic rings, granny square corners, and joining techniques can work through this pattern. The puff stitches and large number of repeated motifs make it more suitable for an intermediate-level project.
Can I use DK yarn instead of worsted weight?
Yes. DK yarn will generally produce smaller, lighter squares when worked with a suitable hook. Make a new gauge sample and recalculate the number of squares needed for the desired blanket dimensions.
How can I make the daisy petals more raised?
Increase the height of the drawn-up loops in each puff stitch while keeping all petals consistent. Test the change on a sample before making the full blanket because taller puffs increase yarn consumption.
Can the blanket be made without a scalloped border?
Yes. Replace the shell edging with two or three rounds of single crochet, working three stitches into each outer corner as needed. This creates a simpler rectangular outline.
How do I change the blanket size?
Add or remove complete rows and columns of granny squares. Multiply the blocked square width by the number of columns and the blocked square height by the number of rows, then account for the border.
Conclusion
This free crochet daisy blanket pattern uses repeated floral granny squares to create a structured bed covering with raised white petals, pink centers, and an ivory background. Consistent square dimensions, controlled puff-stitch tension, and accurately matched joining seams are the main requirements for a flat finished blanket.
Begin by making and blocking one complete square, then measure its size and yarn consumption before calculating the materials for the full project. Save the finished blanket to Pinterest and share your completed crochet work on Instagram using #PinkDaisyCrochetBlanket.
Would you keep the soft pink flower centers shown in this design, or choose a contrasting color for the daisies?









