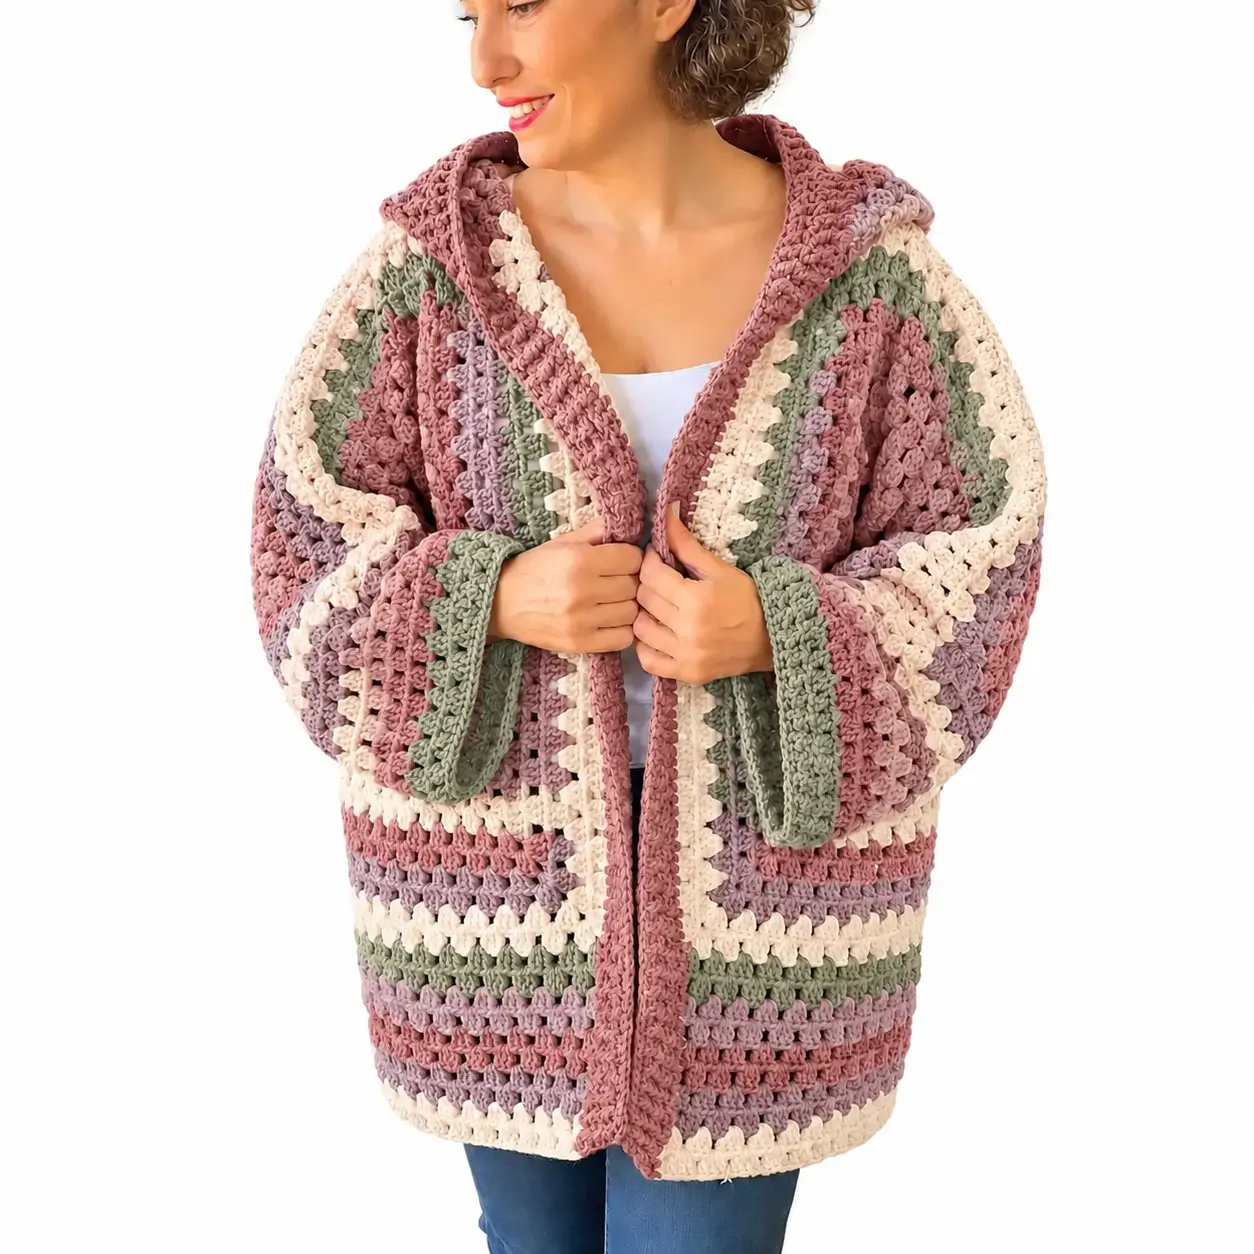
The hood and wide front bands give this cardigan its structure while the body stays loose and drapey. This granny stitch hooded crochet cardigan combines dusty rose, sage green, muted lavender, warm cream, and soft pink in repeating stripes. The construction below is photo-inspired rather than an exact reproduction, using standard granny clusters, rectangular body panels, relaxed sleeves, and an attached hood.
Design: What Makes This Hooded Cardigan Different
The strongest feature is the balance between an open granny-stitch fabric and dense finishing. The body and sleeves use repeated three-double-crochet clusters, which keep a large cardigan from becoming excessively rigid. Wide solid-color bands are then added around the cuffs, front opening, and hood to control stretching.
The color sequence is deliberately irregular. Dusty rose dominates the design, while cream separates darker sections and sage green provides contrast. Muted lavender is used in smaller amounts. This prevents the garment from looking like evenly spaced rainbow stripes.
The sleeves are intentionally generous. A fitted sleeve would change the silhouette considerably, so the armhole and upper sleeve need enough circumference to preserve the relaxed shape.
Project Information at a Glance
| Skill Level | Construction | Yarn | Hook | Fit |
|---|---|---|---|---|
| Intermediate | Panels + sleeves + hood | Worsted / Aran #4 | 5.0–5.5 mm | Relaxed / oversized |
Materials and Tools
Yarn
- Dusty Rose — worsted/Aran #4 — main color
- Warm Cream — worsted/Aran #4 — contrast color
- Sage Green — worsted/Aran #4 — secondary contrast
- Muted Lavender — worsted/Aran #4 — secondary contrast
- Soft Mauve or Pink — worsted/Aran #4 — optional transition shade
For an adult oversized cardigan, approximately 1,200–1,800 g of medium-weight yarn is a practical planning range. The exact amount depends on size, cardigan length, sleeve volume, hood depth, yarn construction, and gauge. Weighing a finished swatch gives a more reliable estimate before purchasing the full quantity.
Tools
- 5.0–5.5 mm crochet hook
- Yarn needle
- Scissors
- Measuring tape
- Locking stitch markers
- Blocking mats, optional
Abbreviations
- ch — chain
- sc — single crochet
- hdc — half double crochet
- dc — double crochet
- sl st — slip stitch
- sp — space
- st/sts — stitch/stitches
- RS — right side
- WS — wrong side
- BLO — back loop only
Gauge and Sizing
Garment measurements are more important than a fixed stitch count for this construction. Crochet a swatch at least 15 × 15 cm in the granny stitch pattern, wash it as the finished cardigan will be washed, allow it to dry, and measure again.
The photographed cardigan has substantial positive ease. For a similar relaxed silhouette, start with approximately 15–25 cm of positive ease around the bust.
| Actual Bust | Suggested Finished Cardigan Circumference |
|---|---|
| 80–90 cm | 100–110 cm |
| 90–100 cm | 110–120 cm |
| 100–110 cm | 120–130 cm |
| 110–120 cm | 130–140 cm |
| 120–130 cm | 140–150 cm |
These measurements are construction targets, not standardized clothing sizes. Measure the wearer and a well-fitting cardigan before calculating the panels.
Basic Granny Stitch Pattern
The cardigan can be constructed with a conventional granny cluster pattern.
Foundation: Chain a multiple appropriate for your measured panel width, allowing for groups of three stitches and spaces.
Row 1: Work 3 dc into the designated foundation space, ch 1, skip the next section of the foundation, and repeat the 3-dc cluster pattern across.
Row 2: Turn. Ch 3. Work 3 dc into each ch-1 space across, placing ch 1 between adjacent clusters.
Row 3 and onward: Repeat Row 2, working each cluster into the space between clusters from the previous row.
Count the cluster spaces rather than relying only on the visual width. Accidentally adding one cluster at an edge will gradually change the shape of a garment panel.
Color Sequence
A photo-inspired sequence can be worked as follows:
- Dusty rose — 2 rows
- Muted lavender — 1 row
- Dusty rose — 2 rows
- Sage green — 2 rows
- Warm cream — 2 rows
- Dusty rose — 2 rows
- Muted lavender — 2 rows
- Warm cream — 1 row
Repeat the sequence while changing the order occasionally. The reference design does not depend on rigidly identical stripes; controlled variation creates the patchwork appearance.
Back Panel
Measure the required finished cardigan circumference and subtract the approximate width contributed by the front bands. Divide the remaining measurement into a back panel and two front panels.
For a relaxed cardigan, the back panel will generally represent close to half the body width.
Foundation
Chain until the foundation reaches the calculated back width without stretching it.
Work the granny stitch pattern across.
Body
Continue in the selected stripe sequence until the panel reaches the underarm.
A hip-length adult cardigan commonly needs approximately 55–70 cm from the hem to the underarm area depending on the wearer and intended overall length.
Upper Back
Continue without shaping for a dropped-shoulder construction.
Stop when the complete back panel reaches the desired shoulder height.
Leave the upper edge unworked until the front panels are ready for joining.
Left Front Panel
Make the left front approximately half the back-panel width, adjusted for the front opening and the band that will be added later.
Work the same granny cluster pattern from hem to shoulder.
Follow the same general color family as the back without requiring every stripe to line up exactly. Aligning several major cream and sage sections will make the finished garment look intentional.
Optional Neck Shaping
For a more open neckline, stop working one cluster at the neck edge several rows before the shoulder.
Repeat the reduction gradually until the neckline has the desired slope.
The attached hood and wide front band will cover small differences in neckline shaping.
Right Front Panel
Work a mirror image of the left front.
Place all neckline reductions on the opposite edge.
Before fastening off, lay the two front panels together. Their hem-to-shoulder lengths should differ by no more than approximately 1 cm.
Joining the Shoulders
Place the front panels against the back panel with right sides together.
Align the outer shoulder edges.
Join each shoulder with slip stitches, single crochet, or mattress-style sewing.
Leave the center back neck open for the hood.
Try the unfinished body on before adding sleeves. This is the best stage to correct excessive body width or shoulder length.
Side Seams and Armholes
Pin the side edges together from the hem upward.
Leave an opening large enough for the relaxed sleeves.
Measure around the upper arm and add approximately 8–15 cm of ease for the loose silhouette shown in the image.
Mark equal armhole depths on both sides before joining the remaining side seams.
Relaxed Sleeves – Make 2
The sleeves can be worked as separate rectangles and joined into tubes. This method gives better control over the oversized shape.
Sleeve Foundation
Chain to the required sleeve length from upper arm to the beginning of the cuff.
Work the granny stitch pattern in rows.
Continue until the rectangle is wide enough to wrap around the upper arm with the required ease.
Color Placement
Use broader dusty-rose sections through the upper sleeve.
Add cream, sage, and lavender stripes between them.
The sleeves do not need to duplicate each other row for row, but use the same total number of rows so both have equal circumference.
Joining the Sleeve
Fold the sleeve rectangle lengthwise.
Join the long edges with a relaxed seam.
Turn right side out.
Pin the sleeve seam to the body side seam and distribute the sleeve evenly around the armhole.
Join without gathering the sleeve head.
Sage Green Cuffs
The cuffs in this version are denser than the granny-stitch sleeves and provide useful structure.
Join sage green yarn around the wrist opening.
Round 1: Work sc evenly around, reducing the circumference if necessary.
Rounds 2–4: Work hdc evenly around.
For a ribbed finish, make a separate BLO single-crochet band.
Ribbed Cuff
Row 1: Ch 11–15 depending on desired cuff depth. Sc in second ch from hook and across.
Row 2: Ch 1, turn. Sc BLO across.
Repeat Row 2 until the strip fits around the wrist without stretching excessively.
Join the short ends and sew or crochet the ribbing to the sleeve opening.
A cuff depth around 8–12 cm creates the wide finish visible in the reference style.
Hood
The hood is an important structural part of this cardigan and should be deep enough to lie naturally behind the neckline when it is not being worn.
Hood Foundation
With the cardigan right side facing, join yarn at one front neckline edge.
Work evenly around the neckline to the opposite front edge.
Count the resulting cluster spaces.
Hood Rows
Work back and forth in granny stitch.
Continue until the hood measures approximately 32–38 cm from the neckline for an average adult version.
Fold the final row in half.
Join the top seam from the crown toward the back.
Turn the hood right side out.
Deeper Hood Option
If a loose hood is required, add several extra rows before closing the crown.
Check the hood while wearing the cardigan rather than relying only on a flat measurement. A hood that looks large on the table can become considerably shallower once the front bands are added.
Dusty Rose Hood Border
Join dusty rose yarn at one lower front edge.
Work continuously up the first front, around the hood, and down the opposite front.
Border Row 1: Sc evenly around.
Border Row 2: Hdc in each stitch.
Border Row 3: Sc BLO in each stitch.
Border Row 4: Hdc in each stitch.
Repeat the last two rows until the band measures approximately 4–7 cm wide.
Do not crowd stitches around the hood curve. Excess stitches cause the border to ripple; too few pull the hood inward.
Hem Finishing
The lower edge should be heavier than the open granny fabric so the cardigan hangs vertically.
Join the chosen finishing color at a lower corner.
Row 1: Sc evenly across the hem.
Row 2: Hdc across.
Row 3: Sc BLO across.
Repeat if a deeper hem is required.
The finished lower band can measure approximately 3–6 cm.
How to Prevent the Cardigan from Becoming Too Heavy
Large crochet cardigans can gain substantial weight when worked entirely in dense stitches. The granny-cluster body reduces this problem because spaces remain between the stitch groups.
Use the denser stitch patterns primarily for the cuffs, hem, front bands, and hood edge.
If the completed swatch feels heavy, consider using a lighter worsted yarn or DK yarn with a corresponding hook rather than reducing the garment dimensions.
Customizing the Length
| Style | Approximate Shoulder-to-Hem Target |
|---|---|
| Cropped | 45–55 cm |
| Hip Length | 60–70 cm |
| Long Hip | 70–80 cm |
| Mid-Thigh | 80–95 cm |
Measure from the shoulder rather than assuming the same length will fit every wearer.
Color Arrangement Ideas
Photo-Inspired Pastel
- Dusty rose
- Sage green
- Warm cream
- Muted lavender
- Soft mauve
Neutral Version
- Oatmeal
- Ivory
- Taupe
- Warm gray
- Chocolate brown
Autumn Version
- Terracotta
- Olive green
- Mustard
- Cream
- Rust
Cool-Tone Version
- Navy
- Denim blue
- Light blue
- Silver gray
- Ivory
Estimating Yarn More Accurately
Instead of relying on a generic yarn quantity, crochet a representative swatch using the actual granny stitch and color changes.
Wash and dry it, then weigh it.
Suppose a 20 × 20 cm swatch weighs 24 g.
Its area is:
20 × 20 = 400 cm²
If the approximate total garment fabric area is 24,000 cm²:
24,000 ÷ 400 = 60 swatch units
60 × 24 g = 1,440 g
Add approximately 10–15 percent for the hood, seams, swatching, finishing bands, and differences in stitch density.
This example demonstrates the calculation method only. Use the weight of your own swatch for purchasing decisions.
Assembly
- Block the back and front panels to their planned measurements.
- Join both shoulder seams while leaving the center neckline open.
- Mark equal armhole depths on the left and right sides.
- Join the body side seams from the hem to the armhole markers.
- Make two sleeves to identical finished measurements.
- Close each sleeve seam and attach the sleeves evenly around the armholes.
- Add the sage cuffs and check both wrist openings for equal circumference.
- Crochet the hood from the neckline and close its crown seam.
- Add the dusty-rose front and hood band, followed by the lower hem finishing.
- Weave in all yarn tails, wash or lightly block the cardigan, and check the final body and sleeve measurements.
The completed cardigan should hang with an open front, relaxed shoulders, generous sleeves, a deep hood, and structured bands around the major edges.
7 Technical Tips
- Shoulder seam stretches: granny clusters can lengthen under the weight of the cardigan. Reinforce each shoulder seam with a line of slip stitches or sewing yarn before attaching the sleeves.
- Front bands ripple: too many stitches have usually been placed along the vertical edges. If the band waves by more than approximately 1–2 cm when laid flat, remove it and reduce the pickup rate.
- Sleeves feel tight: measure the upper arm before closing the sleeve rectangle. For the photographed oversized silhouette, aim for approximately 8–15 cm of additional circumference.
- Hood pulls the neckline backward: a dense hood can become heavy. Keep the hood primarily in granny stitch and reserve dense stitches for the final 4–7 cm border.
- Two sleeves finish at different sizes: count granny-cluster rows instead of measuring only with a tape. Both sleeves should contain the same row count when worked at the same gauge.
- Cuffs flare: reduce the sleeve opening gradually before attaching ribbing. A cuff attached directly to a very wide sleeve without reduction can create folds concentrated at the wrist.
- Color stripes look accidental: repeat at least one major color every 4–8 rows. The exact order can change, but recurring dusty rose, cream, and sage sections keep the palette visually connected.
Care and Blocking
Check the yarn label before washing the finished garment.
For washable fibers, clean the cardigan using the recommended temperature and lay it flat to dry whenever possible.
Reshape the shoulders, hood, cuffs, and front bands while damp.
Do not hang a wet crochet cardigan from the shoulders. The weight of the water can lengthen the granny-stitch fabric and permanently change the proportions.
After drying, measure the cardigan again and record the dimensions. Those measurements are useful if another version is made with the same yarn.
Conclusion
This pastel granny stitch hooded crochet cardigan combines an open cluster fabric with dense dusty-rose edging, sage cuffs, a generous hood, and an intentionally mixed stripe sequence. Begin with the gauge swatch and calculate the body from the wearer’s bust measurement plus the desired ease rather than relying on a fixed stitch count. Complete and measure the body before committing to sleeve circumference or hood depth. Save the construction guide to Pinterest or share the finished cardigan on Instagram with #PastelGrannyHoodedCardigan. For this specific palette, would you keep the sage cuffs or replace them with dusty rose?









