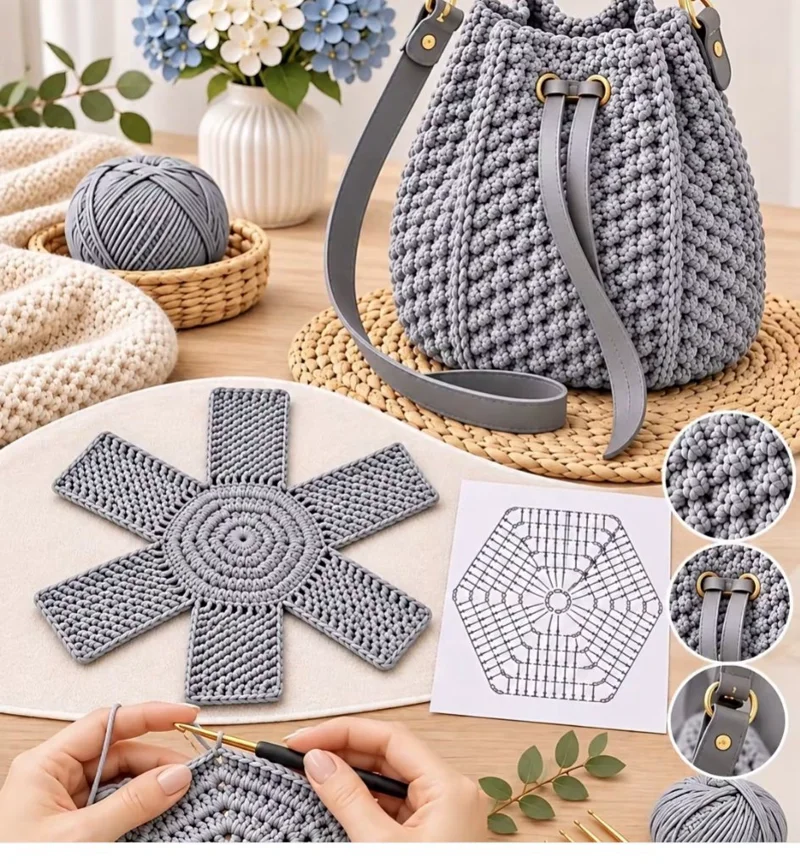
A bucket bag needs a stable circular base, controlled sidewall tension, and a closure that gathers without distorting its rim. This crochet bucket bag pattern combines bulky gray yarn, a 6 mm hook, raised bobble-style stitches, and metal hardware to create a structured handbag approximately 25 cm tall. Intended for intermediate crocheters, the design includes a reinforced bottom, removable shoulder strap, and functional drawstring suitable for everyday accessories.
The Design: What Makes This Gray Bucket Bag Different
The most distinctive feature is the raised surface. Rather than relying on plain single crochet, the bag uses alternating bobble stitches and compact single-crochet rounds to produce a dense, pebble-like appearance.
The circular base is worked separately from the decorative texture. This structural decision keeps the bottom flatter and helps distribute the weight of items placed inside the bag.
A third decision concerns the closure. Two reinforced metal eyelets guide the drawstring, while a firm upper band reduces stretching when the opening is tightened.
A common mistake when making a chunky crochet bag is placing raised stitches directly into an expanding base. The extra fabric can cause unwanted rippling. In this textured crochet handbag, the base remains smooth and the raised pattern begins only after the vertical transition.
Project Info at a Glance
| Specification | Details |
|---|---|
| Skill Level | Intermediate |
| Estimated Time | 8–12 hours |
| Target Finished Size | 25 cm tall × 20 cm base diameter |
| Crochet Hook | 6 mm |
| Yarn Weight | Bulky |
| Construction | Bottom-up, continuous rounds |
| Gauge Target | 12 sc × 14 rounds = 10 cm |
| Best For | Everyday handbag or small project bag |
Note: These are proposed specifications for an original photo-inspired pattern. The measurements and yarn consumption are estimates, and the pattern has not been physically sample-tested. Check your gauge before making the full bag.
Materials and Tools
Yarn
- Medium-gray bulky yarn – 350–450 g: Choose a firm cotton blend or polyester cord with clear stitch definition. A Bobbiny-style braided cord is one option if its gauge matches the pattern.
- Matching gray sewing thread – approximately 5 m: For attaching the optional lining and reinforcing hardware.
- Gray polyester drawstring cord – approximately 100 cm: Choose a flexible cord around 4–5 mm thick, or crochet your own using the instructions below.
For a photograph-inspired finish, avoid extremely soft chenille yarn. Its pile can obscure individual raised stitches, while repeated abrasion may affect the surface.
Tools
- 6 mm crochet hook
- Two locking stitch markers
- Tapestry needle with a large eye
- Sharp scissors
- Measuring tape
- Two gold-tone metal eyelets, approximately 8 mm internal diameter
- Two D-rings, approximately 25 mm wide
- Two swivel clasps compatible with the D-rings
- One gray leather-look shoulder strap, approximately 90–110 cm long
- Eyelet installation tool and backing washers
- Optional circular bag-base insert, approximately 20 cm
- Optional cotton lining fabric and sewing needle
Hardware measurements are construction recommendations rather than exact measurements taken from the reference photograph.
Crochet Abbreviations
| Abbreviation | Meaning |
|---|---|
| MR | Magic ring |
| sc | Single crochet |
| inc | Two single crochets in one stitch |
| dec | Single-crochet decrease |
| sl st | Slip stitch |
| ch | Chain |
| BLO | Back loop only |
| FLO | Front loop only |
| st | Stitch |
| R | Round |
| BO | Bobble stitch |
Bobble stitch (BO): Work four unfinished double crochets into the same stitch, then yarn over and pull through all five loops on the hook. Each completed bobble counts as one stitch.
An invisible decrease works through the front loops of two adjacent stitches, reducing bulk compared with a conventional single-crochet decrease.
Gray Crochet Bucket Bag Pattern – Step by Step
Use US crochet terminology throughout. Work in a continuous spiral unless a section specifically calls for joined rounds. Move the stitch marker at the end of every round.
Part 1: Circular Base (Make 1)
Yarn: Medium gray. Original construction based on standard six-increase circular crochet math.
R1: 6 sc in MR (6)
R2: inc ×6 (12)
R3: (1 sc, inc) ×6 (18)
R4: (2 sc, inc) ×6 (24)
R5: (3 sc, inc) ×6 (30)
R6: (4 sc, inc) ×6 (36)
R7: (5 sc, inc) ×6 (42)
R8: (6 sc, inc) ×6 (48)
R9: (7 sc, inc) ×6 (54)
R10: (8 sc, inc) ×6 (60)
R11: (9 sc, inc) ×6 (66)
R12: (10 sc, inc) ×6 (72)
At the end of R12, measure the base. The target is approximately 20 cm across. If the base is substantially smaller or larger, adjust hook size and gauge rather than adding arbitrary increases.
R13: sc in BLO around (72)
R14: sc around (72)
R15: sc around (72)
The BLO round creates a visible turning ridge between the bottom and sidewall.
Do not fasten off. Continue directly into the body.
Stitch-count checkpoint: Twelve rounds beginning with six stitches and increasing by six per round produce 72 stitches.
Part 2: Textured Bag Body (Make 1)
Yarn: Medium gray. Original alternating bobble-and-single-crochet repeat.
The body has a 72-stitch circumference. Each bobble occupies one stitch, and the alternating single crochets maintain the stitch count.
R16: (BO, 1 sc) ×36 (72)
R17: sc around (72)
R18: (1 sc, BO) ×36 (72)
R19: sc around (72)
R20: (BO, 1 sc) ×36 (72)
R21: sc around (72)
R22: (1 sc, BO) ×36 (72)
R23: sc around (72)
R24: (BO, 1 sc) ×36 (72)
R25: sc around (72)
R26: (1 sc, BO) ×36 (72)
R27: sc around (72)
R28: (BO, 1 sc) ×36 (72)
R29: sc around (72)
R30: (1 sc, BO) ×36 (72)
R31: sc around (72)
R32: (BO, 1 sc) ×36 (72)
R33: sc around (72)
R34: (1 sc, BO) ×36 (72)
R35: sc around (72)
R36: (BO, 1 sc) ×36 (72)
R37: sc around (72)
R38: (1 sc, BO) ×36 (72)
R39: sc around (72)
R40: (BO, 1 sc) ×36 (72)
R41: sc around (72)
R42: (1 sc, BO) ×36 (72)
R43: sc around (72)
R44: (BO, 1 sc) ×36 (72)
R45: sc around (72)
R46: (1 sc, BO) ×36 (72)
R47: sc around (72)
R48: (BO, 1 sc) ×36 (72)
R49: sc around (72)
R50: (1 sc, BO) ×36 (72)
R51: sc around (72)
R52: (BO, 1 sc) ×36 (72)
R53: sc around (72)
R54: (1 sc, BO) ×36 (72)
R55: sc around (72)
R56: (BO, 1 sc) ×36 (72)
R57: sc around (72)
R58: (1 sc, BO) ×36 (72)
R59: sc around (72)
The bobble columns alternate positions between successive raised-stitch rounds. This prevents the texture from forming long, rigid vertical lines.
At R59, measure the total height. The target is approximately 22–23 cm before adding the top band. Because bobbles consume more yarn and affect round height, stop earlier or add further two-round repeats if required.
Technical checkpoint: Each textured round contains 36 bobbles and 36 single crochets, totaling 72 stitches. The intermediate rounds also contain 72 stitches.
Part 3: Reinforced Top Rim (Make 1)
Yarn: Medium gray.
R60: sc around (72)
R61: sc around (72)
R62: sc in BLO around (72)
R63: sc around (72)
R64: sc around (72)
R65: sc around (72)
Finish with a slip stitch into the next stitch. Fasten off, leaving a 15 cm tail for weaving.
The six-round upper section produces a compact band suitable for drawstring hardware. Its exact height depends on yarn thickness.
Eyelet positioning: Lay the bag flat with the front facing upward. Mark two points approximately 4–5 cm apart, centered horizontally and at least 1.5 cm below the finished upper edge.
Do not force eyelets through bulky stitches. Open a small space between stitches, add a reinforcing fabric patch behind each position, and install hardware according to its manufacturer’s instructions.
Part 4: Crochet Drawstring (Make 1)
Yarn: Medium gray.
A crocheted cord provides an alternative to purchased drawstring material.
Row 1: ch 101 (101 chains)
Row 2: Starting in the second chain from the hook, sl st in each chain across (100)
Fasten off, leaving a 12 cm tail at each end.
This produces a narrow cord. Its finished length may be shorter than 100 cm depending on gauge, so measure before attaching any end caps.
For a thicker cord, use a Romanian cord or a purchased braided cord instead. Check that the cord moves freely through both eyelets without excessive friction.
Thread the drawstring around the upper circumference through the spaces between stitches, bringing both ends to the front eyelets. The cord should draw the opening inward without creating a permanent fold in the upper band.
Part 5: Side Strap Tabs (Make 2)
Yarn: Medium gray.
Row 1: ch 9 (9 chains)
Row 2: Starting in the second chain, 8 sc (8)
Row 3: ch 1, turn, 8 sc (8)
Row 4: ch 1, turn, 8 sc (8)
Row 5: ch 1, turn, 8 sc (8)
Row 6: ch 1, turn, 8 sc (8)
Row 7: ch 1, turn, 8 sc (8)
Row 8: ch 1, turn, 8 sc (8)
Fasten off. Leave a 30 cm sewing tail.
Fold each tab around a D-ring and position it on the upper sidewall, approximately 3 cm below the rim. The two tabs must sit directly opposite one another.
Sew through multiple stitches and, preferably, an interior reinforcing patch. Crochet stitches alone can stretch under a loaded bag, particularly where a narrow tab concentrates force.
Part 6: Optional Crocheted Shoulder Strap (Make 1)
Yarn: Medium gray.
The reference image uses a smooth leather-look strap. A crocheted version is possible, but it will not reproduce the same appearance.
Row 1: ch 7 (7 chains)
Row 2: Starting in the second chain, 6 sc (6)
Rows 3–140: ch 1, turn, 6 sc (6 per row)
Fasten off, leaving a 30 cm tail.
Measure the strap while holding it under light tension. Add or remove rows to obtain the desired length.
A cotton webbing core sewn to the back can limit stretching. Attach the ends to swivel clasps using reinforced folded sections rather than relying on a single row of crochet stitches.
Part 7: Optional Interior Lining (Make 1)
A lining is recommended when the bag will carry keys, pens, or small objects that could pass between crochet stitches.
Cut a circular fabric bottom approximately 21–22 cm in diameter, including seam allowance. For the side panel, begin with a rectangle approximately 65 cm wide and 27 cm high, then adjust it to the measured inside circumference and height.
Sew the short edges of the side panel together. Attach the circular base with the right sides facing inward.
Insert the lining into the crochet shell. Fold the top fabric edge inward and hand-stitch it below the drawstring channel, leaving the eyelets unobstructed.
These cutting dimensions are provisional. Measure the finished crochet shell before cutting fabric.
How to Assemble Your Crochet Bucket Bag
- Shape the base. Place the bag on a level surface and check that the circular bottom sits flat without pronounced ripples.
- Check the body. Confirm that the sidewall rises evenly and the raised stitches face outward.
- Set the rim. Fold or gently shape the top band to form a consistent opening.
- Mark the front. Locate the center front and identify two symmetrical eyelet positions.
- Install the eyelets. Reinforce the reverse side with fabric patches and fit both metal eyelets.
- Attach the strap tabs. Position the two D-ring tabs opposite each other and sew through reinforced areas.
- Thread the drawstring. Pass the cord through the upper channel and bring both ends through the front eyelets.
- Attach the shoulder strap. Connect the swivel clasps to the D-rings and check that the strap lies flat.
- Insert the lining. Fit the optional fabric lining without restricting the closure or distorting the rim.
- Finish the bag. Weave in yarn tails, inspect all hardware, and test the bag with a light load before regular use.
The completed bag has a circular bottom, textured sidewall, adjustable drawstring opening, and detachable shoulder strap.
7 Technical Tips for a Better Crochet Bucket Bag
- Prevent stitch-count drift. Place a locking marker in the first stitch of every round and count all 72 stitches after each bobble round. An unnoticed extra stitch changes the alternating texture alignment.
- Prevent base curling. If the base rises into a bowl before R12, compare its diameter with the target 20 cm and check tension. Excessively tight stitches may require a larger hook.
- Prevent bulky decreases. When adapting the bag to a tapered silhouette, use invisible decreases instead of conventional sc2tog stitches. Work through the front loops to reduce visible ridges.
- Prevent eyelet damage. Install the two eyelets at least 1.5 cm below the rim, using backing patches sized for the hardware. Unreinforced eyelets can pull through soft crochet fabric.
- Prevent inconsistent raised texture. Keep all four unfinished double crochets of each bobble at a consistent loop height. Unequal tension creates bobbles that vary noticeably in size.
- Prevent crooked strap placement. Pin both strap tabs before sewing and measure their distance from the upper edge. A difference of more than 5 mm may make the bag hang unevenly.
- Prevent loose yarn tails. Weave each finishing tail through at least 5 cm of dense stitches, reverse direction, and weave through another section. Do not rely on a single knot at the base of a strap attachment.
Common Crochet Bucket Bag Problems and Fixes
Why Is the Base Wavy?
A wavy base can result from an overly loose gauge, excess increases, or yarn that does not hold a flat circle at the chosen stitch height.
Check the stitch count first. R12 must contain exactly 72 stitches. If the count is correct, make a second swatch with a smaller hook and compare the fabric.
Why Does the Bag Collapse When Empty?
A crochet bucket bag made with soft yarn may not stand independently. The bobble texture adds surface volume but does not necessarily provide structural stiffness.
Choose firmer yarn, add a fabric lining, or insert a removable base stabilizer. Avoid cardboard if the bag may become wet.
Why Does the Drawstring Stick?
Friction increases when the cord is too thick for the eyelets or when the channel passes through dense stitches.
Test the cord before final installation. A smooth 4 mm polyester cord may move more freely than a heavily textured crocheted cord.
Can the Bag Be Washed?
Washing depends on the yarn, strap, eyelets, lining, and any internal stabilizer.
A removable strap and removable base insert make maintenance easier. Test yarn colorfastness and follow the fiber manufacturer’s washing instructions. Avoid machine washing hardware unless every component is rated for that treatment.
Can the Pattern Be Made Smaller?
Yes, but changing the base stitch count requires corresponding adjustments to the body repeat.
For example, stopping the base at 60 stitches produces a smaller circumference while preserving an even count for alternating bobbles. The finished dimensions will depend on the revised gauge and number of body rounds.
Final Thoughts
This gray crochet bucket bag pattern combines a 72-stitch circular base, alternating bobble rounds, reinforced eyelets, and detachable strap hardware. The construction separates the decorative surface from the parts that carry weight, making adjustments easier when changing yarn or bag dimensions.
Before using the finished handbag, measure the base, test the drawstring, and inspect the strap attachments under a light load. Save the pattern to Pinterest for reference, and share a completed version on Instagram using #GrayCrochetBucketBag.
For the next variation, consider replacing the gray yarn with black cotton cord while retaining the gold-tone fittings. Would you keep the raised pebble texture or substitute a tighter woven-style stitch for the body?









