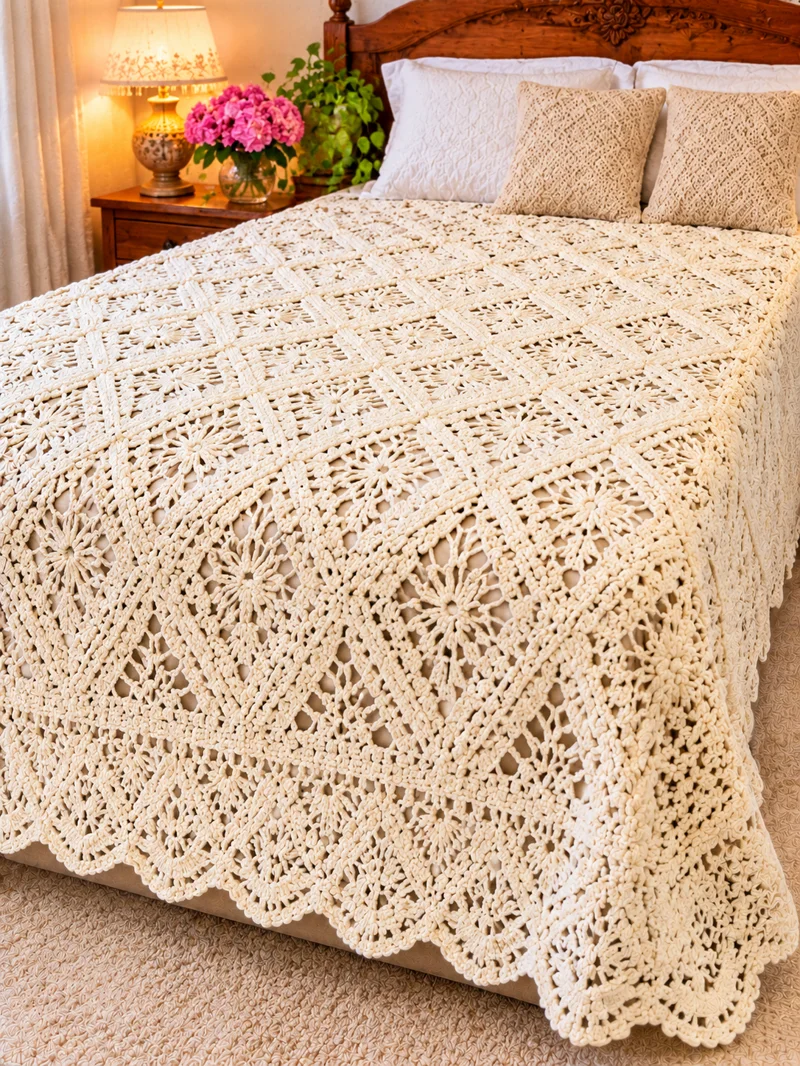
The flower-centered squares on this cream bedspread form a geometric lattice that continues into a scalloped lace border. This crochet lace bedspread pattern uses DK cotton yarn, a 4 mm hook, and 110 joined motifs to target a finished size of 220 × 240 cm. Designed for intermediate to advanced crocheters, its modular construction allows damaged squares to be repaired individually and the overall dimensions to be adjusted before edging.
The Design: What Makes This Floral Bedspread Different
The defining feature of this vintage crochet bedspread is the transition from a circular flower center to a structured square frame. Each motif begins with six evenly spaced petals, then develops four corners that make assembly possible without distorting the floral center.
The second structural decision concerns the joining method. Rather than attaching separate flower appliqués, the floral crochet blanket uses complete square units joined through matching outer stitches. This creates continuous geometric lines and reduces loose decorative components.
Finally, the scalloped border is worked after the main panel is assembled. This prevents the edging from interrupting seams between squares.
A common mistake is stretching individual motifs to fit neighboring squares. The result is uneven spacing and diagonal tension across the finished bedspread. Blocking every square to the same dimensions before joining limits that problem.
Project Info at a Glance
| Skill Level | Intermediate–advanced |
|---|---|
| Estimated Time | 80–140 hours (planning estimate) |
| Target Finished Size | 220 × 240 cm |
| Hook | 4.0 mm |
| Yarn | DK cotton |
| Main Color | Natural cream |
| Motifs | 110 |
| Construction | Joined floral squares |
| Best For | Decorative bed covers and heirloom-style home textiles |
Pattern note: This is an original photo-inspired interpretation, not an exact reconstruction of the photographed bedspread. The pattern has not been physically sample-tested. Make and measure a sample motif before committing to the full project.
Materials and Tools
Yarn
- Natural cream DK cotton yarn — approximately 2,000–3,000 g planning allowance. Choose a consistent dye lot. A smooth cotton yarn gives clear stitch definition and helps the floral design remain visible.
- Optional ivory accent yarn — 50–100 g. Use for subtle contrast in the flower centers. The reference design is essentially monochromatic.
The final quantity depends on the completed gauge sample. If one square weighs 18 g, 110 squares require 1,980 g before joining and edging. Allow an additional provisional reserve of 15–25%, then refine the estimate after measuring your actual yarn consumption.
Tools
- 4.0 mm crochet hook
- Blunt tapestry needle
- Locking stitch markers
- Rustproof blocking pins and mats
- Measuring tape
- Sharp scissors
- Digital kitchen scale
- Spray bottle for blocking
Gauge and Sizing
The target blocked square measures 20 × 20 cm. Ten squares across form a 200 cm wide panel, while eleven rows form a 220 cm long panel. A border extending approximately 10 cm outward on every side brings the target dimensions to 220 × 240 cm.
If your blocked motif measures 18 cm instead, the same layout produces a panel of approximately 180 × 198 cm before edging. Adjust the number of motifs or modify the framing rounds to reach your preferred size.
Measure the finished joined panel before adding the border. Seams, yarn tension, and blocking can change the final dimensions.
Crochet Abbreviations
All instructions use US crochet terminology.
| Abbreviation | Meaning |
|---|---|
| MR | Magic ring |
| ch | Chain |
| sc | Single crochet |
| hdc | Half double crochet |
| dc | Double crochet |
| tr | Treble crochet |
| sl st | Slip stitch |
| sp | Space |
| st | Stitch |
| sk | Skip |
| rep | Repeat |
| RS | Right side |
| FO | Fasten off |
Shell: Five double crochets worked into the same stitch or space.
Picot: Chain three, then slip stitch into the first chain.
Corner group: Two double crochets, chain two, two double crochets in one corner space.
Pattern – Step by Step
Work in joined rounds rather than a continuous spiral. A beginning chain three counts as the first double crochet unless otherwise stated.
Part 1: Floral Lace Square (Make 110)
Yarn: Natural cream DK cotton.
Round 1 – Central Ring
Make a magic ring. Chain 1 and work 6 sc into the ring. Join with sl st to the first sc.
Count: 6 sc.
Round 2 – Flower Foundations
Chain 1. Work 2 sc into each stitch around. Join with sl st.
Count: 12 sc.
Round 3 – Six Petals
Chain 1. Repeat six times: sc in the next stitch, then work (dc, tr, dc) into the following stitch. Join with sl st to the first sc.
Count: 6 sc and 6 three-stitch petal groups; 24 stitches total.
Round 4 – Petal Arches
Chain 1. Sc in the next sc, chain 4, and skip the three stitches forming the next petal. Repeat around and join with sl st.
Count: 6 sc and 6 ch-4 spaces.
The chain arches sit behind the petal tips and provide attachment points for the following round.
Round 5 – Openwork Circle
Slip stitch into the first ch-4 space. Chain 3 (counts as dc), work 3 dc in the same space, and chain 2. In each remaining ch-4 space, work 4 dc and chain 2. Join with sl st.
Count: 24 dc and 6 ch-2 spaces.
Round 6 – Establish the Square
Chain 1 and sc in the first dc. Chain 5, skip the next 3 dc, and sc into the following ch-2 space. Repeat five times: chain 5, skip the next 4 dc, sc in the next ch-2 space. Chain 5 and join with sl st to the first sc.
Count: 6 sc and 6 ch-5 spaces.
Round 7 – Four Square Corners
Slip stitch into the first ch-5 space. Chain 3, then work (2 dc, ch 2, 3 dc) into the same space to form the first corner.
- Second arch: 3 dc.
- Third arch: (3 dc, ch 2, 3 dc).
- Fourth arch: (3 dc, ch 2, 3 dc).
- Fifth arch: 3 dc.
- Sixth arch: (3 dc, ch 2, 3 dc).
Join with sl st to the top of the beginning chain 3.
Count: 48 dc and 4 ch-2 corner spaces.
This six-arch-to-four-corner shaping is provisional and must be checked on a physical sample for balanced square geometry.
Round 8 – Structured Frame
Slip stitch across to the first corner space. Chain 3, then work (dc, ch 2, 2 dc) into the corner. Work 1 dc into each dc along the side. At each subsequent corner, work (2 dc, ch 2, 2 dc). Continue around and join with sl st.
Count: 64 dc and 4 ch-2 corner spaces.
Round 9 – Open Lace Frame
Slip stitch into the first corner space. Work (2 dc, ch 2, 2 dc) in the corner. Along each side, repeat (ch 1, skip 1 dc, dc in next dc) eight times. Work the same corner group in each subsequent corner. Join with sl st.
Count: 48 dc, 32 side ch-1 spaces, and 4 ch-2 corner spaces.
Round 10 – Solid Joining Edge
Slip stitch into the first corner space. Work (2 dc, ch 2, 2 dc) in the corner. Across each side, work 1 dc into each dc and 1 dc into each ch-1 space. Repeat the corner group at the remaining corners. Join with sl st.
Count: 96 dc and 4 ch-2 corner spaces.
Fasten off, leaving a 20 cm yarn tail for joining or weaving.
Check the shape, stitch distribution, and blocked gauge of the complete square before making the remaining motifs.
Part 2: Blocking the Floral Squares
Blocking controls the geometry of each square and improves the accuracy of the joins. Lightly dampen the first motif and place it on a blocking mat. Position the four corners evenly and measure the width and height.
Pin the corners without forcing the stitches beyond their natural stretch. Allow the square to dry completely, then record the dimensions and weight.
Repeat with the remaining motifs. Group squares by size before joining. A difference of more than approximately 5 mm between motifs can become visible across the finished panel.
Part 3: Joining the Square Motifs
Arrange ten squares across and eleven squares down on a clean, flat surface. Keep every square right-side up with the flower centers facing the same direction.
Use a tapestry needle and matching cream yarn to sew corresponding outer stitches together. Start at one corner and continue across the seam, keeping the stitches aligned.
Each side of the proposed outer round has 24 double crochets between the corner spaces. Match these stitches carefully and secure the corner junction without drawing the yarn too tightly.
Join the squares into horizontal rows first. Then connect the rows vertically. Check the panel’s diagonal measurements to identify uneven tension or distorted corners.
For a raised geometric seam, slip stitch the squares together through matching outer loops instead of sewing. This creates a firmer joining ridge.
Part 4: Foundation Border
The photographed bedspread features a wide decorative lace border. This proposed edging combines a stabilizing foundation, open mesh, clusters, and scallops.
Round 1 – Stabilizing Edge
Attach cream yarn at an outer corner. Work sc evenly along the panel edges, matching the existing stitches and seam junctions. At each of the four main corners, work (sc, ch 2, sc). Join with sl st.
Count and record the stitches on each side. The exact number depends on the final joining method.
Round 2 – Double Crochet Foundation
Chain 3. Work 1 dc into each sc around, placing (2 dc, ch 2, 2 dc) into each main corner ch-2 space. Join with sl st.
Round 3 – Mesh Openings
Chain 4, counting as one dc and one chain. Skip one stitch and dc into the next stitch. Repeat along the sides, adjusting the last interval before each corner to maintain symmetry. At each main corner, work (dc, ch 3, dc). Join with sl st.
Round 4 – Openwork Expansion
Slip stitch into the first ch-1 space. Chain 3 and work 2 dc into the same space. Chain 2, then work 3 dc into the next ch-1 space. Repeat along the sides. At each main corner ch-3 space, work (3 dc, ch 3, 3 dc). Join with sl st.
Round 5 – Chain Arches
Chain 1 and sc into the first three-dc group. Chain 5, then sc into the next three-dc group. Continue around the border. At each main corner, replace the standard ch-5 arch with ch 7. Join with sl st.
Round 6 – Scalloped Edging
Slip stitch into the first ch-5 space. Work 7 dc into the space and sc into the following anchoring sc. Repeat across the border. Work 9 dc into each ch-7 corner space. Join with sl st and fasten off.
The border is a construction guide requiring stitch-count adjustments based on the assembled panel. Test the first side and corner before working the entire perimeter.
Part 5: Optional Picot Finish
Attach cream yarn at the beginning of a seven-double-crochet shell. Work sc into the first two dc, make a picot, work sc into the next three dc, make another picot, and work sc into the final two dc.
Slip stitch into the anchoring sc between shells. Repeat around the border, adjusting the larger corner shells to distribute picots evenly.
Fasten off and weave in the yarn tail. Keep the picots small so they do not catch easily on bedding.
Assembly and Finishing
- Crochet one complete floral square and confirm its blocked dimensions.
- Weigh the sample and calculate the yarn requirement.
- Complete all 110 floral squares using the same hook and yarn.
- Weave in loose center tails before blocking.
- Block each square to the selected dimensions and allow it to dry.
- Arrange the squares in ten columns and eleven rows.
- Join the horizontal rows, matching stitches and corners.
- Connect the rows vertically and check the panel’s dimensions.
- Crochet the foundation, mesh, cluster, and scalloped border.
- Weave in remaining tails, wash according to the yarn label, and dry flat.
The finished coverlet consists of a joined floral square panel surrounded by a continuous lace border.
7 Technical Tips for a More Accurate Bedspread
- Mark all four corners. Missing a corner space can shift the square’s geometry and produce uneven sides.
- Measure after blocking. A consistent difference of 5 mm per square can accumulate to 5 cm across ten columns.
- Maintain equal joining tension. Tight seams may shorten the panel edges and cause the flower centers to bulge.
- Check the 24-stitch joining edge. Matching the same number of stitches on neighboring squares prevents diagonal pulling.
- Avoid excessive border increases. A ruffled edge indicates that too many stitches or overly long chain arches have been added.
- Control cotton yarn tension. Changes in hook grip can make later squares larger or smaller than the original sample.
- Secure every yarn tail. Weave tails through several centimeters of dense stitches and reverse direction where possible because open lace provides fewer concealed anchoring points.
How to Customize the Bedspread Size
The modular construction makes it possible to adjust the finished dimensions without redesigning the flower centers.
For a smaller decorative throw, make six columns and eight rows. With 20 cm blocked squares, the central panel measures approximately 120 × 160 cm before edging.
For a larger coverlet, add columns or rows until the central panel covers the desired area. The number of squares depends on mattress dimensions, gauge, and the amount of overhang.
Number of columns = desired panel width ÷ blocked motif width.
Round up to a whole number and repeat the calculation for the length. Calculate the border separately because it extends beyond the square panel.
Finer cotton and a smaller hook produce more delicate openwork but usually require more motifs. Thicker cotton makes larger stitches and a heavier finished fabric.
Washing and Care
Cotton crochet bedspreads can become heavy when wet. Support the fabric while moving it to prevent stretched seams.
Follow the care instructions for your yarn. When permitted, wash gently in cool water with mild detergent and avoid aggressive spinning.
Lay the bedspread flat to dry. Arrange the corners and scallops while damp, without stretching the seams beyond their measured dimensions.
Store the coverlet folded in a clean, dry location. Change the fold lines periodically to reduce persistent creases.
Frequently Asked Questions
Is this crochet bedspread suitable for beginners?
The stitches are familiar, but square shaping, repeated motif construction, and large-scale assembly require consistent counting and tension. The project is better suited to crocheters with experience joining square motifs.
How many crochet squares are needed for a queen-size bedspread?
This design proposes 110 squares, arranged ten across and eleven down. The actual number changes with motif gauge, mattress dimensions, and desired overhang.
What yarn works best for a vintage lace bedspread?
Smooth cotton yarn provides good stitch visibility and clear openwork definition. DK cotton offers a practical balance between motif detail and the number of squares required.
Can the bedspread be made in white instead of cream?
Yes. White, ivory, ecru, and pale beige are suitable monochromatic options. Using one dye lot throughout reduces visible shade differences.
Can I make the border wider?
Yes. Repeat a compatible mesh-and-cluster band before the final scallops, adjusting stitch counts and corner increases to keep the fabric flat.
How do I calculate the yarn quantity accurately?
Weigh one completed, blocked motif and multiply by the number of squares. Add yarn for joining and edging, plus a reserve for gauge variation.
Conclusion
A large floral bedspread requires consistent motif dimensions, accurate joins, and a border designed for the finished panel rather than an assumed stitch count. This crochet lace bedspread pattern provides a modular starting point for producing a cream coverlet with repeating flower centers and scalloped edges. Before making the full set of squares, crochet one sample, block it, and record its dimensions and yarn weight. That measurement determines the final layout and material requirement. Save the construction plan to Pinterest, or share a completed sample square on Instagram using #CreamFloralLaceBedspread. Would you keep the six-petal flower centers entirely cream, or introduce a contrasting ivory ring?








