Navy and Ivory 3D Daisy Granny Square Crochet Bedspread Pattern
Introduction
Five ivory petals have to rise from a navy square without pulling its four corners toward the flower. This navy and ivory 3D daisy granny square crochet bedspread pattern solves that conflict by building the dark structural block separately from the dimensional bloom. Worsted-weight yarn, a 5.0 mm hook and approximately 18–20 cm finished squares create the photo-inspired bedspread and matching floral pillows.
The Design: What Makes the Navy Daisy Square Different
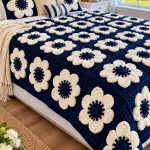
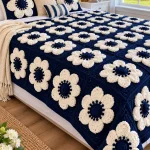
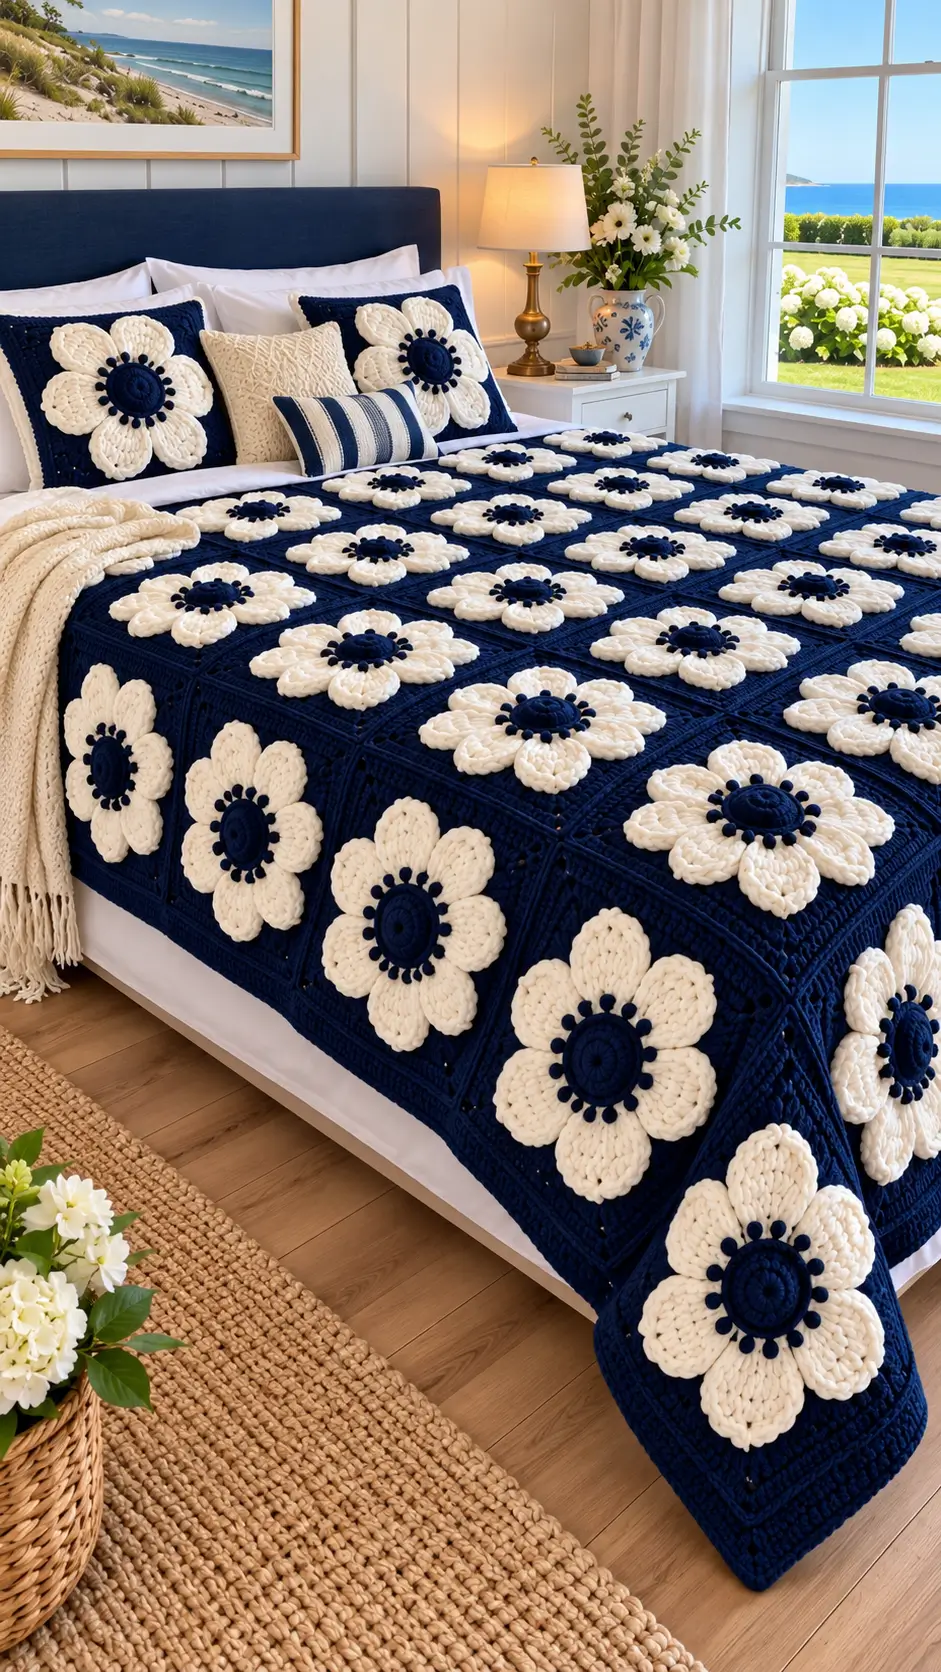
The reference uses strong two-color contrast rather than multiple floral shades. A deep navy background forms the complete structural square. Five broad ivory petals sit above it, while a raised navy disk and a ring of small navy bobbles create the flower center. The result is closer to an appliquéd daisy than a traditional flower worked directly into a granny square.
The construction keeps those jobs separate. The navy square controls dimensions, joining and mattress drop; the flower controls relief. Comparable published 3D flower blocks vary considerably: worsted examples use hooks around 5–5.5 mm, and one documented Aran-weight flower square measures about 16 cm with a 5 mm hook. This project uses a larger 18–20 cm target so the five petals have enough negative space around them.
Project Info at a Glance
| Skill Level | Construction | Target Square | Hook | Best For |
|---|---|---|---|---|
| Intermediate | Flat navy square with separate 3D flower | 18–20 cm | 5.0 mm | Bedspreads, throws and pillow shams |
Materials and Tools
Yarn
- Deep navy — worsted #4 — square backgrounds, flower centers, bobble ring and joining
- Warm ivory — worsted #4 — five large flower petals and optional border detail
Choose yarns with similar thickness and elasticity. A smooth worsted yarn gives the large ivory petals clearer stitch definition than a heavily fuzzy fiber.
Tools
- 5.0 mm crochet hook
- Worsted #4 yarn
- Yarn needle
- Scissors
- Locking stitch markers
- Tape measure
- Blocking mats
- Rust-resistant pins
- Digital scale for yarn calculations
Abbreviations
- MR — magic ring
- ch — chain
- sl st — slip stitch
- sc — single crochet
- hdc — half double crochet
- dc — double crochet
- tr — treble crochet
- BLO — back loop only
- FLO — front loop only
- bo — bobble
- sp — space
- st/sts — stitch/stitches
- FO — fasten off
Pattern — Step by Step
This is an original photo-inspired construction based on standard flower-appliqué and square geometry. Make one complete master motif before producing the full bedspread.
Navy Structural Granny Square
With deep navy, make a MR.
Round 1
Ch 3; this counts as the first dc.
Work 2 dc into MR, ch 3.
Repeat:
(3 dc, ch 3)
three more times.
Join to the top of the beginning ch 3.
You now have four 3-dc groups and four corners.
Round 2
Sl st to the first corner.
Work:
(ch 3, 2 dc, ch 2, 3 dc)
in the first corner.
Ch 1.
In each remaining corner work:
(3 dc, ch 2, 3 dc), ch 1.
Join.
Round 3
Sl st to the first corner.
In each corner work:
(3 dc, ch 2, 3 dc).
Work 3 dc in each side ch-1 space.
Ch 1 between groups.
Join.
Round 4
Continue the established granny-square expansion.
In every corner work:
(3 dc, ch 2, 3 dc).
Work 3 dc into each side ch-1 space, with ch 1 between groups.
Join.
Round 5
Repeat Round 4, adding one additional 3-dc group along each side as the square expands.
Join.
Solid Navy Frame
Round 6
Ch 1.
Sc in every stitch and ch-1 space around.
At each corner ch-2 space work:
(2 sc, ch 2, 2 sc).
Join.
Round 7
Ch 2.
Hdc in every stitch.
At each corner work:
(2 hdc, ch 2, 2 hdc).
Join.
Round 8
Ch 1.
Sc in every stitch.
At each corner work:
(sc, ch 2, sc).
Join and FO.
Target Square Measurement
Block the navy square to approximately 18–20 cm.
If the square is smaller, continue alternating one hdc framing round and one sc framing round until the target measurement is reached.
Add exactly the same rounds to every square.
Navy Flower Center
With deep navy, make a MR.
R1: Ch 1, work 10 sc into MR. Join. (10)
R2: Ch 1, 2 sc in every stitch. Join. (20)
R3: Working in BLO, sc in every stitch. Join. (20)
R4: Sc in every stitch. Join. (20)
FO, leaving a 30 cm tail.
The BLO round gives the disk a shallow raised edge instead of allowing it to lie completely flat.
Optional Raised Center Spiral
Join navy into an unused front loop from R2.
Work loose surface sl sts around all 20 front loops.
Continue inward with several surface sl sts if a stronger spiral effect is wanted.
FO.
The raised center should remain shallow enough for practical bed use.
Navy Bobble Ring
The reference shows small dark projections surrounding the center disk. Make 10 small bobbles separately for a controlled, evenly spaced ring.
Small Bobble — Make 10
Make a MR.
Ch 2.
Work 4 incomplete dc into the ring, leaving the final loop of each stitch on the hook.
Yarn over and pull through all loops.
Ch 1 to close the bobble.
FO, leaving a 12–15 cm tail.
Pull the MR firmly closed.
Positioning the Bobbles
Place the 10 bobbles evenly around the outside of the navy center disk.
Each bobble should sit approximately 3–5 mm away from its neighbors.
Do not attach them permanently until the ivory petals have been positioned.
Ivory Petal — Make 5 per Flower
With ivory, ch 13.
Work into the second chain from the hook:
sc, hdc, dc, 2 dc, 4 tr, 2 dc, hdc, sc.
The sequence uses all 12 available chains.
Ch 2.
Rotate the foundation chain and work along the unused loops on the opposite side:
sc, hdc, 2 dc, 4 tr, 2 dc, dc, hdc, sc.
Sl st to the first sc.
FO, leaving a 25 cm tail.
The result is a broad oval petal with a slightly pointed outer end.
Petal Definition Round
For thicker petals, rejoin ivory at the petal base.
Work sc evenly around the complete perimeter.
At the outer tip work:
(sc, ch 1, sc).
Continue around the opposite side.
Join and FO.
Repeat on all five petals.
Shaping the Five-Petal Flower
Lay the blocked navy square flat.
Mark its exact center.
Arrange five ivory petals around that mark.
Allow the petal bases to overlap slightly beneath the navy center disk.
The outer tips should remain clear of the square’s joining edge by at least 2–3 cm.
Attaching the Petals
Pin all five petals before sewing.
Sew each petal to the navy background through approximately the inner 2.5–3 cm only.
Leave the outer half free.
This produces the dimensional effect without allowing the flower to fold excessively.
Adding the Navy Center
Position the navy disk over the five petal bases.
Sew around its outermost round.
Make a second smaller ring of attachment stitches approximately 1 cm inside the first if additional stability is required.
Do not flatten the raised center while sewing.
Adding the Bobble Ring
Arrange the 10 navy bobbles around the center disk.
Space them evenly.
Sew each bobble through its foundation only.
The rounded portion should remain above the fabric.
Finished Flower Diameter
Target a complete flower diameter of approximately 14–16 cm.
That leaves a visible navy margin around the flower on an 18–20 cm square.
If the flower exceeds 16 cm, shorten the petal foundation to ch 11 and make one test petal before altering the remaining pieces.
Flower Relief
Keep the ivory petals approximately 1–2 cm above the navy background.
The navy center can rise slightly higher.
A flatter construction is preferable for the central sleeping area of a bedspread.
Master Square Check
Complete one entire floral square and record:
- Blocked square width
- Blocked square height
- Diagonal A
- Diagonal B
- Flower diameter
- Petal length
- Complete motif weight
Keep the difference between the two diagonals within approximately 5 mm.
Making the Remaining Squares
Batch the components rather than completing one square at a time.
Make all navy squares first.
Block them to the master measurement.
Next crochet the required ivory petals, followed by navy centers and bobbles.
Assembly can then be completed in consistent groups.
Bedspread Layout
For a blocked square measuring 19 cm, approximate motif-field dimensions are:
| Grid | Squares | Approximate Size Before Border |
|---|---|---|
| 5 × 6 | 30 | 95 × 114 cm |
| 6 × 8 | 48 | 114 × 152 cm |
| 8 × 10 | 80 | 152 × 190 cm |
| 9 × 11 | 99 | 171 × 209 cm |
| 10 × 12 | 120 | 190 × 228 cm |
| 11 × 13 | 143 | 209 × 247 cm |
Add any outer border width separately.
Planning Mattress Coverage
Measure the actual mattress and required side drop.
For a mattress 160 cm wide with a 25 cm drop on both sides:
160 + 25 + 25 = 210 cm.
At 19 cm per square:
210 ÷ 19 = approximately 11.05.
Eleven columns create approximately 209 cm before the border; twelve columns create approximately 228 cm.
Estimating Yarn from a Finished Motif
Weigh one completely finished floral square.
Suppose the master motif weighs 85 g.
For an 80-square bedspread:
85 × 80 = 6,800 g.
Add yarn for seams and the outside border.
Then add approximately 10% for swatching, gauge variation and future repairs.
The 85 g value is only an example. Replace it with the actual measured weight of your motif.
Calculating Navy and Ivory Separately
Weigh the navy and ivory yarn before making one complete motif.
For example, if one square uses:
- Navy — 55 g
- Ivory — 30 g
then 80 squares would require approximately:
- Navy — 4,400 g
- Ivory — 2,400 g
Add additional navy for joining and the border. These quantities demonstrate the calculation method rather than fixed yarn requirements.
Joining Before Adding Flowers
For a large bedspread, join the navy squares before attaching the flowers.
This makes the fabric much easier to handle.
The raised petals can otherwise catch on neighboring squares while long rows are being assembled.
Flat Navy Joining Method
Place two blocked navy squares right sides upward.
Use deep navy yarn.
Insert the hook through corresponding outer loops.
Work relaxed slip stitches from one corner to the next.
Stop after approximately 5 cm and check the seam.
Seam Tension Test
Lay the two joined squares flat.
The seam should not pull the corners toward one another.
If it does, remove the join and work with looser tension or move up approximately 0.5 mm in hook size for joining only.
Joining Horizontal Rows
Join the squares into complete horizontal rows.
Measure each row.
Rows containing the same number of squares should remain within approximately 1 cm of one another.
Joining Rows Vertically
Place completed rows side by side.
Match all square corners before beginning.
Join with the same relaxed navy slip-stitch method.
Keep each four-square intersection compact.
Attaching Flowers After Joining
Once the navy grid is complete, position one five-petal flower in the center of every square.
Attach the ivory petals first.
Add the navy center second.
Sew the bobble ring last.
This order hides the petal attachment stitches beneath the center.
Outer Border — Navy Foundation
Join navy at one outer corner.
Work sc evenly around the complete bedspread.
At each corner work:
(2 sc, ch 2, 2 sc).
Join.
Border Round 2
Ch 2.
Hdc in every stitch.
At each corner work:
(2 hdc, ch 2, 2 hdc).
Join.
Border Round 3 — Textured Navy
Ch 1.
Work sc in BLO around.
At each corner work:
(2 sc, ch 2, 2 sc).
Join.
The unused front loops produce a narrow raised line.
Optional Ivory Accent Round
Join ivory.
Work one relaxed round of sc.
At each corner work:
(sc, ch 2, sc).
Join and FO.
For the strongest match to the reference, omit this round and keep the perimeter predominantly navy.
Final Navy Round
Join navy.
Hdc in every stitch around.
At each corner work:
(2 hdc, ch 2, 2 hdc).
Join and FO.
Matching Daisy Pillow Sham
The reference pillows use one enlarged five-petal flower against a navy square background.
Make a navy panel approximately 45–50 cm square.
A solid hdc or dense granny-square construction works well because the large flower needs a firm foundation.
Large Pillow Petals — Make 5
For a larger flower, begin each ivory petal with ch 19.
Work gradually from short stitches at the base to tr stitches through the widest middle section, then decrease symmetrically toward the outer end.
Work back along the opposite side of the chain.
Make one test petal before producing all five.
Target approximately 17–19 cm petal length for a 45–50 cm pillow.
Large Navy Pillow Center
Make a flat navy disk approximately 11–13 cm across.
Begin with 10 sc in a MR and increase evenly until the target diameter is reached.
Stop increasing once the disk lies flat at the required size.
Pillow Bobble Ring
Make approximately 12–14 navy bobbles.
Arrange them evenly around the enlarged center disk.
Check spacing before sewing any bobble permanently.
Assembling the Pillow Flower
Mark the center of the navy pillow front.
Pin all five ivory petals.
Sew only the inner portion of each petal.
Attach the navy center over their bases.
Add the bobble ring last.
Plain Pillow Back
With navy, chain to the width of the pillow front.
Row 1: Hdc in third chain from hook and across.
Row 2: Ch 2, turn, hdc across.
Repeat until the panel matches the front.
FO.
Assembling the Pillow
Place front and back with wrong sides together.
Sc around three sides in navy.
Insert the cushion form.
Close the fourth side or make an envelope opening for a removable cover.
Smaller Throw Version
Use a 6 × 8 layout of 19 cm squares.
The motif field measures approximately 114 × 152 cm before the border.
This version requires 48 flowers and 240 ivory petals.
Large Bedspread Version
A 10 × 12 layout uses 120 squares.
At five petals per flower, prepare:
120 × 5 = 600 ivory petals.
At 10 bobbles per flower:
120 × 10 = 1,200 navy bobbles.
Batch production is strongly recommended at this scale.
Reducing the Number of Bobbles
For faster construction, use five larger bobbles instead of ten small ones.
Position one bobble between each pair of ivory petals.
This changes the center appearance but preserves the five-fold symmetry.
Flatter Bedspread Version
For a bedspread intended for regular sleeping use, omit the separate bobbles.
Work one surface-crochet ridge around the navy center instead.
Sew the ivory petals farther toward their tips so they rise only approximately 5–10 mm.
Higher-Relief Decorative Version
Sew only the innermost 2 cm of each ivory petal.
Add the separate bobble ring.
Allow the center disk to remain slightly cupped.
This version produces stronger relief but is better suited to a decorative bed cover than a sleeping blanket.
Alternative Coastal Blue Version
Replace deep navy with medium denim blue.
Keep warm ivory petals.
The same stitch counts and construction can be used if both yarns match the original gauge.
Alternative Reversed Version
Make ivory foundation squares.
Use navy for all five petals and the center.
Add an ivory center ridge if more contrast is required.
Keep the joining yarn the same color as the foundation squares.
Assembly
- Crochet one navy foundation square, block it to approximately 18–20 cm and keep its two diagonal measurements within 5 mm.
- Make five ivory test petals and arrange them on the master square, keeping every tip at least 2–3 cm away from the joining edge.
- Crochet the navy center and 10 bobbles, then assemble one complete flower and record its diameter and relief.
- Produce the remaining navy squares in batches and compare every fifth block with the master before stacking them for assembly.
- Join the blocked squares into horizontal rows with relaxed navy slip stitches and test each seam after approximately 5 cm.
- Join the rows vertically, keeping the four-square intersections compact and checking that the navy grid remains rectangular.
- Attach five ivory petals to every square through only their inner 2.5–3 cm, keeping the outer sections free.
- Sew one navy disk over each set of petal bases, then add the evenly spaced navy bobbles around every center.
- Work the navy perimeter rounds after the complete floral field has been checked for flatness and correct overall dimensions.
- Weave all structural tails through 6–8 cm of dense navy crochet, complete a light final blocking and reshape the ivory petals by hand after drying.
The finished bedspread should have a flat navy structural grid with five-petal ivory flowers, raised navy centers and consistent dark joining lines between every square.
7 Technical Tips
- Keep all five petals within approximately 5 mm of the master-petal length. One shorter petal makes the center appear displaced even when it is sewn to the geometric middle of the square.
- Leave at least 2–3 cm between each ivory petal tip and the square edge. Petals entering the joining zone become trapped or folded when neighboring blocks are connected.
- Keep the two square diagonals within approximately 5 mm. A distorted navy background makes the entire flower grid appear crooked after assembly.
- Test the navy joining seam after approximately 5 cm. Tight slip stitches shorten the edge and create visible ridges through the dark background.
- Keep normal bedspread petal relief near 1–2 cm. Greater projection increases snagging and creates uncomfortable high points across the sleeping surface.
- Pin all 10 center bobbles before sewing the first one. Unequal spacing is highly visible against the ivory petals because the dark ring acts as a strong visual circle.
- Weave structural tails through at least 6–8 cm of dense navy fabric. Avoid hiding seam tails beneath the ivory petals, where repeated movement can pull the ends into view.
Care and Final Blocking
Follow the washing instructions for the chosen yarn. Support the complete bedspread during washing because a large motif blanket becomes considerably heavier when wet.
Lay the project flat and align the navy joining grid first. Measure the top, center and bottom widths, then check both long sides.
Shape the outside border next. Arrange the ivory petals only after the structural fabric is correctly positioned.
Do not press the flowers under heavy blocking boards. Allow the bedspread to dry completely, then lift each petal gently from its base to restore the dimensional profile.
Conclusion
The five ivory petals create the visual scale of this navy and ivory 3D daisy granny square crochet bedspread pattern, while the independent navy squares keep the finished cover measurable and stable. Start with one 18–20 cm master block, make five identical petals and test the complete flower before producing additional components. Join the navy field before attaching hundreds of dimensional pieces on a large version, then add the centers and bobble rings after the petals are secure. Your next step is to crochet one navy square and one ivory petal and confirm their proportions together. Save the project to Pinterest or share it on Instagram with #NavyIvoryDaisyBedspread. Would you keep the navy bobble ring, or use a simpler raised center for a flatter bedspread?
Et
7