Introduction
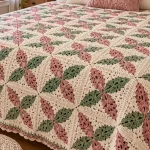
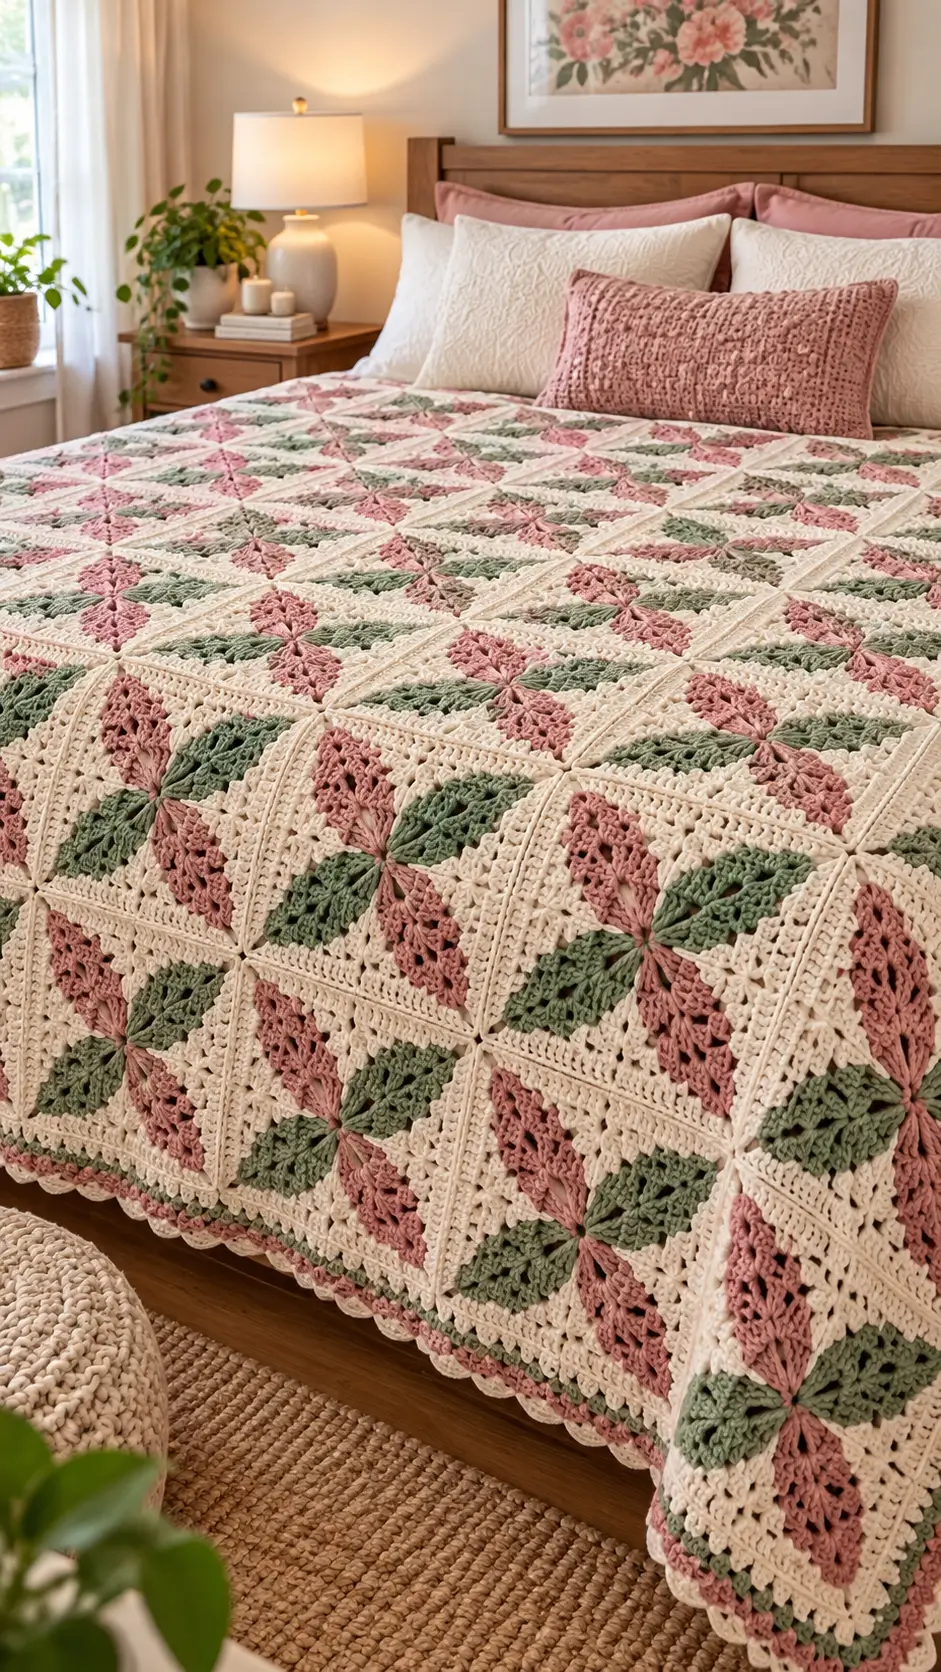
Four rotating color wedges have to meet at one center without turning the square into a diamond. This pinwheel granny square crochet bedspread pattern combines dusty pink, sage green and warm cream sections inside a firm cream frame. Worked in worsted-weight yarn with a 5.0 mm hook, the photo-inspired construction targets approximately 20–22 cm per blocked square and creates a flat, practical bedspread rather than a raised floral surface.
The Design: What Makes the Pinwheel Square Different
The photographed blanket uses geometric movement rather than dimensional flowers. Each block contains four fan-shaped sections radiating from the center. Dusty pink and sage provide the strongest contrast, while cream sections connect the colored wedges to the outer frame. The result resembles a patchwork quilt translated into crochet.
Pinwheel squares are commonly made with strategic color changes and expanding sections; current examples range from small 9.5–11.5 cm blocks in finer yarn to 11–12 inch motifs worked with larger hooks and cotton yarns. For this bedspread, the square is deliberately scaled to 20–22 cm. The main technical risk is unequal tension between colors. Even a small gauge difference can shift the center and make opposite corners measure differently.
Project Info at a Glance
| Skill Level | Construction | Target Square | Hook | Best For |
|---|---|---|---|---|
| Intermediate | Four-section flat pinwheel square | 20–22 cm | 5.0 mm | Bedspreads, throws and cushions |
Materials and Tools
Yarn
- Dusty pink — worsted #4 — approximately 25–30% of motif yarn
- Sage green — worsted #4 — approximately 25–30% of motif yarn
- Warm cream — worsted #4 — approximately 40–50%, including frames, joining and border
Use yarns from the same range whenever possible. The three colors need similar thickness, twist and elasticity because every section must reach the same outer frame.
Tools
- 5.0 mm crochet hook
- Worsted #4 yarn
- Yarn needle
- Scissors
- Locking stitch markers
- Tape measure
- Blocking mats
- Rust-resistant pins
- Digital scale for yarn calculations
Abbreviations
- MR — magic ring
- ch — chain
- sl st — slip stitch
- sc — single crochet
- hdc — half double crochet
- dc — double crochet
- tr — treble crochet
- sp — space
- st/sts — stitch/stitches
- RS — right side
- WS — wrong side
- FO — fasten off
Pattern — Pinwheel Granny Square
This is an original photo-inspired construction. The pinwheel is built as four equal wedge units joined at their narrow ends, then surrounded with cream squaring and framing rounds. This approach makes the color sections easier to measure than a multi-ball continuous spiral.
Dusty Pink Wedge — Make 2
With dusty pink, ch 4.
Row 1: 2 dc in fourth ch from hook. Turn. (3 dc including turning chain)
Row 2: Ch 3, dc in first st, dc across, 2 dc in final st. Turn. (5)
Row 3: Ch 3, dc in first st, dc across, 2 dc in final st. Turn. (7)
Row 4: Ch 3, dc in first st, ch 1, skip 1 st, dc across until 2 sts remain, ch 1, skip 1 st, 2 dc in final st. Turn.
Row 5: Ch 3, dc in first st, dc in every dc and ch-1 sp across, 2 dc in final st. Turn.
Row 6: Repeat Row 4.
Row 7: Repeat Row 5.
Row 8: Ch 3, dc in first st, dc across, 2 dc in final st.
FO. Leave a 20 cm tail for assembly.
Sage Green Wedge — Make 2
Repeat the complete dusty-pink wedge instructions using sage green.
All four wedges must have the same row count and final measurement.
Checking the Four Wedges
Lay the two pink and two sage pieces side by side.
Their final rows should be equal in width within approximately 3 mm.
Measure from the narrow starting point to the center of the final row.
All four measurements should also agree within approximately 3 mm.
Correct an inconsistent wedge before assembly.
Assembling the Pinwheel Center
Arrange the four wedges with their narrow starting points meeting at the center.
Alternate colors:
pink → sage → pink → sage.
Rotate each wedge in the same direction so the wider edges form four rotating blades.
Using the long tails, secure the four narrow tips together.
Do not close the center with a bulky knot.
Joining Adjacent Wedge Edges
Place one pink wedge beside one sage wedge.
Using cream yarn or the corresponding wedge color, whip stitch or mattress stitch the adjacent inner edges together.
Stop when the pieces naturally begin separating toward the outside.
Repeat between all four wedges.
The center should now form a flat rotating cross rather than four completely independent pieces.
Cream Foundation Around the Pinwheel
Join warm cream at the outer edge of one wedge.
Work sc evenly around the complete pinwheel.
Place one stitch into each obvious stitch top and distribute additional stitches along row ends as needed.
Mark four positions approximately 90 degrees apart.
These markers establish the square corners.
First Squaring Round
Ch 2.
Hdc evenly from the first corner marker to the next.
At each marked corner work:
(2 hdc, ch 2, 2 hdc).
Repeat around.
Join.
Count the stitches on opposite sides.
Opposite sides must contain the same number.
Second Squaring Round
Ch 3.
Dc in every stitch across each side.
At every corner ch-2 space work:
(2 dc, ch 2, 2 dc).
Join.
Openwork Cream Round
Ch 1.
Sc in the first stitch.
Across each side repeat:
ch 2, skip 1 st, sc in next st.
At each corner work:
(sc, ch 3, sc).
Join.
Cream Fan Round
Sl st into the first ch-2 space.
Work:
2 hdc in each ch-2 side space.
Work one hdc in each intervening sc.
At each corner ch-3 space work:
(2 hdc, ch 2, 2 hdc).
Join.
Solid Cream Structural Round
Ch 1.
Sc in every stitch.
At each corner work:
(2 sc, ch 2, 2 sc).
Join.
Raised Cream Frame
Ch 2.
Hdc in the back loop of every stitch around.
At each corner ch-2 space work:
(2 hdc, ch 2, 2 hdc).
Join.
The unused front loops create a subtle ridge similar to the strong cream outlines visible between squares in the reference.
Second Frame Round
Ch 2.
Hdc in every stitch.
At each corner work:
(2 hdc, ch 2, 2 hdc).
Join.
Final Joining Round
Ch 1.
Sc in every stitch around.
At each corner work:
(sc, ch 2, sc).
Join and FO.
Target Square Size
Block the finished motif to approximately 20–22 cm square.
Pinwheel motifs vary widely with construction. Current examples include an approximately 11.5 cm square made in fine-to-sport cotton with a 2.5 mm hook, while larger textured pinwheel squares are available around 11–12 inches with 4.5–5.0 mm hooks. The 20–22 cm measurement here is therefore a project target for this photo-inspired bedspread.
Blocking the Master Square
Pin the four corners first.
Measure the top and bottom.
Measure both sides.
Then measure both diagonals.
Keep the difference between diagonals within approximately 5 mm.
Do not pull one colored wedge farther than the others to correct an inaccurate center.
Checking the Pinwheel Center
Place a ruler through the center from one side of the square to the opposite side.
Repeat in the other direction.
The point where the two measurements cross should sit near the geometric center of the motif.
A center displaced by more than approximately 5 mm usually indicates that one wedge is larger or was joined under different tension.
Alternative Continuous-Color Construction
Experienced colorwork crocheters can construct the pinwheel in continuous rounds instead of separate wedges.
Current pinwheel-square designs often create rotation through strategic color changes within a round rather than changing yarn only at round ends.
The separate-wedge method used here is easier to reproduce at bedspread scale because each color section can be measured independently before the cream frame is added.
Making the Remaining Squares
Keep the blocked master square beside your workspace.
Compare every fifth motif with it.
Check:
- Outside width
- Outside height
- Both diagonals
- Pink wedge width
- Sage wedge width
Keep finished outside dimensions within approximately 5 mm of the master.
Bedspread Layout
If each blocked square measures 21 cm, useful motif-field dimensions include:
| Grid | Squares | Approximate Size Before Border |
|---|---|---|
| 5 × 6 | 30 | 105 × 126 cm |
| 6 × 8 | 48 | 126 × 168 cm |
| 8 × 10 | 80 | 168 × 210 cm |
| 9 × 11 | 99 | 189 × 231 cm |
| 10 × 12 | 120 | 210 × 252 cm |
| 11 × 13 | 143 | 231 × 273 cm |
Add the finished border depth separately.
Planning the Drop
Measure the mattress width and the required drop on both exposed sides.
For example, a 160 cm mattress with a 30 cm drop on both sides requires:
160 + 30 + 30 = 220 cm.
At 21 cm per blocked square:
220 ÷ 21 = approximately 10.5.
Eleven columns would create a motif field approximately 231 cm wide before the border.
Changing Pinwheel Orientation
The direction of each square changes the larger pattern across the bedspread.
For a uniform layout, rotate every pinwheel in the same direction.
For a quilt-like layout, rotate alternate squares by 90 degrees.
This creates larger secondary diamonds where four blocks meet.
Recommended Photo-Inspired Layout
Arrange the first square with pink running from lower center toward the upper left and sage rotating beside it.
Rotate the next square 90 degrees.
Continue alternating orientation across the row.
Reverse the sequence on the following row.
View the layout from several meters away before joining.
Estimating Yarn
Weigh one finished and blocked master square.
Suppose it weighs 65 g.
For an 80-square blanket:
65 × 80 = 5,200 g.
Add cream yarn for joining and the border, then add approximately 10% for swatching, gauge differences and future repairs.
Replace the 65 g example with the actual weight of your own square.
Calculating Yarn by Color
Weigh each yarn before and after making one master motif.
For example, suppose one square uses:
- Dusty pink — 16 g
- Sage green — 16 g
- Warm cream — 33 g
For 80 squares, the example becomes:
- Dusty pink — 1,280 g
- Sage green — 1,280 g
- Warm cream — 2,640 g
Add separate cream yarn for seams and the border. These quantities demonstrate the calculation method rather than fixed requirements.
Arranging the Finished Squares
Block every motif before joining.
Lay the complete arrangement on a clean floor or large table.
Check the pinwheel directions first.
Then inspect the cream frames.
The frame lines should create an uninterrupted grid across the bedspread.
Photograph the layout before stacking the motifs.
Flat Cream Joining Method
Use warm cream.
Place two squares right sides upward.
Insert the hook through corresponding outer loops.
Work relaxed slip stitches from one corner to the next.
Do not pull the working yarn tightly after each stitch.
Testing the Seam
Stop after approximately 5 cm.
Lay both motifs flat.
The joined edge should remain equal to the original blocked measurement.
If the corners pull toward one another, remove the seam and work more loosely.
Joining Horizontal Rows
Join all squares into horizontal rows first.
Measure each completed row.
Rows containing the same number of blocks should remain within approximately 1 cm of one another.
Correct a contracted seam before joining rows together.
Joining the Rows
Place two completed rows side by side.
Match every square intersection.
Join with the same cream slip-stitch method.
At each four-square intersection, use one compact connection through the corresponding corner spaces.
Why the Cream Frame Matters
The cream border around every motif has two functions.
First, it visually separates the pink and sage pinwheels.
Second, it provides a consistent joining surface independent of the decorative wedges.
Without that frame, small differences in the colored sections become much more obvious after assembly.
Bedspread Border — Round 1
Join cream at one outer corner.
Work sc evenly around the complete motif field.
At each corner work:
(2 sc, ch 2, 2 sc).
Join.
Border Round 2
Ch 2.
Hdc in every stitch.
At each corner work:
(2 hdc, ch 2, 2 hdc).
Join.
Border Round 3 — Sage Accent
Change to sage.
Ch 1.
Sc in every stitch around.
At each corner work:
(sc, ch 2, sc).
Join and FO sage.
Border Round 4 — Pink Accent
Join dusty pink.
Work hdc in every stitch.
At each corner work:
(2 hdc, ch 2, 2 hdc).
Join and FO pink.
Border Round 5 — Cream Openwork
Join cream.
Sc in the first stitch.
Repeat:
ch 3, skip 2 sts, sc in next st.
At each corner use one ch-5 space.
Join.
Border Round 6 — Cream Scallops
Into each ch-3 side space work:
(sc, hdc, 4 dc, hdc, sc).
Into each corner ch-5 space work:
(sc, hdc, 7 dc, hdc, sc).
Repeat around.
FO.
Optional Deeper Bedspread Border
For a full-size bedspread, add one extra cream hdc round before the sage accent.
A second cream openwork round can also be added before the scallops.
Check the border after each round.
A bedspread edge several meters long magnifies even small stitch-distribution errors.
Matching Pinwheel Pillow
Join four motifs in a 2 × 2 arrangement.
Rotate the squares so their pinwheels create one larger central geometric pattern.
Add cream framing rounds until the front reaches the required cushion size.
For a standard decorative pillow, target approximately 45–50 cm.
Solid Pillow Back
With cream yarn, chain to the width of the blocked pillow front.
Row 1: Hdc in the third chain from hook and across.
Row 2: Ch 2, turn, hdc across.
Repeat Row 2 until the panel matches the front.
FO.
Assembling the Pillow
Place the front and back with wrong sides together.
Sc through both layers around three sides.
Insert the cushion form.
Close the fourth side or construct an envelope opening for removal.
Alternative Colorway — Blue and Cream
Replace dusty pink with denim blue.
Replace sage with powder blue.
Keep the complete structural frame warm cream.
The pinwheel geometry remains unchanged.
Alternative Colorway — Terracotta and Olive
Use terracotta instead of dusty pink and muted olive instead of sage.
Keep an oatmeal or warm-cream frame.
This palette emphasizes the quilt-like geometry rather than the floral character of the original colors.
Alternative Colorway — Lavender and Sage
Replace dusty pink with lavender.
Keep sage green and warm cream.
Do not alter wedge stitch counts when changing colors.
Assembly
- Crochet two dusty-pink and two sage wedges, then compare all four pieces and keep their final widths within approximately 3 mm.
- Arrange the four wedge tips at the center in alternating colors and secure them without creating a bulky central knot.
- Join the adjacent wedge edges, then work the cream foundation around the pinwheel and mark four independent square corners.
- Complete the cream squaring and framing rounds, then block the master motif to approximately 20–22 cm with its diagonals within 5 mm.
- Make the remaining motifs and compare every fifth square with the master for outside dimensions and colored-wedge width.
- Arrange all blocked squares in the planned orientation and photograph the complete bedspread layout before stacking the rows.
- Join the squares horizontally with relaxed cream slip stitches and test every seam after approximately 5 cm.
- Join the completed rows vertically, matching all four-square intersections and keeping the cream grid straight.
- Work the cream, sage and pink border rounds only after the entire motif field lies flat and measures correctly.
- Weave all tails through dense cream framing stitches, complete a light final blocking and align the outer scallops before drying.
The completed bedspread should form a regular cream grid filled with alternating dusty-pink and sage pinwheels, with flat centers, square corners and a lightly scalloped perimeter.
7 Technical Tips
- Keep all four wedge widths within approximately 3 mm. One wider section moves the visual center away from the geometric center of the square.
- Keep blocked-square diagonals within 5 mm. Matching side lengths do not detect a square that has shifted diagonally during assembly.
- Mark the four cream corners before beginning the first squaring round. Choosing corner positions while crocheting can produce unequal opposite sides.
- Test each joining seam after approximately 5 cm. A tight slip-stitch seam shortens the blocked edge and creates raised cream ridges across the bedspread.
- Measure every fifth motif against the master. A repeated 5 mm difference across ten squares changes the total blanket width by approximately 5 cm.
- Check the border after every 30–40 cm of the first perimeter round. Too many stitches produce waves, while too few make the outside edge curve inward.
- Weave each structural tail through at least 6–8 cm of dense cream crochet. Avoid hiding assembly tails inside the open colored wedges where they can remain visible.
Care and Final Blocking
Follow the washing instructions for the selected yarn. Support the bedspread when wet rather than lifting it by one corner.
Lay the project flat and align the cream joining grid first.
Measure the top, middle and bottom widths. Then check the two long sides.
Shape the outer scallops only after the main field is square.
Allow the bedspread to dry completely before folding so the pinwheel sections retain their blocked geometry.
Conclusion
The rotating pink and sage sections define this pinwheel granny square crochet bedspread pattern, but consistent wedge measurements are what keep the full grid accurate. Make four test wedges first, assemble one 20–22 cm master square and check both diagonals before beginning production. Keep the decorative sections flat, reserve the dense cream rounds for joining and test several connected motifs before assembling long rows. Your next step is to crochet one pink and one sage wedge and compare their measurements side by side. Save the finished bedspread to Pinterest or share it on Instagram with #PinkSagePinwheelBedspread. Would you arrange every pinwheel in the same direction, or rotate alternate squares to create larger secondary diamonds?