Introduction
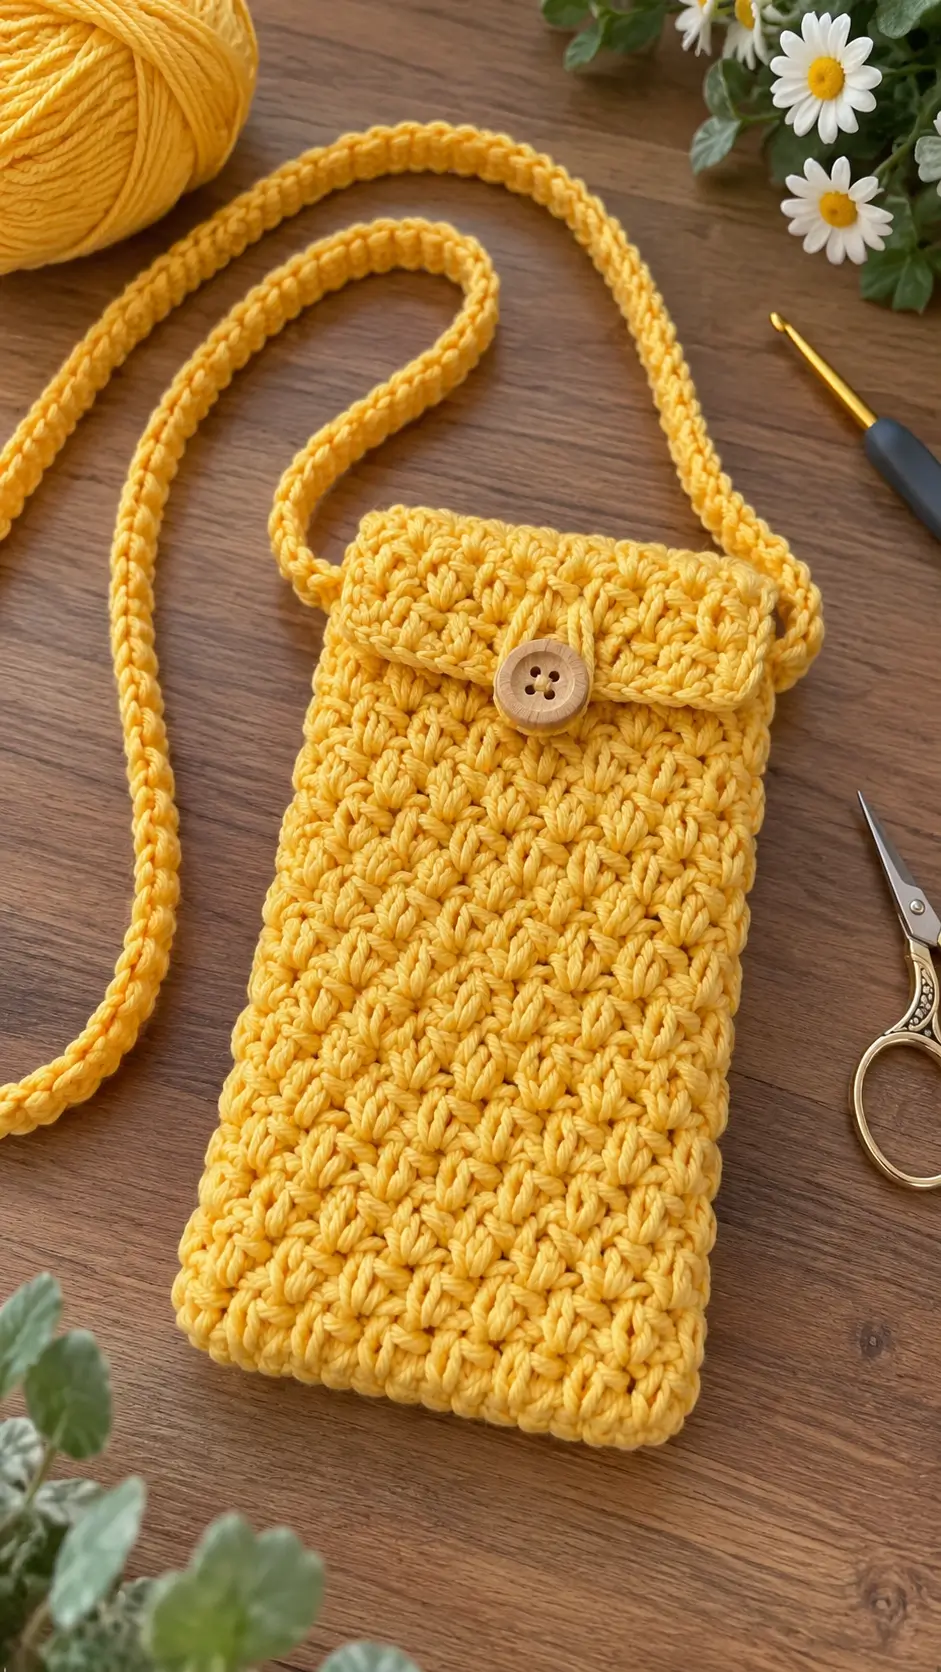
A phone pouch fails first at the strap or the opening, not in the middle of the fabric. This yellow crochet phone bag pattern uses a dense textured body, reinforced top edge, fitted flap, wooden button and low-stretch crossbody cord. Made with cotton yarn and a 4.0 mm hook, the adjustable construction is suitable for an intermediate crocheter who wants a compact hands-free bag sized directly to a phone.
The Design: What Makes This Crochet Phone Bag Different
The photographed pouch combines three structural decisions. First, the body is narrow and close-fitting so the phone cannot rotate inside it. Second, a repeated cluster texture adds thickness without requiring a separate decorative panel. Third, the strap attaches beside the reinforced upper edge instead of to the flap, keeping carrying tension away from the closure.
The flap overlaps the opening by roughly one quarter of the bag height and closes with a central wooden button. A compact buttonhole is worked into the flap rather than added later. The long crochet strap is deliberately denser than the body because a loosely worked chain can lengthen significantly under the weight of a phone. For best results, measure the device with its everyday case attached before choosing the starting chain.
Project Info at a Glance
| Skill Level | Construction | Target Size | Hook | Best For |
|---|---|---|---|---|
| Intermediate | Seamless pouch with flap and cord | Adjustable to phone | 4.0 mm | Smartphone crossbody pouch |
Materials and Tools
Yarn
- Mustard or sunflower yellow — DK #3 or light worsted cotton — approximately 100–150 g depending on phone and strap dimensions
A firm cotton or cotton-rich yarn is preferable to a highly elastic fiber. The pouch needs enough resistance to support the device without stretching vertically.
Tools
- 4.0 mm crochet hook
- Yellow cotton yarn
- 20–25 mm wooden button
- Yarn needle
- Scissors
- Locking stitch markers
- Tape measure
Abbreviations
- ch — chain
- sl st — slip stitch
- sc — single crochet
- hdc — half double crochet
- dc — double crochet
- sp — space
- st/sts — stitch/stitches
- FO — fasten off
Measure Your Phone Before Crocheting
Measure the phone with its normal case attached.
Record three measurements:
- Phone width
- Phone height
- Phone thickness
The finished internal width should be approximately the phone width plus its thickness, with a small amount of working clearance. Do not make the pouch several centimeters wider than the device. Cotton crochet relaxes during use.
For example, a phone measuring approximately 8 cm wide × 16 cm high can use a pouch around 9–10 cm wide × 18–19 cm high, depending on case thickness and stitch gauge.
Gauge Swatch
Before starting the bag, make a textured swatch at least 10 × 10 cm.
Wash or damp-block it as you intend to treat the finished pouch.
Measure the stitch and row gauge after drying.
The fabric should be dense enough that a phone corner cannot push easily through the stitches.
Pattern — Phone Pouch Base
This construction starts with a foundation chain and works around both sides, eliminating a separate bottom seam.
Chain until the foundation measures approximately the width of your phone plus 5–8 mm.
For the sample instructions below, ch 18.
Round 1
Sc in the second chain from hook.
Sc across to the final chain.
Work 3 sc in the final chain.
Rotate the work.
Continue along the unused loops on the opposite side of the foundation chain.
Sc across.
Work 2 sc in the starting end.
Join with sl st.
Place a marker at the beginning of the round.
Round 2
Ch 1.
Sc in every stitch around.
Join.
Do not increase.
The work should now begin forming a shallow pocket.
Round 3
Ch 1.
Sc in every stitch around.
Join.
Checking the Base
Insert the bottom of the phone after Round 3.
The crochet should fit around it without requiring force.
If more than approximately 1 cm of empty space remains across the width, restart with fewer foundation chains.
If the phone stretches the stitches open, restart with additional chains or a larger hook.
Textured Body Stitch
The body uses compact paired half-double-crochet clusters to create the raised diagonal texture visible in the reference.
Texture Round A
Ch 2.
Work 2 hdc in the next stitch.
Skip the following stitch.
Repeat:
*2 hdc in next st, skip next st*
around.
Join with sl st.
Texture Round B
Ch 2.
Work 2 hdc into the space between the paired hdc stitches of the previous round.
Continue working one 2-hdc cluster into every corresponding cluster space around.
Join.
Continuing the Body
Repeat Texture Round B until the pouch reaches approximately 1.5–2 cm below the top of the phone when the phone is inserted.
Check the height every three or four rounds.
Do not rely only on a row count because phone dimensions and crochet gauge differ.
Reinforcing the Upper Opening
Once the textured section reaches the required height, switch to sc.
Top Round 1
Ch 1.
Sc evenly around.
Join.
Top Round 2
Ch 1.
Sc in every stitch.
Join.
Top Round 3
Repeat one more sc round.
Do not FO.
These rounds stabilize the opening and provide a firm attachment area for the strap and flap.
Creating the Back Flap
Lay the pouch flat with the desired front facing you.
Mark the left and right edges.
The flap is worked only across the back half of the pouch.
Flap Row 1
Continue with the working yarn.
Sc across the back half of the pouch from one side marker to the other.
Ch 1 and turn.
Flap Row 2
Sc across.
Ch 1 and turn.
Flap Row 3 — Texture
Work:
*2 hdc in next st, skip next st*
across.
Adjust the final stitch with one hdc if required.
Ch 1 and turn.
Flap Row 4
Work paired hdc clusters into the spaces between the clusters from the previous row.
Ch 1 and turn.
Flap Rows 5–7
Continue the same texture.
Stop when the flap overlaps the front of the pouch by approximately 4–5 cm.
Shaping the Flap Corners
For a slightly rounded flap like the reference, reduce one stitch at each end of the final two rows.
Shaping Row 1
Sl st across the first stitch.
Work the established texture across.
Leave the final stitch unworked.
Shaping Row 2
Repeat the same reduction.
The flap should narrow subtly rather than forming a sharp point.
Buttonhole Row
Find the horizontal center of the flap.
Work sc until approximately 1 cm before the center.
Ch 3–5, depending on button diameter.
Skip enough stitches to match the chain opening.
Continue sc across.
Turn.
Final Flap Edge
Work sc across the flap, placing one sc into each stitch and enough sc into the buttonhole chain to keep it firm.
Continue down one side of the flap, across its lower attachment area if accessible, and up the opposite side.
At each rounded corner work 2 sc where needed.
FO.
Testing the Buttonhole
Pass the selected button through the opening before sewing it to the bag.
The button should pass through with light resistance.
If the hole is loose enough for the button to fall through without pressure, reduce it before completing the project.
Attaching the Wooden Button
Insert the phone into the pouch.
Close the flap naturally without pulling it downward.
Mark the center of the buttonhole on the front panel.
Remove the phone.
Sew the 20–25 mm wooden button securely at the marked point.
Pass the sewing yarn through dense body stitches rather than through only one textured cluster.
Crossbody Strap
The photographed strap is narrow, rounded and considerably denser than the pouch body.
A simple long chain is not recommended because it can stretch under repeated loading.
Strap Foundation
Leave a 25 cm starting tail.
Ch until the cord measures approximately 110–125 cm for an adult crossbody strap.
For a shorter shoulder strap, target approximately 70–90 cm.
Measure the chain against the intended wearer before continuing.
Strap Row 1
Starting in the second chain from hook, sl st into every chain.
Keep the stitches loose enough that the strap remains flexible.
Strap Row 2
Rotate the cord slightly.
Work surface slip stitches along the opposite side of the foundation chain.
This creates a rounded, reinforced cord with crochet structure on both sides.
FO leaving a 25 cm tail.
Alternative Low-Stretch Strap
For a firmer strap, use foundation single crochet instead.
Make foundation sc until the strap reaches the required length.
Turn.
Sl st through the back loop of every stitch.
This creates a flatter cord and reduces lengthwise stretch.
Testing Strap Stretch
Measure the strap while unloaded.
Place the phone inside the pouch and temporarily attach the strap.
Hang the bag for approximately 30 minutes.
Measure the strap again.
If it lengthens by more than approximately 3–5 cm, shorten it before permanent attachment or remake it with firmer tension.
Attaching the Strap
Position one strap end at each side of the upper opening.
The attachment should span approximately 2–3 cm vertically.
Using the long tails, sew each end through multiple rounds of the reinforced sc section.
Pass through the strap several times.
Do not attach the strap only to the decorative textured clusters.
Reinforcing the Strap Attachments
After sewing, thread the tail through the inside of the pouch.
Work several horizontal stitches across the attachment zone.
Then work several vertical stitches.
The crossed reinforcement distributes load across a larger area.
Weave the remaining tail through at least 5 cm of dense crochet.
Optional Crochet Strap Tabs
If you prefer a replaceable strap, make two small tabs.
Ch 8.
Sc in second chain from hook and across.
Ch 1 and turn.
Sc across for another 3–4 rows.
FO leaving a long tail.
Fold each tab around a small D-ring and sew both ends to the reinforced upper side of the pouch.
A removable strap can then be clipped to the rings.
Optional Lining
A fabric lining reduces stretching and prevents small objects from catching on the textured stitches.
Measure the completed pouch interior.
Cut two fabric rectangles approximately 1 cm larger on every side than the required finished lining dimensions.
Sew the side and bottom seams.
Turn the upper raw edge inward.
Insert the lining and hand-sew it beneath the reinforced crochet opening.
Optional Card Pocket
For an internal card pocket, crochet a small rectangle in sc.
Make it approximately 7–8 cm wide × 6 cm high.
Sew the two sides and lower edge to the lining or inside back panel.
Leave the top edge open.
Keep the pocket low enough that cards do not interfere with the flap closure.
Adjusting the Pattern for a Larger Phone
Do not automatically change the hook size.
First increase the foundation chain until it extends approximately 5–8 mm beyond the phone width.
Work the base rounds and test the actual device.
Then continue the body until the required height is reached.
This preserves the fabric density while changing the dimensions.
Adjusting for a Thick Phone Case
Measure the phone with the case installed.
A thick protective case can add more than a centimeter to the combined circumference.
If the test base feels tight, add foundation chains rather than forcing the finished pouch to stretch.
Repeated overstretching will deform the top opening and button placement.
Making the Bag Wider for Keys
If the pouch needs to carry keys or cards beside the phone, add approximately 2–3 cm to the width.
Keep the phone in a separate fabric lining compartment if metal keys will be carried regularly.
This prevents the screen and camera housing from rubbing against hard objects.
Making a Shorter Neck Pouch
Use the same body and flap instructions.
Make the strap approximately 75–90 cm, depending on the wearer.
Test the finished length before attaching both ends.
A neck pouch should sit high enough that the phone does not swing heavily while walking.
Making a Wrist Strap
Instead of the crossbody cord, crochet approximately 35–40 cm of reinforced strap.
Fold it in half.
Sew both ends to one upper side of the pouch.
Reinforce the attachment through at least three rounds of dense sc.
Color Variations
The sunflower yellow shown in the reference makes the texture particularly visible because the entire project is worked in one color.
The same construction also works well in:
- Sage green
- Warm cream
- Dusty rose
- Terracotta
- Denim blue
- Olive green
For a two-color version, make the body in one shade and use a contrasting color for the flap, strap and final edging.
Estimating Yarn
The most accurate calculation comes from weighing the finished body before making the strap.
Suppose the body and flap use 70 g and the finished strap uses 35 g.
The project would require approximately:
70 g + 35 g = 105 g
Add approximately 10% for gauge variation, sampling and finishing.
These numbers are calculation examples rather than fixed yarn requirements.
Assembly
- Measure the phone with its normal protective case and make a gauge swatch using the intended yarn and 4.0 mm hook.
- Crochet the oval-style foundation around both sides of the starting chain and test the base directly around the lower end of the phone.
- Work the textured body until it reaches approximately 1.5–2 cm below the top of the inserted device.
- Add three dense sc rounds around the opening to stabilize the pouch and create reinforced attachment zones.
- Work the flap from the back half of the opening, shape its lower corners and create a centered buttonhole.
- Insert the phone, close the flap naturally and mark the wooden button position before sewing the button securely to the front.
- Crochet the reinforced strap to the required shoulder or crossbody length and test it under the actual phone weight.
- Attach each strap end through a 2–3 cm section of the reinforced upper edge rather than through one decorative stitch group.
- Add the optional lining or internal card pocket, keeping all sewing below the flap hinge and buttonhole.
- Weave every structural yarn tail through at least 5 cm of dense crochet, insert the phone and complete a final fit and strap-length check.
The completed pouch should hold the phone without excessive side clearance, close without stretching the flap and support the device from reinforced strap attachment points.
7 Technical Tips
- Limit empty width around the phone to roughly 5–8 mm when establishing the starting size. A much wider pouch allows the device to rotate and places uneven pressure on the flap.
- Test the body around the actual phone after the first three rounds. Waiting until the textured section is complete makes a width error considerably more expensive to correct.
- Keep the strap attachment at least 2–3 cm deep. Sewing into only the uppermost round concentrates the complete phone weight on a narrow row of stitches.
- Load-test the strap for 30 minutes before final attachment. If the cord gains more than approximately 3–5 cm, shorten it or remake it with denser construction.
- Size the buttonhole to the actual button rather than a fixed chain count. A gap only a few millimeters too large can release a smooth wooden button while walking.
- Keep the flap hinge free from strap sewing. Overlapping those two structural areas can make the flap twist toward one side instead of closing centrally.
- Weave strap tails through at least 5 cm of dense stitches. Short tails can work loose under repeated crossbody loading even when ordinary decorative tails remain secure.
Care and Finishing
Follow the care instructions for the selected yarn.
Remove the phone before washing the pouch.
If the wooden button is not designed for repeated washing, spot-clean the finished bag instead.
Reshape the pouch while damp and allow it to dry without weight on the strap.
Do not hang a wet cotton pouch from the crossbody cord because the additional water weight can lengthen both the strap and the upper attachment points.
Conclusion
The critical measurements in this yellow crochet phone bag pattern are the fitted body width, reinforced opening and loaded strap length. Measure the phone with its case, make the foundation only slightly wider than the device, and test the fit before building the textured body. Add the wooden button only after the flap has reached its finished length, then load-test the strap before permanent attachment. A fabric lining can be added when extra shape retention is required. Save the finished pouch to Pinterest or share it on Instagram with #SunflowerPhoneBag. For this yellow version, would you keep the natural wooden button or replace it with a contrasting dark brown button?









