SEO Title: Chunky Cable Crochet Blanket Pattern – Free Throw
Meta Description: Make a chunky cable crochet blanket pattern in navy and cream with raised braided stitches, super bulky yarn, a full row repeat, border, and sizing tips.
Introduction
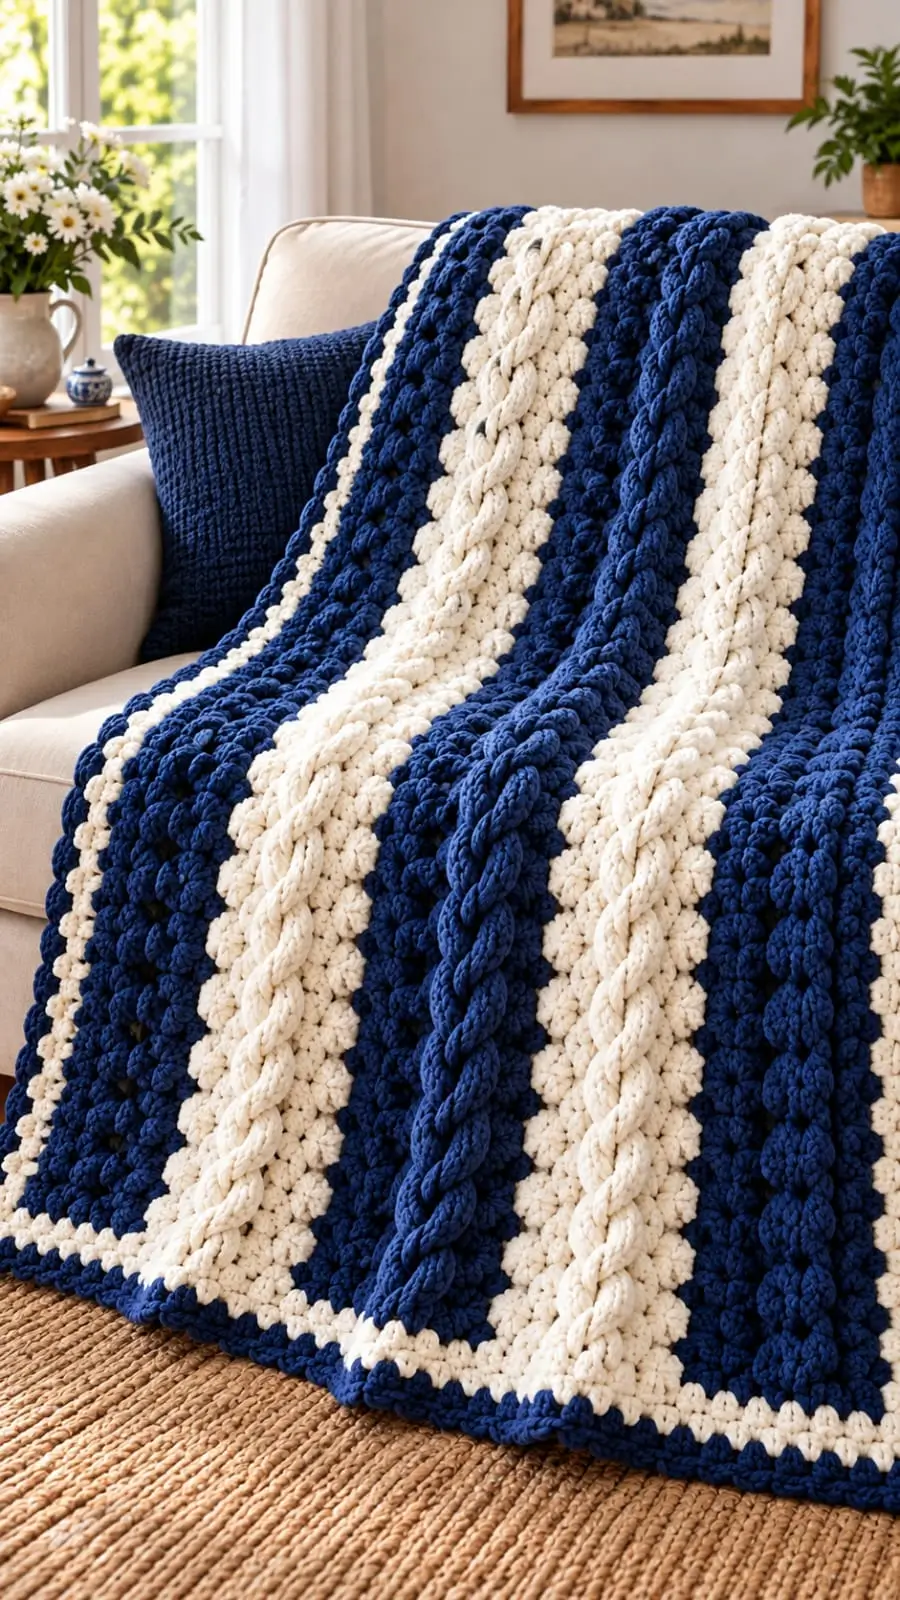
Braided navy columns rise between ivory panels in this chunky cable crochet blanket pattern, creating a strong vertical structure across a rectangular throw. The design uses super bulky yarn, a 10 mm crochet hook, and raised post stitches to target a finished size of approximately 120 × 150 cm. Intended for intermediate crocheters, the pattern provides a repeatable cable arrangement suitable for a sofa throw or decorative bed covering.
The Design: What Makes This Navy and Cream Blanket Different
The defining feature of this braided cable crochet blanket is the arrangement of raised cable columns inside contrasting color panels. Each panel has a fixed stitch allocation, keeping the crossings aligned throughout the fabric.
Half-double crochet stitches provide a dense background. The raised stitches are worked around posts, while the surrounding fabric supports their shape. Maintain the same stitch count after every crossing.
Two simple border rounds frame the striped surface. A common mistake is pulling inactive yarn too tightly at a color transition. Separate yarn supplies for adjacent panels reduce that problem.
Project Info at a Glance
| Skill Level | Intermediate |
|---|---|
| Estimated Time | 20–30 hours |
| Target Finished Size | 120 × 150 cm |
| Starting Hook | 10 mm |
| Yarn | Super bulky #6 |
| Best For | Sofa throws and intermediate cable practice |
Dimensions and time are estimates. This photo-inspired pattern has not been physically tested.
Materials and Tools
Yarn
- Deep navy blue: Super bulky #6, approximately 1,200–1,600 g.
- Warm ivory cream: Super bulky #6, approximately 800–1,100 g.
- Optional reserve: 200–300 g for swatching and adjustments.
Suggested yarn: Lion Brand Wool-Ease Thick & Quick, or a comparable plied super bulky yarn. These quantities are planning allowances, not measured consumption.
Tools
- 10 mm crochet hook, adjusted to gauge
- Locking stitch markers
- Large-eye tapestry needle
- Scissors
- Measuring tape
- Row counter
- Optional blocking mats
Gauge
Make a swatch containing at least two complete 16-stitch panels and 16 rows. For 96 stitches to measure approximately 120 cm across, the finished fabric must average eight working stitches per 10 cm. Measure the row gauge independently to calculate the required length.
Crochet Abbreviations
- ch – Chain
- sc – Single crochet
- hdc – Half-double crochet
- dc – Double crochet
- fptr – Front-post treble crochet
- sl st – Slip stitch
- st / sts – Stitch / stitches
- RS – Right side
- WS – Wrong side
- rep – Repeat
- BLO – Back loop only
Special Stitch: Six-Stitch Cable Crossing
On a right-side crossing row, skip the first three stitches of the six-stitch cable section. Work one front-post treble crochet around each of the next three corresponding stitch posts. Return to the three skipped posts and work one front-post treble crochet around each. The completed crossing contains six stitches.
Keep the long stitches relaxed. On the following row, work into the top loops of the six cable stitches in their new order.
Pattern – Step by Step
This blanket is worked flat in turned rows. The width contains six vertical panels of 16 stitches each.
Foundation Chain
With navy yarn, chain 97.
Foundation Row (WS): Work 1 hdc in the second chain from the hook and in each chain across. (96 sts)
Place stitch markers after stitches 16, 32, 48, 64, and 80.
Color Panels
- Panel 1: Navy – 16 stitches
- Panel 2: Cream – 16 stitches
- Panel 3: Navy – 16 stitches
- Panel 4: Cream – 16 stitches
- Panel 5: Navy – 16 stitches
- Panel 6: Cream – 16 stitches
Use separate yarn supplies for the panels. Cross the yarns on the wrong side at each boundary to avoid gaps.
Main Blanket Body
Row 1 (RS): Ch 1, turn. Work 1 hdc in each stitch across, changing colors at the panel boundaries. (96 sts)
Row 2 (WS): Ch 1, turn. Work 1 hdc in each stitch across. (96 sts)
Row 3 (RS): Ch 1, turn. Work 1 hdc in each stitch across. (96 sts)
Row 4 (WS): Ch 1, turn. Work 1 hdc in each stitch across. (96 sts)
Row 5 (RS): Ch 1, turn. In each 16-stitch panel work 5 hdc, one six-stitch front-post treble cable crossing, and 5 hdc. Repeat across six panels. (96 sts)
Row 6 (WS): Ch 1, turn. Work 1 hdc into the top of every stitch, including the cable stitches. (96 sts)
Row 7 (RS): Ch 1, turn. Work 1 hdc in each stitch across. (96 sts)
Row 8 (WS): Ch 1, turn. Work 1 hdc in each stitch across. (96 sts)
Row 9 (RS): Repeat Row 5. (96 sts)
Rows 10 onward: Repeat Rows 6–9 until the desired length is reached, stopping after a non-crossing row.
Testing note: The stitch arithmetic is consistent, but the crossing sequence must be swatched before making the full blanket. The hook size and post-stitch height may need adjustment.
Optional Textured Background
To reproduce more of the raised texture visible in the photograph, add bobble details to selected background sections without changing the six-stitch cable areas. Make a separate sample first, because bobbles alter fabric height and yarn consumption.
Contrasting Border
Round 1: Attach cream yarn at a corner. Work sc evenly around the four sides, placing 3 sc in each corner. Join with a sl st.
Round 2: Attach navy yarn. Work sc around, placing 3 sc in the center corner stitch of each corner. Join with a sl st.
Fasten off and leave a 15–20 cm tail for weaving. Adjust the side-edge stitch spacing to prevent rippling.
Assembly and Finishing
- Inspect the foundation edge for missed loops.
- Check all six panel boundaries.
- Examine the cable columns for incomplete stitches.
- Measure the blanket width.
- Measure the blanket length.
- Secure all color-change ends.
- Finish the cream inner border.
- Complete the navy outer border.
- Block according to the yarn care label.
- Record the finished measurements.
7 Technical Tips for Better Cable Definition
- Stitch markers: Mark every 16-stitch boundary. Verify the 96-stitch total after every row.
- Cable tension: Avoid tight crossing stitches. If the fabric narrows by more than approximately 1 cm, adjust the hook or tension.
- Cable stitch count: Every crossing must contain six stitches. Extra stitches in skipped loops cause unintended increases.
- Color transitions: Avoid pulling the inactive yarn tight. A narrow boundary can pucker the fabric.
- Border spacing: Too many side-edge stitches create rippling. Redistribute the stitches evenly.
- Yarn texture: Chenille can obscure post openings. Test the cable before choosing a fuzzy yarn.
- Tail weaving: Weave tails through at least 10 cm of fabric. Change direction before trimming to reduce loosening.
Common Problems and Fixes
Why does the blanket pull inward at cable rows?
The crossing stitches may be too tight. Work the front-post treble stitches with relaxed tension and compare the swatch width above and below each crossing.
Why do the cream stripes look wider?
Differences in yarn thickness or color-change tension can alter panel width. Measure each panel and compare stitch height before continuing.
Can I make the blanket wider?
Add complete 16-stitch panels. Adding one navy and one cream panel increases the foundation width by 32 working stitches.
Can I use worsted-weight yarn?
Yes, but the blanket will be smaller with the same stitch count. Make a new gauge swatch and adjust the panel and row counts.
How should I wash the blanket?
Follow the yarn label. Avoid hanging the blanket by a narrow edge while wet, as its weight can stretch the cable fabric.
Related Crochet Patterns
- Braided Cable Crochet Blanket – A textured aran-weight design. [INTERNAL LINK NEEDED]
- Timeless Cabled Throw – Front-post cable technique. [INTERNAL LINK NEEDED]
- Cozy Current Throw – A chenille cable blanket. [INTERNAL LINK NEEDED]
- Cable Crochet Blanket Tutorial – Cable instructions and photo guidance. [INTERNAL LINK NEEDED]
Conclusion
The navy and cream layout gives this chunky cable crochet blanket pattern a defined structure that can be adapted to different throw dimensions. Before making the full project, complete a cable swatch, confirm the six-stitch crossing, and measure the actual panel width. Use those measurements to adjust the foundation and row count where necessary.
Once finished, photograph the blanket flat and draped over furniture to show both the stripe arrangement and raised cable texture. Share the finished project on Pinterest or Instagram with #NavyCreamCableBlanket, including the yarn, hook size, and final measurements.
Would you keep all six cable columns the same width, or make the central navy columns wider?









