Introduction
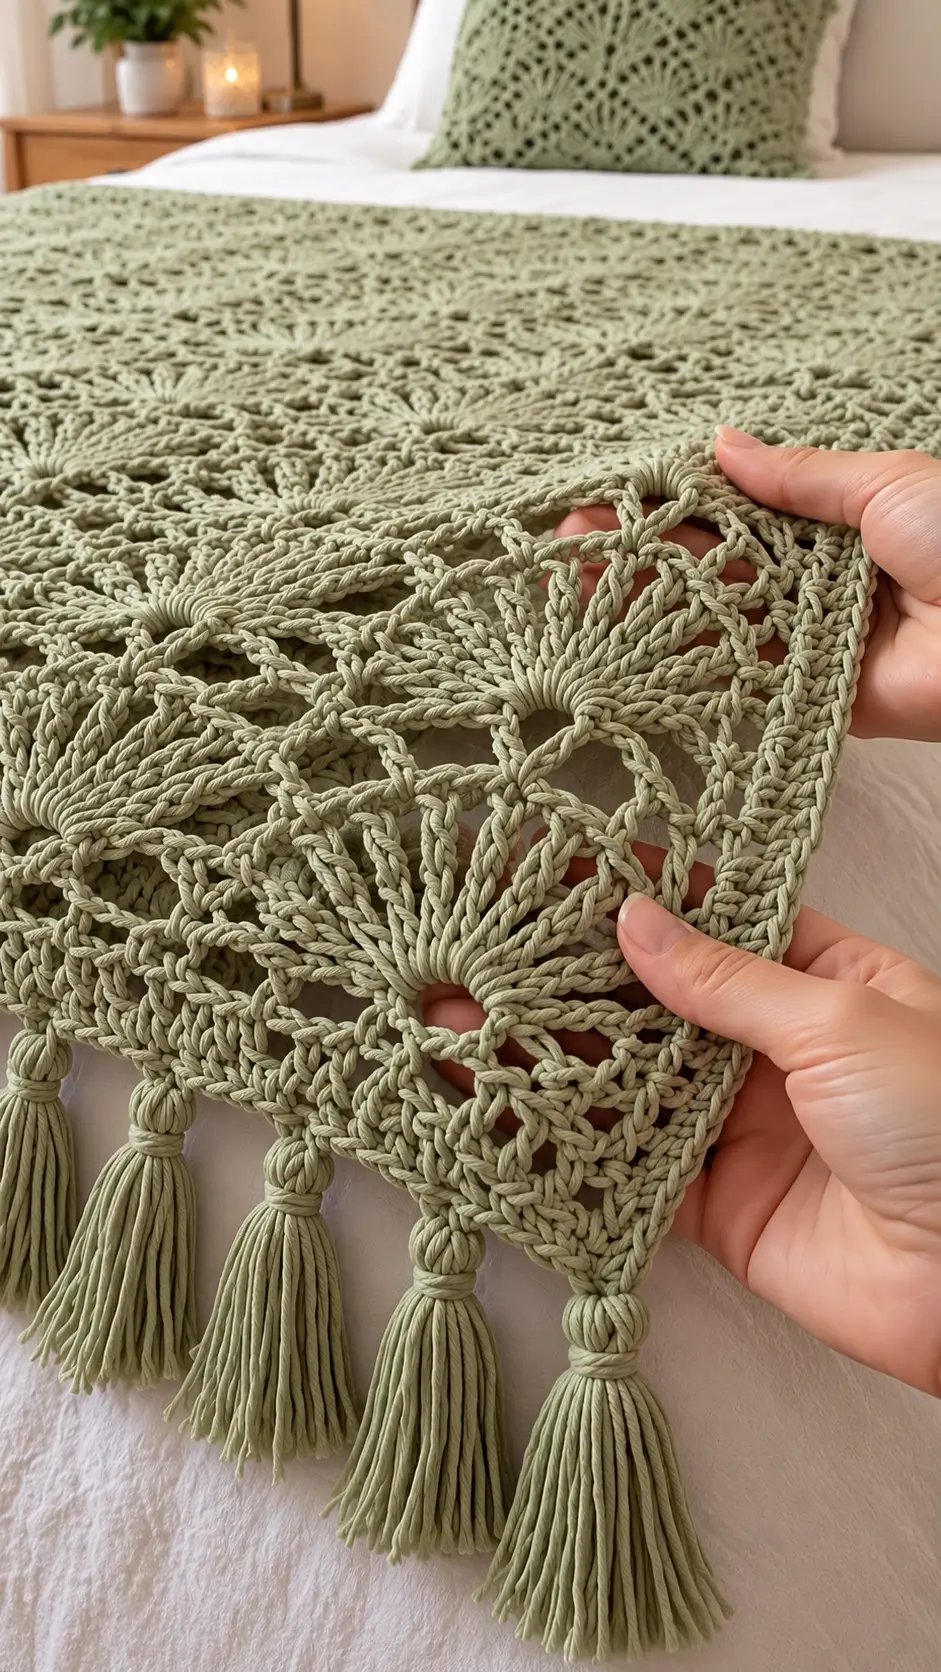
The open fan inside each square needs to spread almost to the corners without letting the center collapse into a hole. This sage green crochet lace bedspread pattern uses repeating openwork squares, radiating fan stitches, geometric chain spaces and a deep tassel edge. DK cotton with a 4.0 mm hook produces a defined modular fabric suitable for an intermediate-to-advanced bed runner, throw, bedspread, or matching cushion.
The Design: What Makes This Sage Lace Bedspread Different
The motif is built around negative space rather than a dense granny-square center. Long stitches radiate from a compact lower section, creating fan-shaped wedges separated by chain arches. Those arches become the visual framework of the square and continue into neighboring motifs after joining. A narrow structural perimeter prevents the open center from carrying seam tension.
The second defining feature is the tassel border. Tassels hang from selected edge points rather than every stitch, so the lace remains visible above them. The photo also suggests a single-color construction. That choice puts more emphasis on stitch direction, chain-space size and blocking accuracy because there are no color changes to disguise irregular motif dimensions.
Project Info at a Glance
| Skill Level | Construction | Target Motif | Hook | Best For |
|---|---|---|---|---|
| Intermediate–Advanced | Openwork square motifs joined into panels | 15–17 cm | 4.0 mm | Bed runners, throws, bedspreads and cushions |
Materials and Tools
Yarn
- Sage green — DK #3 cotton or cotton blend — main motifs, joins and border
- Sage green — same yarn — additional quantity reserved for tassels
Make one complete motif before purchasing yarn for a large bedspread. The amount required changes considerably with motif size, yarn construction, tassel length and the number of open chain spaces.
Tools
- 4.0 mm crochet hook
- DK #3 cotton or cotton-blend yarn
- Yarn needle
- Scissors
- Locking stitch markers
- Tape measure
- Blocking mats
- Rust-resistant pins
- 15–18 cm cardboard tassel template
Abbreviations
- MR — magic ring
- ch — chain
- sl st — slip stitch
- sc — single crochet
- hdc — half double crochet
- dc — double crochet
- tr — treble crochet
- dtr — double treble crochet
- sp — space
- st/sts — stitch/stitches
- FO — fasten off
Pattern — Sage Openwork Fan Square
This is an original photo-inspired construction. Make one complete square, block it, and use its measurements as the master for every repeated motif.
Center Ring
With sage yarn, ch 8.
Join with sl st to form a ring.
Round 1
Ch 1.
Work 16 sc into the ring.
Join with sl st. (16 sc)
Round 2 — Fan Foundations
Ch 5.
Skip 1 stitch and sc in the next stitch.
Repeat:
ch 5, skip 1 st, sc in next st
around.
Join.
You should have 8 ch-5 spaces.
Round 3 — First Radiating Fans
Sl st into the first ch-5 space.
Work:
sc, hdc, dc, 2 tr, dc, hdc, sc
into the same space.
Ch 3.
Repeat the same fan into the next ch-5 space.
Continue around.
Join.
You now have eight narrow fans separated by ch-3 spaces.
Round 4 — Open Arches
Sl st to the top area of the first fan.
Ch 6.
Sc into the ch-3 space between fans.
Ch 6.
Sc into the upper center of the next fan.
Repeat around.
Join.
The larger chain arches create the open structure visible in the reference.
Round 5 — Dividing the Motif into Four Sections
Place a marker at every second fan.
These four marked positions will become the corners.
Work through the next arch:
sc, ch 4, sc.
In the following arch at a marked position work:
sc, ch 6, sc.
Repeat around, alternating side arches and larger corner arches.
Join.
Round 6 — Building the Fan Wedges
Sl st into the first side arch.
Work:
3 dc, ch 2, 3 dc
into the side arch.
In the corner ch-6 space work:
4 tr, ch 4, 4 tr.
Continue around, repeating the side group and corner group.
Join.
The motif should now begin changing from circular to square.
Round 7 — Long Radiating Stitches
At each side section work one dc into the first stitch, then progressively increase stitch height toward the corner:
dc, dc, tr, tr, dtr.
At the corner work:
(dtr, ch 4, dtr).
Mirror the sequence after the corner:
dtr, tr, tr, dc, dc.
Use chain spaces between stitch groups where needed to preserve the open lace structure.
Repeat on all four sides.
Round 8 — Lace Framework
Work along each side using:
ch 4, skip 2 sts, sc in next st.
Repeat until reaching the corner.
At each corner work:
ch 6, sc into the corner space, ch 6.
Continue around.
Lay the motif flat after this round.
If the sides pull inward, increase selected ch-4 spaces to ch 5.
Round 9 — Structural Outer Round
Sl st into the first chain space.
Work 4 sc into each ch-4 side space.
At each corner ch-6 space work:
3 sc, ch 3, 3 sc.
Continue around.
Join.
This denser perimeter becomes the joining edge and prevents the lace fans from absorbing seam tension.
Round 10 — Final Square Edge
Ch 1.
Sc in every stitch along each side.
At each corner work:
(sc, ch 2, sc).
Join and FO.
Blocking the Master Motif
Block the first square to approximately 15–17 cm.
Pin all four corners first.
Measure horizontally and vertically.
Then measure both diagonals.
The two diagonals should differ by no more than approximately 5 mm.
Open each chain arch with a pin only after the square perimeter is accurate.
Adjusting Motif Size
For a smaller motif, use sport-weight cotton and a smaller hook.
For a larger square, add one extra structural round rather than lengthening the chain spaces excessively.
A very long chain arch can look correct while lying flat but may stretch substantially once the complete bedspread hangs over the mattress edge.
Optional Larger 18–20 cm Square
After Round 10, continue with one additional round.
Ch 3.
Dc in every stitch along each side.
At each corner work:
(2 dc, ch 2, 2 dc).
Join.
Follow with one final sc round.
Block all squares to the same target measurement.
Planning the Bedspread Grid
Calculate the finished dimensions from the blocked master motif rather than from an unblocked square.
If the master square measures 16 cm, approximate motif-field dimensions are:
| Grid | Motifs | Approximate Size Before Border |
|---|---|---|
| 5 × 7 | 35 | 80 × 112 cm |
| 7 × 9 | 63 | 112 × 144 cm |
| 9 × 11 | 99 | 144 × 176 cm |
| 10 × 13 | 130 | 160 × 208 cm |
| 12 × 14 | 168 | 192 × 224 cm |
Add the border width and tassel drop separately. A bedspread intended to hang down both mattress sides needs a larger grid than a decorative bed runner positioned only across the foot of the bed.
Layout Before Joining
Block every square before assembly.
Place the motifs on a large flat surface.
Orient the radiating fans in the same direction.
Stand several steps away and inspect the chain-space lines.
They should create continuous geometric paths across the complete panel.
Joining Method — Flat Slip Stitch
Place two motifs side by side with right sides facing upward.
Join sage yarn at the first corresponding corners.
Insert the hook through matching edge loops.
Work loose slip stitches along the seam.
Stop every few centimeters and open the joined squares flat.
If the seam pulls the squares upward, remake it with looser stitches.
Alternative Sewn Join
For a nearly invisible connection, use mattress stitch.
Place the squares beside each other.
Using a yarn needle and matching sage yarn, pass through corresponding edge loops.
Pull only until the two edges meet.
Do not cinch the seam.
The openwork sections should remain the same width beside the join as they are in the center of each motif.
Join-As-You-Go Option
You can connect motifs during the final chain-space round once the master layout has been tested.
At an attachment point work:
ch 2, sl st into the corresponding chain space of the completed motif, ch 2.
Continue the current square.
Use the same joining positions on every motif.
This method reduces sewing but requires careful control of orientation.
Joining Complete Rows
Join motifs into horizontal rows first.
Return each finished row to the layout before joining the next one.
After all horizontal rows are complete, join them vertically.
Check the total width after every second row.
Correct a contracting seam before more fabric is added.
Bedspread Border — Foundation Round
Join sage yarn at one outer corner.
Work sc evenly around the complete perimeter.
Place one sc in each edge stitch and distribute additional stitches only where needed around joining points.
At every corner work:
(2 sc, ch 2, 2 sc).
Join.
Border Round 2 — Chain Arches
Ch 1.
Sc in the first stitch.
Work:
ch 4, skip 2 sts, sc in next st.
Repeat around.
At each corner use one larger ch-6 space.
Border Round 3 — Open Fans
Sl st into the first ch-4 space.
Work:
(sc, hdc, 3 dc, hdc, sc)
into the space.
Ch 2.
Repeat into the next space.
Continue around.
At each corner work a slightly larger fan:
(sc, hdc, 5 dc, hdc, sc).
Border Round 4 — Tassel Foundation
Work sc around the outer edge.
At regular intervals create attachment loops with:
ch 3, sl st into the same stitch.
Place one attachment loop approximately every 8–12 cm along the tasselled edges.
Keep the spacing identical on opposite sides.
Making the Tassels
Cut a piece of cardboard approximately 15–18 cm high.
Wrap sage yarn around the cardboard 20–30 times, depending on the desired tassel thickness.
Thread a separate strand under the upper loops and tie firmly.
Cut the lower loops.
Remove the bundle from the cardboard.
Forming the Tassel Neck
Measure approximately 2–2.5 cm below the top knot.
Wrap a separate yarn strand around the bundle 6–10 times.
Tie securely.
Thread the ends inside the tassel with a yarn needle.
Trim the lower edge only after the tassel has been attached.
Attaching the Tassels
Pull the upper tassel loop through one ch-3 border loop.
Pass the entire tassel through its own top loop.
Pull firmly but do not distort the border.
Repeat at every marked position.
Lay the bedspread flat before trimming all tassels to equal length.
Tassel Placement
The photographed style works particularly well with tassels along the lower edge or along three exposed sides.
A full four-sided tassel border adds substantial yarn weight and can be inconvenient at the head of a bed.
For a bed runner, use tassels on the two short ends.
For a throw, all four sides can be used if the motifs are sufficiently firm.
Estimating Tassel Yarn
Make one finished tassel and weigh it.
Suppose one tassel weighs 12 g.
If the bedspread requires 24 tassels:
12 g × 24 = 288 g
Add this amount to the motif and border yarn calculation.
Tassels can consume more yarn than their visual area suggests, so calculate them separately.
Estimating Motif Yarn
Weigh one blocked square.
Suppose one 16 cm motif weighs 28 g.
For a 99-square layout:
28 g × 99 = 2,772 g
Add joining yarn, border yarn and tassels.
Then add approximately 10% for samples, gauge differences and repairs.
The 28 g figure is an example for calculation rather than a fixed requirement.
Matching Sage Lace Cushion
The cushion visible with this style can be constructed from the same square motif.
For a small front, arrange 3 × 3 motifs.
For larger motifs, a 2 × 2 arrangement may be sufficient.
Join them with the same flat seam used on the bedspread.
Measure the completed panel before making the back.
Solid Cushion Back
With sage yarn, chain to the required width.
Row 1: Hdc in the third chain from the hook and across.
Row 2: Ch 2, turn, hdc across.
Repeat until the panel matches the lace front.
Block both pieces to matching dimensions.
Joining the Cushion
Place the lace front and solid back with wrong sides together.
Sc through both layers along three sides.
Insert the cushion form.
Close the fourth side or add buttons for a removable cover.
Do not place tassels around a cushion that will be used for sleeping.
Making a Bed Runner
A smaller runner uses the same motif with fewer rows.
For 16 cm squares, a 3 × 9 arrangement produces a motif field of approximately 48 × 144 cm before the border.
Add tassels to both short ends.
This format reproduces the open lace effect with substantially fewer motifs than a full bedspread.
Making a Wider Throw
Use a 7 × 9 or 8 × 10 motif layout.
Keep the tassel spacing independent of the motif count.
Mark the final border at regular centimeter intervals so the fringe remains visually balanced even if a tassel does not fall directly beneath every motif center.
Controlling Chain-Space Tension
Chain spaces form a large percentage of this design.
Do not tighten them to match the height of sc stitches.
Make each chain with normal working tension.
If the motif cups after the openwork rounds, the arches may be too short.
If the motif ripples, they may be too long or the surrounding stitch groups may contain excess stitches.
Keeping the Fans Symmetrical
Count every long-stitch group.
Each of the four principal sections should contain the same number of radiating stitches.
Place a marker at every corner as soon as the square shaping begins.
Do not move those markers until the structural perimeter has been completed.
Blocking Open Lace
Openwork crochet changes considerably during blocking.
Pin the four corners first.
Measure the square.
Next pin the midpoint of each side.
Only then open the decorative chain arches.
Pinning every arch before establishing the perimeter can stretch one side farther than the others.
Preventing a Heavy Bedspread from Stretching
The weight of dozens of motifs can lengthen open chain spaces when the bedspread hangs over a mattress.
Use a relatively firm gauge for the structural outer rounds.
Keep the final joining edge denser than the center.
When washing, support the complete wet fabric rather than lifting it by one corner or one tasselled edge.
Assembly
- Crochet one complete sage fan motif and block it to approximately 15–17 cm before calculating the final bedspread dimensions.
- Measure all four edges and both diagonals of the master square, recording the dimensions for comparison with every repeated motif.
- Make the required number of squares, keeping the corner markers in place until each structural outer round is finished.
- Block all motifs to the master measurement and open the chain arches only after the square perimeter has been pinned accurately.
- Arrange the squares in the final grid with all fan sections facing the same direction and inspect the geometric lines before joining.
- Join motifs into horizontal rows using a loose flat slip-stitch or mattress-stitch seam, then connect the completed rows vertically.
- Work the structural perimeter around the full bedspread, followed by the chain-arch and open-fan border rounds.
- Mark tassel attachment points at equal 8–12 cm intervals along the selected edges before making the fringe bundles.
- Make all tassels from the same cardboard template, attach them to the marked loops and trim them only after the bedspread is lying flat.
- Weave all remaining yarn tails through dense structural stitches and complete a final light blocking without stretching the tasselled edges.
The completed fabric should form an even sage-green lace grid with clearly opened fan motifs, square corners and tassels hanging at consistent intervals.
7 Technical Tips
- Keep every blocked motif within 5 mm of the master square. A 5 mm error repeated across twelve motifs can create a 6 cm difference at the opposite edge of a large bedspread.
- Measure both diagonals before joining. If one diagonal is more than approximately 5–8 mm longer, the motif is skewed and will distort the surrounding seam grid.
- Check every ch-4 and ch-6 space for consistent tension. Short arches cause cupping, while oversized arches create ripples that remain visible after the squares are joined.
- Keep slip-stitch seams relaxed. A seam only 5 mm shorter than the blocked motif edge can form a noticeable groove through an otherwise flat lace panel.
- Use one cardboard template for every tassel. Cutting bundles individually without a template can create fringe-length differences of several centimeters.
- Attach tassels approximately 8–12 cm apart. Very close spacing adds unnecessary weight and can pull the open lace border downward.
- Weave structural tails through at least 5 cm of dense edge stitches. Do not weave joining tails through long chain arches because the ends can become visible when the lace stretches.
Color Variations
Sage green gives the openwork a muted botanical appearance, but the single-color structure also works in warm ivory, oatmeal, dusty blue, terracotta, muted lavender or charcoal.
For a two-color version, keep the motifs sage and work the final border and tassels in cream. Another option is to alternate two closely related greens while keeping the joining yarn identical throughout the project.
A single-color version remains the closest match to the photographed design because the shadows created by the fan stitches become the primary source of contrast.
Care and Final Blocking
Follow the washing instructions for the selected yarn.
Support the complete bedspread while wet.
Lay it flat and align the central seam grid first.
Measure the width at the top, middle and bottom before shaping the border.
Arrange the tassels last and allow them to hang naturally while drying whenever the blocking surface permits.
If the tassels become uneven after washing, comb them gently with your fingers and trim only after they are completely dry.
Conclusion
The chain arches control the geometry of this sage green crochet lace bedspread pattern, while the dense outer round keeps those open fans stable during assembly. Start with one 15–17 cm master square, block it accurately and test four joined motifs before committing yarn to the complete bedspread. Weigh that sample and one finished tassel separately to calculate realistic material requirements. Keep every seam loose and attach the fringe only after the final border lies flat. Save the finished design to Pinterest or share it on Instagram with #SageLaceBedspread. For this sage design, would you place tassels only along the foot of the bed or continue them around all three exposed sides?









