Introduction
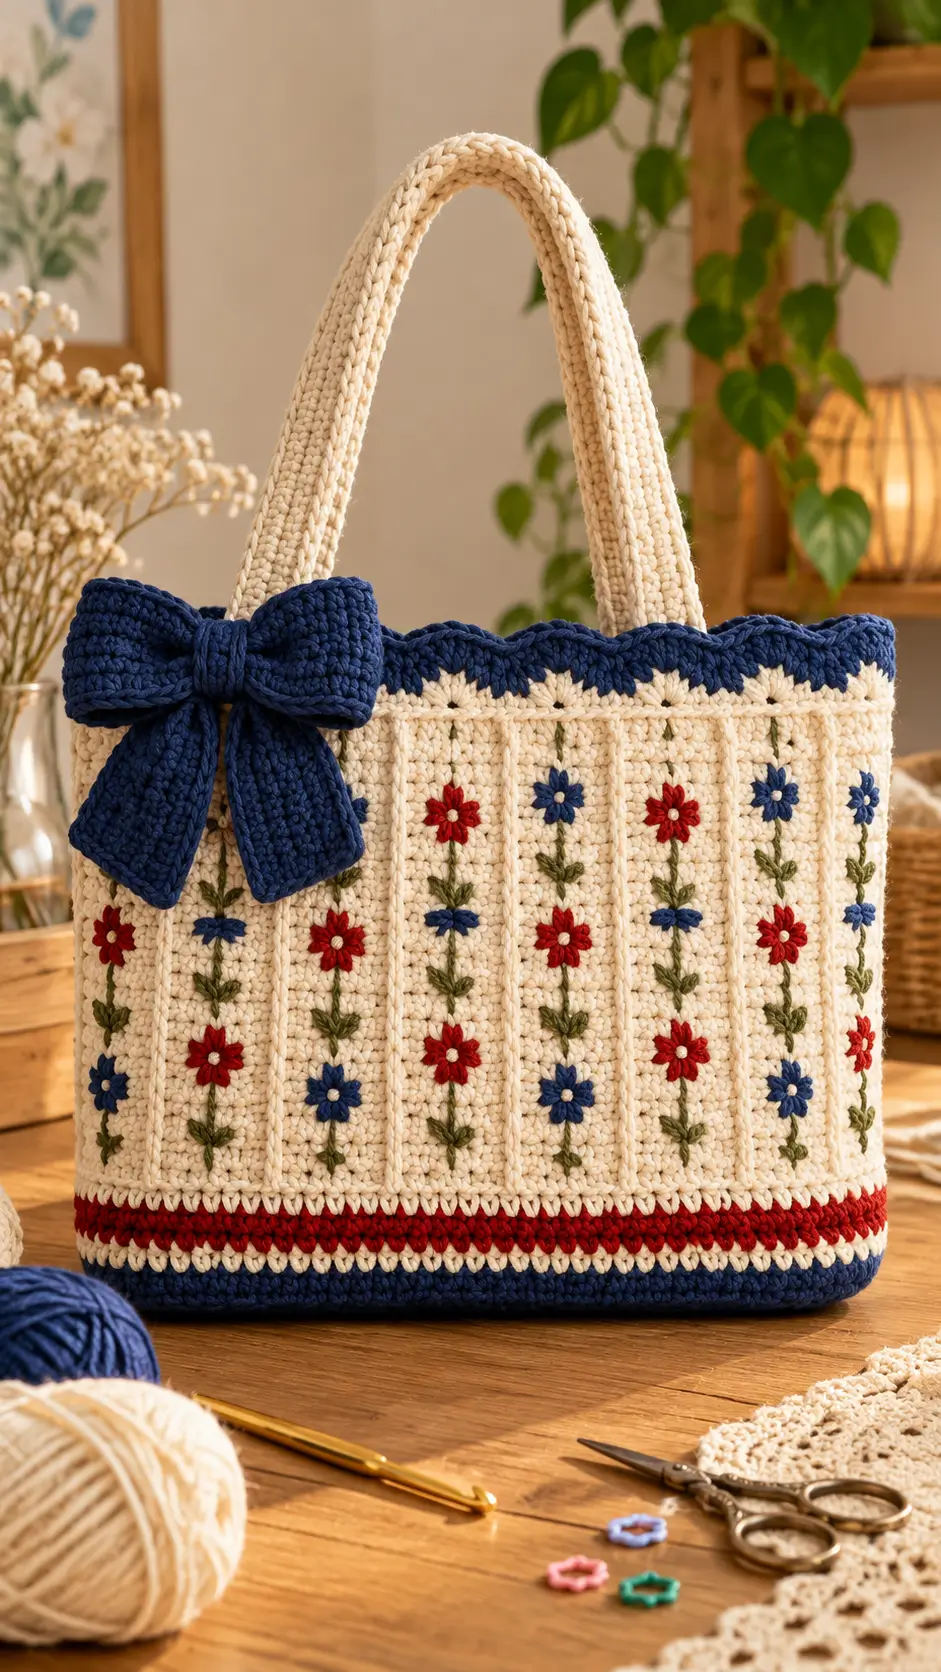
The navy bow covers one corner of a cream tote embroidered with red and blue blossoms on olive stems. This floral crochet tote bag pattern recreates that specific arrangement using worsted cotton, a 5 mm hook, an embroidered flower grid, and a firm rectangular base. The planned bag measures approximately 30 × 31 × 7 cm before handles and suits intermediate crocheters. Its closed single-crochet fabric holds small everyday items more securely than an open mesh.
The Design: What Makes This Floral Tote Different
Unlike a granny-square shopper, the photographed bag has one continuous cream field. Constructing the body upward from a rectangle keeps the sides square and gives the stitched flowers a continuous ground. Four low-contrast surface-crochet ridges partition the front into five vertical columns; this keeps embroidered stems aligned without introducing gaps that could catch keys or pens.
The navy base visually balances the large bow, while the three narrow red rounds above it repeat the red petals. A scalloped navy rim references the rounded bow loops without weakening the top edge. You will embroider the flowers after the bag body is finished, so their centers can be aligned to measured rounds rather than guessed during crochet. Avoid sewing through both walls; doing so closes the pocket. This embroidered crochet tote design also uses reinforced cotton handles and optional lining to control stretch.
Project Info at a Glance
| Skill Level | Time | Finished Size | Hook | Best For |
|---|---|---|---|---|
| Intermediate | Approximately 10–14 hours | Target: 30 × 31 × 7 cm | 5.0 mm | Small everyday essentials and project storage |
Size note: Measurements are calculated estimates and require confirmation with a finished sample.
Materials and Tools
Yarn
- Cream/ivory — worsted cotton (#4), approximately 280 g — suggested brand: Knit Picks Dishie.
- Deep navy — worsted cotton (#4), approximately 90 g — for the base, upper border and oversized bow.
- Crimson red — worsted cotton (#4), approximately 20 g — for the horizontal stripe.
- Red DK cotton (#3), approximately 10 g — for embroidered flower petals.
- Royal blue — DK cotton (#3), approximately 15 g — for alternating flowers.
- Olive green — DK cotton (#3), approximately 20 g — for stems and leaves.
- Off-white — DK cotton (#3), approximately 5 g — for flower centers.
These quantities are estimated purchase allowances, not measured consumption from a tested sample. For comparison, the Made by Gootie floral tote uses 200 g of primary cotton and 60 g of contrast cotton in a different construction.
Tools
- 5.0 mm crochet hook
- Tapestry needle
- Embroidery needle
- Locking stitch markers
- Scissors
- Measuring tape
- Rustproof sewing pins
- Optional cotton fabric lining
- Optional flexible base insert
Gauge
Target gauge: 16 single crochet stitches and 18 rows per 10 × 10 cm, using worsted cotton and a 5 mm crochet hook.
Work a 12 × 12 cm sample before beginning the project. Measure the center 10 cm rather than the edges. A different stitch gauge will change the bag dimensions, strap length and yarn consumption.
Abbreviations
- MR: Magic ring
- sc: Single crochet
- inc: Increase
- dec: Decrease
- sl st: Slip stitch
- ch: Chain
- BLO: Back loop only
- dc: Double crochet
- FO: Fasten off
- RS: Right side
For an invisible decrease, insert the hook through the front loops of the next two stitches and complete one single crochet.
Pattern conventions: US crochet terminology. The rectangular base, bow and handles use turned rows. The bag body uses a continuous spiral, followed by a joined scalloped edging.
Pattern — Step by Step
Rectangular Base (Make 1)
Yarn: navy blue. Construction: original rectangular-base calculations.
Chain 49.
R1: Sc in second ch from hook and across (48).
R2: Ch 1, turn, sc across (48).
R3: Ch 1, turn, sc across (48).
R4: Ch 1, turn, sc across (48).
R5: Ch 1, turn, sc across (48).
R6: Ch 1, turn, sc across (48).
R7: Ch 1, turn, sc across (48).
R8: Ch 1, turn, sc across (48).
R9: Ch 1, turn, sc across (48).
R10: Ch 1, turn, sc across (48).
R11: Ch 1, turn, sc across (48).
R12: Ch 1, turn, sc across (48).
Do not fasten off. Mark the four corners of the base and keep the working yarn attached.
Main Bag Body and Striped Base (Make 1)
Yarn: navy, cream and crimson red.
R1: Work 48 sc along the first long edge, 12 sc along the short edge, 48 sc along the opposite long edge and 12 sc along the remaining short edge (120).
Join the first perimeter round. Continue in a spiral.
R2: BLO sc around (120).
R3: Sc around (120).
R4: Sc around (120).
R5: Change to cream; sc around (120).
R6: Sc around (120).
R7: Change to red; sc around (120).
R8: Sc around (120).
R9: Sc around (120).
R10: Change to cream; sc around (120).
R11: Sc around (120).
R12: Sc around (120).
R13: Sc around (120).
R14: Sc around (120).
R15: Sc around (120).
R16: Sc around (120).
R17: Sc around (120).
R18: Sc around (120).
R19: Sc around (120).
R20: Sc around (120).
R21: Sc around (120).
R22: Sc around (120).
R23: Sc around (120).
R24: Sc around (120).
R25: Sc around (120).
R26: Sc around (120).
R27: Sc around (120).
R28: Sc around (120).
R29: Sc around (120).
R30: Sc around (120).
R31: Sc around (120).
R32: Sc around (120).
R33: Sc around (120).
R34: Sc around (120).
R35: Sc around (120).
R36: Sc around (120).
R37: Sc around (120).
R38: Sc around (120).
R39: Sc around (120).
R40: Sc around (120).
R41: Sc around (120).
R42: Sc around (120).
R43: Sc around (120).
R44: Sc around (120).
R45: Sc around (120).
R46: Sc around (120).
R47: Sc around (120).
R48: Sc around (120).
R49: Sc around (120).
R50: Sc around (120).
R51: Sc around (120).
R52: Sc around (120).
R53: Change to navy; sc around (120).
R54: Sc around (120).
R55: Sc around (120).
R56: Sc around (120).
R57 — Navy scalloped edging: Join the end of R56 with a slip stitch. Repeat [sl st in next stitch, skip 2 stitches, 5 dc in next stitch, skip 2 stitches] twenty times (20 shells).
Fasten off. Leave a 15 cm tail and weave it into the inside rim. The shell round consumes all 120 underlying stitches.
Cream Handles (Make 2)
Yarn: cream.
Chain 87. Leave a 25 cm beginning tail for attachment.
R1: Sc in second ch from hook and across (86).
R2: Ch 1, turn, sc across (86).
R3: Ch 1, turn, sc across (86).
R4: Ch 1, turn, sc across (86).
R5: Ch 1, turn, sc across (86).
R6: Ch 1, turn, sc across (86).
Fasten off, leaving a second 25 cm tail. Each handle targets approximately 54 cm long and 3.3 cm wide at the specified gauge.
Pin one handle behind the front rim, with attachment centers near stitches 11 and 38. Repeat on the back panel. Sew each attachment as a reinforced rectangle with a diagonal cross. Do not attach the handles only to the scallops.
Navy Bow Loops (Make 1)
Yarn: deep navy.
Chain 35.
R1: Sc in second ch from hook and across (34).
R2: Ch 1, turn, sc across (34).
R3: Ch 1, turn, sc across (34).
R4: Ch 1, turn, sc across (34).
R5: Ch 1, turn, sc across (34).
R6: Ch 1, turn, sc across (34).
R7: Ch 1, turn, sc across (34).
R8: Ch 1, turn, sc across (34).
R9: Ch 1, turn, sc across (34).
R10: Ch 1, turn, sc across (34).
R11: Ch 1, turn, sc across (34).
R12: Ch 1, turn, sc across (34).
Fasten off, leaving a 25 cm tail. Gather the center of the rectangle to create two large bow wings.
Navy Bow Tails (Make 2)
Yarn: navy.
Chain 15.
R1: Sc in second ch from hook and across (14).
R2: Ch 1, turn, sc across (14).
R3: Ch 1, turn, sc across (14).
R4: Ch 1, turn, sc across (14).
R5: Ch 1, turn, sc across (14).
R6: Ch 1, turn, sc across (14).
R7: Ch 1, turn, sc across (14).
R8: Ch 1, turn, sc across (14).
R9: Ch 1, turn, sc across (14).
R10: Ch 1, turn, sc across (14).
R11: Ch 1, turn, sc across (14).
R12: Ch 1, turn, sc across (14).
R13: Ch 1, turn, sc across (14).
R14: Ch 1, turn, sc across (14).
R15: Ch 1, turn, sc across (14).
R16: Ch 1, turn, sc across (14).
R17: Ch 1, turn, sc across (14).
R18: Ch 1, turn, sc across (14).
Fasten off, leaving a 20 cm sewing tail on each strip. Position the tails beneath the bow wings in a shallow inverted V.
Navy Bow Center Band (Make 1)
Yarn: navy.
Chain 7.
R1: Sc in second ch from hook and across (6).
R2: Ch 1, turn, sc across (6).
R3: Ch 1, turn, sc across (6).
R4: Ch 1, turn, sc across (6).
R5: Ch 1, turn, sc across (6).
R6: Ch 1, turn, sc across (6).
R7: Ch 1, turn, sc across (6).
R8: Ch 1, turn, sc across (6).
R9: Ch 1, turn, sc across (6).
R10: Ch 1, turn, sc across (6).
Fasten off with a 25 cm tail. Wrap the band around the gathered bow loops and tail tops. Sew the ends together underneath.
Cream Vertical Raised Lines (Make 4)
Yarn: cream.
Identify the 48 stitches of the front panel. At columns 9, 19, 29 and 39, work loose surface slip stitches vertically from R13 through R52.
Work one surface stitch per round (40 surface stitches per line). Leave approximately 15 cm at both ends for weaving.
The decorative lines divide the embroidered panel into five vertical sections without changing the main body stitch count.
Embroidered Red and Blue Daisies (Make 20)
Yarn: red and royal blue DK cotton, with cream centers.
Mark five flower columns at front stitches 5, 14, 24, 34 and 43.
Mark four flower heights at body rounds 19, 29, 39 and 49.
Five columns multiplied by four rows gives a total of 20 embroidered flowers.
Alternate red and blue flowers in a checkerboard arrangement, beginning with a red flower at the first column and lowest flower row.
For each flower, work six lazy-daisy petals around a central point. Each petal should extend approximately two crochet stitches or two rounds from its center.
Anchor the loops with short straight stitches and finish each flower with a small off-white center. Use a French knot or several compact straight stitches.
Olive Green Stems and Leaves (Make 5)
Yarn: olive green DK cotton.
Backstitch a narrow green stem under each column of flowers, extending approximately from R15 to R50.
Place paired V-shaped leaves between the flower centers near rounds 24, 34 and 44. Add another small pair near round 16.
Keep each leaf about two stitches long. Avoid catching the opposite wall of the bag while embroidering.
Optional Lining and Base Insert
Measure the finished interior before cutting fabric. Cut the cotton lining with approximately 1 cm seam allowance on each edge.
Sew the fabric lining, place it inside the bag and attach it just beneath the upper navy border.
If the base needs additional support, add a removable flexible insert inside a fabric sleeve.
Assembly
- Check the base: Flatten the rectangular base and verify the 120-stitch perimeter.
- Shape the body: Position the front and back panels evenly around the base.
- Mark the flower grid: Add four cream vertical lines and identify twenty embroidery centers.
- Embroider the flowers: Make alternating red and blue daisies with cream centers.
- Add the stems: Backstitch five green stems and sew the paired leaves.
- Attach the handles: Pin the cream handles behind the top rim and sew reinforced attachment rectangles.
- Assemble the bow: Arrange the bow wings over the tails and secure them with the center band.
- Position the bow: Attach it to the upper-left front, clear of the bag opening and handle joins.
- Install the lining: Add the optional cotton lining and removable base support.
- Finish: Weave in all tails, inspect the decorative edging and check the handle stitching with a light test load.
The finished tote has a rectangular cotton base, twenty embroidered flowers, cream handles, scalloped edging and an oversized navy bow.
7 Technical Tips
- Misplaced stitch markers: Mark body stitches 1, 49, 61 and 109 when completing the perimeter. Incorrect marker positions shift the flower grid into the side gusset.
- Weak base corners: Work exactly 12 sc along each short edge of the rectangular base. Missing stitches create diagonal distortion when weight is added.
- Visible decrease holes: The body has no decreases, so gaps indicate missed stitches or loose tension. If adapting the shape with decreases, work through the front loops for a less visible result.
- Distorted flowers: Mark the flower centers at rounds 19, 29, 39 and 49 before embroidering. A one-round placement error can make an entire row slope.
- Velvet yarn substitution: Recheck gauge if replacing cotton with velvet yarn. Stretch and raised fibers may change the handle length and conceal embroidery stitches.
- Loose bow wings: Pin the bow at the center and both outer wing corners before sewing. Securing only the middle allows the wings to curl away from the bag.
- Short handle tails: Leave at least 25 cm at each handle end for attachment. Secure the sewing tails through several interior stitches to reduce the chance of separation under load.
Related Patterns
- Floral Crochet Tote — Made by Gootie — A round-bottom floral crochet bag. [INTERNAL LINK NEEDED: round-bottom crochet tote]
- Florentina Tote — Hobbii — A floral granny-square handbag. [INTERNAL LINK NEEDED: flower granny-square tote]
- Floral Cross-Stitch Tote — Yarnspirations — A decorated crochet carryall. [INTERNAL LINK NEEDED: embroidered crochet bag]
- Florence Tote — Katia — A striped tote featuring embroidered flowers. [INTERNAL LINK NEEDED: crochet flower embroidery]
Conclusion
Count the base perimeter before beginning the main body: it must contain 120 stitches. Complete the embroidery before installing the lining, then inspect both handle joins from inside the bag for missed attachment points. The floral crochet tote bag pattern is designed around a five-column arrangement, but changing the flower colors will not affect its structure. Photograph the bag from the front and from the side to show the depth of the rectangular base. Share the result on Pinterest and Instagram with #NavyBowFloralTote, and link back to this article if posting your project notes. Would you keep all five floral columns, or leave the bow-side column unembroidered?
Pattern Disclosure
This is an original photo-inspired crochet pattern reconstruction. Stitch counts have been checked mathematically, but the design has not been physically test-crocheted. Finished dimensions, yarn consumption and handle strength require sample testing before the pattern can be presented as tested.