Introduction
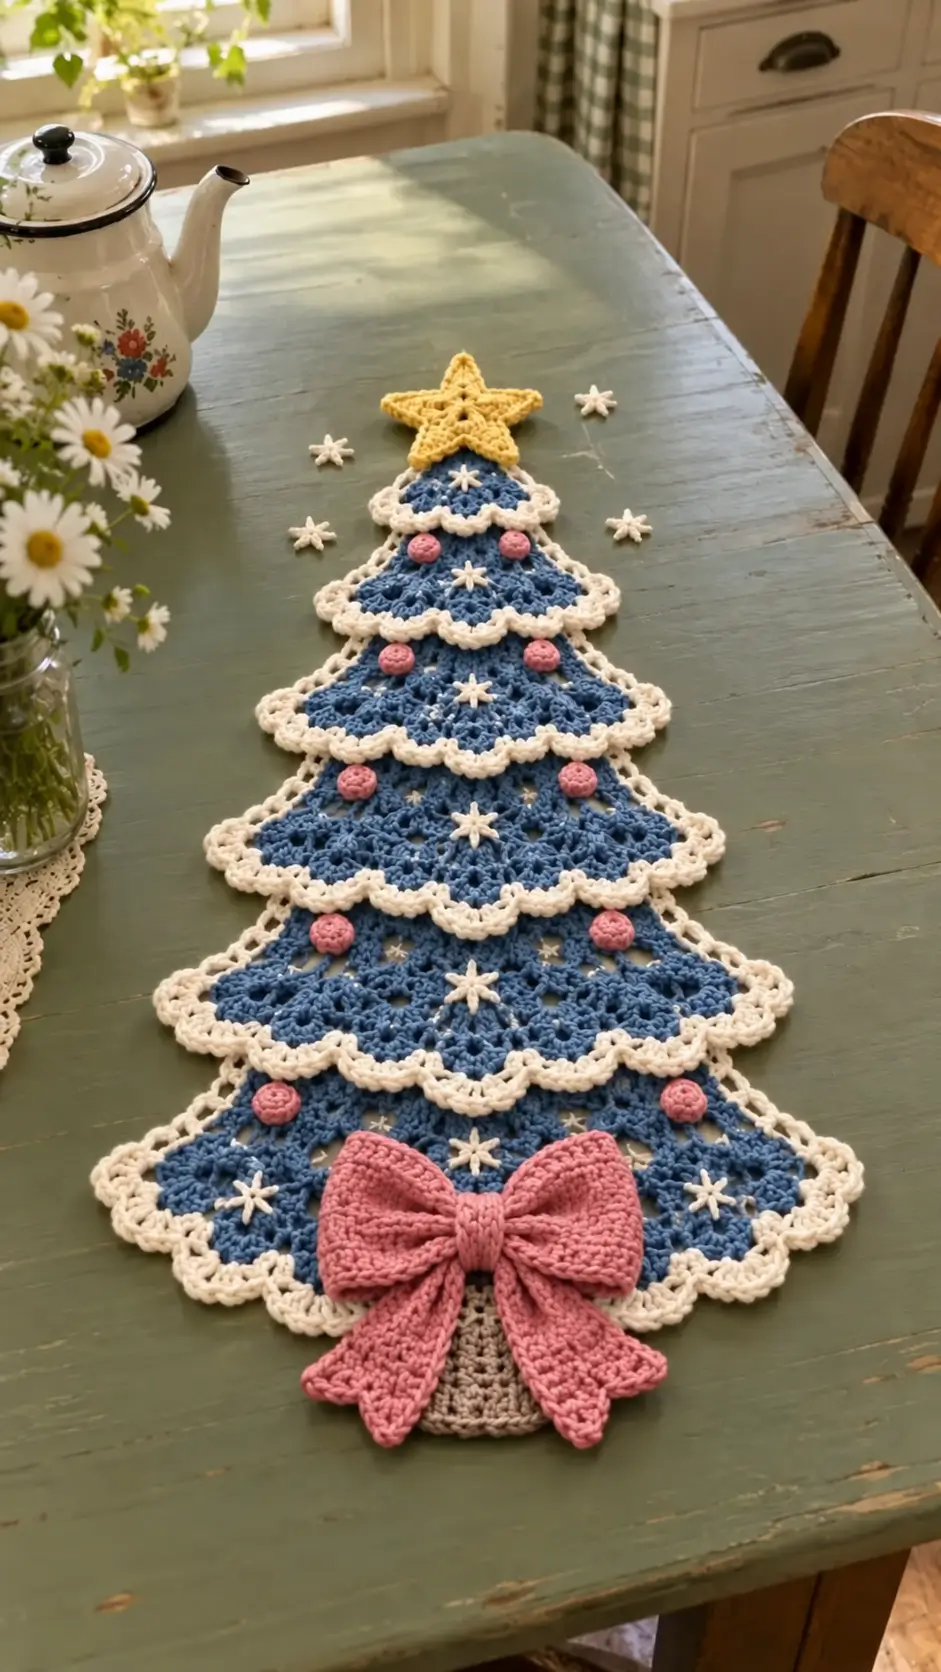
Six blue branch tiers must widen independently while their center line stays aligned under a single gold star. This crochet Christmas tree table runner pattern recreates that structure with dusty-blue lace, cream snow-like scallops, pink ornaments, white stars, a neutral trunk and a large pink bow. DK cotton with a 3.5–4.0 mm hook produces a flat intermediate table decoration approximately 80–100 cm long.
The Design: What Makes This Christmas Tree Runner Different
The runner is shaped as the tree itself rather than placing tree motifs inside a rectangular background. Each branch tier forms a separate widening triangle with an open lace center and a dense cream scalloped lower edge. The tiers overlap visually down one central axis, producing a full tree without a solid backing panel. Small pink bobbles act as ornaments, while embroidered or crocheted ivory stars break up the blue field.
The reference also uses two strong terminal features: a five-point gold star at the narrow top and a dimensional pink bow over the trunk at the base. Flat crochet Christmas trees are commonly constructed with shaped tiers, and comparable DK examples use 4.0 mm hooks; published small versions range from about 10–13 cm tall, while table-runner designs can reach roughly 53 cm before adapting the concept to a larger decorative format. 0
Project Info at a Glance
| Skill Level | Construction | Finished Size | Hook | Best For |
|---|---|---|---|---|
| Intermediate | Six graduated lace tiers | Approx. 80–100 × 35–45 cm | 3.5–4.0 mm | Dining tables, sideboards and holiday displays |
The dimensions above are project targets derived from the photographed proportions. Published Christmas-tree crochet projects demonstrate how strongly size changes with yarn and construction: examples range from a 10 cm ornament using medium yarn and a 4 mm hook to a 25 × 21 cm decorative tree, while one filet table runner measures about 10 × 21 inches. 1
Materials and Tools
Yarn
- Dusty blue — DK #3 cotton or cotton blend — approximately 180–250 g
- Warm ivory — DK #3 cotton — approximately 90–130 g
- Dusty pink — DK #3 cotton — approximately 50–70 g
- Golden yellow — DK #3 cotton — approximately 15–25 g
- Taupe or light brown — DK #3 cotton — approximately 10–15 g
These quantities are project estimates, not published specifications. Small flat DK Christmas trees can use very little yarn—a documented 11 cm sport-weight ornament requires about 4 g—so weighing the first completed branch tier is more accurate than scaling directly from an ornament pattern. 2
Tools
- 3.5–4.0 mm crochet hook
- Yarn needle
- Scissors
- Locking stitch markers
- Tape measure
- Blocking mats
- Rust-resistant pins
Abbreviations
- MR — magic ring
- ch — chain
- sl st — slip stitch
- sc — single crochet
- hdc — half double crochet
- dc — double crochet
- tr — treble crochet
- sp — space
- st/sts — stitch/stitches
- FO — fasten off
Pattern — Step by Step
This is an original photo-inspired construction. The photographed runner is used as a visual reference for proportions, colors and component placement; the stitch instructions below are independently constructed.
Tree Construction
Make six separate triangular branch tiers. Tier 1 is the smallest and sits beneath the star. Tier 6 is the broad lower section immediately above the bow.
Each tier uses the same basic increase system but begins with a different foundation width. Working the tiers separately makes it easier to keep the cream scallops crisp and prevents the increasingly wide tree from distorting the narrow top.
Tier 1 — Small Top Branch
With dusty blue, ch 5.
Row 1: Dc in fifth ch from hook. Turn. (2 dc including turning chain)
Row 2: Ch 3, 2 dc in first st, dc across, 2 dc in final st. Turn.
Row 3: Ch 3, 2 dc in first st, ch 1, skip 1 st, dc in next st; continue a simple ch-1 mesh across, ending with 2 dc in final st.
Row 4: Ch 3, 2 dc in first st, dc in every dc and ch-1 space across, 2 dc in final st.
Row 5: Repeat the open mesh structure from Row 3.
Row 6: Repeat the solid expansion from Row 4.
The triangle should now have a clearly pointed top and gently widening sides.
Cream Snow Edge — Tier 1
Change to ivory.
Work sc evenly along the first diagonal edge.
Across the broad lower edge repeat:
sc in next st, skip 1 st, 5 dc in next st, skip 1 st.
Adjust the final repeat so the scallops remain centered.
Sc evenly up the opposite diagonal edge.
FO.
Tier 2
With dusty blue, ch 9.
Row 1: Dc in fourth chain from hook and across.
Row 2: Ch 3, 2 dc in first st, dc across, 2 dc in final st.
Row 3: Increase at both ends while working dc, ch 1, skip 1 across the center.
Row 4: Work a solid dc row with one increase at each side.
Rows 5–8: Alternate open mesh and solid dc rows while increasing at both sides.
Add the same ivory scalloped lower edge.
Tier 3
With dusty blue, ch 13.
Work the same alternating solid and openwork structure for approximately 10 rows.
Increase at both outside edges on every row.
The finished tier should be visibly wider than Tier 2 while retaining the same triangular angle.
Add the ivory scalloped edge.
Tier 4
With dusty blue, ch 17.
Work approximately 12 rows.
Alternate solid dc rows with ch-1 mesh rows.
Increase at the beginning and end of every row.
Finish the lower edge with ivory shells.
Tier 5
With dusty blue, ch 21.
Work approximately 14 rows.
Maintain the same mesh rhythm.
Add one extra solid row before the border if the lace feels too flexible.
Finish with the ivory scallops.
Tier 6 — Large Bottom Branch
With dusty blue, ch 25.
Work approximately 16 rows, increasing at both ends throughout.
Alternate:
Solid row: dc across.
Lace row: dc, ch 1, skip 1, dc.
Continue until the bottom tier measures approximately 35–45 cm across after blocking.
Add the ivory shell border along the entire lower edge.
Refining the Scalloped Snow Border
The cream edging is visually heavier than a basic picot. Use rounded shells rather than tiny points.
For a deeper scallop, work:
(sc, hdc, 5 dc, hdc, sc)
across one designated section of the lower edge.
Repeat evenly.
If the border begins to wave, reduce the number of shells rather than decreasing their stitch count.
Blocking the Six Tiers
Block every tier separately before assembly.
Pin the top point first.
Establish a vertical center line.
Pin the two bottom corners at equal distances from that center line.
Shape each cream scallop only after the blue triangle is symmetrical.
Arranging the Tree
Lay Tier 6 flat.
Place Tier 5 above it so its lower scalloped edge overlaps the upper portion of Tier 6 by approximately 2–3 cm.
Continue upward with Tiers 4, 3, 2 and 1.
Keep every point on the same vertical axis.
The scalloped edges should remain fully visible.
Joining the Branch Tiers
Use dusty-blue yarn and a needle.
Sew only through the hidden overlap zones.
Use an attachment line approximately 3–5 cm long near the center of each tier.
Add one smaller anchoring stitch near each side if needed.
Do not sew down the complete overlapping edge because that removes the layered branch effect.
Pink Crochet Ornaments — Make 10–14
With dusty pink, make a MR.
Round 1: 6 sc in MR. Join. (6)
Round 2: 2 sc in each stitch. (12)
Round 3: Sc in each stitch around. (12)
FO with a 15 cm tail.
For a flatter ornament, omit Round 3. For the raised button-like effect visible in the reference, retain Round 3 and allow the circle to cup slightly.
Attaching the Pink Ornaments
Distribute ornaments asymmetrically but keep their overall visual weight balanced.
Use approximately:
- Tier 1: 0 ornaments
- Tier 2: 2 ornaments
- Tier 3: 2 ornaments
- Tier 4: 2 ornaments
- Tier 5: 2–3 ornaments
- Tier 6: 2–3 ornaments
Sew around the center of each ornament while leaving its outer edge slightly raised.
Small Ivory Stars — Make 6–10
With ivory, make a MR.
Round 1: Work 10 sc into MR. Join. (10)
For each of five points work:
Ch 4, sl st in second ch from hook, sc in next ch, hdc in next ch, skip 1 base st, sl st in next base st.
Repeat five times.
FO.
These small stars can be sewn to the blue tiers or positioned around the runner as separate table decorations.
Large Gold Star Topper
With golden yellow, make a MR.
Round 1: 10 sc in MR. Join. (10)
Round 2: 2 sc in each stitch. Join. (20)
Star Point 1
Ch 8.
Starting in the second chain from hook work:
sl st, sc, hdc, dc, dc, tr, tr.
Skip three stitches of the center round and sl st into the next stitch.
Remaining Star Points
Repeat the same point construction four more times, spacing the five points evenly around the 20-stitch center.
FO.
Block the star to approximately 12–15 cm from point to opposite indentation.
Published flat Christmas-tree projects frequently use separate star toppers, while small medium-weight tree ornaments commonly use a 4 mm hook. 3
Attaching the Gold Star
Place the bottom two star points over the narrow top of Tier 1.
Sew through the hidden lower portion of the star.
Add one concealed stitch near the center.
Leave the upper three points free so the topper remains visibly separate from the blue tree.
Tree Trunk
With taupe or light brown, ch 13.
Row 1: Sc in second chain from hook and across. (12)
Rows 2–10: Ch 1, turn, sc across. (12)
FO.
Block into a rectangle approximately 6–8 cm wide × 8–10 cm long.
Sew the top 2 cm behind Tier 6.
Large Pink Bow
The bow is a separate dimensional accessory placed over the trunk and lower tree.
Bow Center Strip
With dusty pink, ch 9.
Row 1: Sc in second ch from hook and across. (8)
Rows 2–12: Ch 1, turn, sc across.
FO leaving a long tail.
Left Bow Loop
With pink, ch 25.
Row 1: Hdc in third chain from hook and across.
Rows 2–8: Ch 2, turn, hdc across.
FO.
Fold the rectangle so its short ends meet at the center.
Sew the ends together.
Pinch the center.
Right Bow Loop
Repeat the left loop exactly.
Place both loops side by side.
Wrap the bow center strip tightly around their middle and sew it securely at the back.
Left Bow Tail
With pink, ch 13.
Row 1: Hdc in third chain from hook and across.
Rows 2–18: Ch 2, turn, hdc across.
For the final three rows, decrease one stitch at both ends to taper the tail.
FO.
Right Bow Tail
Repeat the left tail.
Angle both tails outward beneath the bow loops.
Published crochet bow appliqués demonstrate that small bows can be made with minimal yardage; one Aran-weight example lists approximately 9–11 m. 4 The larger bow here should be measured and weighed as part of the project sample rather than assigned a fixed published quantity.
Attaching the Bow
Place the bow center approximately where the blue tree meets the trunk.
Sew the center strip securely to the underlying crochet.
Add one hidden stitch near the inside of each loop.
Attach the upper 2–3 cm of each tail.
Leave the lower tail sections free.
Optional White Embroidered Stars
Instead of crocheting every small star separately, embroider selected stars directly onto the blue lace.
Bring ivory yarn up through a dense blue stitch.
Make five or six straight stitches radiating from one center point.
Keep each ray approximately 1–1.5 cm long.
Secure the yarn on the reverse without pulling the lace inward.
Optional Snowflake Accents Around the Runner
The reference includes several small detached ivory stars around the tree.
Make four to eight additional small stars.
Do not attach them to the runner if you want a flexible table arrangement.
They can be placed loosely around the tree and removed for washing or storage.
Finished Proportions
| Component | Target Measurement |
|---|---|
| Complete runner | 80–100 cm long |
| Maximum tree width | 35–45 cm |
| Gold star | 12–15 cm |
| Pink ornament | 2–3 cm |
| Large bow | 20–25 cm across |
| Small ivory star | 3–5 cm |
These are photo-inspired target measurements. Existing crochet Christmas-tree designs vary widely: one DK/light-worsted flat tree measures 8.5 × 10 cm with a 4 mm hook, another T-shirt-yarn tree reaches 25 × 21 cm, and a filet tree runner measures approximately 10 × 21 inches. 5
Making a Shorter Runner
Use five tiers instead of six.
Remove Tier 5 rather than the smallest top tier so the progression from star to branches remains recognizable.
Reduce the bottom tier to approximately 30–35 cm wide.
Keep the bow and star proportionally smaller.
Making a Longer Runner
Add a seventh blue tier beneath Tier 6.
Begin it approximately four foundation stitches wider than the previous tier.
Work two additional rows before adding the cream scalloped edge.
A seventh tier can increase the overall runner length toward 110–120 cm, depending on overlap.
Yarn Estimation
Make and block Tier 4 first because it represents a useful middle-size sample.
Weigh it before and after adding the ivory border.
Suppose the blue section weighs 28 g and the cream border weighs 9 g.
Do not multiply that number by six directly because the tiers are graduated. Instead, weigh at least one small, one medium and one large tier and calculate the remaining pieces from those samples.
Small Christmas-tree patterns demonstrate that yarn consumption can range from only a few grams for a flat sport-weight motif to 70–100 m for larger decorative constructions. 6
Keeping the Tree Flat
The blue triangles must be blocked before they are overlapped.
If a tier cups, the side increases are insufficient.
If its lower edge waves before the cream border is added, the increases are too frequent or the hook tension has loosened.
Correct the blue tier first. The cream shells should decorate a flat foundation, not compensate for a distorted one.
Keeping the Tree Centered
Run a temporary contrasting yarn line vertically through the center of all six tiers during assembly.
Align the top point, center of every tier, center of the bow and center of the trunk with that line.
Remove the guide yarn after sewing.
A deviation of even 1–2 cm becomes obvious across a long tree silhouette.
Controlling the Cream Scallops
Measure a 10 cm section of the blue edge before adding shells.
Work a test group of scallops.
If the finished cream edge exceeds the original 10 cm section by more than approximately 5 mm, reduce the number of shells.
Too many shells create ruffling around the tree.
Placement of the Ornaments
Avoid arranging the pink ornaments in exact vertical columns.
Alternate left and right positions from one tier to the next.
Keep them at least 2 cm away from the cream scalloped edge so the colors remain visually separated.
Position ivory stars between the pink ornaments rather than directly beside them.
Assembly
- Crochet all six dusty-blue branch tiers, add the ivory scalloped lower edges and block every piece separately before joining.
- Arrange Tier 6 at the bottom and overlap Tiers 5 through 1 upward by approximately 2–3 cm while maintaining one vertical center line.
- Sew the hidden overlap zones with dusty-blue yarn, leaving the cream scalloped edges free and fully visible.
- Make the taupe trunk and attach its upper section behind the center of the lowest blue tier.
- Crochet the large golden star, block all five points and attach only its lower section to the top branch tier.
- Make the pink ornaments and distribute them across the branch tiers without creating rigid vertical rows.
- Add the ivory crocheted or embroidered stars, keeping each decorative element clear of the cream branch edging.
- Construct the two pink bow loops, center wrap and two tails, then assemble them into one dimensional bow.
- Sew the bow over the junction between the trunk and bottom branch tier, attaching its center firmly while leaving most of the loops and tails free.
- Weave all yarn tails, lightly block the assembled runner and re-form every cream scallop, star point and bow tail before drying.
The completed runner should form one centered Christmas-tree silhouette with six progressively wider blue tiers, visible ivory snow edges, a gold star above and a pink bow covering the trunk junction.
7 Technical Tips
- Keep every branch point on one vertical center line. A 1–2 cm sideways shift in the middle tiers produces a visibly leaning tree when the runner is viewed from the end of the table.
- Overlap neighboring tiers by approximately 2–3 cm. Less overlap can expose gaps between the blue sections, while excessive overlap hides the open lace and shortens the finished tree.
- Test the cream shell count across a measured 10 cm section. If the scalloped edge grows by more than about 5 mm, remove a shell repeat before continuing.
- Keep pink ornaments at least 2 cm above the ivory edge. Placing them directly against the scallops visually merges the two decorations and makes the branch outline less distinct.
- Attach the bow primarily through its center wrap. Sewing around the complete loops flattens the bow and removes the three-dimensional shape visible in the reference.
- Block the gold star before sewing it to the tree. The five points should be evenly spaced; correcting a distorted star after attachment can pull the narrow top tier sideways.
- Weave structural tails through at least 5 cm of dense crochet. Avoid finishing assembly tails inside open mesh spaces because the loose structure provides less friction during washing.
Color Variations
The dusty blue, ivory, pink and gold combination gives this runner a nontraditional Christmas palette while retaining recognizable seasonal shapes. Keep ivory around the branch edges if you want the snow effect to remain clear.
For a traditional version, replace blue with forest green and pink with deep red. A documented flat Christmas-tree appliqué uses DK yarn and a 4 mm hook, so the same general yarn category remains practical after changing colors. 7
For a neutral version, use sage for the tree, warm cream for the edging, muted gold ornaments and a burgundy bow. Do not add too many colors; the layered branch silhouette is already visually detailed.
Care and Final Blocking
Follow the care instructions for the selected yarn.
Wash the runner without hanging it while wet.
Lay it flat and establish the vertical center line first. Align the six tier points, then shape the outer corners and ivory scallops.
Reopen any lace spaces that contracted during washing. Shape the gold star separately with five pins if necessary. Lift the pink bow loops after the runner has dried rather than pinning them flat against the table surface.
Conclusion
The widening branch sequence controls this crochet Christmas tree table runner pattern. Start with one middle blue tier, test the ivory shell spacing, and block it before producing the five remaining sizes. Keep the six center points aligned, restrict the overlap to roughly 2–3 cm and attach the ornaments only after the complete tree lies flat. The next practical step is to crochet Tier 4 and record its blocked width plus separate blue and cream yarn weights; those measurements will make the final size and yarn estimate more reliable. Share the finished runner on Pinterest or Instagram with #BlueLaceChristmasTreeRunner. Would you keep the dusty-blue tree and pink bow, or switch the tree to sage green while retaining the same ivory snow border?