Introduction
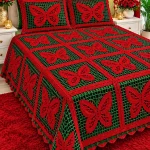
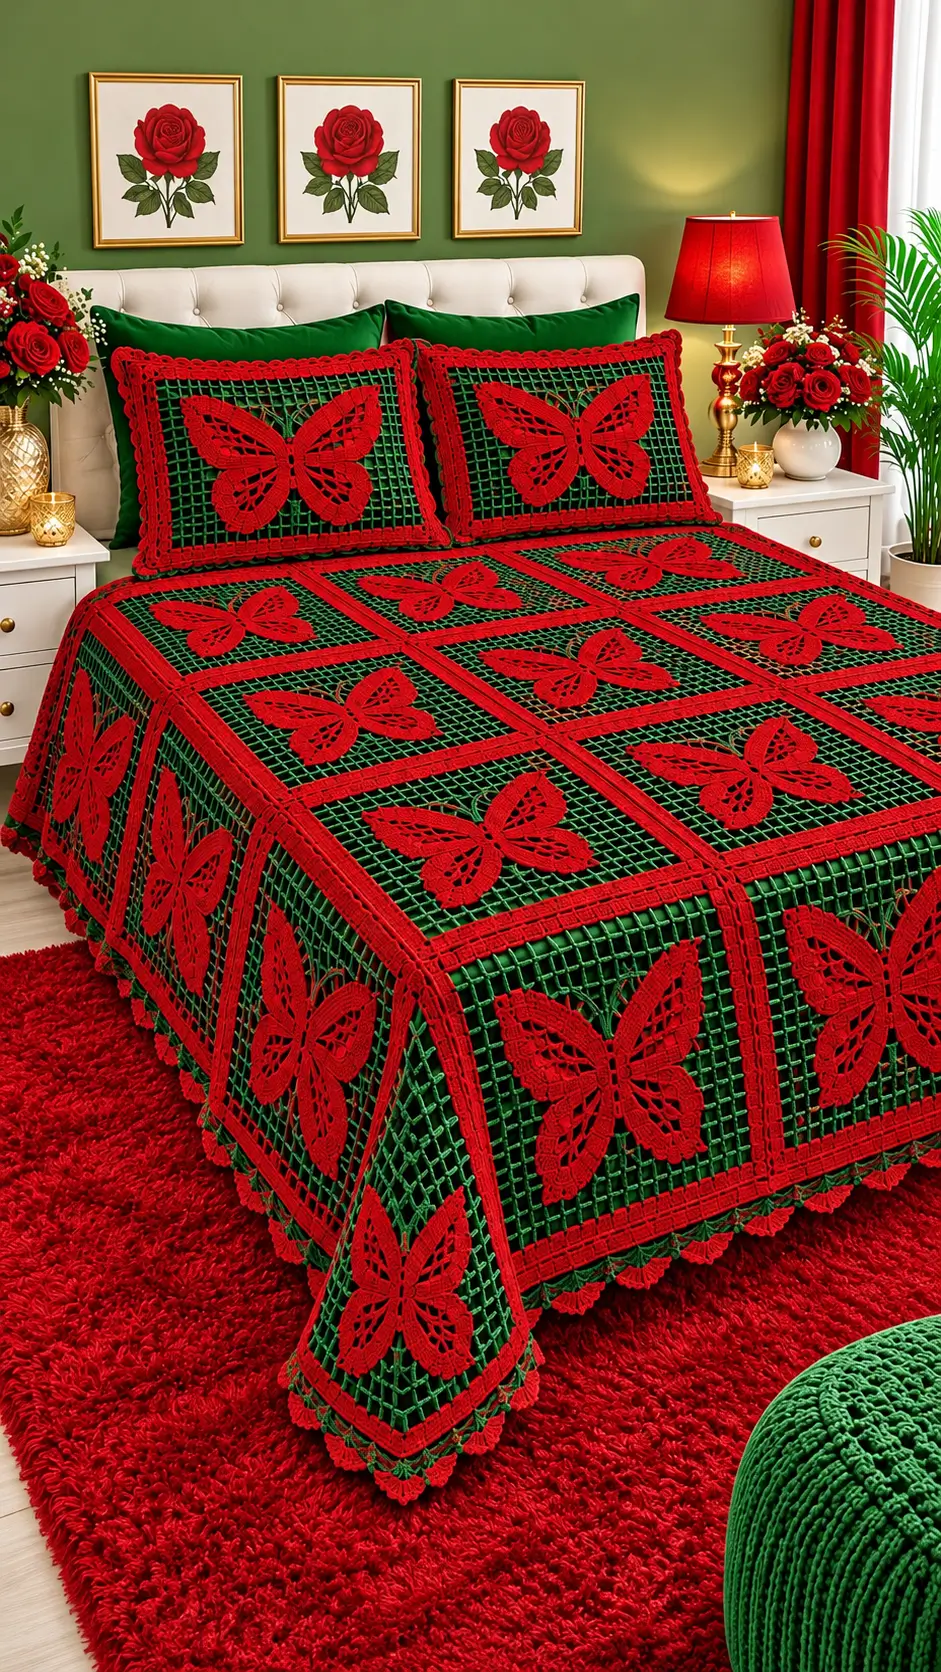
A butterfly’s upper and lower wings must remain distinct against an open crochet grid. This butterfly crochet bedspread uses emerald DK cotton, crimson butterfly appliqués, a 4.5 mm hook, and matching cushion fronts. The proposed seven-by-nine panel layout measures about 202 × 258 cm if each blocked panel reaches 28 cm; that dimension is a design target, not a measured sample. Intermediate stitch control is required. Separate panels make damaged sections replaceable without unraveling the whole cover.
The Design: What Makes This Butterfly Bedspread Different
The butterfly is worked above the green mesh rather than inside it. That distinction lets the four red wings keep their outline while the background remains open; filled filet cells would produce a flatter silhouette. Each large upper wing has twelve shaping rows, while each smaller lower wing has eight. A narrow stitched body conceals the meeting points. Next, a three-round red frame gives every open panel a firmer seam line, reducing distortion when the panels are joined. The red and green crochet blanket repeats the same motif, but the pillow fronts use larger mesh panels to frame each butterfly. One common mistake in a filet crochet butterfly square is pulling appliqué stitches so tightly that the grid collapses inward. Attach the wings at distributed anchor points rather than sewing around every open edge.
Project Info at a Glance
| Skill Level | Time | Finished Size | Hook | Best For |
|---|---|---|---|---|
| Intermediate | Measure after a test panel; full-project time unverified | Proposed queen coverlet: 202 × 258 cm | 4.5 mm mesh; 3.5–4 mm wings | Decorative adult bedding |
Construction note: This is an original photo-inspired working pattern, not a stitch-for-stitch reconstruction or physically sample-tested design. Its width and length are calculated as seven panels by nine panels, plus 3 cm at each outer edge. The green net is decorative and should not replace a solid blanket where warmth is needed.
Materials and Tools
Yarn
- Emerald green — DK/light worsted cotton, category 3: For 63 mesh panels and two cushion fronts. A suggested product is Paintbox Yarns Cotton DK; weigh a completed sample panel to calculate grams before purchasing a full quantity.
- Crimson red — DK/light worsted cotton, category 3: For the frames, 65 butterflies, seams, and final scallops. Use a matching DK cotton and weigh a decorated sample to calculate yarn requirements.
- Optional darker red — DK cotton: A small remnant for butterfly bodies or antennae if more contrast is preferred.
Yarn budget formula: Green grams = (green grams per blocked bed panel × 63) + (green grams per pillow front × 2) + 10% reserve.
Red grams = (red grams per framed butterfly panel × 63) + (red grams per decorated pillow front × 2) + measured seam and edging yarn + 10% reserve.
For illustration only, a 20 g green bed panel would require 1,260 g before cushion fronts and reserve; this is arithmetic, not a measured yarn estimate. Keep skeins from the same dye lot.
Tools
- 4.5 mm crochet hook for filet mesh, plus 3.5 or 4 mm hook for firmer red wings.
- Tapestry needle, locking stitch markers, scissors, tape measure, blocking mat, and rustproof pins.
- Two washable cushion inserts sized after the finished fronts have been blocked.
- Matching woven fabric, sewing thread, and a needle or sewing machine for the optional envelope-style cushion backs.
The Craft Yarn Council places DK in category 3 and lists 4.5–5.5 mm as a common crochet hook range, not a compulsory gauge. A smaller appliqué hook is a deliberate shaping choice.
Abbreviations and Stitch Rules
| Abbreviation | Meaning |
|---|---|
| ch | Chain |
| sc | Single crochet |
| dc | Double crochet |
| sl st | Slip stitch |
| inc | Two sc in one stitch |
| sc2tog | Single crochet two together |
| sp | Space |
| RS | Right side |
| WS | Wrong side |
| FO | Fasten off |
All terms are US crochet terms. A filet cell in this pattern is a ch-2 gap between two dc posts. At the opening edge, ch 5 represents one dc and the first ch-2 space. Invisible decreases are not needed for these flat wings; sc2tog draws the next two stitches together without forming a decorative ridge.
Pattern — Step by Step
Green Filet Mesh Bed Panel (Make 63)
Yarn: emerald green. Original 24-cell open-mesh construction. Work in turning rows, not a continuous spiral.
Foundation: Ch 77, keeping the chain loose enough for the bottom edge to lie flat.
Row 1: Dc in the eighth ch from the hook; [ch 2, skip 2 ch, dc in next ch] 23 times. (24 ch-2 spaces; 25 dc posts including the turning-chain post.)
Row 2: Ch 5, turn; dc in next dc; [ch 2, dc in next dc] 23 times. (24 spaces; 25 dc posts.)
Rows 3–8: Repeat Row 2. (24 spaces and 25 posts per row.)
Rows 9–16: Repeat Row 2. (24 spaces and 25 posts per row.)
Rows 17–24: Repeat Row 2. (24 spaces and 25 posts per row.)
The nominal panel has 24 cells across and 24 rows high. Block the first piece and measure both sides. If width and height differ by more than 1 cm, add or subtract complete mesh rows on later panels, or change hook size and make a fresh swatch; record one standard for the whole project. Fasten off and weave in the green tail.
Red Square Frame (Make 63)
Yarn: crimson red. Original edging; stitch distribution is based on the measured mesh edges rather than an invented fixed perimeter count.
Round 1: Join at a corner on the RS. Work sc across the top, with 2 sc into each ch-2 space and 1 sc into each dc post; along vertical edges, distribute roughly 2 sc per row end, adding an occasional third where the edge contracts. At each corner, work 3 sc and join with sl st. Check that the work remains flat before proceeding.
Round 2: Ch 3 to count as first dc; dc in each sc around, with 3 dc in the center corner stitch at all four corners. Join with sl st.
Round 3: Ch 1; sc in each dc around, with 3 sc in each center corner stitch. Join with sl st and FO, leaving a 25 cm tail for later joining.
The target is 28 × 28 cm for one complete blocked and framed panel. Change the gauge or cell count before making a batch if the first sample cannot approach that measurement without stretching.
Large Upper Butterfly Wings (Make 130)
Yarn: crimson red; two upper wings per butterfly, for 65 butterflies in the bed-and-pillow set. Original flat shaping rows.
Row 1: Ch 5, sc in second ch and in each remaining ch. (4 sc.)
Row 2: Ch 1, turn; inc, 2 sc, inc. (6 sc.)
Row 3: Ch 1, turn; inc, 4 sc, inc. (8 sc.)
Row 4: Ch 1, turn; inc, 6 sc, inc. (10 sc.)
Row 5: Ch 1, turn; inc, 8 sc, inc. (12 sc.)
Row 6: Ch 1, turn; inc, 10 sc, inc. (14 sc.)
Row 7: Ch 1, turn; sc2tog, 4 sc, ch 2, skip 2 sc, 4 sc, sc2tog. (10 sc and one ch-2 eyelet; 12 effective positions.)
Row 8: Ch 1, turn; sc2tog, sc in next 3 sc, 2 sc in the ch-2 space, sc in next 3 sc, sc2tog. (10 sc.)
Row 9: Ch 1, turn; sc2tog, 6 sc, sc2tog. (8 sc.)
Row 10: Ch 1, turn; sc2tog, 4 sc, sc2tog. (6 sc.)
Row 11: Ch 1, turn; sc2tog, 2 sc, sc2tog. (4 sc.)
Row 12: Ch 1, turn; sc2tog twice. (2 sc.) FO, leaving a 20 cm sewing tail.
Make the second wing with the same rows. Flip it over during assembly to mirror the first rather than changing the row math.
Small Lower Butterfly Wings (Make 130)
Yarn: crimson red; two lower wings per butterfly. The shorter shaping sequence separates the lower lobes from the upper lobes.
Row 1: Ch 5, sc in second ch and across. (4 sc.)
Row 2: Ch 1, turn; inc, 2 sc, inc. (6 sc.)
Row 3: Ch 1, turn; inc, 4 sc, inc. (8 sc.)
Row 4: Ch 1, turn; inc, 6 sc, inc. (10 sc.)
Row 5: Ch 1, turn; sc2tog, 2 sc, ch 2, skip 2 sc, 2 sc, sc2tog. (6 sc and one ch-2 eyelet; 8 effective positions.)
Row 6: Ch 1, turn; sc2tog, sc in next sc, 2 sc in ch-2 space, sc in next sc, sc2tog. (6 sc.)
Row 7: Ch 1, turn; sc2tog, 2 sc, sc2tog. (4 sc.)
Row 8: Ch 1, turn; sc2tog twice. (2 sc.) FO with a 20 cm tail.
Both lower wings use identical stitch counts. Turn one over to form the opposite side of the butterfly.
Butterfly Body and Antennae (Make 65 Sets)
Yarn: crimson or optional darker red. The body hides the four separate wing bases.
Body Row 1: Ch 13; sc in second ch and each remaining ch. (12 sc.)
Body Row 2: Ch 1, turn; sc across. (12 sc.) FO, leaving a 25 cm sewing tail.
Left antenna: Attach yarn to one top corner of the body, ch 7, sl st back along 6 chains, and FO.
Right antenna: Repeat from the opposite top corner. Keep both antennae free of long loops that may catch in the mesh.
For each butterfly, position two large wings above two small wings, with the narrow starting ends meeting near the body. Overlap those ends by about 1 cm, then sew the rectangular body over the join. Make one complete sample butterfly and check that it fits within the framed square with at least 3 cm clearance on all sides.
Matching Pillow Front (Make 2)
Yarn: emerald green with crimson frame. Each front has one full butterfly.
Foundation: Ch 113. This is the 36-cell version of the mesh foundation: 36 × 3 + 5.
Row 1: Dc in eighth ch from hook; [ch 2, skip 2 ch, dc in next ch] 35 times. (36 spaces; 37 dc posts.)
Row 2: Ch 5, turn; dc in next dc; [ch 2, dc in next dc] 35 times. (36 spaces; 37 posts.)
Rows 3–36: Repeat Row 2. (36 spaces; 37 posts per row.)
Measure and block the front; adjust the number of rows or hook before repeating if the fabric is not nearly square. Work the same three red frame rounds used for the bed panels. Attach one butterfly centered on each RS, leaving room between its outer wings and the frame.
Pillow Envelope Back (Make 2 Sets)
Material: matching green woven fabric, not crochet yarn. This practical backing keeps the open decorative front usable.
For each pillow, let S equal the side length in centimeters of the blocked crochet front. Cut two rectangles measuring S + 2 cm tall by approximately 0.7S + 2 cm wide.
Fold and stitch a 1 cm hem along one long vertical edge of each piece. With right sides facing, position both pieces behind the crocheted front so the hemmed edges overlap centrally; sew around all four outside edges with a 1 cm seam allowance. Turn right side out through the overlap. Add the washable insert only after the outer seams are completed.
Outside Scalloped Border (Make 1 Continuous Edge)
Yarn: crimson red. Work after all 63 bed panels have been joined.
Round 1: Join red at the upper-left corner and work sc evenly around the entire joined cover, with 3 sc at each corner. (Count depends on the actual joined edge.)
Round 2: Across the left side, foot, and right side, repeat [skip 2 sc, 5 dc in next sc, skip 2 sc, sl st in next sc] to create red scallops. Adjust the spacing by one stitch near each corner so that shells do not pull; finish the head edge with sc only. FO and weave in all tails.
Assembly
- Block a single green mesh panel before committing yarn to the full project; write down its dimensions, row count, and weight.
- Crochet and frame 63 matching panels, then arrange them seven across and nine down, RS facing up.
- Assemble one complete four-wing butterfly to confirm its proportions against a framed green panel.
- Place the butterfly body at the center of each mesh square and mark its vertical axis with removable markers.
- Position the two upper wings diagonally outward and the two smaller wings below them, keeping visible gaps between lobes.
- Stitch through solid wing edges and nearby dc posts at six or more spaced anchor points, without cinching open mesh cells.
- Sew the narrow body over the wing bases and secure the antenna ends; repeat for all 63 bed panels.
- Join the framed squares by whipstitching corresponding red border loops into seven columns of nine, then join the columns without forcing mismatched edges together.
- Make both larger pillow fronts, attach one butterfly to each, add the overlapping fabric backs, and test the cushion insert fit.
- Work the final red outer edging, weave in every yarn tail for at least 8 cm, wash as allowed by the yarn label, and dry the cover flat.
The completed set consists of one joined butterfly coverlet and two matching cushion covers.
7 Technical Tips
- Foundation-chain contraction: A foundation narrower than the later mesh rows makes the bottom edge bow. Use a hook 0.5 mm larger for the starting chain if a 77-chain test pulls inward.
- Missing mesh posts: Losing one dc on Row 2 reduces the panel from 24 cells to 23. Count 25 vertical posts, including the turning-chain post, before starting the next row.
- Uneven butterfly pairs: Two upper wings with different Row 6 counts will not mirror correctly. Confirm 14 sc at the widest row on both pieces before shaping the eyelets.
- Collapsed eyelets: Sewing through the two chains of a wing eyelet closes the decorative opening. Anchor the appliqué at solid sc edges instead, at least 3 mm away from an eyelet.
- Tight corner frames: Working only one sc into a corner creates a cupped red border. Use three corner stitches and check the panel on a flat blocking surface after each edging round.
- Misaligned seams: A difference greater than 1 cm between adjacent framed panels makes the join ripple. Pin four corners and each midpoint before whipstitching two squares together.
- Loose finishing tails: A tail left shorter than 8 cm can emerge after washing. Weave it through several neighboring solid stitches, reverse direction, and trim only after laundering.
Conclusion
Before scaling this design, crochet one framed green square and one complete four-wing motif. Record the panel width, length, green and red yarn weights, and butterfly clearance. Those four measurements determine how closely the final coverlet follows the photograph and how much yarn to buy. The butterfly crochet bedspread described here uses 63 repeat panels and two coordinated pillow fronts; adjust the grid only after measuring the mattress and desired side drop. Save a clear overhead photograph to Pinterest and share a close-up of the wing joins on Instagram with #RedGreenButterflyBedspread. Would you keep the butterfly antennae red, or work them in a darker shade to separate them from the upper wings?