Introduction
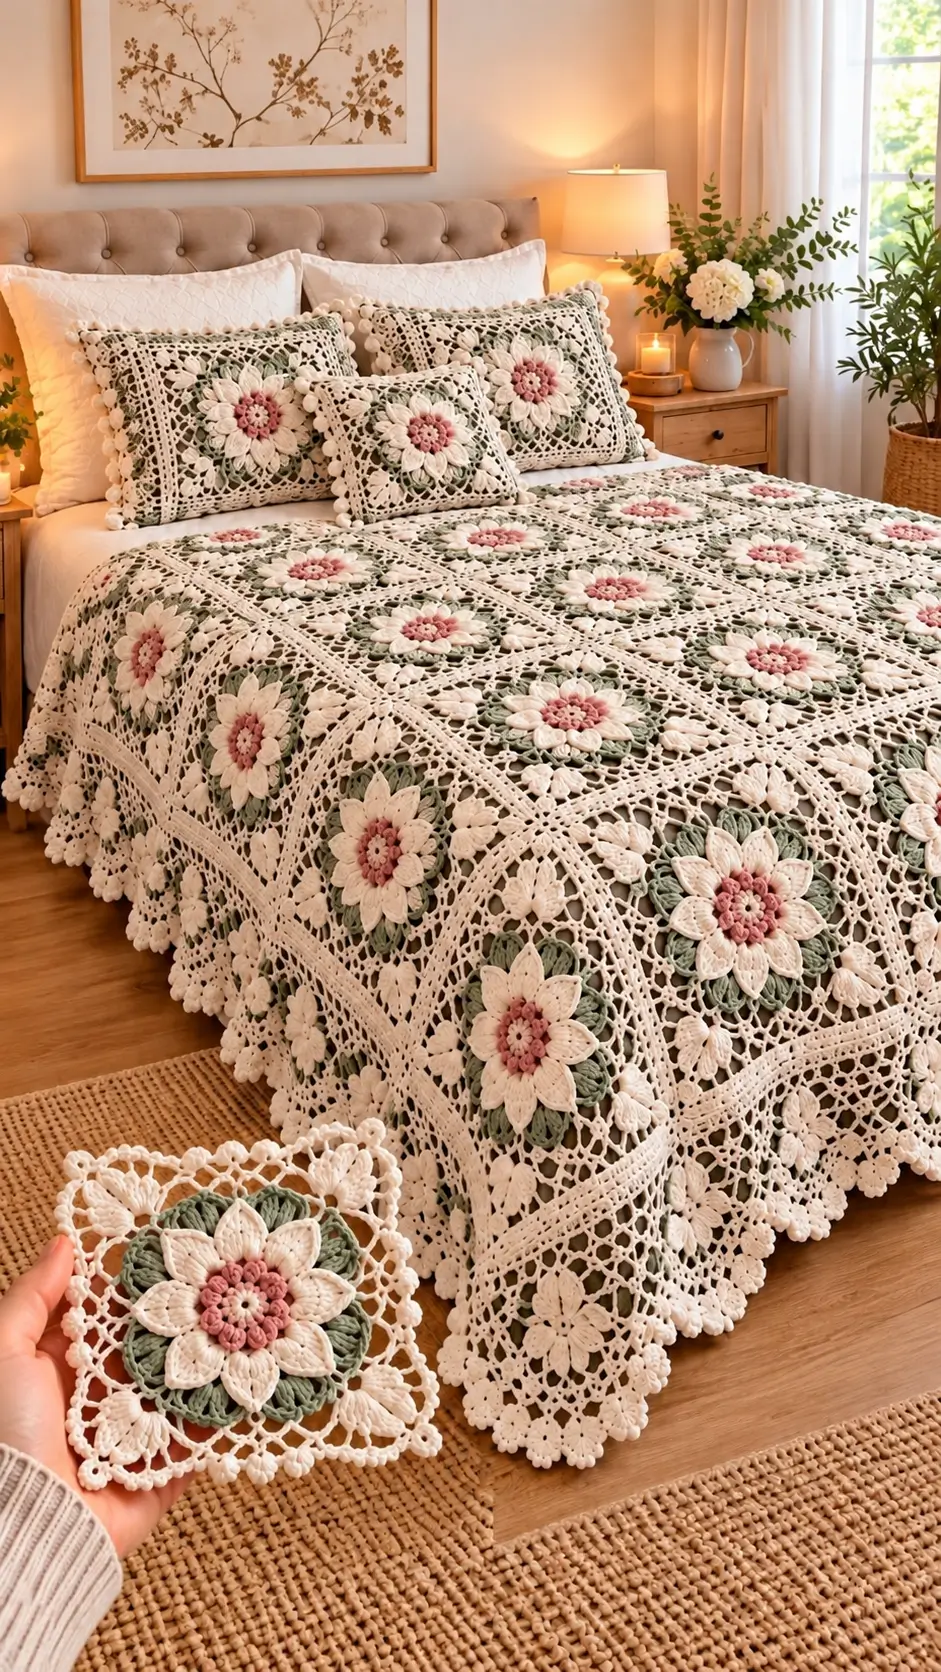
Eight raised ivory petals surrounding a dusty-pink center give each square in this crochet floral granny square bedspread pattern its distinctive daisy-like structure. The design combines DK cotton yarn, a 4 mm crochet hook, sage-green leaf details, and an ivory lace framework. Intended for intermediate crocheters, the proposed 210 × 240 cm bedspread uses repeated motifs that can be resized to fit different mattresses. Individual squares also provide the foundation for matching pillow covers.
The Design: What Makes This Floral Bedspread Different
The flower is constructed separately from its surrounding square, allowing the petals to remain raised while the background lies flat. A dusty-pink center establishes the focal point, and eight ivory petals create a consistent circular arrangement.
A sage-green backing introduces a second structural layer. It helps separate the pale flower from the ivory openwork and provides attachment points for the square foundation.
The third design decision concerns the lace framework. Instead of filling the entire square with dense stitches, the outer rounds incorporate chain spaces and corner shaping. This reduces fabric weight and allows the finished bedspread to drape.
A common mistake when making a 3D flower granny square is pulling the joining stitches too tightly. That distorts the corners and produces visible ridges across a crochet lace bedspread.
Project Info at a Glance
| Detail | Specification |
|---|---|
| Skill Level | Intermediate |
| Project Time | 50–90 hours, variable |
| Finished Size | Approximately 210 × 240 cm (target) |
| Crochet Hook | 4 mm |
| Yarn Weight | DK cotton or cotton blend |
| Construction | Individual joined squares |
| Primary Technique | Raised flowers and openwork crochet |
| Best For | Bed coverings, decorative throws, and pillow covers |
Note: This is an original image-inspired design, not an exact reconstruction of the photographed bedspread. The dimensions, quantities, and pattern have not been physically tested. Make and block a sample before starting the complete project.
Materials and Tools
Yarn
Use a smooth DK cotton or cotton-blend yarn with consistent thickness. A matte finish makes the raised petals and openwork stitches more visible.
- Ivory cream – DK – approximately 2,000 g: Main petals, square borders, joining yarn, and decorative edging.
- Sage green – DK – approximately 450 g: Leaves and flower backing.
- Dusty rose pink – DK – approximately 300 g: Textured flower centers.
- Optional deeper pink – DK – approximately 100 g: Additional contrast for the center rounds.
Suitable yarn families include cotton DK yarns from Paintbox Yarns, Scheepjes, or manufacturers offering comparable fiber content and yardage. These are suggestions rather than exact matches to the reference photograph.
The listed quantities are preliminary planning estimates. Actual consumption depends on gauge, motif dimensions, joining method, and border width.
Tools
- 4 mm crochet hook
- Tapestry needle with a blunt tip
- Locking stitch markers
- Sharp yarn scissors
- Measuring tape
- Blocking mats and rust-resistant pins
- Optional pillow inserts for matching cushions
Crochet Abbreviations
| Abbreviation | Meaning |
|---|---|
| MR | Magic ring |
| ch | Chain |
| sc | Single crochet |
| hdc | Half double crochet |
| dc | Double crochet |
| tr | Treble crochet |
| sl st | Slip stitch |
| inc | Two single crochet stitches in one stitch |
| dec | Single crochet decrease |
| BLO | Back loop only |
| sp | Space |
| st | Stitch |
| rep | Repeat |
| FO | Fasten off |
An invisible decrease is worked through the front loops of two adjacent stitches and is mainly used for closed three-dimensional crochet pieces rather than this openwork design.
Pattern note: Unlike amigurumi, floral granny squares use joined rounds, chain spaces, and variable stitch groups. Their stitch counts do not necessarily increase by six stitches per round.
Pattern – Step by Step
The pattern below is a proposed construction based on the visible floral design. It has not been sample-tested and should be treated as a design draft rather than an exact reproduction.
Part 1: Dusty Pink Flower Center (Make 110)
Yarn: Dusty rose pink.
The center begins with a flat circular base. Keep the tension consistent to prevent the circle from becoming cone-shaped.
- Round 1: Make 6 sc in MR. Join with sl st to the first sc. (6 sc)
- Round 2: Ch 1, work 2 sc into each stitch around. Join. (12 sc)
- Round 3: Ch 1, repeat [1 sc, inc] six times. Join. (18 sc)
- Round 4: Ch 1, repeat [2 sc, inc] six times. Join. (24 sc)
- Round 5: Ch 1, repeat [3 sc, inc] six times. Join. (30 sc)
- Round 6: Ch 1, repeat [4 sc, inc] six times. Join. (36 sc)
- Round 7: Ch 1, repeat [5 sc, inc] six times. Join. (42 sc)
Fasten off, leaving approximately 15 cm of yarn for attachment.
For a more compact center, stop after Round 4 and use the smaller 24-stitch circle. The photographed flowers have relatively compact centers, so this alternative may provide more balanced proportions.
Part 2: Raised Ivory Flower Petals (Make 8 per Square)
Yarn: Ivory cream.
Each petal is worked separately and attached around the pink center.
- Row 1: Ch 7. Beginning in the second chain from the hook, work 1 sc, 1 hdc, 2 dc, 1 hdc, and 1 sc. (6 stitches)
- Row 2: Ch 1 and turn. Work 1 sc, 1 hdc, 2 dc, 1 hdc, and 1 sc. (6 stitches)
- Row 3: Ch 1 and turn. Work 1 sc in each stitch. (6 sc)
Fasten off with a 15 cm sewing tail.
Make eight identical petals. Position their narrow bases at equally spaced points around the pink center, overlapping adjacent edges slightly.
Use a tapestry needle to sew each petal base to the center. Work through the back of the pink circle so that the attachment stitches are hidden.
For additional dimension, make a second set of eight smaller petals using a starting chain of five. Position the smaller petals between the larger ones.
This optional second layer produces a fuller flower but increases yarn consumption and assembly time.
Part 3: Sage Green Leaf Layer (Make 1 per Square)
Yarn: Sage green.
The green foundation sits behind the flower and provides a contrasting foliage layer.
- Round 1: Work 6 sc in MR. Join. (6 sc)
- Round 2: Ch 1, inc in every stitch. Join. (12 sc)
- Round 3: Ch 1, repeat [1 sc, inc] six times. Join. (18 sc)
- Round 4: Ch 1, repeat [2 sc, inc] six times. Join. (24 sc)
- Round 5: Ch 1, repeat [3 sc, inc] six times. Join. (30 sc)
- Round 6: Ch 1, repeat [4 sc, inc] six times. Join. (36 sc)
- Round 7: Ch 1, repeat [5 sc, inc] six times. Join. (42 sc)
For each decorative leaf, ch 6. Starting in the second chain from the hook, work 1 sc, 1 hdc, 1 dc, 1 hdc, and 1 sc. (5 stitches)
Fasten off with a sewing tail. Make eight leaves.
Sew the leaves around the outer edge of the green circle, spacing them evenly. Position the ivory flower over the center and attach it securely.
Leave the green leaf tips visible between the ivory petals to create the layered floral appearance.
Part 4: Ivory Openwork Granny Square (Make 110)
Yarn: Ivory cream.
This square uses a conventional granny-cluster structure as a stable foundation. Its lace is simpler than the intricate mesh visible in the reference photograph.
- Round 1: Make MR. Ch 3 (counts as first dc), work 2 dc into the ring, ch 2. Repeat [3 dc, ch 2] three more times. Join with sl st to the top of the starting ch 3. (12 dc, four ch-2 corners)
- Round 2: Sl st to the first corner. Work (3 dc, ch 2, 3 dc) in that corner. Ch 1. Repeat the same corner group in each remaining corner, placing ch 1 between corners. Join. (24 dc, four ch-2 corners, four ch-1 side spaces)
- Round 3: Sl st to the first corner. Work (3 dc, ch 2, 3 dc) in the corner, ch 1, then 3 dc into the next side ch-1 space, ch 1. Repeat around, working the same corner group in every corner. Join. (36 dc, four ch-2 corners, eight ch-1 side spaces)
- Round 4: Repeat the established structure, adding one 3-dc cluster in each new side space. Join. (48 dc, four ch-2 corners, twelve ch-1 side spaces)
- Round 5: Continue the same structure. (60 dc, four ch-2 corners, sixteen ch-1 side spaces)
- Round 6: Continue the same structure. (72 dc, four ch-2 corners, twenty ch-1 side spaces)
Continue in the same manner until the blocked square approaches the target dimension of 20 cm.
The required number of additional rounds depends on yarn thickness, stitch tension, and hook size. Do not assume that Round 6 will produce a 20 cm square.
Part 5: Attaching the Flower to the Square
Lay the ivory square flat with its right side facing upward.
Position the sage-green backing at the center, with the leaves pointing toward the corners and sides.
Sew the green foundation to the square through several evenly spaced attachment points. Avoid stitching down the entire outer leaf edge.
Place the ivory flower over the green circle. Stitch through the pink center and selected petal bases.
Check the underside for loose sewing tails. The finished motif should lie flat at the corners while the flower remains raised above the background.
Planning the Bedspread Size
The number of squares depends on the finished size of one blocked motif. The following examples assume a 20 cm square before joining.
| Layout | Number of Squares | Approximate Panel Size |
|---|---|---|
| 6 × 8 | 48 | 120 × 160 cm |
| 8 × 10 | 80 | 160 × 200 cm |
| 9 × 10 | 90 | 180 × 200 cm |
| 10 × 11 | 110 | 200 × 220 cm |
A 10 × 11 arrangement with a 5 cm border on every side measures approximately 210 × 230 cm. A 10 cm border produces approximately 220 × 240 cm.
To reach a different finished size, adjust the motif gauge, number of squares, or border depth after blocking the sample.
A difference of only 5 mm per motif becomes 5 cm across a row of ten squares. Accurate measurements are essential for a large joined project.
Joining the Floral Granny Squares
A flat joining method works well for a bedspread with raised flowers.
Arrange all the squares in rows with the flowers facing upward. Check that the dimensions remain consistent.
Place two adjacent squares with their right sides together. Using ivory yarn and a tapestry needle, whipstitch through the corresponding outer edge loops.
Keep the seam tension even. Pulling too tightly shortens the edges and may cause rippling.
Join the individual squares into strips first. Connect the strips to form the complete bedspread.
A slip-stitch join worked through the inner loops is another option for creating a relatively flat seam.
Decorative Lace Border
The border frames the floral motifs and adds a decorative finish to the bedspread.
Border Round 1: Foundation
Attach ivory yarn at a corner. Ch 1 and work sc evenly around the bedspread, placing 3 sc in each corner.
Distribute the stitches carefully along the joined edges so that the fabric remains flat. Join with sl st.
Border Round 2: Openwork
Ch 4. Skip 2 stitches and work 1 sc into the next stitch.
Repeat [ch 3, skip 2 stitches, sc in next stitch] around the border, adjusting spacing near the corners.
At each corner, work a larger ch-5 space to provide room for shaping.
Border Round 3: Lace Arches
Work 5 dc into each ch-3 space, followed by 1 sc at the next anchor point.
Repeat around the border. Adjust the number of double crochet stitches in selected arches where the spacing is uneven.
Border Round 4: Scalloped Finish
Work [sl st, ch 3, 3 dc, ch 3, sl st] into selected spaces from the previous round to create decorative scallops.
Space the scallops evenly and adjust the corner shaping as necessary.
Fasten off and weave in the remaining yarn ends.
This simplified scalloped border is an image-inspired alternative, not an exact reproduction of the multi-layer floral lace edging in the photograph.
Matching Crochet Pillow Covers
The floral bedspread can be paired with matching pillow covers using the same ivory, sage-green, and dusty-pink motifs.
Large Floral Pillow Covers
Make four floral squares for each front panel and arrange them in a 2 × 2 layout.
Join the squares using the same technique as the bedspread.
Measure the completed panel before choosing a pillow insert. Add a fabric back with an envelope closure or button opening.
Small Decorative Pillow
Use one enlarged floral square or a four-square arrangement made with finer yarn.
Add a narrow ivory border around the front panel.
For easier washing, construct the cover with a removable back rather than sewing the pillow insert permanently inside.
The final pillow measurements must be adjusted to the selected insert and closure method.
Assembly – 10 Steps
- Crochet one complete pink flower center and check its diameter.
- Make eight ivory petals and attach them around the pink center.
- Crochet the green foundation and prepare the decorative leaves.
- Attach the leaves and position the flower over the green backing.
- Crochet one ivory granny-square foundation and block it.
- Sew the flower assembly to the center of the square.
- Measure the completed sample and calculate the required number of motifs.
- Make the remaining squares and arrange them into the chosen layout.
- Join the squares and work the decorative lace border.
- Weave in all remaining ends, block the bedspread, and construct the matching pillow covers.
The project is complete when the bedspread lies flat, all seams are secure, and the yarn tails are concealed.
7 Technical Tips for Better Results
- Use stitch markers at every corner. A misplaced corner cluster can distort the square and create uneven edges during joining.
- Measure the blocked motif. A 5 mm size difference repeated across ten squares changes the panel width by 5 cm.
- Keep the flower center flat. If the pink circle forms a cup, check the stitch counts and relax the tension before attaching the petals.
- Control petal overlap. Place all eight petal bases at regular intervals to prevent the flower from leaning toward one side.
- Avoid excessive seam tension. Tight joins can shorten the panel edges and cause the finished bedspread to buckle.
- Pin the border before final blocking. Distorted scallops and stretched corners are easier to identify when the fabric is spread across a measured surface.
- Weave yarn tails through multiple stitch directions. Short, unsecured ends may work loose during laundering, especially around raised flower attachments.
Care and Washing
Cotton and cotton-blend yarns can have different shrinkage rates and washing requirements, even when they share the same yarn weight.
Follow the care instructions on the selected yarn label. Before washing the complete bedspread, wash and dry a sample motif using the intended cleaning method.
Measure the sample before and after washing to identify any change in dimensions.
A large crochet bedspread becomes considerably heavier when wet. Support the fabric during washing and drying rather than hanging it from one edge.
Drying flat helps maintain the dimensions of the joined squares and protects the raised floral details.
Avoid high-temperature pressing directly over the petals because excessive pressure can flatten the dimensional stitches.
Conclusion
The finished design combines raised floral motifs, sage-green leaves, ivory granny-square foundations, and a decorative lace border. Its modular construction allows the bedspread to be adapted to different mattress sizes, while the same squares can be used for matching pillows.
Before making the complete crochet floral granny square bedspread pattern, prepare one test motif, block it, and record its measurements and yarn consumption. These figures provide a more reliable basis for calculating the final project.
Save the design to Pinterest for future reference, or share your completed version on Instagram using #FloralGrannySquareBedspread.
Would you keep the dusty-pink flower centers shown in the photograph, or alternate them with a deeper rose shade?