Introduction
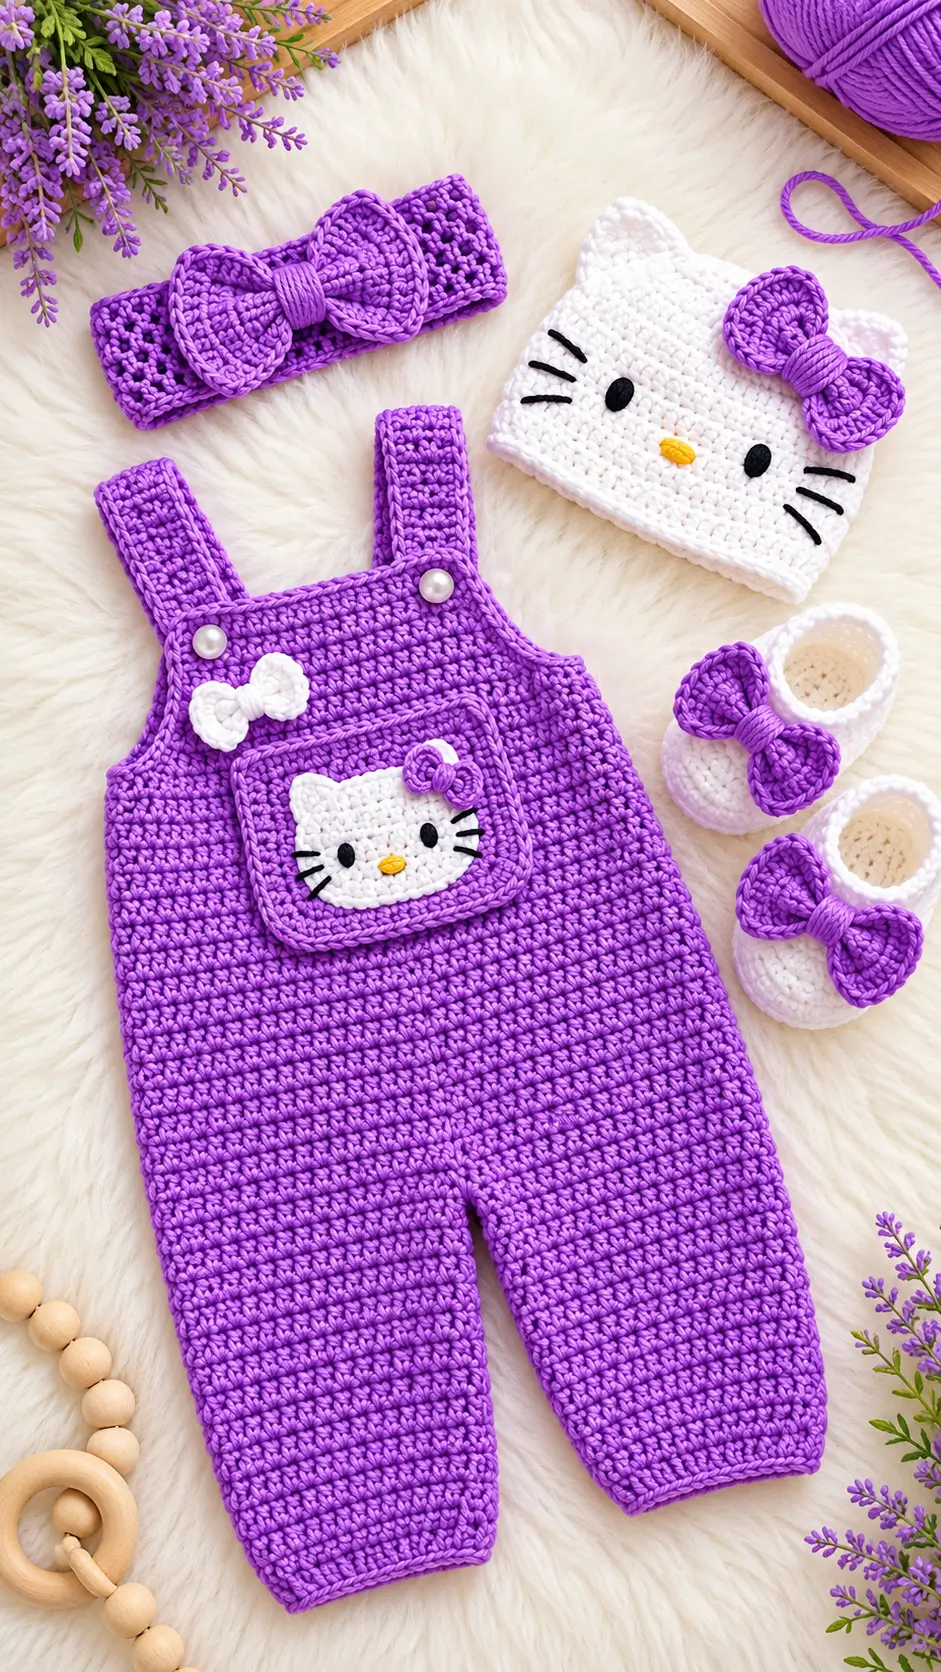
Hello Kitty’s whiskers must remain visible beneath the bow without crowding the cat’s triangular ears. This Hello Kitty crochet baby outfit combines a purple romper, white cat-ear hat, decorative pocket, bow headband, and matching booties. DK-weight yarn and a 3.5 mm hook provide a practical starting point for a newborn-to-three-month sample. The project requires intermediate crochet skills and produces coordinated pieces suitable for supervised photography and appropriately fitted everyday wear.
The Design: What Makes This Hello Kitty Outfit Different
The purple crochet baby romper uses a broad bib, two shoulder straps, and separate trouser legs. These elements create the overall silhouette while allowing the maker to adjust the torso and leg measurements independently. A flat decorative pocket keeps the cat-face appliqué visible without adding unnecessary thickness across the front.
The crochet cat ear baby hat requires two upright ears that maintain their shape without wire or plastic supports. Their placement should leave sufficient space for the large purple bow, which sits to one side rather than directly between the ears.
Finally, the matching crochet baby booties with bows repeat the lavender-and-white color arrangement. This links the footwear visually to the hat and headband.
A common construction error is making the cat-face appliqué too large. Oversized facial features distort the pocket and reduce the space available for its purple border.
Project Info at a Glance
| Specification | Project Plan |
|---|---|
| Skill Level | Intermediate |
| Estimated Time | 12–18 hours (estimate) |
| Intended Size | 0–3 months |
| Reference Bootie Sole | 9 cm |
| Hook | 3.5 mm starting hook |
| Yarn Weight | DK / Category 3 |
| Construction | Flat rows, joined rounds and appliqués |
| Best For | Coordinated baby outfit and supervised photography |
Important sizing note: The photographed garment has not been measured. The 9 cm bootie sole is a reference measurement from a comparable 0–3-month pattern. Check the finished dimensions against the intended baby’s measurements before use.
Materials and Tools
Yarn
Choose a soft, washable baby-appropriate yarn. Smooth DK cotton or a suitable cotton-acrylic blend makes decorative stitches easier to distinguish.
The following yarn quantities are planning allowances, not measured consumption from the photographed outfit.
- Lavender purple: DK yarn, approximately 200–250 g, such as Paintbox Yarns or equivalent.
- White: DK yarn, approximately 80–120 g, for the hat, booties, appliqué and bows.
- Black: Small amount of embroidery thread for eyes and whiskers.
- Yellow: Small amount of embroidery thread for noses.
- Extra lavender: Reserve approximately 15–20 g from the main allocation for bows and edging.
Actual yarn consumption depends on gauge, garment length, stitch density and the number of accessories.
Tools
- 3.5 mm crochet hook for initial gauge testing
- Tapestry needle with a blunt tip
- Locking stitch markers
- Measuring tape
- Scissors
- Removable pins for positioning decorations
- Washable marking thread
The photograph includes pearl-like buttons. For a baby-safe adaptation, replace them with embroidered button motifs or suitable securely constructed closures without detachable small components.
Do not add plastic safety eyes, beads, wire or loose decorations. Embroidered facial details are preferable for infant accessories.
Crochet Abbreviations
| Abbreviation | Meaning |
|---|---|
| MR | Magic ring |
| sc | Single crochet |
| inc | Two single crochets in one stitch |
| dec | Single crochet decrease |
| sl st | Slip stitch |
| ch | Chain |
| BLO | Back loop only |
| hdc | Half double crochet |
| dc | Double crochet |
| st / sts | Stitch / stitches |
| RS | Right side |
| WS | Wrong side |
| FO | Fasten off |
An invisible decrease joins the front loops of two adjacent stitches, reducing the visible bulk of the decrease.
Hello Kitty Crochet Baby Outfit Pattern – Step by Step
Pattern note: This is an original, untested adaptation inspired by the photograph, not the original designer’s pattern. The decorative pieces have written stitch instructions. The lower romper requires measurement-based drafting and fit testing before it can be considered a complete wearable garment pattern.
Before You Begin: Gauge and Construction
The flat garment pieces use rows rather than continuous spirals. Rounded decorations use joined rounds or spirals as specified.
Make a 15 × 15 cm swatch in single crochet using DK yarn and a 3.5 mm hook. Wash and dry it according to the yarn manufacturer’s instructions, then measure the center 10 cm.
For the sample construction, the working gauge assumption is:
- 22 single crochet stitches = 10 cm
- 24 rows = 10 cm
This is a reference gauge from a comparable DK bootie pattern and must be checked with your selected yarn.
1. Purple Romper Front Bib
Yarn: Lavender purple. Work in flat rows.
Begin with ch 37.
R1: Sc in second ch from hook and across (36).
R2–R18: Ch 1, turn, sc across (36).
R19: Ch 1, turn, dec, sc 32, dec (34).
R20: Sc across (34).
R21: Dec, sc 30, dec (32).
R22: Sc across (32).
R23: Dec, sc 28, dec (30).
R24–R30: Sc across (30).
Fasten off, leaving a 25 cm sewing tail.
This panel forms a rectangular bib with gently narrowed upper edges. At the assumed gauge, its upper width is approximately 13.6 cm.
The photographed romper widens below the bib. Draft that lower section to the baby’s actual torso measurements rather than extending the bib at a fixed stitch count.
2. Purple Shoulder Straps (Make 2)
Yarn: Lavender purple.
Ch 9.
R1: Sc in second ch from hook and across (8).
R2–R32: Ch 1, turn, sc across (8).
Fasten off with a 25 cm tail.
Measure both straps after blocking. Adjust their length so the bib sits at the intended chest height without pulling on the shoulders.
Use a secure, baby-appropriate fastening method. Avoid loose or detachable buttons.
3. Romper Lower Body and Legs
Yarn: Lavender purple.
The lower body requires an individually fitted front and back rise, crotch depth, hip circumference, diaper allowance and two leg openings. A universal 36-stitch amigurumi tube would not provide a reliable garment fit.
- Measure the intended hip circumference over a diaper.
- Add comfortable ease appropriate to the fabric and intended fit.
- Convert the required circumference into stitches using the washed gauge swatch.
- Divide the stitch allocation between front and back, accounting for seams.
- Work the torso to the measured crotch depth.
- Form the crotch with a suitable gusset and accessible fastening.
- Divide the remaining fabric into two leg sections.
- Work each leg to the measured length.
- Finish both leg openings with flexible edging.
- Check that no seam or closure presses against the diaper area.
Fit note: Exact lower-body row counts cannot be supplied without the required measurements and physical fit testing. Do not treat this section as a tested garment pattern.
4. White Cat-Face Pocket Appliqué
Yarn: White. Work in flat rows.
Ch 13.
R1: Sc in second ch from hook and across (12).
R2–R8: Ch 1, turn, sc across (12).
R9: Inc, sc 10, inc (14).
R10: Sc across (14).
R11: Inc, sc 12, inc (16).
R12: Sc across (16).
Fasten off, leaving a 20 cm tail.
5. Cat Ear Triangles (Make 2)
Yarn: White.
R1: Ch 6, sc in second ch and across (5).
R2: Dec, sc 1, dec (3).
R3: Sc across (3).
R4: Sc3tog (1).
Fasten off with a 15 cm tail.
Sew the triangles to the upper edge of the white face. Position one on each side, leaving a shallow central notch.
Embroider two black oval eyes, three whiskers on each side and a small yellow oval nose. Center the facial details and keep their spacing symmetrical.
6. Purple Pocket Border
Yarn: Lavender purple.
Ch 23.
R1: Sc in second ch and across (22).
R2–R16: Ch 1, turn, sc across (22).
R17: Work sc around the perimeter, placing three sc in each corner.
Fasten off with a 30 cm tail.
Place the white cat-face appliqué on the purple pocket panel, leaving a visible border around all four sides.
Sew the face securely in place. Attach the finished pocket to the romper only after checking its placement and the garment fit.
7. White Decorative Chest Bow
Yarn: White.
Ch 11.
R1: Sc in second ch from hook and across (10).
R2–R6: Ch 1, turn, sc across (10).
Fasten off with a 25 cm tail.
Pinch the rectangle at the center and wrap the remaining yarn around it several times. Stitch the center wrapping securely on the reverse side.
Position the white bow near the upper left side of the romper, matching the photograph.
8. White Cat-Ear Hat
Yarn: White. Work in a continuous spiral.
R1: 6 sc in MR (6).
R2: Inc ×6 (12).
R3: (1 sc, inc) ×6 (18).
R4: (2 sc, inc) ×6 (24).
R5: (3 sc, inc) ×6 (30).
R6: (4 sc, inc) ×6 (36).
R7: (5 sc, inc) ×6 (42).
R8: (6 sc, inc) ×6 (48).
R9: (7 sc, inc) ×6 (54).
R10: (8 sc, inc) ×6 (60).
R11: (9 sc, inc) ×6 (66).
R12: (10 sc, inc) ×6 (72).
R13: (11 sc, inc) ×6 (78).
R14: (12 sc, inc) ×6 (84).
Continue working one sc in each stitch without increases until the required hat depth is reached.
At 22 stitches per 10 cm, 84 stitches represent approximately 38.2 cm of unstretched circumference. This is a mathematical reference, not a verified finished hat size.
Check the crown circumference, depth and fabric stretch against the intended head measurements. Fasten off with a 15 cm tail.
9. White Cat Ears (Make 2)
Yarn: White. Work in continuous spirals.
R1: 6 sc in MR (6).
R2: Sc around (6).
R3: (1 sc, inc) ×3 (9).
R4: Sc around (9).
R5: (2 sc, inc) ×3 (12).
R6: Sc around (12).
R7: (3 sc, inc) ×3 (15).
R8: Sc around (15).
R9: (4 sc, inc) ×3 (18).
R10–R11: Sc around (18).
Fasten off, leaving a 25 cm sewing tail.
Flatten each ear without stuffing. Position the ears symmetrically on the upper hat crown and sew through both layers of each flattened base.
10. Purple Hat Bow
Yarn: Lavender purple.
Ch 15.
R1: Sc in second ch from hook and across (14).
R2–R8: Ch 1, turn, sc across (14).
Fasten off with a 30 cm tail.
Gather the center with several tight yarn wraps. Stitch through the wraps to secure the shape.
Attach the bow below one ear, leaving the embroidered facial features visible.
11. Purple Bow Headband
Yarn: Lavender purple.
The photograph includes an openwork headband with a large central bow. Measure the actual head circumference before making the band, and select a soft, flexible construction.
Decorative bow:
Ch 19.
R1: Sc in second ch from hook and across (18).
R2–R10: Ch 1, turn, sc across (18).
Fasten off with a 35 cm tail.
Gather the center and wrap it securely with yarn. Attach the finished bow to a separately fitted band.
Safety note: Do not use tight elastic, long ties or constricting edges. Baby headbands are for direct supervision only and must be removed before sleep.
12. White Baby Booties (Make 2)
Yarn: White, with lavender bows.
The photograph shows rounded, low-cut white booties with large purple bows. Their construction uses an oval sole, shaped toe and short upper.
For a complete reference construction, the free crochet bow baby booties pattern from Maisie and Ruth provides DK-weight instructions with a 3.5 mm hook and a 9 cm sole option for 0–3 months.
View the free crochet bow baby booties pattern.
Make the booties in white, then attach lavender bows to reproduce the photograph’s color arrangement.
13. Lavender Bootie Bows (Make 2)
Yarn: Lavender purple.
Ch 13.
R1: Sc in second ch from hook and across (12).
R2–R6: Ch 1, turn, sc across (12).
Fasten off with a 25 cm tail.
Gather each rectangle at the center. Wrap with yarn several times and stitch securely through the wrapping.
Attach one bow to the front of each bootie. Keep the toe flexible and avoid hard embellishments or loose attachments.
14. Purple Miniature Pocket Bow
Yarn: Lavender purple.
Ch 9.
R1: Sc in second ch from hook and across (8).
R2–R4: Ch 1, turn, sc across (8).
Fasten off with a 20 cm tail.
Gather the middle and secure the center with several yarn wraps. Stitch the miniature bow near the upper corner of the cat-face pocket.
Keep the bow smaller than the white cat’s ear-to-ear width so the embroidered face remains visible.
How to Assemble the Hello Kitty Crochet Baby Outfit
- Complete the garment structure. Join the fitted romper front, back, crotch and legs using a suitable infant garment construction.
- Attach the bib. Center the purple bib on the upper front edge of the romper and sew it flat.
- Secure the shoulder straps. Attach the straps at the front and back after checking their length and placement.
- Prepare the cat face. Embroider the eyes, whiskers and yellow nose before sewing the white appliqué to the pocket.
- Attach the pocket. Center the white cat face on its purple border, then position the decorated pocket on the romper front.
- Finish the trouser legs. Complete both leg openings with flexible edging and inspect the crotch seams.
- Assemble the hat. Sew both white ears to the crown, checking their spacing and symmetry.
- Add the decorative bows. Secure the purple hat bow, white chest bow and miniature pocket bow with buried yarn ends.
- Finish the accessories. Complete the headband and both booties, then attach their lavender bows securely.
- Inspect the finished pieces. Check every seam, closure, opening and decorative attachment before washing and use.
The completed set consists of a purple romper, white cat-ear hat, purple bow headband and matching white baby booties.
7 Technical Tips for Better Crochet Results
- 1. Stitch-marker placement: Move the marker into the first stitch of each spiral round. A misplaced marker can shift the hat increases and distort the crown.
- 2. Stuffing firmness: Do not stuff the hat ears or decorative bows. Stuffing creates bulky protrusions and adds unnecessary weight to wearable baby accessories.
- 3. Invisible decreases: Use front-loop invisible decreases only where shaping calls for them. Replacing ordinary decreases indiscriminately can change the fabric texture and stretch.
- 4. Eye placement timing: Embroider both eyes before attaching the cat-face appliqué to the pocket. Working the facial details after attachment makes it harder to hide thread ends and correct uneven spacing.
- 5. Yarn tension: Keep the washed 10 cm gauge swatch as the reference for garment measurements. Switching to chunky or velvet yarn without recalculating stitch counts can produce a substantially larger garment.
- 6. Pinning accuracy: Pin both hat ears and all bows before permanent stitching. A difference of even 1 cm can make the face appear asymmetrical.
- 7. Tail weaving: Leave approximately 20–30 cm sewing tails on appliqués and bows, then weave them through several stitch paths. Short or unsecured tails can work loose during washing and handling.
Conclusion
The purple romper, white cat-ear hat, bow headband and matching booties form a coordinated character-inspired baby set. Reproducing the photographed design requires accurate gauge measurements, balanced decorative proportions and properly fitted garment construction. The hat, bows and appliqués can be sampled independently, while the romper should be completed only after its measurements and closures have been established.
Before making the final Hello Kitty crochet baby outfit, crochet a washed gauge swatch and record the intended chest, hip, head and foot measurements. Share a finished project on Pinterest or Instagram using #PurpleHelloKittyCrochetSet and include the yarn and hook details.
Which bow placement best preserves the cat’s ear and whisker proportions?