Introduction
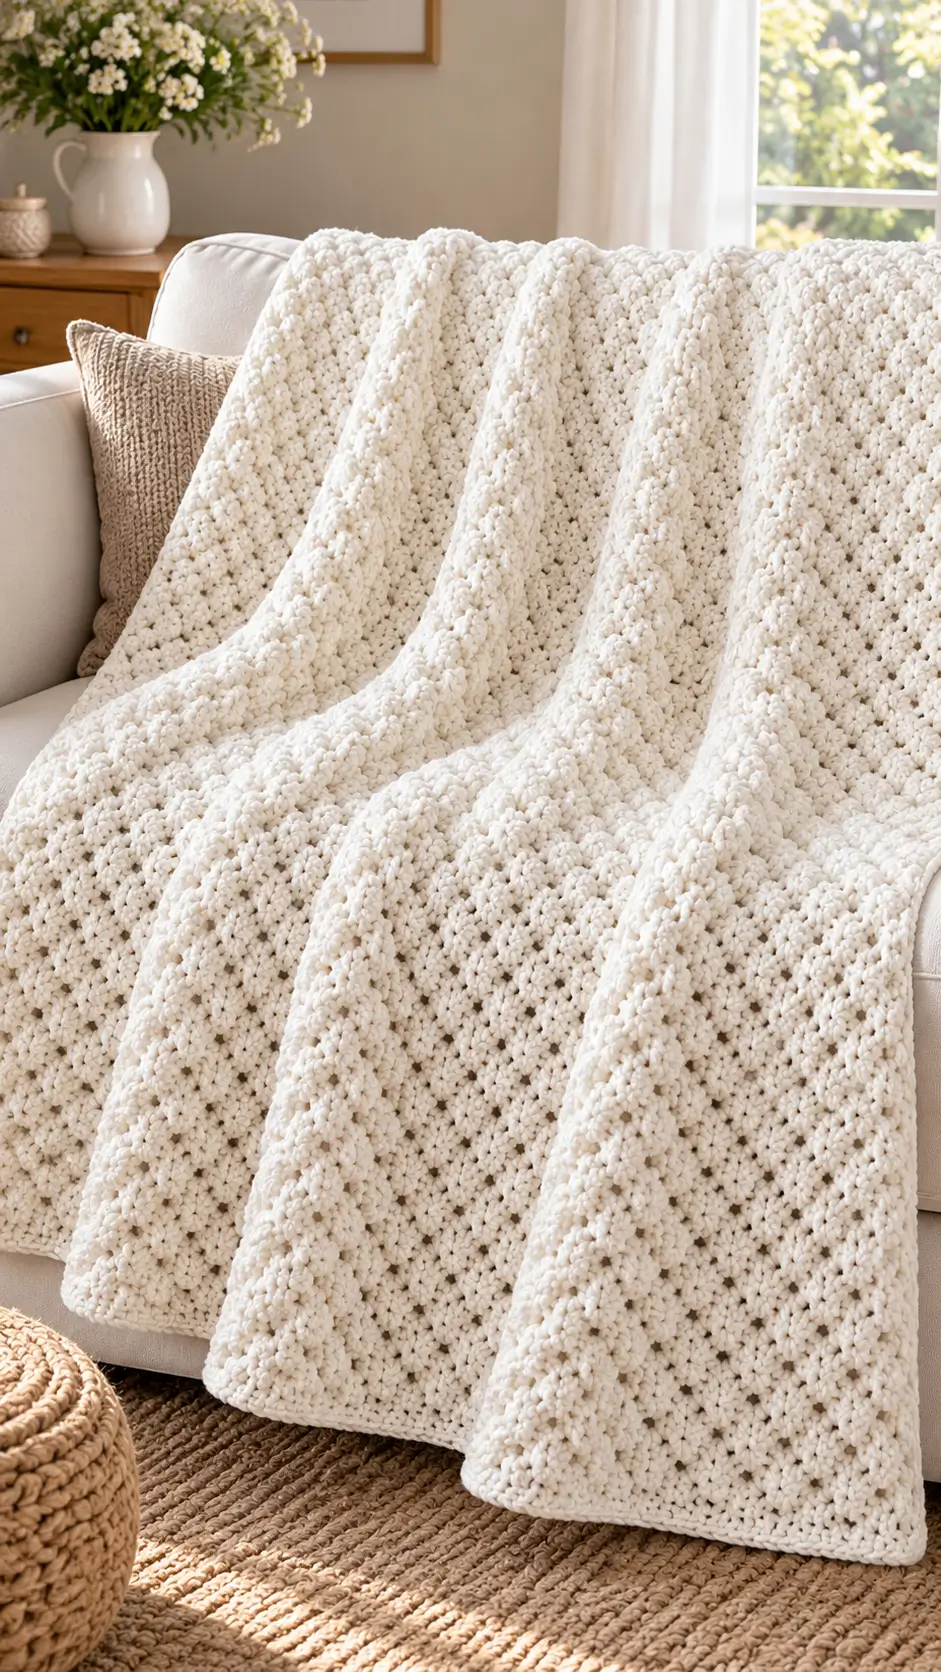
The ivory throw in the reference photograph gets its distinctive surface from closely spaced raised stitch clusters rather than cables or color changes. This chunky crochet blanket pattern recreates that structural effect with super bulky yarn, an 8 mm starting hook, and a repeating three-stitch sequence. Designed for confident beginners, the proposed 130 × 160 cm throw uses flat rows and a narrow border. Its single-color construction also makes row counting and resizing easier.
The Design: What Makes This Textured Ivory Blanket Different
Three construction decisions define this textured crochet throw. First, clusters combine one single crochet, one half double crochet, and one double crochet. Their different heights form a raised surface without requiring post stitches or complex cables.
Second, each cluster occupies one insertion point while two neighboring stitches are skipped. This balances the stitch count and creates small openings between the raised groups. The fabric stays flexible instead of becoming an overly rigid panel.
Third, a single-crochet foundation and finishing row frame the bulky yarn crochet blanket before its narrow perimeter border is added. These flatter edges help control the shape of the finished rectangle.
A common mistake is placing a new cluster into the tallest stitch of the previous group rather than its single crochet. That shifts the texture sideways and gradually distorts the edges.
Project Info at a Glance
| Detail | Specification |
|---|---|
| Skill Level | Confident beginner |
| Estimated Time | 18–28 hours, untested |
| Target Finished Size | 130 × 160 cm |
| Crochet Hook | 8 mm, adjustable |
| Yarn Weight | Super bulky, category 6 |
| Construction | Flat, turned rows |
| Stitch Pattern | Three-stitch cluster repeat |
| Best For | Sofa throws and home décor |
| Terminology | US crochet terms |
The finished size and time are planning targets. Actual results depend on measured gauge and working speed.
Materials and Tools
Yarn
- Warm ivory or cream: Super bulky weight 6, provisional 1,500–1,900 g. Suggested yarn: Bernat Softee Chunky or comparable yarn.
- Accent yarn: None required.
- Optional swatch yarn: Approximately 50–100 g from the main yarn supply, reusable if unraveled.
Bernat Softee Chunky is a 100% acrylic yarn sold in 100 g balls containing approximately 108 yards each. Its recommended crochet hook size is 8 mm.
The provisional purchase budget corresponds to approximately 15–19 balls of that specification. This is not a measured consumption figure for the new design. Calculate the final requirement from your swatch before buying a full quantity.
Tools
- 8 mm crochet hook, with 7 mm and 9 mm alternatives if gauge adjustment is needed.
- Tapestry needle with a large eye for weaving bulky yarn ends.
- Locking stitch markers for identifying the first and last stitch.
- Measuring tape for checking gauge and dimensions.
- Scissors for cutting yarn.
- Digital kitchen scale for estimating yarn consumption from a sample.
Choosing the Right Yarn
The photographed blanket has a thick, softly defined surface. A smooth or moderately twisted super bulky yarn will make the individual clusters more visible than highly fuzzy yarn.
Acrylic is a practical choice for a frequently used throw because many acrylic blanket yarns are machine washable. Follow the actual ball-band care instructions, especially when substituting polyester chenille or wool blends.
Keep the entire project within one dye lot where possible. Even cream and ivory shades can differ noticeably between production batches.
Crochet Abbreviations
| Abbreviation | Meaning |
|---|---|
| ch | Chain |
| sc | Single crochet |
| hdc | Half double crochet |
| dc | Double crochet |
| sl st | Slip stitch |
| st / sts | Stitch / stitches |
| sk | Skip |
| rep | Repeat |
| RS | Right side |
| WS | Wrong side |
| BLO | Back loop only |
| inc | Increase |
| dec | Decrease |
The invisible decrease is normally worked through the front loops of two adjacent stitches, but it is not required in this flat blanket pattern.
Understanding the Textured Cluster Stitch
The main stitch group consists of:
(1 sc, 1 hdc, 1 dc) worked into the same stitch.
After completing the group, skip two stitches before making the next cluster.
Each group produces three new stitches while consuming three positions from the previous row: one worked position and two skipped positions.
This preserves the row’s overall stitch count.
Unlike a puff stitch, the three stitches are completed separately. There is no need to hold multiple unfinished stitches on the hook.
Free Chunky Crochet Blanket Pattern – Step by Step
Before You Begin: Gauge Swatch
Make a foundation chain of 23 stitches.
Work the first three pattern rows described below, then continue the cluster row until the swatch measures at least 15 cm high.
Lay the sample flat without stretching it. Measure a central 10 cm section horizontally and vertically.
For the planning calculations in this article, use an illustrative gauge of 9 stitches and 8 rows per 10 cm. This has not been tested with the specified yarn and stitch combination.
If your gauge differs, resize the foundation and row count rather than assuming the stated measurements will be exact.
Foundation Chain
Yarn: Warm ivory, super bulky weight 6.
For the proposed full-size throw:
Ch 119.
This creates 118 working stitches after the first row, following the construction of the selected repeat.
Row 1 – Foundation
Work 1 sc into the second chain from the hook.
Continue making 1 sc in each remaining chain.
Row 1: 118 sc (118 sts).
Ch 1 and turn. The turning chain does not count as a stitch.
Count every stitch before proceeding. A missing foundation stitch will change the placement of the clusters in the next row.
Row 2 – Establish the Cluster Pattern
Work (1 sc, 1 hdc, 1 dc) into the first stitch.
Skip the next two stitches.
Repeat the cluster-and-skip sequence across the row, placing the last cluster at stitch 115.
Work 1 sc in the final stitch, stitch 118.
Row 2: 39 clusters plus 1 sc (118 sts).
Ch 1 and turn.
The first row of clusters will show a textured surface with small gaps between the groups.
Row 3 – Continue the Texture
Work (1 sc, 1 hdc, 1 dc) into the first single crochet of the previous row.
Skip the next two stitches.
Continue placing clusters into the single-crochet anchors of the preceding row.
Work 1 sc into the final single crochet.
Row 3: 39 clusters plus 1 sc (118 sts).
Ch 1 and turn.
Rows 4–126 – Repeat
Repeat Row 3 for each subsequent row.
Every row should contain:
- 39 complete clusters.
- 1 final single crochet.
- 118 total stitches.
After Row 126, measure the blanket.
At the illustrative gauge of eight rows per 10 cm, 126 rows correspond to approximately 157.5 cm before the final border. This is a calculation, not a measured sample.
If your blanket is shorter than the desired length, continue the same row repeat. If it is longer, stop at the nearest completed row.
Row 127 – Finishing Row
Ch 1 and turn.
Work 1 sc in every stitch across.
Row 127: 118 sc (118 sts).
Do not fasten off if you plan to make the border in the same color.
The finishing row creates a flatter top edge, making the perimeter border easier to work evenly.
How to Crochet the Blanket Border
The photographed blanket has a relatively narrow edge rather than a deep decorative frame.
A simple single-crochet border suits this construction because it adds definition without competing with the cluster texture.
Border Round 1
Ch 1.
Work 1 sc into each stitch across the top edge.
At the corner, work 3 sc into the corner position.
Continue down the side, distributing stitches evenly along the row ends. A useful starting approach is approximately one sc per row end, but the correct number depends on actual row height.
Work 3 sc into the next corner.
Crochet across the foundation edge, placing one sc in each foundation position.
Repeat the corner and side treatment until returning to the beginning.
Join with a slip stitch.
Do not rely on a fixed perimeter count unless the row-end pickup rate has been established from your gauge.
Border Round 2
Ch 1.
Work 1 sc in each stitch around the perimeter.
At each corner, place 3 sc into the center stitch of the previous corner group.
Join with a slip stitch.
Fasten off, leaving approximately 20 cm of yarn for weaving.
If the edge ripples, too many stitches may have been placed along the sides. If it pulls inward, the side pickup rate may be too low.
How to Adjust Your Crochet Blanket Size
The repeat is designed around a foundation of 3n + 2 chains, where n is the number of clusters.
The resulting working-stitch count is 3n + 1.
Use the following table as a starting guide. All measurements are based on the illustrative gauge of nine stitches and eight rows per 10 cm, not on a physically tested sample.
| Blanket Type | Target Size | Starting Chain | Approximate Rows |
|---|---|---|---|
| Small Lap Blanket | 90 × 110 cm | 83 | 88 |
| Medium Throw | 110 × 140 cm | 101 | 112 |
| Large Sofa Throw | 130 × 160 cm | 119 | 128 |
| Oversized Throw | 150 × 180 cm | 137 | 144 |
The table rounds the foundation to a valid repeat. Actual dimensions must be checked against a washed or relaxed swatch.
How Much Yarn Does a Chunky Crochet Blanket Need?
Yarn consumption is affected by fiber type, yarn thickness, stitch height, hook size, and personal tension.
A cluster stitch generally consumes more yarn than a plain single-crochet fabric of comparable area, because each group contains stitches of three different heights.
For this design, a provisional allowance of 1,500–1,900 g provides a planning range, but it is not a tested requirement.
A more reliable method is to make and weigh a sample.
- Crochet a sample of at least 20 × 20 cm using the intended yarn and hook.
- Measure its actual width and height in centimeters.
- Weigh the sample in grams.
- Divide the sample’s weight by its measured area.
- Multiply the result by the planned blanket area.
- Add an allowance for the border and spare yarn.
For example, a 20 × 20 cm sample weighing 35 g represents 400 cm² of fabric. A 130 × 160 cm blanket has an area of 20,800 cm².
Projected yarn weight: (35 ÷ 400) × 20,800 = 1,820 g.
Adding 10% would give approximately 2,002 g. This is an illustrative calculation, not a claim that the photographed blanket uses that amount.
Buy yarn based on your actual sample and the available ball size.
Assembly and Finishing
Although a blanket has no separate sewn components, finishing still follows a specific order.
- Complete the foundation and all textured rows.
- Check the stitch count across the final row.
- Work the single-crochet finishing row.
- Measure the width at three positions.
- Measure the length along both sides.
- Add the first perimeter border round.
- Inspect the corners for curling or excess fabric.
- Complete the second border round.
- Weave yarn ends through several changes of direction on the wrong side.
- Wash or relax the blanket according to its yarn-care label, then measure it again.
The finished blanket is a rectangular, single-color textured throw with a two-round single-crochet border.
7 Technical Tips for a Better Chunky Crochet Blanket
- Mark the first and last stitch. Losing one edge stitch changes the 118-stitch row count and can create a sloping side.
- Check every cluster anchor. Working into the hdc or dc instead of the sc shifts the repeat and changes the surface pattern.
- Keep foundation-chain tension loose. A chain substantially tighter than the first crochet row can pull the bottom edge inward.
- Measure the center of the fabric. Measuring a 10 cm gauge section near the border can distort the stitch and row readings.
- Check for excess border stitches. Rippling along the sides indicates that the pickup rate may be too high for the fabric’s row height.
- Use consistent tension with chenille substitutions. Pulling tightly on velvet-style yarn can compress its pile and obscure the cluster definition.
- Weave tails at least 15 cm through the fabric. Change direction several times so bulky yarn ends are less likely to work loose during laundering.
Common Crochet Blanket Problems and Fixes
Why Is My Blanket Curling?
Curling can result from a foundation chain that is too tight, an overly firm hook tension, or a border with too few stitches.
Compare the width at the foundation with the width several rows above. If the difference is substantial, remaking the foundation with a larger hook may be more effective than trying to stretch the edge.
Why Are the Clusters Uneven?
The most likely causes are inconsistent insertion points and changing yarn tension.
Check that each new cluster is placed into the single crochet from the previous row. Count the clusters periodically rather than waiting until the end of the blanket.
Can I Substitute Worsted-Weight Yarn?
Yes, but the fabric will be thinner and the finished dimensions will change.
Make a new gauge swatch, choose an appropriate hook, and recalculate the foundation chain and row count.
Can I Make the Blanket Without a Border?
Yes. The single-crochet foundation and finishing rows already frame the textured body.
However, the side edges may look less uniform without a perimeter round.
Is This Crochet Stitch Reversible?
Both sides have visible texture, but the raised groups will not look identical from front to back.
For a consistent presentation on a sofa, select the side with the preferred cluster definition as the visible surface.
Conclusion
This chunky crochet blanket pattern uses a repeating three-stitch cluster, a single-color fabric, and a narrow border to approximate the raised texture visible in the reference photograph. The proposed dimensions are 130 × 160 cm, but the finished measurement depends on yarn selection, gauge, and blocking. Before making the full throw, crochet a 20 × 20 cm sample, record its dimensions and weight, and calculate the required foundation and yarn quantity. Save the pattern to Pinterest for future reference, or share a finished project on Instagram using #IvoryClusterThrow. When working the ivory clusters, did you prefer the more pronounced texture of an 8 mm hook or a looser 9 mm hook?