Introduction
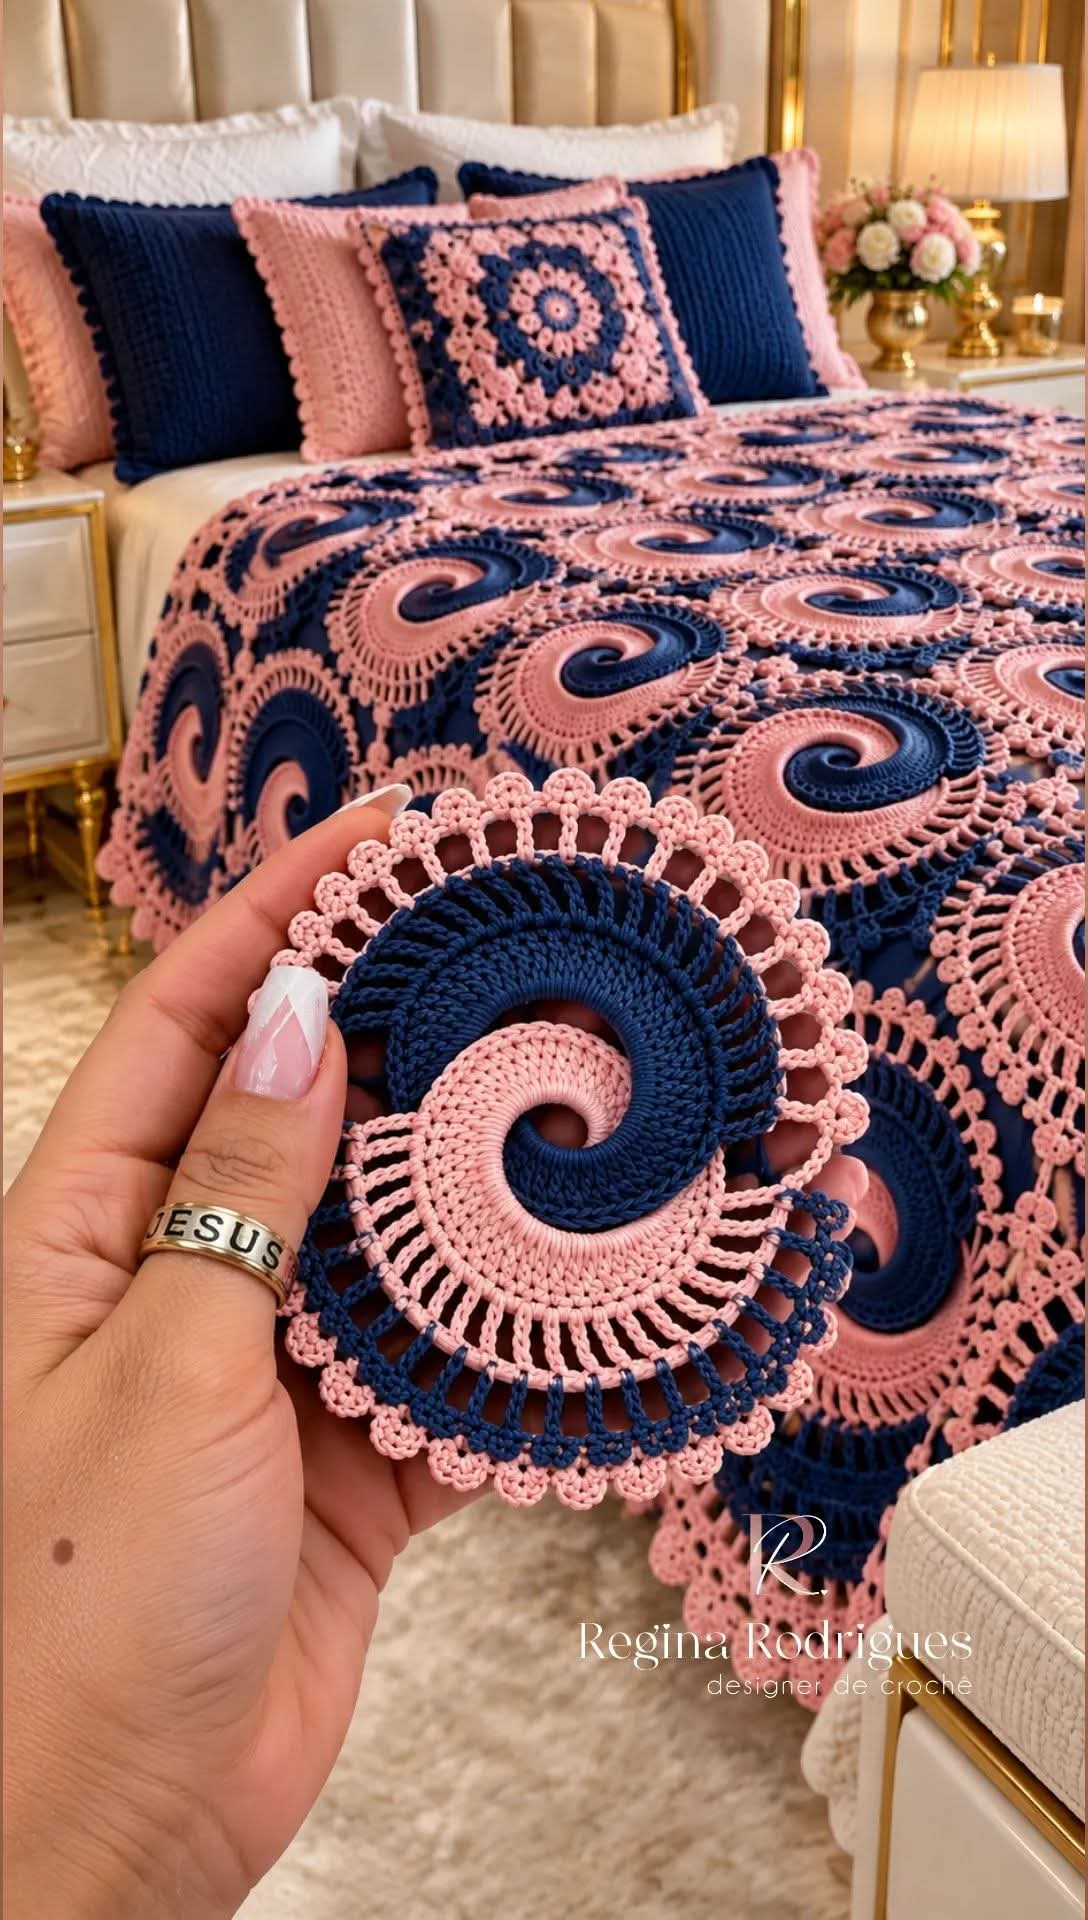
Two opposing curls must reach the center without closing its small eye, or this motif loses the wave-like geometry visible across the blanket. This spiral crochet motif pattern combines blush pink and deep navy sections with open spokes and a scalloped lace edge. Worked with DK yarn and a 4 mm hook, the modular medallions can be joined into a throw, bedspread, decorative runner, or coordinated pillow panel.
The Design: What Makes This Spiral Motif Different
The central structure is not made from ordinary concentric rounds. Pink and navy sections grow as opposing curved arms, producing an S-shaped division that remains visible from the center to the outer edge. A small central opening prevents the curl from becoming visually heavy.
Outside that dense spiral, tall stitches and chain spaces form an open transition ring. The final scalloped section increases the apparent diameter without adding the weight of another solid round. That combination makes the two-color crochet spiral practical for repeating across a bedspread.
The primary failure mode is cupping. Both spiral arms must expand at comparable rates; adding stitches too slowly pulls the medallion upward, while excessive increases create ripples. Make one blocked sample before producing the complete motif set.
Project Information
| Detail | Specification |
|---|---|
| Skill Level | Intermediate to Advanced |
| Construction | Two-color circular spiral with openwork edging |
| Suggested Yarn | DK / #3 |
| Suggested Hook | 4.0 mm |
| Colors | Deep navy and blush pink |
| Target Motif Diameter | Approx. 18–20 cm after blocking |
| Joining | Join-as-you-go or sewn lace junctions |
| Best For | Bedspreads, throws, pillows and decorative panels |
The 4 mm hook and DK yarn combination is supported by published spiral-crochet references. Crochet designer Renate Kirkpatrick lists DK yarn with 4 and 5 mm hooks for a spiral motif. Finished dimensions vary substantially: published spiral motifs range from approximately 7.6 cm in thread to about 9 cm with sport-weight cotton, so the larger 18–20 cm measurement above is a design target for this expanded lace-edged version rather than a published specification.
Materials and Tools
Yarn
- Deep navy DK yarn — approximately 12–16 g per motif
- Blush pink DK yarn — approximately 12–16 g per motif
These per-motif quantities are planning estimates, not published quantities for the photographed bedspread. Weigh one completed medallion before purchasing yarn for a bed-size project.
Tools
- 4.0 mm crochet hook
- Tapestry needle
- Scissors
- Locking stitch markers
- Flexible measuring tape
- Blocking mats
- Rustproof pins
Abbreviations
- ch — chain
- sc — single crochet
- hdc — half double crochet
- dc — double crochet
- tr — treble crochet
- sl st — slip stitch
- inc — increase
- st/sts — stitch/stitches
- sp — space
- BLO — back loop only
All instructions use US crochet terminology. Place a locking marker in the first stitch of each active spiral arm because the colors are worked without closing every section as a conventional round.
Two-Color Spiral Crochet Motif Pattern
Work with both colors attached. Do not cut the inactive color during the central spiral unless specifically stated.
Central Ring
Use blush pink.
Ch 12.
Join with a sl st to form a ring without twisting the chain.
The opening should remain visible after the spiral begins. If the center closes completely with your yarn, increase the foundation ring by 2 chains.
Pink Spiral Arm — Foundation
Working partly around the central ring:
Row 1: Ch 1, work 4 sc around the ring, 4 hdc around the ring, then 4 dc around the ring. (12)
Drop the pink loop without fastening off.
Place a locking marker through the loop.
Navy Spiral Arm — Foundation
Rotate the work 180 degrees.
Join navy yarn to the unused half of the central ring.
Row 1: Ch 1, work 4 sc, 4 hdc, and 4 dc around the remaining half of the ring. (12)
Drop the navy loop and mark it.
The two color sections should now curve away from opposite sides of the central opening.
Pink Spiral Arm — Second Pass
Return to the marked pink loop.
Row 2: Work 2 dc in the first stitch, dc in each of the next 2 stitches; repeat the increase approximately every third stitch while following the curved outside edge.
Continue until the pink arm reaches the beginning of the navy section.
Drop the loop.
The purpose of the increases is to widen the outside of the curve without widening its inner edge at the same rate.
Navy Spiral Arm — Second Pass
Return to navy.
Repeat the same expansion sequence used for pink.
Maintain matching stitch density in both colors.
Lay the motif flat after completing the navy pass.
The two sections should form a recognizable S-shaped spiral around the center opening.
Pink Spiral Arm — Third Pass
Pick up pink.
Work dc across the outer edge, increasing approximately every fourth stitch.
Near the inner curve, substitute hdc for dc where needed to maintain the tightening spiral.
Do not add increases along the tightest portion of the inner curve.
Drop the pink loop.
Navy Spiral Arm — Third Pass
Repeat the same shaping in navy.
Match the location and approximate number of increases used in the pink arm.
At this stage, measure from the center opening to the outside edge in four directions. A difference greater than approximately 5 mm indicates uneven expansion.
Fourth Spiral Pass
Continue each color separately.
Work mostly dc along the broad outside curves.
Add one increase approximately every fifth stitch.
Use hdc toward the inner curl where a shorter stitch is required.
Complete the pink pass first, drop the loop, then repeat the same shaping with navy.
Stop adding dense spiral rows when the central disc measures approximately 11–12 cm across.
Closing the Outer Spiral Circle
The two active sections must now transition into a complete circular perimeter.
With pink, continue across its outer section using dc stitches.
At the transition to navy, work a loose sl st into the corresponding navy edge.
Drop pink.
Pick up navy and continue around its section.
Join to the beginning of the outer perimeter.
Count the available stitches around the circumference.
If necessary, distribute a small number of increases evenly so the total is divisible by the number of planned openwork spokes.
First Openwork Ring
The reference motif changes abruptly from dense crochet to tall radial openings.
Continue with the color present on each half of the spiral.
Ch 4 to represent the first tr.
Work:
tr in next stitch, ch 2, skip 1 stitch.
Repeat around the circumference.
Maintain the pink section over the pink spiral and navy over the navy spiral.
Join carefully at both color transitions.
The openings should remain similar in width.
Second Openwork Ring
Work one sc into the top of the first tall stitch.
Ch 4.
Sc into the next tall-stitch group.
Repeat around.
This creates a ring of chain arches above the radial openings.
If the motif begins cupping, increase selected arches from ch 4 to ch 5. If it begins ruffling, shorten selected arches rather than forcing the motif flat during blocking.
Outer Lace Ring
The photographed medallion uses a decorative outer ring that is more elaborate than a plain circular border.
Into each ch-4 arch work:
(sc, ch 3, 2 dc, ch 3, sc)
Repeat around.
Keep the pink lace over the pink section and navy lace over the navy section if reproducing the split-color appearance.
For a more unified blanket, work the entire final ring in blush pink.
Picot Scalloped Edge
Use blush pink for the floral-looking perimeter shown prominently in the foreground motif.
Join pink yarn in any outer arch.
Work:
sc, ch 3, sl st into first ch, sc
into the first arch.
Move to the next arch and repeat.
Continue around the complete circumference.
The ch-3 loops form compact picots around the edge.
Fasten off and weave the tail through the back of several matching pink stitches.
Alternative Rounded Scallop
For a softer outer edge, replace the picot sequence with:
(sc, hdc, 3 dc, hdc, sc)
in each selected chain arch.
Use one method consistently across every motif intended for the same blanket.
Controlling the Spiral Shape
The center is the most technical section of this crochet spiral blanket motif. The outer curve needs more fabric than the inner curve. Uniform increases across both edges produce a circle with color blocks rather than a visible spiral.
Use taller stitches toward the expanding outer curve and shorter stitches toward the center curl. Published spiral methods use the same underlying principle: changes in stitch height and increases create the visual rotation.
Place the motif on a flat surface after every complete pink-and-navy pass. Correct a developing cup before continuing.
Why the Two Colors Should Stay Attached
Cutting the yarn after every short spiral section creates unnecessary tails and can introduce small changes in tension at each restart.
Instead, finish one color section, enlarge the active loop, and secure it with a locking marker.
Pick up the opposite color and work its corresponding section.
Return to the parked loop when required.
This alternating method keeps both spiral arms active and makes it easier to compare their growth.
Color Placement
The image uses a high-contrast combination of deep navy and blush pink.
For the closest visual balance:
- Deep navy — approximately half of each central spiral
- Blush pink — approximately half of each central spiral
- Blush pink — selected outer scallops and connecting lace
- Navy — selected joining arches for additional contrast
Keep the same direction of color rotation across most motifs if you want the bedspread to read as an organized repeat.
Alternating clockwise-looking and counterclockwise-looking arrangements creates a more complex surface but requires careful layout before joining.
Blocking One Spiral Motif
Block a sample before calculating the blanket.
Place the completed medallion on a blocking mat.
Pin opposite points first.
Measure the diameter.
Rotate the ruler 90 degrees and measure again.
The two measurements should differ by no more than approximately 5 mm.
Continue pinning around the circumference without stretching individual scallops excessively.
Target approximately 18–20 cm for this expanded DK version.
Allow the motif to dry completely before removing the pins.
How Many Motifs Are Needed?
Circular motifs do not cover the same area as square blocks because joining leaves open spaces between neighboring medallions. Make a four-motif sample panel before calculating a bedspread.
| Layout | Motifs | Use |
|---|---|---|
| 4 × 5 | 20 | Decorative panel or small throw |
| 6 × 8 | 48 | Medium throw |
| 8 × 10 | 80 | Large throw / small bed cover |
| 10 × 12 | 120 | Bed blanket |
| 12 × 14 | 168 | Large bedspread |
These are layout counts rather than guaranteed bed dimensions. Join four blocked motifs first and measure the resulting unit, including the lace space between medallions.
Joining Two Spiral Motifs
The photograph shows open connections rather than heavy seams. A chain-arch join preserves that negative space.
Place two blocked motifs side by side.
Mark three or four corresponding joining points on each edge.
Join blush pink yarn to the first marked arch.
Ch 3.
Remove the hook from the loop.
Insert the hook through the corresponding arch of the second motif and pull the loop through.
Ch 3 and anchor back into the next arch of the first motif.
Continue between corresponding points.
Keep all connecting chains the same length.
Four-Motif Junction
Four circular motifs create a larger opening where their edges meet.
Do not pull all four medallions directly into one tight stitch. That produces a hard center and can distort the circles.
Instead, connect the surrounding arches to form a small open ring.
Join yarn at the first motif.
Ch 3 and connect to the second motif.
Ch 3 and connect to the third.
Repeat for the fourth.
Join back to the first connection.
The resulting opening should remain flat and approximately symmetrical.
Optional Lace Filler Motif
For a denser bedspread, fill the opening between four spiral medallions.
Use blush pink.
Make an MR.
Round 1: Work 8 sc into the ring. (8)
Round 2: *Ch 5, skip 1 stitch, sc in next stitch.* Repeat four times.
Round 3: Into each ch-5 loop work (sc, ch 5, sc).
During Round 3, connect the tip of each new ch-5 loop to a corresponding arch on one of the four surrounding medallions.
Fasten off.
Matching Spiral Crochet Pillow
The bedroom image repeats the navy-and-pink palette on decorative pillows. A cushion panel can use a single large spiral medallion as its center or four smaller motifs arranged in a 2 × 2 configuration.
For a single-medallion pillow, enlarge the spiral with additional openwork rounds until it approaches the desired cushion width.
Then square the circle using four corner sections.
Squaring Round
Divide the outer circumference into four equal sections.
At each planned corner work:
(2 dc, 2 tr, ch 3, 2 tr, 2 dc)
Use dc and hdc between corners to gradually flatten the sides.
Repeat additional rounds until the panel reaches the required dimensions.
Simple Bedspread Border
Once all medallions and fillers are connected, work around the complete outside perimeter.
Border Round 1
Use navy.
Work sc evenly around the outside.
Use chain stitches to bridge deep gaps between medallions.
Border Round 2
Change to blush pink.
Work ch-5 arches around the perimeter, anchoring each arch with sc.
Border Round 3
Into each ch-5 arch work:
(sc, hdc, 5 dc, hdc, sc)
Repeat around.
Adjust the number of stitches at major corners so the edge remains flat.
Border Round 4
Work one small picot at the center of every shell:
ch 3, sl st into first ch.
Fasten off after completing the perimeter.
Assembly
- Crochet one complete navy-and-pink spiral medallion and block it to establish the working diameter.
- Record the diameter and finished weight before making additional motifs.
- Produce the required number of medallions while keeping the spiral direction and color placement consistent.
- Block every motif to the same diameter and check that the central openings remain similar.
- Arrange all motifs on a large flat surface before beginning the joins.
- Connect neighboring medallions with equal-length chain arches rather than tight solid seams.
- Form open four-motif junctions and add optional filler motifs where additional coverage is required.
- Join the completed motif sections into full blanket rows or panels.
- Work the navy-and-pink outer lace border around the assembled bedspread.
- Weave in all remaining tails and lightly block the joining network and perimeter.
The completed bedspread should lie flat with clearly visible opposing spirals, consistent central openings, evenly spaced lace connections, and an outer edge that does not pull the circular motifs out of shape.
7 Technical Tips for Spiral Crochet Motifs
- Mark both active color loops. Losing the working position by even one stitch can shift one spiral arm ahead of the other and break the S-shaped division.
- Check flatness after every two-color pass. A center rising more than about 1 cm from the work surface indicates insufficient expansion and should be corrected before another pass is added.
- Keep the center opening consistent. If one motif closes to 1 cm while another remains 2 cm wide, the difference becomes obvious across a repeated bedspread.
- Match both spiral radii. Measure from the center to four points around the dense disc; a difference greater than approximately 5 mm signals uneven shaping.
- Do not tighten parked yarn loops. Pulling an inactive color backward shortens its inner curve and can cause the center to twist.
- Block before joining. Joining an 18 cm motif directly to a 20 cm motif transfers the size difference into the lace connectors and produces irregular gaps.
- Weigh one finished medallion. Multiply that figure by the final motif count and add at least 15 percent for connecting lace, fillers, border rounds, and swatching.
Fixing a Cupped Spiral
A spiral that forms a shallow bowl does not have enough circumference around its outer edge.
First inspect the most recent dense round. Add increases at evenly distributed points rather than concentrating several increases in one section.
If the problem occurs in the openwork area, lengthen selected chain arches by one chain.
Do not depend on aggressive blocking to correct severe cupping. The tension normally returns after washing.
Fixing a Ruffled Spiral
Ruffling indicates excess circumference.
Reduce the frequency of increases on the next dense pass.
For lace rounds, shorten selected chain spaces or skip a planned decorative repeat where the excess begins.
Compare the corrected motif with the blocked master sample before continuing.
Yarn Planning for a Bedspread
Published spiral patterns use yarns ranging from lace thread to sport, DK, and medium weights, so a universal grams-per-motif figure is not reliable.
Use a digital scale instead. If one completed and blocked medallion weighs 30 g and the blanket requires 120 motifs, the medallions require approximately 3,600 g before joining and border yarn is included.
Separate color consumption can be calculated by weighing each yarn ball before and after one complete motif. Record the navy and pink usage independently, then multiply each result by the planned motif count.
Choosing Yarn for the Spiral Effect
High contrast makes the central S-curve easier to read. Navy and blush pink work because their values remain clearly separated even when the spiral arms narrow near the center.
Smooth yarn also displays the curved stitch lines more clearly than heavily fuzzy fibers.
Cotton provides strong stitch definition but can make a bed-size project heavy. Acrylic reduces weight and typically offers more elasticity through the joining network. A cotton-acrylic blend provides a middle option for a decorative coverlet.
Use the same yarn family for both colors. Two yarns with different thicknesses can cause one spiral arm to expand faster than the other even when the stitch counts match.
Conclusion
This spiral crochet motif pattern depends on balanced growth between two opposing color sections rather than ordinary concentric rounds. Make one navy-and-blush medallion first, block it, then record its diameter and weight before starting a full bedspread. Keep both working colors attached through the central spiral, compare their expansion after every pass, and add the openwork only after the dense disc lies flat. That sequence gives the repeating motifs consistent dimensions for lace joining.
Save the finished layout to Pinterest or share the bedspread on Instagram with #TwoColorSpiralCrochet. Before making the second motif, photograph the first one with its spiral direction marked. Would you keep every navy curl rotating the same way across the bed, or alternate the motif orientation from row to row?









