Introduction
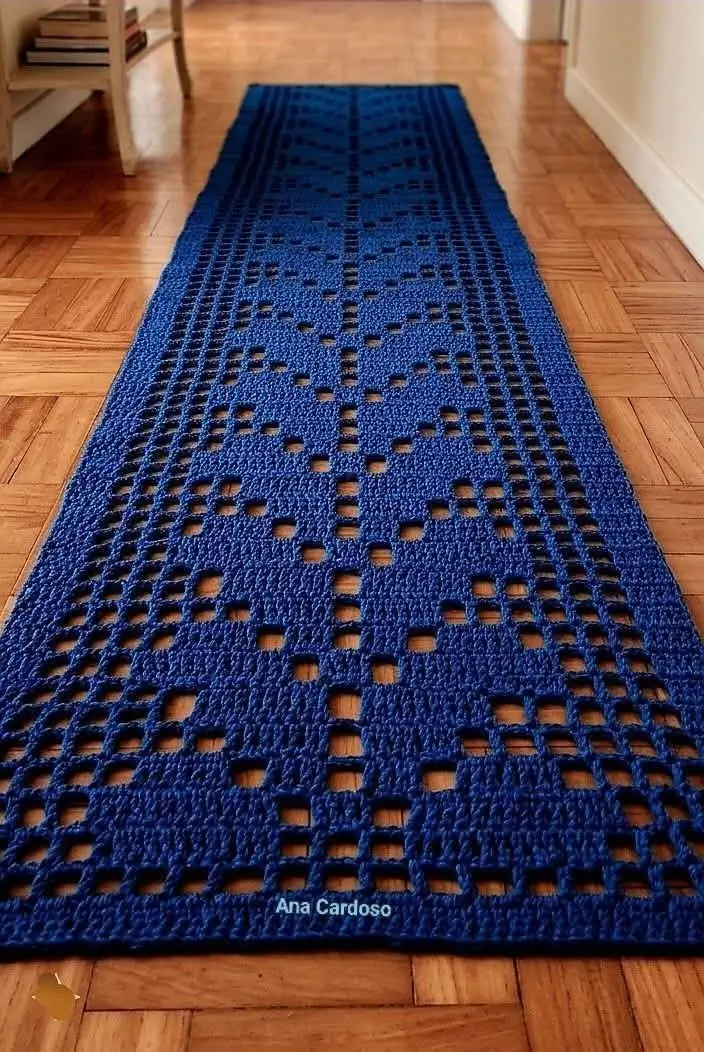
A series of open squares forms the diamond and cross motifs that distinguish this blue filet crochet runner pattern. The rectangular design combines solid crochet stitches with evenly spaced mesh openings to create a geometric floor covering. Made with sturdy cotton yarn and a suitable crochet hook, this intermediate-level project can be adapted to hallways, entryways, or narrow spaces. Its repeating construction also makes it practical to adjust the finished length.
The Design: What Makes This Crochet Runner Different
This geometric crochet rug uses a central sequence of diamond-like shapes framed by parallel columns of open mesh. The contrast between filled blocks and empty squares creates the design without changing yarn colors.
The central motifs are arranged along the length of the runner, giving the piece a continuous, symmetrical appearance. Multiple mesh columns near the edges form a decorative border, while the surrounding solid stitches provide visual definition.
For a crochet hallway runner, consistent mesh dimensions are particularly important. Uneven chain spaces can distort the geometric shapes and cause the sides to curve. A stable foundation, regular stitch height, and careful blocking help maintain the rectangular proportions.
The photograph provides visual inspiration, but the following instructions describe an original adaptable filet crochet construction rather than the original designer’s exact pattern.
Project Information
| Skill Level | Intermediate |
|---|---|
| Technique | Filet crochet |
| Construction | Flat rows |
| Suggested Hook | 4.0–5.0 mm, adjusted to yarn |
| Suggested Yarn | Firm cotton or cotton-blend yarn |
| Finished Size | Adjustable |
| Estimated Time | Varies with dimensions and stitch gauge |
Materials and Tools
Yarn
- Royal blue cotton yarn: Main color for the entire runner. Choose a firm yarn with good stitch definition.
- Optional matching yarn: Additional yarn for edging or reinforcing the border.
The required yarn quantity depends on the chosen width, length, yarn thickness, and number of solid mesh blocks. Make and weigh a gauge sample before estimating the total amount.
Tools
- Crochet hook: 4.0–5.0 mm as a starting range, or the size suitable for your yarn.
- Scissors: For trimming yarn ends.
- Tapestry needle: For weaving in loose ends.
- Stitch markers: For marking the first and last mesh columns.
- Measuring tape: For checking width and length.
- Blocking mats and pins: For shaping the completed runner.
- Non-slip rug underlay: Recommended when the runner is placed on a smooth floor.
Crochet Abbreviations
- ch: Chain
- sc: Single crochet
- dc: Double crochet
- sl st: Slip stitch
- st: Stitch
- sk: Skip
- rep: Repeat
- RS: Right side
- WS: Wrong side
Instructions use US crochet terminology.
Understanding Filet Crochet
Filet crochet creates patterns from a grid of open and filled squares. A chart usually represents each square with either an empty cell or a shaded cell.
Open Mesh
An open mesh square consists of a double crochet, two chain stitches, and two skipped stitches, followed by the next double crochet. Adjacent squares share their boundary stitches.
Solid Mesh
A filled mesh square replaces the two-chain opening with two double crochet stitches. Together with the shared boundary stitch, it occupies three stitch positions.
Reading a Filet Crochet Chart
Each chart cell corresponds to one mesh square. Right-side rows are generally read from right to left, while wrong-side rows are read from left to right. Work every row in the direction required by the chart.
Before starting the runner, crochet a sample containing both solid and open mesh. Compare the height and width of the squares. The sample should form an even grid rather than noticeably stretched rectangles.
Blue Filet Crochet Runner Pattern – Step by Step
Pattern note: The instructions below create an original open-mesh runner base with solid borders. The diamond and cross motifs visible in the photograph require a separately drafted, counted filet chart. They cannot be reproduced accurately from a generic mesh repeat alone.
Step 1: Determine the Width
Choose the number of filet squares across the runner. For this example, use 31 squares across the width.
The starting chain for the first open-mesh row is calculated as follows:
31 × 3 + 5 = 98 chains.
This includes the turning-chain allowance for a conventional filet crochet foundation.
Step 2: Crochet the Foundation
Row 1: Chain 98. Work 1 dc in the eighth chain from the hook. *Ch 2, skip 2 chains, 1 dc in the next chain.* Repeat from * to the end. (31 open mesh squares)
Count the squares before turning. The last double crochet must be placed correctly so that the foundation remains straight.
Step 3: Work the Mesh Base
Row 2: Ch 5 and turn. Skip the first open space, dc in the next dc. *Ch 2, dc in the next dc.* Repeat across. (31 open mesh squares)
Rows 3–6: Repeat Row 2. (31 open mesh squares per row)
These rows form a simple mesh foundation. Keep the chain spaces consistent and check that all 31 squares remain present.
Step 4: Add Solid Mesh Sections
To form a filled square above an open square, work 2 dc into the chain-2 space, followed by 1 dc into the next boundary stitch.
For a filled square above another filled square, work double crochet stitches into the corresponding stitches of the previous row.
Maintain the three-stitch width of each mesh square. Do not add extra boundary stitches between neighboring filled cells.
Step 5: Create the Geometric Motifs
Plan the decorative design on squared paper or a filet crochet chart. Use shaded cells for filled mesh and blank cells for open mesh.
For a symmetrical diamond, establish a central vertical axis. Increase the motif width by one square on each side over successive chart rows, then decrease it in the reverse order.
Place smaller geometric shapes between the main diamonds. Repeat the completed chart section until the runner reaches the required length.
Important: These are motif-design instructions, not an exact row-by-row chart for the photographed rug.
Step 6: Maintain the Side Borders
Keep an equal number of mesh squares on both sides of the central design. This preserves symmetry and helps prevent the decorative section from drifting toward one edge.
Count the mesh columns at regular intervals. If a square is accidentally added or omitted, correct the row before continuing.
Step 7: Complete the Final Rows
After finishing the last geometric repeat, work six additional rows of open mesh to balance the beginning of the runner.
Fasten off, leaving a yarn tail long enough to weave securely through several stitches.
How to Crochet the Border
A border helps define the rectangular shape and gives the runner a more finished appearance.
- Join the yarn at a corner of the runner.
- Work single crochet stitches evenly along the first long edge.
- At each corner, work three single crochet stitches into the corner area.
- Continue around all four sides, distributing stitches evenly along the row ends.
- Join the round with a slip stitch.
- For a wider border, work another round of single crochet, maintaining three stitches at each corner.
- Fasten off and weave in all yarn ends.
A tight border may pull the corners inward. Too many stitches can create rippling. Adjust the number of stitches along the row ends according to the actual fabric gauge.
How to Adjust the Runner Size
Adjusting the Width
Increase or decrease the number of filet squares in the foundation. Each additional square adds three foundation chains under the construction method used here.
For example, a 41-square runner begins with 128 chains when using the same foundation formula.
Adjusting the Length
Add complete motif repeats rather than stopping halfway through a diamond. This maintains the geometric rhythm and allows the final section to match the beginning.
Calculating Yarn Requirements
Make a representative sample that includes both solid and open mesh. Measure its area and weigh it. Divide the planned runner area by the sample area, then multiply by the sample weight.
Add approximately 10–15% extra yarn for borders, joins, and variation in tension. This is an estimate; heavily filled motif sections may require more yarn than open mesh sections.
7 Technical Tips for a Better Filet Crochet Runner
- Prevent missing mesh squares: Count all 31 mesh squares at the end of each row. Place stitch markers at the first and last boundary stitches.
- Control uneven stitch height: Compare the height and width of ten consecutive mesh squares. Change hook size or adjust double crochet height if the grid becomes distorted.
- Avoid curved edges: Check that the turning chain is the correct height for double crochet. An extra stitch at the edge can increase the width gradually.
- Correct distorted diamonds: Mark the center column of the chart before beginning each motif. A one-square shift can make the two sides visibly unequal.
- Prevent a wavy border: Distribute edge stitches according to the row height rather than placing a fixed number into every row end. Check the fabric on a flat surface before fastening off.
- Secure yarn tails: Weave each tail through several stitches, reverse direction, and weave again. Loose ends can emerge when a floor runner is washed or moved.
- Reduce slipping: Use a non-slip rug pad sized slightly smaller than the finished runner. Crochet fabric placed directly on polished wood or tile can move underfoot.
Blocking and Finishing
Blocking helps straighten the edges and define the open mesh pattern. Follow the care instructions for the selected yarn, particularly when working with cotton blends or synthetic fibers.
Lay the runner on a clean blocking surface and gently shape it into a rectangle. Measure the width at the beginning, center, and end to check for consistency.
Align the corners and allow the fabric to dry completely before removing the pins. Avoid overstretching the mesh, as this may enlarge the openings and alter the motif proportions.
Care Instructions
Wash the runner according to the yarn manufacturer’s instructions. A large crocheted rug can become heavy when wet, so support its weight when lifting it to prevent stretching.
Dry flat whenever practical. Avoid hanging a wet runner from one end, because its weight may distort the length and open mesh sections.
Inspect the border and woven-in yarn ends after washing. Repair loose stitches before returning the runner to the floor.
Conclusion
The blue filet crochet runner pattern uses open and filled mesh squares to create a rectangular decorative surface with repeating geometric motifs. Consistent stitch height, accurate mesh counts, and balanced side borders are the main construction requirements. Begin with a gauge sample, decide on the finished dimensions, and prepare a complete motif chart before working the full runner. Add a stable border and suitable non-slip backing when the finished piece will be used on a smooth floor.
Share your completed project on Pinterest or Instagram using #BlueFiletCrochetRunner. Which geometric detail would you repeat along the center: the large diamond motifs or the smaller cross-shaped openings?









