Introduction
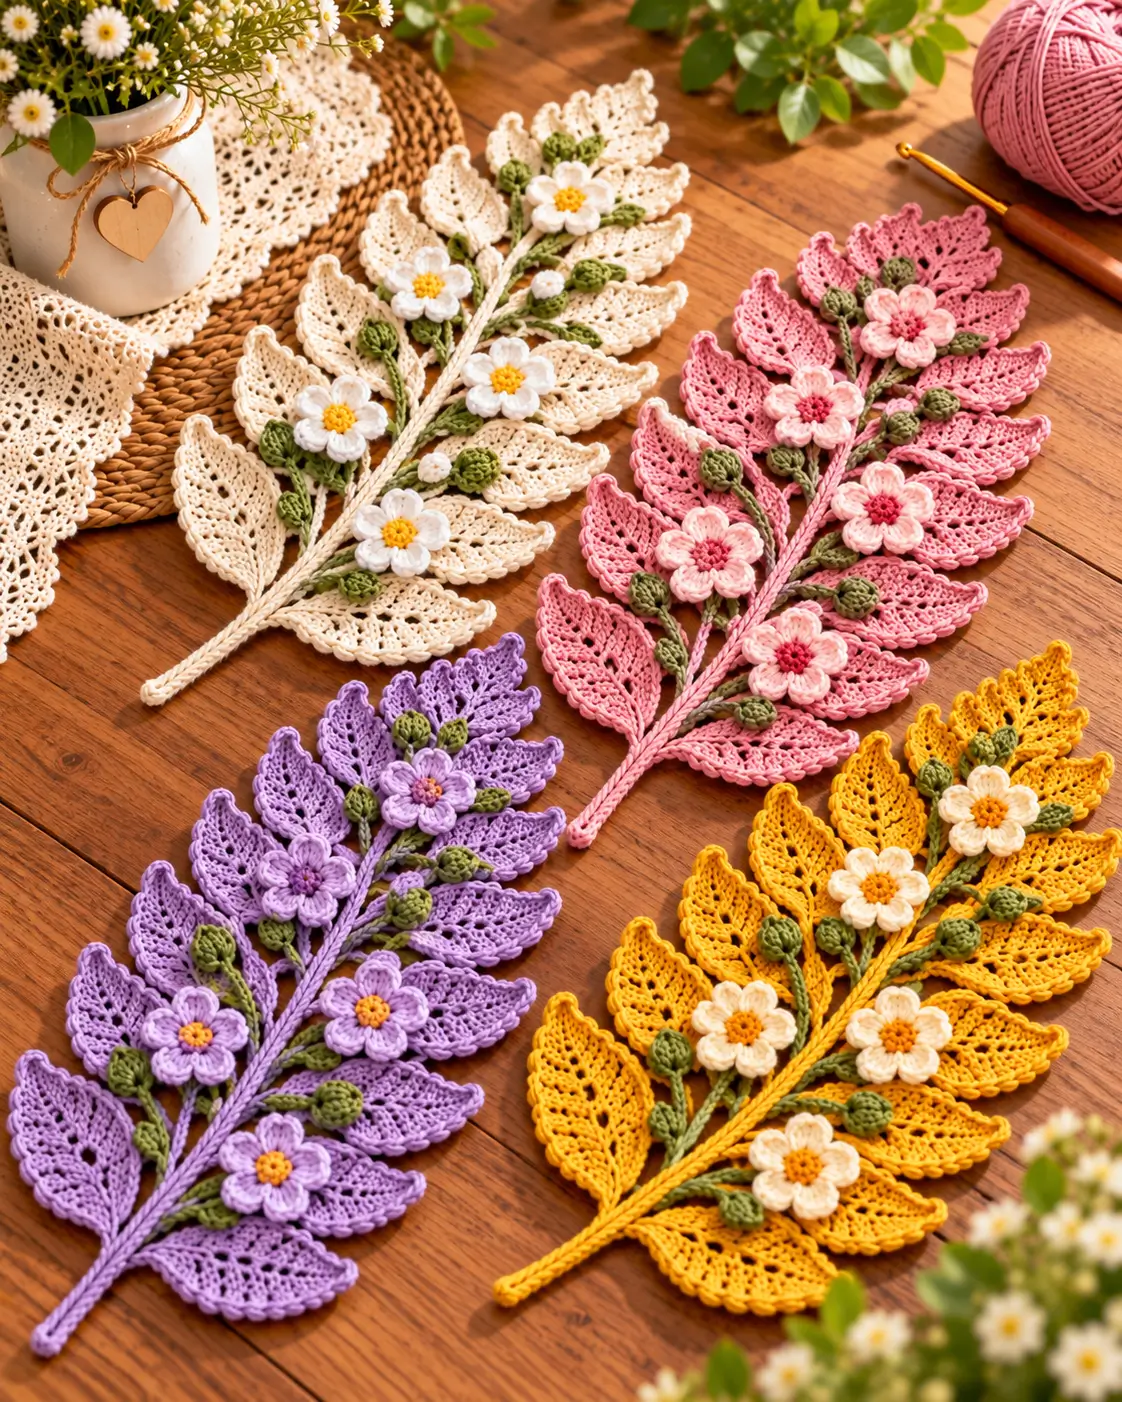
Each floral branch combines openwork leaves, five-petal blossoms, and clustered green buds along one tapered stem. This crochet floral branch pattern uses sport-weight cotton-blend yarn, a 2 mm hook, and separate motifs assembled into an estimated 25–30 cm decoration. The intermediate project develops lace shaping and accurate appliqué placement. Make one branch for a garment panel or combine four colors for a botanical wall arrangement.
The Design: What Makes These Floral Branches Different
The defining feature is the contrast between openwork foliage and raised flower centers. Each crochet lace leaf uses a central chain spine, graduated stitch heights, and small chain spaces to produce a pointed botanical outline. A narrow base reduces bulk where several leaves meet the main stem.
The five petal crochet flower uses separate petal groups around a compact center. This construction keeps the petals distinct while allowing the finished motif to sit slightly above the foliage. Small green buds fill spaces between larger leaves and prevent the composition from appearing empty.
A common mistake is attaching every leaf at the same angle. That creates a rigid, ladder-like arrangement. Alternating the leaf direction and adjusting branch lengths produces a more natural silhouette.
The design works best as a flat decoration with selected elements raised slightly from the surface.
Project Info at a Glance
| Project Detail | Specification |
|---|---|
| Skill Level | Intermediate |
| Estimated Time | 4–6 hours per branch |
| Finished Size | Approximately 25–30 cm (estimated) |
| Hook | 2.0 mm |
| Yarn | Sport / Fine #2 |
| Construction | Separate motifs, sewn assembly |
| Best For | Wall décor, garment appliqués, framed botanical art |
The time, size, and yarn quantities are planning estimates for this original image-inspired design. Actual results depend on yarn, tension, and blocking.
Materials and Tools
Yarn
Choose smooth cotton or cotton-blend yarn for defined stitches and openwork details. YarnArt Jeans is one suitable example of a cotton-acrylic yarn.
- Main leaf color — ivory, pink, lavender, or yellow: Sport-weight yarn, approximately 15–25 g.
- Flower petal color — white, pale pink, or lavender: Sport-weight yarn, approximately 5–8 g.
- Green — olive or moss: Sport-weight yarn, approximately 5–7 g.
- Flower center color — mustard, orange, or magenta: Sport-weight yarn, approximately 1–2 g.
- Stem color: Use the same yarn as the main leaves.
Tools
- 2.0 mm crochet hook
- Tapestry needle
- Small scissors
- Locking stitch markers
- Dressmaking pins
- Measuring tape
- Blocking mat
- Optional thin floral wire for decorative pieces that will not be handled by children
Safety eyes and stuffing are unnecessary for the flat components. A tiny amount of stuffing may be used inside the raised buds.
Crochet Abbreviations — US Terms
| Abbreviation | Meaning |
|---|---|
| MR | Magic Ring |
| ch | Chain |
| sc | Single Crochet |
| hdc | Half Double Crochet |
| dc | Double Crochet |
| tr | Treble Crochet |
| inc | Increase (2 sc in one stitch) |
| dec | Single Crochet Decrease |
| sl st | Slip Stitch |
| BLO | Back Loop Only |
| st / sts | Stitch / Stitches |
| sp | Space |
| FO | Fasten Off |
| rep | Repeat |
An invisible decrease works through the front loops of two adjacent stitches, reducing the visible ridge on small crocheted buds.
Pattern note: Stitch totals appear in parentheses. Turning chains and joining slip stitches do not count as stitches unless stated otherwise.
Free Crochet Floral Branch Pattern — Step by Step
The reference design includes four color combinations: ivory, dusty pink, lavender, and golden yellow. Crochet one complete branch before repeating the design in additional colors.
Part 1: Main Stem (Make 1)
Yarn: Main leaf color.
The main stem provides the structural center of the arrangement. Use a firm crocheted cord to support the attached motifs.
Row 1: Ch 81. Starting in the second chain from the hook, work 80 sl st along the chain (80).
Row 2: Ch 1, turn. Work 80 sc along the previous row (80).
Fasten off, leaving a 25 cm tail for assembly.
For a thicker stem, fold the cord lengthwise and sew the long edges together. Keep the seam on the reverse side.
Mark attachment points approximately every 2–3 cm. These marks help distribute the leaves, flowers, and side stems.
Part 2: Lace Leaves (Make 12)
Yarn: Ivory, dusty pink, lavender, or golden yellow.
These pointed leaves form the largest components of the branch. Each leaf is worked around a central foundation chain.
Round 1: Ch 15. Starting in the second chain from the hook, work:
- 1 sl st
- 2 sc
- 2 hdc
- 6 dc
- 2 hdc
- 1 sc
Work 3 sc in the final chain to turn around the tip.
Continue down the opposite side of the foundation chain:
- 1 sc
- 2 hdc
- 6 dc
- 2 hdc
- 2 sc
- 1 sl st
Round 2: Ch 1. Work 1 sc into each available stitch around the outer edge, placing 3 sc in the center stitch at the pointed tip. Join with a sl st.
Round 3 — Decorative Edge: Ch 3, skip one stitch, sl st in the next stitch. Repeat around the leaf edge, adjusting the final repeat as needed. At the pointed tip, work ch 3 and sl st into the same tip stitch.
Fasten off, leaving a 15 cm sewing tail.
This creates a scalloped leaf motif inspired by the photograph rather than an exact reproduction of its intricate lace structure. Test the first leaf and adjust the shaping before making the remaining eleven.
For a more open texture, selected double crochet stitches can be replaced with chain spaces. This modification changes the stitch count and should be tested on a sample leaf.
Block each finished leaf into a narrow oval with a pointed end.
Part 3: Five-Petal Flowers (Make 4)
Yarn: White, pale pink, or lavender.
Each flower consists of a compact circular center surrounded by five rounded petal groups.
Round 1: Work 6 sc in MR (6). Join with a sl st.
Round 2: Inc in each stitch (12). Join with a sl st.
Round 3 — Petals: Work the following sequence into each of five attachment points distributed around the center:
(sl st, ch 2, 2 dc, 1 tr, 2 dc, ch 2, sl st)
Work each petal group into its selected attachment point. Use slip stitches across intervening stitches to reach the next attachment point, distributing five petals as evenly as possible around the 12-stitch center.
Fasten off, leaving a 15 cm sewing tail.
For flatter petals, replace the treble crochet with a double crochet. For fuller petals, keep the treble stitch and lightly shape each petal with your fingers.
Use white flowers with mustard centers for the ivory branch, pale pink flowers with magenta centers for the pink branch, lavender flowers for the purple branch, and cream flowers with orange centers for the yellow branch.
Part 4: Raised Flower Centers (Make 4)
Yarn: Mustard, orange, magenta, or deep purple.
Round 1: 6 sc in MR (6).
Round 2: Inc ×6 (12).
Fasten off, leaving a 15 cm tail.
Position one disk over the middle of each five-petal flower and sew it securely in place.
For extra surface texture, add a few short embroidery stitches across the disk using matching yarn.
A slightly raised center creates separation between the flower and the surrounding lace leaves.
Part 5: Green Flower Buds (Make 8)
Yarn: Olive or moss green.
Work in continuous spiral rounds and mark the beginning of each round.
R1: 6 sc in MR (6)
R2: Inc ×6 (12)
R3: 12 sc (12)
R4: 12 sc (12)
R5: Dec ×6 (6)
Fasten off, leaving a 15 cm tail.
For a firm bud, insert a very small amount of stuffing before closing. For a softer, flatter appearance, leave it unstuffed.
Thread the yarn tail through the front loops of the six remaining stitches. Pull gently to close the opening.
Make eight buds, keeping their shapes consistent.
Part 6: Small White Buds (Make 2)
Yarn: White or cream.
R1: 6 sc in MR (6)
R2: Inc ×6 (12)
R3: 12 sc (12)
R4: Dec ×6 (6)
Fasten off, leaving a 12 cm sewing tail. Close the remaining opening.
These accents should appear slightly smaller than the green buds. A firmer tension or smaller hook can help reduce their finished size.
Part 7: Green Side Stems (Make 8)
Yarn: Olive green.
These short cords connect the flowers and buds to the main branch.
Row 1: Ch 13 (13 chains).
Row 2: Starting in the second chain from the hook, work 12 sl st (12).
Fasten off, leaving approximately 12 cm at each end for sewing.
For longer side branches, add four chains before working the slip stitches.
Position the side stems beneath the flowers and buds. Hide the ends behind the larger leaves wherever possible.
Part 8: Small Green Leaves (Make 4)
Yarn: Olive green.
These small accents fill narrow gaps between the larger leaves and buds.
Row 1: Ch 8. Starting in the second chain from the hook, work 1 sl st, 1 sc, 1 hdc, 1 dc, 1 hdc, 1 sc, 1 sl st (7).
Row 2: Ch 1, turn. Work 1 sc in each stitch (7).
Fasten off, leaving a 12 cm tail.
Place the small leaves beside the green buds with their pointed ends facing outward.
Part 9: Optional Decorative Accent Circles (Make 2)
Yarn: Flower petal color.
These small flat circles can fill open spaces beneath selected flowers.
R1: 6 sc in MR (6)
R2: Inc ×6 (12)
R3: (1 sc, inc) ×6 (18)
Fasten off, leaving a 12 cm tail.
Attach beneath two flowers if the arrangement needs additional coverage. Omit them for a lighter botanical appearance.
How to Assemble the Crochet Floral Branch
- Prepare the main stem. Lay the cord on a blocking mat with the narrow end pointing upward. Mark the centerline.
- Arrange the large leaves. Position six leaves on each side of the stem, alternating their angles and leaving a small gap near the base.
- Attach the leaves. Sew each leaf at its base using the remaining yarn tail. Keep the pointed tips free rather than stitching the entire leaf flat.
- Position the flowers. Place four five-petal flowers along the upper and middle sections. Use slightly uneven spacing for a natural silhouette.
- Sew the flower centers. Attach each raised disk securely to its flower, keeping the petal edges visible.
- Connect the side stems. Sew the green cords from the main stem toward the flowers and buds. Hide their ends beneath adjacent motifs.
- Attach the green buds. Position eight buds in pairs or small clusters between the leaves. Sew through their bases to preserve their rounded shape.
- Add small accents. Place the white buds and small green leaves in open spaces. Attach the optional circles if needed.
- Check the silhouette. Pin the branch flat and adjust the leaves until both sides appear balanced without being identical.
- Finish the reverse side. Weave each tail through at least 3 cm of existing stitches, reverse direction once, trim the excess, and lightly block the completed branch.
The completed branch contains twelve large leaves, four flowers, eight green buds, two white buds, and a corded central stem.
7 Technical Tips for Better Crochet Floral Branches
- Mark the stem: Place a stitch marker every 10 stitches along the main cord. Missing a foundation stitch can shift the attachment layout and shorten the finished stem.
- Control bud stuffing: Keep stuffing inside the small bud cavity. Excess fiberfill makes a 12-stitch bud look spherical rather than oval.
- Use invisible decreases: Work through the front loops when closing the buds. A standard decrease may create a visible ridge across the six-stitch opening.
- Position flower centers accurately: Center each decorative disk over the original six-stitch ring. Off-center placement makes the five petals appear uneven.
- Avoid thick velvet yarn: Choose smooth yarn for the openwork leaves. Thick pile obscures the chain spaces and reduces the definition of pointed edges.
- Pin leaves before sewing: Position leaves approximately 30–45 degrees from the stem. Attaching every leaf at 90 degrees creates a stiff, ladder-like appearance.
- Secure yarn tails: Weave each tail through at least 3 cm of stitches and reverse direction. Short unsecured tails can loosen when the decoration is handled or mounted.
Four Color Combinations for Crochet Floral Branches
1. Ivory and White Floral Branch
Combine ivory lace leaves with white flowers, mustard-yellow centers, and olive-green buds. This palette emphasizes the openwork structure of the leaves and creates a light botanical appearance.
2. Dusty Pink Floral Branch
Use dusty rose leaves, pale pink petals, deep magenta centers, and moss-green buds. The difference between the petal and center colors makes each flower stand out against the surrounding foliage.
3. Lavender Floral Branch
Work the large leaves in lavender, then add light purple flowers with darker violet centers. Olive-green buds provide contrast without changing the main color family.
4. Golden Yellow Floral Branch
Combine golden-yellow leaves with cream flowers, orange centers, and dark green buds. The darker accents separate the small flowers from the surrounding yellow foliage.
Use the same yarn family and hook size for all four branches. Changes in yarn thickness can produce noticeable differences in the finished dimensions.
How to Use Your Finished Crochet Floral Branches
The finished floral appliqués can be arranged individually or combined into a coordinated four-piece collection. Their flexible construction allows the stems to follow curved or straight surfaces.
Framed Botanical Wall Art
Block each branch flat before mounting it on linen or another stable woven fabric. Arrange the branches diagonally and sew the main stems to the backing at several points.
Secure the leaves only at their bases to preserve the decorative openwork edges. A simple frame allows the raised flowers and buds to remain visible.
Clothing and Fabric Accessories
Attach a floral branch to a jacket panel, fabric tote, or decorative cushion cover. For washable items, omit floral wire and use a compatible cotton yarn.
Sew through the main stem and flower centers to reduce movement during use. Hand washing is preferable for heavily textured appliqués.
Table Decorations
Arrange several branches along a table runner or decorative fabric panel. Use flatter flowers and unstuffed buds when the finished piece needs to lie close to the surface.
Block the leaves gently and follow the yarn manufacturer’s care instructions when applying moisture or heat.
Four-Branch Wall Display
Mount ivory, pink, lavender, and yellow branches in parallel or arrange them in a fan shape. Repeating the same leaf and flower construction creates a coordinated display while allowing each colorway to remain distinct.
Conclusion
This crochet floral branch pattern combines separate lace leaves, five-petal flowers, raised centers, green buds, and a corded stem into one botanical decoration. Complete a single branch first, measure the finished result, and record the yarn consumption before repeating the design in additional colors. Blocking the leaves and pinning the components before assembly will help maintain the intended shape.
Save the pattern to Pinterest with a photograph of the finished branch. Share completed color variations on Instagram using #CrochetFloralBranch and include the yarn weight and hook size in the caption.
Which leaf color produces the clearest contrast with the small olive-green buds: ivory, pink, lavender, or golden yellow?









