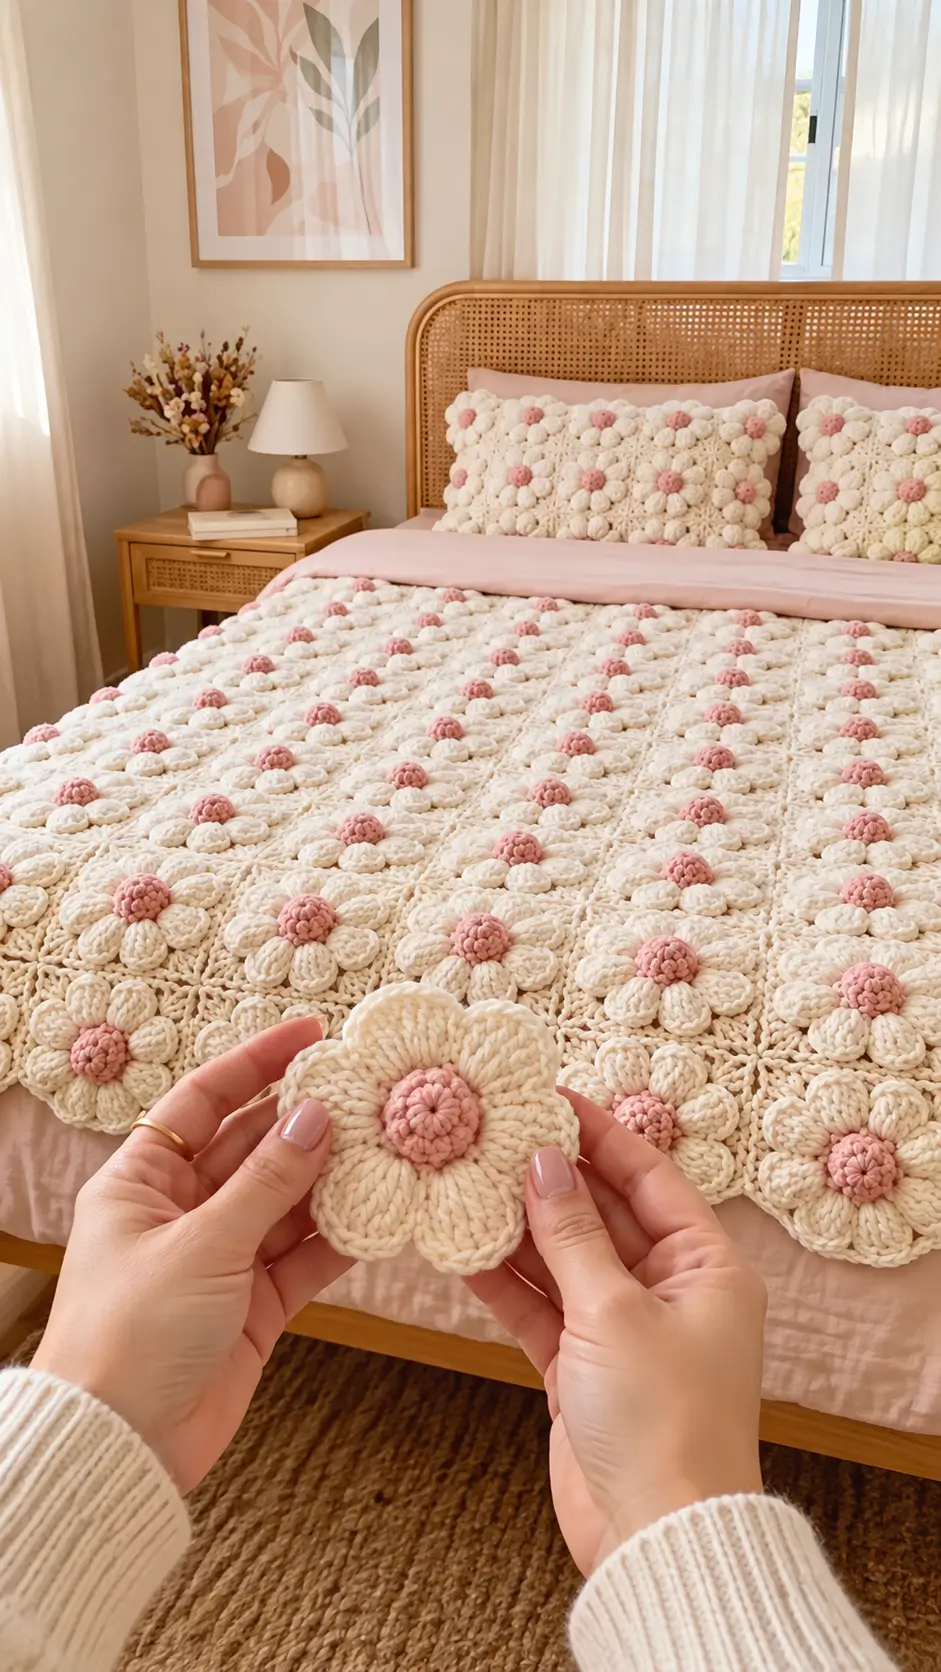
Eight rounded ivory petals surround each dusty pink center in this 3D daisy crochet blanket pattern, creating a repeating floral surface rather than a flat granny-square design. The proposed blanket uses worsted-weight yarn, a 5 mm crochet hook, and approximately 80 individual flowers. Suitable for intermediate crocheters, the modular construction makes it possible to adjust the dimensions for a throw, bed covering, or coordinated pillow set.
The Design: What Makes This Daisy Blanket Different
The defining feature is the contrast between the raised flower centers and the rounded petals. Each center is built as a small stuffed dome, while the surrounding petals are worked separately to maintain their shape.
The second structural decision concerns the arrangement. A regular grid of flowers gives the chunky crochet flower blanket consistent spacing and allows additional rows to be added without changing the motif instructions.
Third, the petals are joined from the back rather than sewn together across their visible surfaces. This preserves the relief of the raised petal crochet blanket.
A common construction error is pulling the joining stitches too tightly. When that happens, the petals fold inward and the blanket develops an uneven surface. Check motif spacing before completing each row. The finished fabric must remain flexible enough to drape over the edge of a bed.
Project Info at a Glance
| Project Detail | Specification |
|---|---|
| Skill Level | Intermediate |
| Estimated Time | 35–55 hours |
| Target Finished Size | 120 × 150 cm (47 × 59 inches) |
| Crochet Hook | 5.0 mm (H/8) |
| Yarn Weight | Worsted / Medium #4 |
| Construction | Individual dimensional flower motifs |
| Estimated Flowers | 80 |
| Best For | Decorative throws, bed coverings, and matching cushions |
Note: Finished dimensions, time, and yarn consumption are planning estimates. The original pattern interpretation has not been physically sample-tested.
Materials and Tools
Yarn
For the pink and cream crochet blanket shown in the reference, choose two solid colors with similar yarn thickness and fiber composition.
- Warm ivory yarn: Worsted / Medium #4, approximately 1,800–2,200 g. Suggested yarn: Paintbox Yarns Simply Aran.
- Dusty pink yarn: Worsted / Medium #4, approximately 250–400 g. Suggested yarn: Paintbox Yarns Simply Aran.
- Ivory joining yarn: Taken from the main yarn allowance.
- Polyester fiberfill: A small amount for the raised pink flower centers.
These yarn quantities are purchasing estimates rather than measured consumption. Crochet one complete sample flower and weigh the yarn used in each color before purchasing the full amount.
For a closer visual match to the photograph, bulkier yarn may be preferable. Changing yarn weight affects motif size, drape, hook requirements, and the number of flowers needed.
Tools
- 5.0 mm crochet hook
- Tapestry needle with a large eye
- Locking stitch markers
- Sharp scissors
- Measuring tape
- Blocking mats and rust-resistant pins
- Digital kitchen scale accurate to at least 1 g
- Optional polyester stuffing for the raised centers
Crochet Abbreviations
| Abbreviation | Meaning |
|---|---|
| MR | Magic Ring |
| sc | Single Crochet |
| inc | Increase: 2 sc in the same stitch |
| dec | Single Crochet Decrease |
| sl st | Slip Stitch |
| ch | Chain |
| BLO | Back Loop Only |
| hdc | Half Double Crochet |
| dc | Double Crochet |
| tr | Treble Crochet |
| st / sts | Stitch / Stitches |
| FO | Fasten Off |
All instructions use US crochet terminology.
For an invisible decrease, insert the hook through the front loops of the next two stitches, yarn over, pull through both front loops, then yarn over and pull through the remaining loops.
3D Daisy Crochet Blanket Pattern – Step by Step
The design uses individual flowers joined into a flexible rectangular blanket. The central dome is worked in continuous rounds, while the flower base is worked in joined rounds.
Pattern note: These instructions are an original, mathematically checked construction draft inspired by the reference photograph. They have not been physically tested. Make one sample flower before starting the full blanket.
Part 1: Raised Pink Flower Center (Make 80)
Yarn: Dusty pink
The flower center forms a shallow rounded dome. A compact center creates definition between the pink surface and the surrounding ivory petals.
R1: 6 sc in MR (6)
R2: inc × 6 (12)
R3: (1 sc, inc) × 6 (18)
R4: (2 sc, inc) × 6 (24)
R5: (3 sc, inc) × 6 (30)
R6: (4 sc, inc) × 6 (36)
R7: sc in each st around (36)
R8: sc in each st around (36)
R9: (4 sc, dec) × 6 (30)
R10: (3 sc, dec) × 6 (24)
Add a small quantity of fiberfill before closing. Keep the center shallow rather than forming a firm sphere.
R11: (2 sc, dec) × 6 (18)
R12: (1 sc, dec) × 6 (12)
R13: dec × 6 (6)
Fasten off, leaving a 20 cm tail. Thread the tail through the front loops of the final six stitches and draw the opening closed.
Flatten the underside slightly with your fingers.
Part 2: Ivory Flower Base (Make 80)
Yarn: Warm ivory
This flat circular foundation supports the petals and provides a sewing surface for the pink center.
R1: 6 sc in MR (6)
R2: inc × 6 (12)
R3: (1 sc, inc) × 6 (18)
R4: (2 sc, inc) × 6 (24)
R5: (3 sc, inc) × 6 (30)
R6: (4 sc, inc) × 6 (36)
R7: (5 sc, inc) × 6 (42)
R8: (6 sc, inc) × 6 (48)
R9: sc in each st around (48)
R10: sc in each st around (48)
Join with a slip stitch. Fasten off, leaving a 25 cm sewing tail.
Mark every sixth stitch along the final round. These eight positions divide the flower into equal petal sections.
Do not stuff the ivory base. It must remain flat enough to support the petal ring.
Part 3: Rounded Ivory Petals (Make 8 Per Flower)
Yarn: Warm ivory
Total: 640 petals for an 80-flower blanket.
Each petal is a small oval-shaped piece. The wider end faces outward, while the narrower foundation edge is attached to the flower base.
R1: 6 sc in MR (6)
R2: inc × 6 (12)
R3: (1 sc, inc) × 6 (18)
R4: sc in each st around (18)
R5: sc in each st around (18)
R6: (1 sc, dec) × 6 (12)
R7: sc in each st around (12)
R8: dec × 6 (6)
Flatten the petal without stuffing. Fasten off, leaving a 20 cm tail.
Sew the flattened narrow end to one marked six-stitch section of the ivory base. Repeat until eight petals surround the center.
The petals should overlap slightly at their lower edges. Avoid stitching across their rounded outer tips.
Check the petal attachment width on your sample motif before making all 640 petals. The single-crochet petals will not reproduce the exact ribbed appearance of the photographed flowers.
Part 4: Attaching the Pink Flower Center
Yarn: Use the remaining dusty pink yarn tail.
Place the completed pink center over the middle of the ivory base.
Check that all eight petals are visible around the center.
Thread the pink yarn tail through a tapestry needle. Sew the underside of the center to the base using small, evenly spaced stitches.
Catch only the underside of the pink center when possible so that the attachment stitches remain hidden.
Do not pull the sewing yarn tightly enough to distort the dome.
After completing the attachment, pass the needle through the center of the base and weave the remaining yarn through several stitches on the reverse.
The finished flower should lie reasonably flat on its back while retaining the raised pink center.
Part 5: Joining the Daisy Flowers
Yarn: Warm ivory
Method: Sewn petal-tip joins with additional reinforcement.
The reference blanket has a dense floral surface. A fully connected backing would be needed for a solid, gap-free bed covering. This joining method creates an openwork flower-motif blanket.
- Arrange the completed flowers in eight columns and ten rows.
- Place two flowers side by side, with their outer petal tips touching.
- Using ivory yarn, make three small whip stitches through the back loops at the first point of contact.
- Repeat at a second adjacent contact point to strengthen the connection.
- Continue across the row.
- Join the next row using the same method, attaching each new flower to the flowers directly above it.
- Where four flowers meet, check for open gaps.
- Fill these spaces with the small ivory connectors described below, if needed.
Keep the flowers facing upward during joining. Inspect the front after every five joins to check for twisted petals.
Part 6: Small Ivory Gap Connectors (Make as Needed)
Yarn: Warm ivory
Gap connectors reduce the openings between neighboring flowers and provide additional support at the intersections.
R1: 6 sc in MR (6)
R2: inc × 6 (12)
R3: (1 sc, inc) × 6 (18)
R4: (2 sc, inc) × 6 (24)
Join with a slip stitch.
Fasten off, leaving a 30 cm tail.
Position each connector behind a four-flower intersection. Sew its outer edge to the undersides of the surrounding petals at four evenly spaced points.
Use the same number of attachment stitches at each point.
If the connector pulls the petals inward, replace it with a larger circle or loosen the attachment stitches.
The number and size of connectors depend on the actual flower spacing.
Part 7: Blanket Edge Finishing
Yarn: Warm ivory
Because this blanket has a scalloped outline, a conventional rectangular border cannot be worked evenly without first creating a continuous edge.
For a flower-shaped edge, use the following finishing method.
- Attach the ivory yarn to the outer tip of a border petal.
- Work surface slip stitches through the back loops around the exposed petal edges.
- Place one slip stitch in each available edge stitch.
- At each junction between neighboring petals, continue into the next petal without tightening the connecting yarn.
- Repeat around the complete blanket perimeter.
- Fasten off and weave in the end.
This edge treatment reinforces the perimeter but does not convert the blanket into a straight-sided rectangle.
For a straight border, additional filler motifs and a separately developed foundation round are required.
Part 8: Matching Daisy Pillow Covers (Optional)
The reference photograph includes two pillows with the same cream-and-pink daisy texture.
To adapt the blanket motifs, make enough flowers to cover the front of a cushion insert.
A 45 × 45 cm insert is a practical starting size, but the number of flowers must be calculated from the measured sample motif.
- Join the flowers into a square front panel.
- Make a separate plain crochet back panel using ivory yarn.
- Work rows of single crochet until the back matches the dimensions of the floral front.
- Place both panels together with their wrong sides facing inward.
- Join three edges using single crochet stitches worked through corresponding edge positions.
- Insert the cushion.
- Close the final side with a removable seam or sewn closure.
For a washable pillow, an envelope-style backing is preferable to a permanently closed cover.
How Many Daisy Flowers Do You Need?
The exact number depends on the measured width and height of one joined motif.
| Blanket Size | Approximate Layout | Total Flowers |
|---|---|---|
| 90 × 120 cm | 6 × 8 | 48 |
| 120 × 150 cm | 8 × 10 | 80 |
| 150 × 180 cm | 10 × 12 | 120 |
| 180 × 210 cm | 12 × 14 | 168 |
These calculations assume a joined flower motif occupies approximately 15 × 15 cm. This gauge has not been verified for the proposed pattern.
For a more accurate calculation, divide the desired blanket width by the measured joined-motif width, rounding upward. Repeat for the blanket length, then multiply the number of columns by the number of rows.
Measure a joined sample rather than an isolated flower because petal overlap and joining tension affect the final dimensions.
How to Assemble Your 3D Daisy Crochet Blanket
- Complete one full sample flower and measure its width, height, and weight after blocking.
- Confirm the intended flower spacing and calculate the required number of motifs.
- Crochet the dusty pink centers, checking that the final dome shape remains consistent.
- Make the ivory circular bases and mark eight evenly spaced attachment sections on each.
- Crochet eight rounded petals for every base, then sew them into position.
- Attach each pink center to its completed ivory flower, hiding the sewing stitches underneath.
- Arrange the flowers on a flat surface in the planned column-and-row layout.
- Join adjacent petals from the reverse side, checking alignment after each completed row.
- Attach gap connectors where needed, then finish the exposed perimeter and make any matching pillow panels.
- Weave in all remaining ends, block the fabric to the intended shape, and record the finished dimensions.
The blanket is complete when the joined motifs lie evenly, the perimeter is secure, and no loose yarn tails remain.
7 Technical Tips for Better Results
- 1. Stitch marker placement: Losing the first stitch of a continuous round can shift the increase sequence and produce an uneven dome. Move a locking marker to the first stitch of every new round.
- 2. Stuffing firmness: Overfilled centers can become spherical instead of forming shallow raised buttons. Add stuffing in small amounts and stop when the center holds its shape without stretching the stitches.
- 3. Invisible decreases: Standard decreases may leave visible gaps on the pink flower centers. Use front-loop invisible decreases and check that the decrease rounds remain aligned.
- 4. Center placement: A center sewn more than 5 mm away from the middle of its base can make the petals appear uneven. Mark the center point before sewing and check the spacing from four opposite directions.
- 5. Chunky yarn tension: Tight stitches in bulky yarn can make the petals stiff and reduce the blanket’s drape. Make a sample with the intended hook and increase the hook size by 0.5 mm if the fabric is too rigid.
- 6. Pinning before joining: Joining flowers without checking their orientation can create diagonal rows or uneven gaps. Pin a complete row on a flat surface and compare its measured length with the previous row.
- 7. Tail weaving: Short yarn tails may work loose when a heavy blanket is handled or washed. Leave approximately 15–20 cm for sewing and weave the remaining tail through several changes of direction on the reverse.
Troubleshooting Common Daisy Blanket Problems
Why Are My Crochet Daisy Petals Curling Inward?
Petal curling can result from tight tension, insufficient stitch increases, or tight attachment to the center base.
Check the petal shape before sewing it to the flower. If the individual petal lies flat but curls after attachment, the problem is probably the sewing tension or the amount of overlap.
Why Are There Gaps Between the Flowers?
Circular motifs cannot completely fill a rectangular surface without additional joining structures.
Small connectors can reduce these spaces, but they will not necessarily create a fully closed fabric.
A solid blanket requires larger filler sections or a continuous backing layer.
Why Are Some Flowers Larger Than Others?
Changes in yarn tension, hook size, or yarn thickness can alter the finished diameter.
Measure several completed motifs. If the difference is greater than approximately 5 mm, adjust tension or hook choice before joining the complete blanket.
Can I Make This Blanket with Velvet Yarn?
Velvet yarn can create rounded, soft-looking flowers, but stitch definition is less visible than with standard plied yarn.
The proposed pattern would require a new gauge sample, especially for the small pink centers and their decreases.
Can I Wash a 3D Daisy Crochet Blanket?
Washing instructions depend on the fiber composition and care labels of the selected yarn.
For machine-washable acrylic yarn, use the manufacturer’s recommended washing method. Place delicate floral items inside a large mesh laundry bag when practical.
Dry the blanket according to the yarn label. Avoid hanging a heavy wet blanket because the weight may stretch the joining stitches.
Check the attachment points and raised flower centers after washing.
Is This Crochet Blanket Suitable for Babies?
A version intended for an infant requires additional safety considerations.
Avoid detachable or poorly secured decorations, loose stuffing, and large openings that could catch small fingers.
This proposed dimensional design is intended primarily as a decorative throw rather than an infant sleep blanket.
Conclusion
This 3D daisy crochet blanket pattern uses raised pink centers, individual ivory petals, and modular flower construction to create a textured floral covering. Before making the complete blanket, crochet one flower, measure its joined dimensions, and calculate the yarn consumption for the intended size. The proposed 80-flower layout can then be adjusted to fit a throw or larger bed covering. Matching cushion panels can be made with the same motifs.
Save the pattern to Pinterest and share your completed project on Instagram using #3DDaisyCrochetBlanket. When arranging the flowers, will you keep every dusty pink center the same shade or alternate several pink tones across the ivory background?









