Introduction
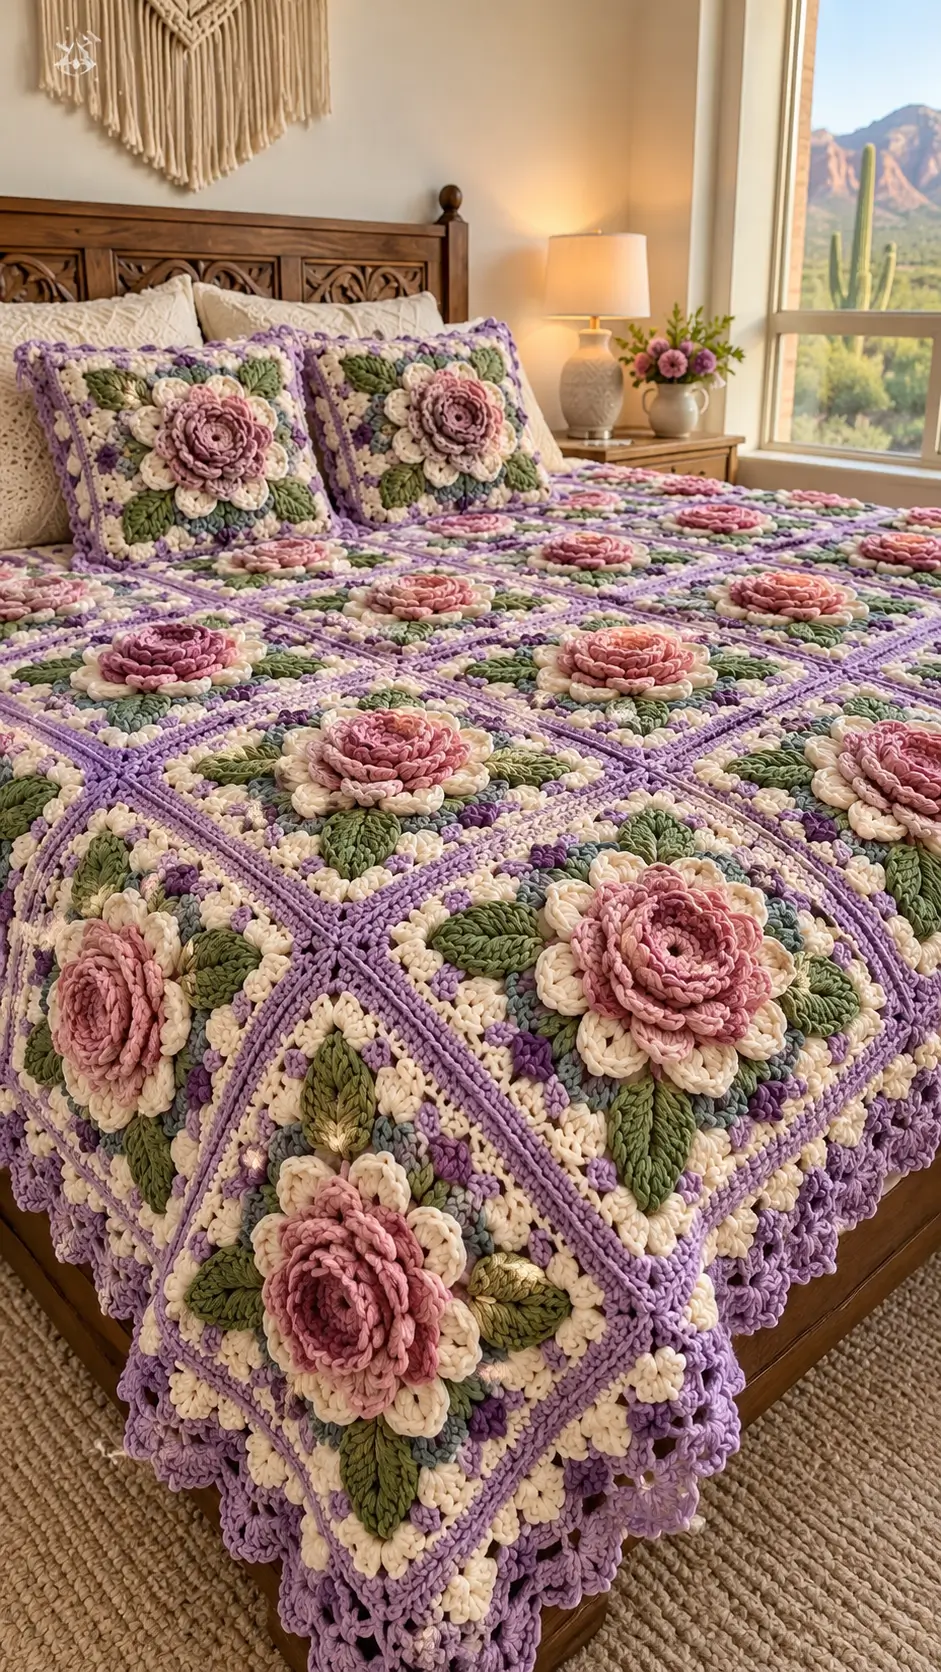
A rose this deep cannot be built as a flat flower and still reproduce the overlapping petals visible across the bedspread. This 3D rose granny square crochet blanket pattern uses layered dusty-pink roses, cream petals, olive leaves, ivory backgrounds, and lavender borders. Worked with DK yarn and a 4 mm hook, the modular construction can be expanded from a throw to a full bedspread and repeated for matching pillow covers.
The Design: What Makes This Rose Blanket Different
The central rose controls the proportions of every square. Small curled petals create the dense flower center, medium petals increase its diameter, and broader outer petals produce the open rose shape. Cream petals beneath the pink flower provide separation between the rose and green leaves.
Four olive leaves extend toward the corners of each 3D flower granny square. Their placement distributes the visual weight of the raised flower across the block instead of concentrating everything at its center.
Lavender borders perform a different job. They create a visible grid between the cream squares and provide a consistent joining line across the bedspread. The most common construction problem is attaching flowers before checking square dimensions. A bulky rose can distort an undersized base, so the square should be blocked before final assembly.
Project Information
| Detail | Specification |
|---|---|
| Skill Level | Intermediate |
| Technique | 3D crochet flowers and modular granny squares |
| Hook | 4.0 mm |
| Yarn | DK / light worsted |
| Square Size | Approx. 15 cm after blocking |
| Main Colors | Dusty pink, cream, olive, lavender and ivory |
| Construction | Individual floral squares joined into panels |
| Best For | Bedspread, blanket, throw and cushion covers |
A published 3D rose granny square measures 13 cm using DK yarn with 4–4.5 mm hooks. The 15 cm target here allows additional space for the leaves, cream background and lavender frame visible in the photographed design.
Materials and Tools
Yarn
- Dusty pink DK yarn — roses
- Cream DK yarn — outer flower petals and decorative clusters
- Olive green DK yarn — leaves
- Ivory DK yarn — square backgrounds
- Lavender DK yarn — square frames, joining and border
- Muted sage or blue-green DK yarn — optional background accents
For a bed-size project, yarn requirements should be calculated from a completed sample rather than estimated from the photograph. Crochet one full square, weave in its ends, weigh it, and multiply that figure by the required number of motifs. Add approximately 15–20 percent for joining and the outer border.
Tools
- 4.0 mm crochet hook
- Tapestry needle
- Scissors
- Locking stitch markers
- Measuring tape
- Blocking mats
- Rustproof pins
Abbreviations
- MR — magic ring
- ch — chain
- sc — single crochet
- hdc — half double crochet
- dc — double crochet
- tr — treble crochet
- inc — increase
- sl st — slip stitch
- st/sts — stitch/stitches
- sp — space
- FLO — front loop only
- BLO — back loop only
- RS — right side
- WS — wrong side
Keep the unused loops accessible when making the rose foundation because they provide attachment points for additional petal layers.
3D Rose Granny Square Crochet Pattern
Make one complete test block before beginning the full blanket. The finished sample establishes the actual square dimensions, flower height and yarn consumption.
Rose Center
Yarn: dusty pink.
Round 1: Make an MR. Work 8 sc into the ring. Pull closed and join with a sl st. (8)
Round 2: Ch 1. Work 2 sc in every stitch around. Join. (16)
Round 3: Working in BLO, sc in each stitch around. Join. (16)
Do not fasten off.
Inner Rose Petals
Turn the work so the unused front loops from Round 3 are accessible.
Working in the front loops:
Petal sequence: Sl st in next loop, ch 3, 2 dc in same loop, 2 dc in next loop, ch 3, sl st in next loop.
Repeat the petal sequence around the center.
The petals should overlap slightly rather than lying flat against the center.
Middle Rose Petals
Join dusty pink yarn behind the first petal layer.
Ch 4 and anchor with a sl st behind the next petal. Continue around to create a ring of ch-4 spaces.
Into each ch-4 space work:
(sc, hdc, 3 dc, hdc, sc)
Repeat around.
Push the first petal layer slightly forward while working. The middle petals should sit behind the inner petals rather than directly underneath them.
Large Outer Rose Petals
Create another foundation behind the middle petals using ch-5 spaces.
Into each ch-5 space work:
(sc, hdc, dc, 3 tr, dc, hdc, sc)
Repeat around and join.
Fasten off with a long tail.
The rose should now have three visibly separate petal levels: a tight center, medium petals and broad outer petals.
Cream Petal Layer
The photographed squares contain a cream floral layer underneath the pink rose. This lighter ring separates the rose from the green leaves.
Yarn: cream.
Join cream yarn behind the outer rose petals.
Create 8 evenly distributed ch-6 spaces around the flower.
Into each ch-6 space work:
(sc, hdc, 2 dc, 2 tr, 2 dc, hdc, sc)
Repeat eight times.
Fasten off.
Arrange the cream petals so their pointed centers remain visible between the pink rose and green leaves.
Crochet Leaves — Make 4 Per Square
Yarn: olive green.
Ch 10.
Starting in the second ch from hook:
Sl st in first ch, sc in next, hdc in next, dc in next 2, tr in next 2, dc in next, hdc in final ch.
Ch 2 at the tip.
Work down the opposite side of the foundation chain:
Hdc, dc, 2 tr, 2 dc, hdc, sc, sl st.
Fasten off with a 15 cm tail.
Make four leaves for each large flower square.
For more surface texture, work a line of loose surface slip stitches along the center foundation chain after the leaf is complete.
Arranging the Leaves
Place the four leaves behind the cream petal layer before attaching the flower to its square.
Position one leaf diagonally toward each corner.
The leaf tips should remain visible beyond the cream petals but should not extend into the final lavender border.
Pin all four leaves before sewing.
Attach only the lower third of each leaf. Leaving the upper section unattached preserves the raised botanical texture visible in the reference design.
Ivory Granny Square Background
Yarn: ivory.
The background is made separately so it can be blocked before the heavy flower is attached.
Round 1: MR. Ch 3, 2 dc in ring, ch 2; work (3 dc, ch 2) three more times. Join. Four 3-dc groups.
Round 2: Sl st to first corner. Work (3 dc, ch 2, 3 dc) in each corner, placing ch 1 between corner groups. Join.
Round 3: In each corner work (3 dc, ch 2, 3 dc). Work 3 dc in each side ch-1 space, placing ch 1 between groups.
Round 4: Continue the established granny-square sequence, adding one additional 3-dc group to each side.
Round 5: Repeat the established pattern.
Round 6: Repeat again, maintaining four ch-2 corners.
Measure the square.
Continue additional rounds if necessary until the block approaches 13–14 cm before the lavender frame is added.
Lavender Square Frame
Yarn: lavender.
Join lavender yarn in any corner.
Frame Round 1: Work the established granny-square pattern around the entire motif. In each corner work (3 dc, ch 2, 3 dc).
Frame Round 2: Ch 1 and sc around the entire square. Work (sc, ch 2, sc) in each corner.
Fasten off.
Block the square to approximately 15 × 15 cm.
Attaching the 3D Rose
Place the completed rose-and-leaf assembly in the center of the blocked ivory square.
Measure from the rose center to all four corners before sewing. The distances should match.
Thread the long cream or green yarn tails onto a tapestry needle.
Sew through the lower petal and leaf layers without passing through the upper pink petals.
Secure the center firmly.
Add several attachment points underneath the cream petals.
Do not sew the outer edges of the pink petals flat. Their free edges create the dimensional rose effect.
Small Purple Accent Clusters
Yarn: lavender or dark purple.
The reference image contains small purple details between the larger flowers and leaves.
Join yarn at a selected background stitch.
Work:
Ch 3, 2 dc together in same stitch, ch 1, sl st into same stitch.
Fasten off.
Place several clusters around each square, but keep their positions consistent from block to block.
How Many Squares Are Needed?
The required motif count depends on the finished square size and intended bed dimensions.
If each blocked square measures 15 cm, the following calculations provide useful starting points:
| Layout | Square Count | Approx. Motif Area |
|---|---|---|
| 8 × 10 | 80 squares | 120 × 150 cm |
| 10 × 12 | 120 squares | 150 × 180 cm |
| 12 × 14 | 168 squares | 180 × 210 cm |
| 12 × 16 | 192 squares | 180 × 240 cm |
These dimensions exclude the outer lace border.
A full bedspread with substantial side and foot overhang may require more motifs than a blanket designed to cover only the mattress surface.
Joining the Granny Squares
Block every square to the same dimensions before joining.
Arrange the blocks on a clean floor or large work surface and check the direction of the leaves and flowers.
Lavender Flat Join
Place two squares with right sides facing upward.
Join lavender yarn at one corner.
Insert the hook through the corresponding edge loops of both squares and work a slip stitch.
Continue across the complete edge.
Keep the slip stitches relaxed.
Join all squares into horizontal rows first, then connect the completed rows.
The lavender joining lines should form a continuous geometric grid across the bedspread.
Matching 3D Rose Pillow Covers
The photographed set repeats the same rose construction on square decorative pillows.
For a 45 cm cushion using 15 cm motifs, make nine squares and arrange them in a 3 × 3 grid.
Join the nine squares with lavender yarn using the same method as the bedspread.
Pillow Front
Make:
- 9 complete rose granny squares
- 3 squares across
- 3 squares down
The assembled panel should measure approximately 45 × 45 cm before any additional edging.
Pillow Back
A fabric backing keeps the reverse side relatively flat and reduces yarn consumption.
Alternatively, crochet two plain overlapping rectangular panels to create an envelope closure.
Attach the back around the outside of the floral panel while leaving the envelope opening free.
Large Crochet Bedspread Border
The photographed bedspread uses a substantial lavender lace border. A deeper edge balances the visual weight of the raised roses.
Border Round 1
With lavender yarn, work sc evenly around the entire blanket.
At each corner work:
(sc, ch 2, sc)
Border Round 2
Ch 3 and dc in each stitch around.
At each corner work:
(2 dc, ch 3, 2 dc)
Border Round 3
Ch 5, skip 2 stitches and sc in the next stitch.
Repeat around.
At each corner work a ch-7 loop instead of ch 5.
Border Round 4
Work:
(sc, ch 5, sc)
into each chain loop.
Continue around the entire blanket.
Border Round 5
Into each ch-5 loop work:
(sc, hdc, 5 dc, hdc, sc)
This produces the first scalloped layer.
Border Round 6
Join lavender yarn behind the previous shells.
Work ch-5 loops between the scallops.
Into every second loop work:
(sc, hdc, 7 dc, hdc, sc)
Distribute the larger shells evenly around the perimeter.
At the four corners, add sufficient chain space to prevent the border from cupping.
Fasten off and weave in the remaining tail.
Assembly
- Crochet one complete rose granny square and block it to the target measurement.
- Calculate the required number of squares from the actual blocked size.
- Make all pink rose centers and complete their three petal layers.
- Add the cream outer petals and four olive leaves to each floral unit.
- Crochet and block all ivory square backgrounds before attaching the flowers.
- Center and sew each floral unit to its corresponding square.
- Add the lavender frame and any small purple accent clusters.
- Block all finished squares to identical dimensions and join them with lavender yarn.
- Work the complete lace border around the assembled bedspread.
- Weave in every remaining end and perform a final light blocking to align the joining grid and border.
The finished bedspread should have a regular lavender grid, centered raised roses, consistently angled leaves and a flat perimeter beneath the lace edging.
7 Technical Tips for 3D Rose Granny Squares
- Block the square before attaching the rose. A difference of only 5 mm per block can become several centimeters across a 12-square bed width.
- Keep the upper petals free. Sewing through every petal layer compresses the rose and removes the dimensional structure.
- Measure flower placement from all four corners. A rose positioned 1 cm off center becomes obvious after neighboring squares create a straight joining grid.
- Attach only the lower third of each leaf. Sewing the entire leaf perimeter down removes the raised texture visible around the flowers.
- Keep lavender joining stitches relaxed. Tight joins shorten the square edges and produce ridges between otherwise flat blocks.
- Check border corners after every round. A cupped corner needs additional stitches or chain space, while a ruffled corner contains too much expansion.
- Weigh one finished square before buying blanket quantities. Multiply its yarn weight by the total motif count, then add 15–20 percent for seams and the deep outer border.
How to Keep the Roses Dimensional
The central flowers are the defining feature of this crochet rose blanket, so they should not be flattened during finishing.
When blocking individual squares, pin the square background and lavender frame rather than the pink petals. Arrange each rose by hand after the background has dried.
The smallest petals should remain relatively close to the center. Medium petals can angle outward, while the broadest outer petals should open far enough to reveal the cream layer underneath.
If the entire flower collapses toward the square, check the attachment stitches. Too many sewing points can immobilize the petals.
If the rose becomes excessively tall, reduce the number of tall stitches in the outer petal layer rather than tightening the entire flower.
Choosing Colors for the Floral Blanket
The photographed palette depends on controlled contrast. Dusty pink establishes the roses, while ivory and cream provide enough neutral space for each flower to remain visually separate.
Olive green is muted enough to define the leaves without competing with the pink petals. Lavender then creates a distinct framework around every square.
A practical palette consists of:
- Dusty rose for the main flowers
- Soft cream for the secondary petals
- Ivory for the square backgrounds
- Olive green for the leaves
- Soft lavender for borders and joins
- Muted sage for optional background details
Keep the main rose color consistent if you want the geometric arrangement to dominate. For a more varied floral blanket, alternate two or three related pink shades while keeping the ivory, green and lavender sections unchanged.
Care and Storage
A large dimensional blanket needs more support during washing than a flat granny-square afghan. Check the yarn label before choosing a cleaning method.
If handwashing is appropriate, support the complete bedspread when lifting it from the water. Do not lift the saturated blanket from one edge because the weight can stretch the joining seams.
Press out excess water without twisting the flowers.
Dry the blanket flat whenever space permits. Reshape the lavender grid and border while damp, then arrange the rose petals after the background has dried.
For storage, fold the bedspread loosely and avoid placing heavy objects directly over the raised flowers for extended periods.
Conclusion
This 3D rose granny square crochet blanket pattern depends on three measurements: consistent square dimensions, centered flower placement and relaxed joining seams. Make and block one complete motif first, weigh it for yarn calculations, then repeat the same flower, leaf and frame proportions across the bedspread. The dusty-pink roses should remain raised above cream petals and olive leaves while the lavender joins form an even grid underneath.
Record the blocked square measurement before starting the full set. Save the finished bedspread to Pinterest or share the floral set on Instagram with #3DRoseGrannySquareBlanket. For your version, would you keep the lavender joining grid or replace it with dusty pink?









