Introduction
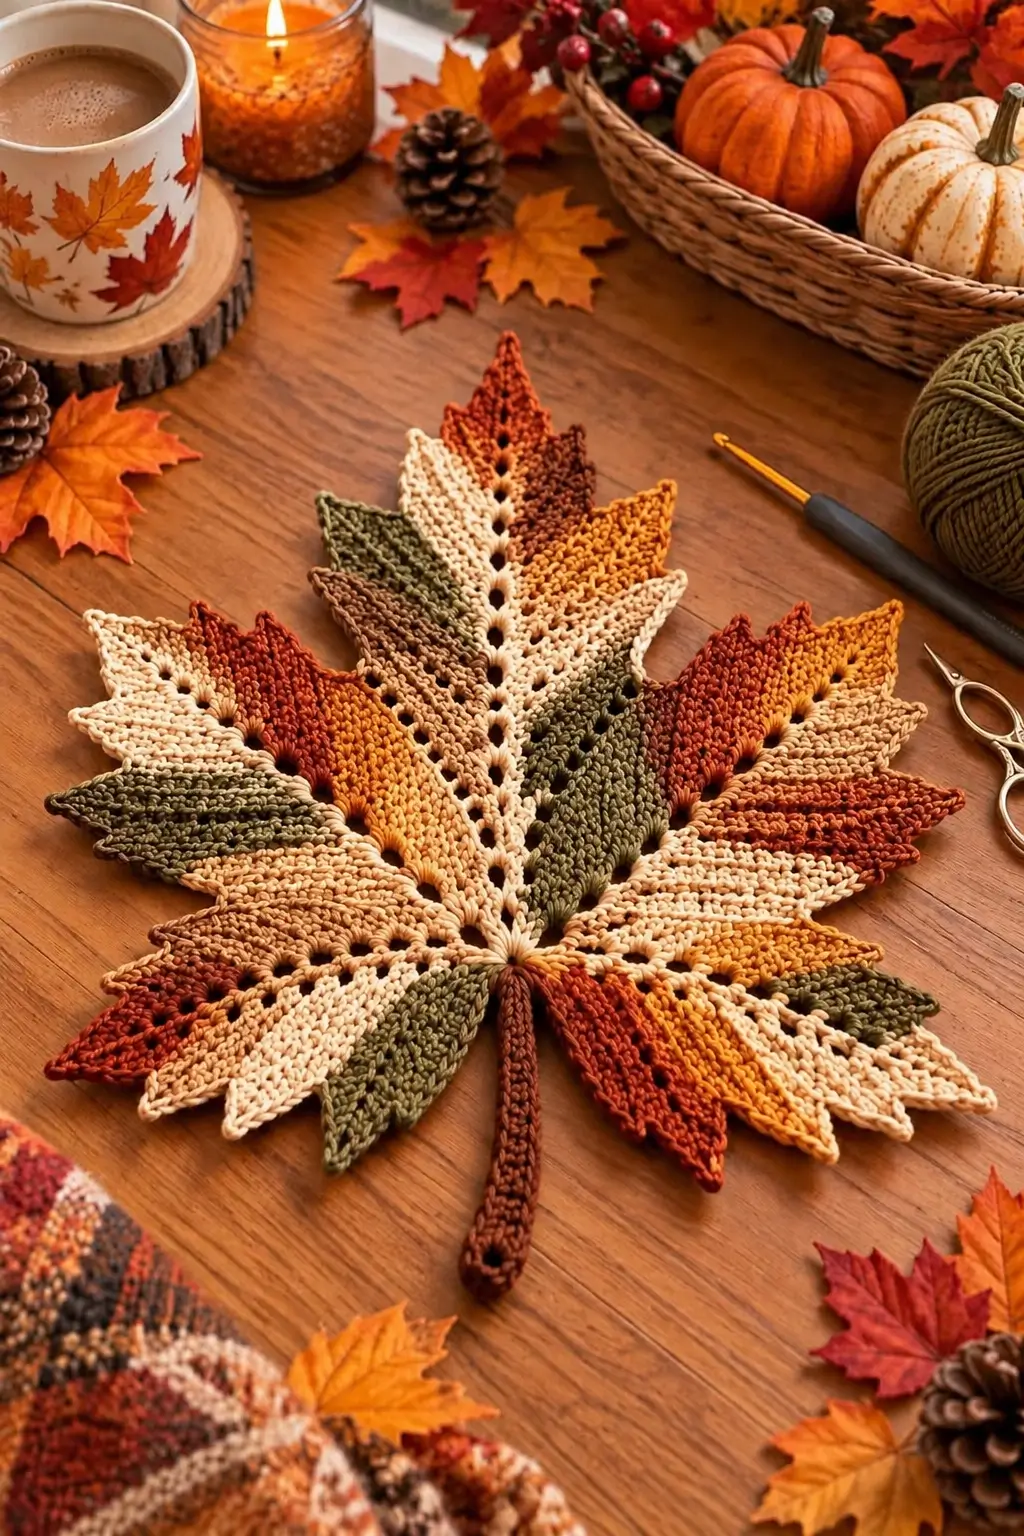
A maple leaf loses its recognizable silhouette if the center point is not longer than the four surrounding lobes. This crochet maple leaf pattern builds that hierarchy with five primary lobes, smaller lower points, a raised central structure, and a long stem. Worked in cream, rust, mustard, olive, and brown worsted yarn, the finished leaf measures approximately 24–27 cm and works as a fall table decoration.
The Design: What Makes This Maple Leaf Different
The photographed leaf is substantially larger and more structural than a standard crochet appliqué. Its most important feature is the elongated center lobe. Two upper side lobes angle away from it, while shorter lower sections broaden the base without turning the outline into a symmetrical star.
Color placement provides the second structural element. Instead of crocheting the entire leaf in one autumn shade, this multicolor crochet maple leaf alternates cream, olive, mustard, rust, and brown across individual sections. The arrangement resembles the uneven color change of an autumn leaf.
A pronounced center line visually connects the upper point to the stem. Smaller openings beside that line imitate branching veins. One common error is making every lobe the same length; that removes the characteristic maple-leaf proportions.
Project Information
| Detail | Specification |
|---|---|
| Skill Level | Intermediate |
| Project Type | Large crochet maple leaf / table decoration |
| Finished Size | Approx. 24–27 cm tall including upper leaf body; size varies by tension |
| Hook | 3.5 mm |
| Yarn | Worsted weight #4 |
| Construction | Individual pointed lobes joined at a central base |
| Estimated Time | 4–6 hours |
| Best For | Fall table decor, placemat, centerpiece, wall decoration |
A published worsted-weight maple leaf worked with a 3.5 mm hook measures approximately 25.5 cm tall by 23 cm wide, making that combination a practical reference for a large decorative leaf.
Materials and Tools
Yarn
- Cream worsted-weight yarn — approximately 20–25 g
- Rust worsted-weight yarn — approximately 15–20 g
- Mustard worsted-weight yarn — approximately 10–15 g
- Olive green worsted-weight yarn — approximately 10–15 g
- Brown worsted-weight yarn — approximately 10–15 g
These are planning quantities for the photo-inspired multicolor version. Yarn consumption changes with the number of lobes, hook size, and finished dimensions.
Tools
- 3.5 mm crochet hook
- Tapestry needle
- Scissors
- Stitch markers
- Blocking mat
- Rustproof blocking pins
- Flexible measuring tape
Abbreviations
- ch — chain
- sl st — slip stitch
- sc — single crochet
- hdc — half double crochet
- dc — double crochet
- tr — treble crochet
- st/sts — stitch/stitches
- sp — space
- BLO — back loop only
- FO — fasten off
The pattern uses US crochet terminology. Keep slip stitches relaxed where they form veins because tight surface stitches can make the finished leaf curl.
Crochet Maple Leaf Pattern — Step by Step
This photo-inspired version is assembled from pointed lobes worked around foundation chains. Varying the foundation-chain length produces the graduated silhouette visible in the reference image.
Large Center Lobe — Make 1
Suggested color: rust, brown, or cream.
Foundation: Ch 18.
Row 1: Starting in the second ch from hook, sc in next 2 ch, hdc in next 2 ch, dc in next 4 ch, tr in next 5 ch, dc in next 2 ch, hdc in next ch, sc in final ch.
Ch 3 to form the pointed tip.
Working down the opposite side of the foundation chain: sc in first available loop, hdc in next, dc in next 2, tr in next 5, dc in next 4, hdc in next 2, sc in final 2 loops.
Sl st at the base.
Edging: Ch 1 and work sc evenly around the lobe. At the tip, work (sc, ch 2, sl st into first ch, sc) to sharpen the point.
FO, leaving a 20 cm tail for assembly.
Upper Side Lobes — Make 2
Suggested colors: mustard and olive, or cream and rust.
Foundation: Ch 15.
Row 1: Starting in second ch from hook, sc in next 2 ch, hdc in next 2, dc in next 3, tr in next 4, dc in next 2, hdc in final ch.
Ch 3 for the tip.
Work down the opposite side using the mirrored sequence: hdc, 2 dc, 4 tr, 3 dc, 2 hdc, 2 sc.
Sl st at the base.
Work sc evenly around the complete lobe. At the upper point, work (sc, ch 2, sl st into first ch, sc).
FO and leave a long assembly tail.
Middle Side Lobes — Make 2
Suggested colors: cream and rust.
Foundation: Ch 13.
Starting in second ch from hook:
Sc in next 2 ch, hdc in next 2, dc in next 3, tr in next 2, dc in next 2, hdc in final ch.
Ch 3.
Work the corresponding stitches along the opposite side of the foundation chain.
At the point, use a ch-2 picot to create the narrow maple-leaf tip.
Work sc around the outer edge and FO.
Lower Lobes — Make 2
Suggested colors: brown, olive, cream, or mustard.
Foundation: Ch 10.
Starting in second ch from hook:
Sc in next 2 ch, hdc in next 2, dc in next 3, hdc in next ch, sc in final ch.
Ch 2 and sl st into the first ch to create the point.
Work back along the opposite side using the mirrored stitch sequence.
Finish with sc around the outer perimeter.
FO and leave approximately 15–20 cm of yarn for assembly.
Small Basal Points — Make 2
Suggested colors: cream and rust.
Ch 8.
Starting in second ch from hook, work:
Sc, hdc, dc, 2 tr, dc, sc.
Ch 2 for the point.
Continue along the opposite side:
Sc, dc, 2 tr, dc, hdc, sc.
Sl st at the base and FO.
These smaller sections sit close to the stem and widen the lower silhouette without competing with the five primary points.
Creating the Open Crochet Veins
The photographed leaf contains narrow openings along the center of several lobes. These spaces make each section look more like a leaf and less like a solid crochet oval.
For a more open version, replace selected stitches along the center line with chain spaces while making each lobe.
At approximately one-third of the lobe length, work:
Ch 1, skip 1 foundation loop, continue in pattern.
Repeat at two or three evenly spaced positions.
On the return side, work around the corresponding chain spaces rather than filling them completely.
The openings should decrease in size toward the point. Do not place a large opening directly at the tip because it can weaken the pointed structure.
Raised Central Vein
After each lobe is complete, surface crochet can be added along its foundation chain.
- Insert the hook at the base of the lobe.
- Pull up a loop of cream or matching yarn.
- Work surface slip stitches along the original foundation chain.
- Continue toward the pointed tip.
- Keep each slip stitch loose enough for the lobe to remain flat.
- FO approximately 1 cm before the tip.
The raised line should remain visible without pulling the two sides of the lobe together.
Arranging the Maple Leaf
Place all completed sections on a flat surface before sewing.
Position the largest center lobe vertically. Angle the two upper side lobes approximately 30–40 degrees away from the center.
Place the middle lobes farther outward. The two lower lobes should sit close to horizontal, while the smallest basal points angle downward toward the stem.
Overlap the bases by approximately 1–2 cm.
Pin every section before sewing. Compare the left and right sides from a distance rather than judging one lobe at a time.
Joining the Leaf Sections
- Place the large center lobe on the work surface.
- Position the two upper side lobes underneath its lower edges.
- Add the middle lobes on the left and right sides.
- Position the lower lobes so they extend outward from the base.
- Add the two small basal points beside the future stem position.
- Pin every overlap before beginning the permanent seams.
- Using the long yarn tails, sew through the bases of adjacent lobes.
- Keep stitches on the back whenever possible.
- Reinforce the central junction with several additional stitches.
- Lay the assembled leaf flat and correct the lobe angles before attaching the stem.
The completed leaf body should remain flat with the center point clearly higher than every surrounding lobe.
Crochet Maple Leaf Stem
Suggested color: brown or rust.
Ch 30.
Starting in the second ch from hook, work 1 sc in every chain. (29 sc)
Ch 1 and turn.
Work 1 sc in every stitch across. (29 sc)
For a thicker stem, turn once more and work another row of sc.
FO, leaving approximately 25 cm for attachment.
Position the stem behind the lower center of the assembled leaf. Insert approximately 2–3 cm of the upper stem underneath the lobes and sew it firmly to the central junction.
Optional Decorative Edge
A continuous outer edging can visually connect the individually crocheted lobes.
Join cream, rust, or brown yarn near the base.
Work sc evenly around the complete maple-leaf perimeter.
At every major point, work:
(sc, ch 2, sl st into first ch, sc)
At deep valleys between lobes, use a sl st instead of additional sc stitches. This pulls the valley inward and keeps the individual points distinct.
Continue around the entire leaf and join at the starting position.
FO and weave in the tail on the back.
Blocking the Crochet Maple Leaf
Blocking controls the final outline and is particularly important for a large multicolor leaf.
- Dampen the finished leaf according to the yarn’s care instructions.
- Place it face up on a blocking mat.
- Pin the center lobe first and pull it vertically.
- Pin both upper side lobes at matching angles.
- Position the middle and lower lobes symmetrically.
- Pin every pointed tip separately.
- Arrange the stem in a straight or slightly curved position.
- Allow the leaf to dry completely before removing the pins.
Do not stretch one side farther than the other. Measure from the center vein to corresponding left and right tips while the piece is pinned.
Autumn Color Placement
The image uses irregular color placement rather than a repeating stripe sequence. That distinction is important.
Use cream through several central sections to create visual continuity. Place rust and burnt orange around the outer lobes, then distribute olive and mustard asymmetrically.
Brown works particularly well near the center and stem because it visually anchors the lighter colors.
A practical five-color palette is:
- Ivory or natural cream
- Burnt orange
- Deep rust
- Mustard gold
- Olive green
- Warm brown for the stem and selected sections
Avoid making the left and right halves identical. Uneven color distribution gives the finished crochet fall leaf a more natural appearance while the lobe dimensions maintain the overall symmetry.
How to Adjust the Finished Size
Changing yarn weight is the simplest method. DK yarn with a 3 mm hook produces a smaller decoration, while worsted yarn with a 3.5–4 mm hook creates a larger table piece.
You can also change the foundation chains. Add two chains to the center and upper lobes for a larger leaf, then extend the remaining sections proportionally.
Do not enlarge only the center lobe. Every section must remain proportional or the finished piece will become narrow rather than simply larger.
Before making all of the sections, crochet the center lobe and measure it. Use that measurement to determine whether the planned leaf will fit its intended table, wall, or centerpiece location.
7 Technical Tips for a Flat Maple Leaf
- Keep the center lobe longest. If the side lobes reach the same height, the silhouette becomes star-shaped rather than resembling a maple leaf.
- Leave at least 15–20 cm assembly tails. Short tails are difficult to secure through several overlapping lobe bases.
- Keep surface slip stitches loose. Tight vein stitches shorten the foundation chain and make the lobe curl lengthwise.
- Pin every lobe before sewing. A side point shifted by 2 cm can make the entire leaf appear unbalanced.
- Reinforce the central junction. All lobes and the stem transfer tension through this small area, making weak attachment stitches a likely failure point.
- Block the major points individually. Pinning only the outside corners allows the smaller maple-leaf points to round off while drying.
- Keep the stem centered under the main vein. Even a 1 cm offset is noticeable because the eye follows the stem directly toward the upper center point.
Using the Finished Crochet Maple Leaf
A large leaf in worsted cotton or a cotton blend works well as an autumn table centerpiece. Place it under a vase, decorative pumpkin arrangement, or other lightweight seasonal display.
The same design can function as a placemat if the surface remains relatively flat. For this use, omit heavily raised embellishments and weave every tail securely into the back.
Several smaller versions can be connected into a fall table runner. Another option is to crochet individual leaves in rust, mustard, olive, and cream and arrange them along a mantel.
For wall display, attach a small hanging loop to the back near the upper center rather than hanging the piece from one of the pointed lobes.
Care and Storage
Check the yarn manufacturer’s washing instructions before cleaning the finished leaf. Cotton and many cotton blends can be gently washed, but blocking may need to be repeated afterward.
Dry the piece flat rather than hanging it while wet. The weight of the damp yarn can stretch the upper point and stem.
For seasonal storage, place the leaf flat between sheets of acid-free tissue or loosely roll it around a wide cardboard tube. Avoid sharply folding the points because repeated creases can distort the blocked outline.
Conclusion
This crochet maple leaf pattern gets its recognizable shape from graduated lobes rather than five identical points. Make the long center section first, arrange shorter side lobes around it, and check the complete silhouette before sewing the bases together. Surface crochet adds the raised veins, while cream, rust, mustard, olive, and brown create the multicolor autumn effect shown in the reference design.
Pin the finished leaf to its final measurements and record the hook, yarn, and center-lobe length before making another. Save the project to Pinterest or share your finished version on Instagram with #AutumnMapleLeafCrochet. Which section would you make dominant on your next leaf: rust orange, mustard gold, or olive green?









