Introduction
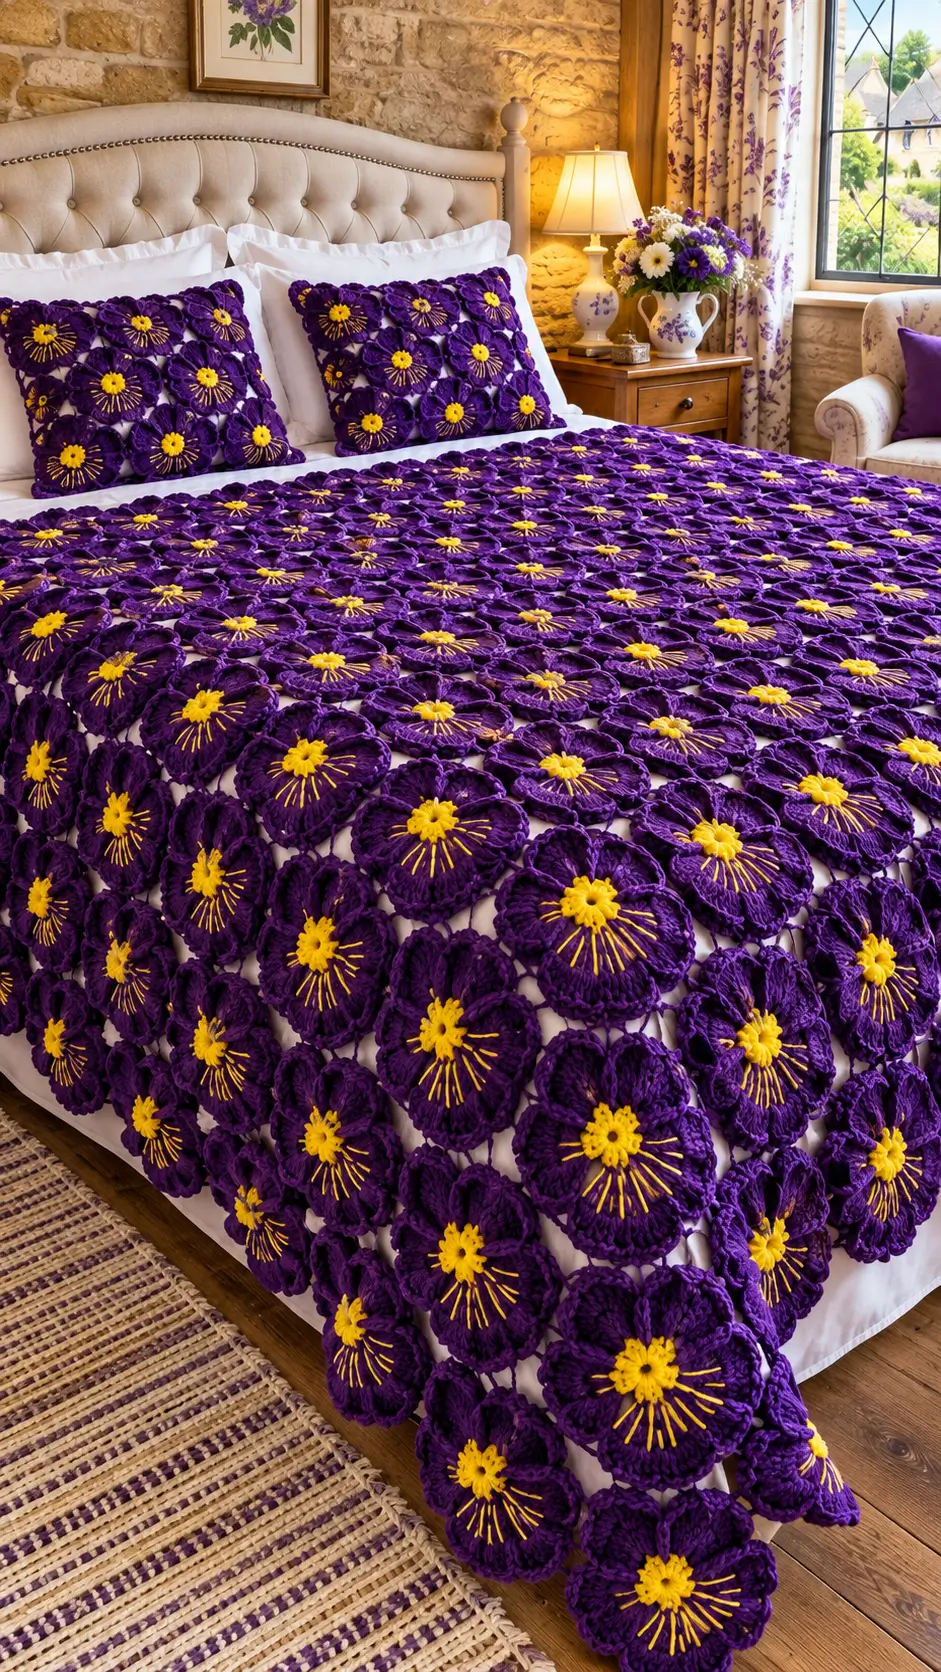
Pansy flowers have five overlapping petals and a contrasting center, making their shape particularly suitable for decorative crochet motifs. This purple crochet pansy flower bedspread pattern combines deep violet petals, bright yellow centers, and an openwork floral arrangement to create a coordinated bedroom set.
The project includes a decorative bedspread and two matching pillows. Using worsted-weight yarn and a 4.0 mm crochet hook, intermediate crocheters can construct individual flowers and join them into a larger textile.
The Design: What Makes This Crochet Pansy Bedspread Different
The defining characteristic of this floral crochet bedspread is its repeating arrangement of large purple pansy flowers. Each flower has a yellow center surrounded by rounded, overlapping petals.
Unlike traditional granny-square blankets, the design does not depend on a solid square background. Instead, individual floral motifs are connected using small joining stitches, leaving decorative spaces between the flowers.
This construction creates a flexible fabric with an open appearance.
The contrasting yellow centers help distinguish each flower, even when the purple petals overlap.
Another important feature is the variation in flower orientation. Some motifs face upward, while others naturally turn toward the edges of the bed.
A common mistake when making a crochet pansy flower blanket is joining the flowers too tightly. Excessive tension can distort the petals and cause the finished fabric to contract.
Small connecting chains allow the individual flowers to retain their rounded shape.
Project Info at a Glance
| Project Detail | Specification |
|---|---|
| Pattern Name | Violet Pansy Garden Bedspread |
| Skill Level | Intermediate |
| Estimated Time | 80–140 hours |
| Finished Size | Approximately 220 × 240 cm |
| Crochet Hook | 4.0 mm |
| Yarn Weight | Worsted Weight #4 |
| Main Color | Deep Purple |
| Accent Color | Golden Yellow |
| Construction | Joined Floral Motifs |
| Accessories | Two Matching Crochet Pillows |
| Best For | Decorative Bedroom Bedding |
Note: These dimensions and working times are proposed specifications for a photo-inspired pattern. They are not verified measurements of the pictured bedspread.
Materials and Tools
Yarn
Choose yarn with good stitch definition so the individual pansy petals remain visible.
- Deep purple worsted-weight yarn – approximately 3,000–4,000 g for the main flower motifs.
- Golden yellow worsted-weight yarn – approximately 300–500 g for the flower centers and decorative details.
- Deep purple worsted-weight yarn – approximately 500–800 g for the matching pillow covers.
- Additional purple yarn – approximately 200–400 g for joining stitches and edging.
Estimated total yarn: 4,000–5,700 g.
These quantities are preliminary allowances. Actual consumption depends on the number of flowers, motif diameter, yarn thickness, and joining method.
For a more accurate estimate, complete one flower, weigh it, and multiply its weight by the number of motifs required.
Recommended Crochet Hooks
- 4.0 mm crochet hook for the main flower motifs.
- 3.5 mm crochet hook for tighter yellow flower centers.
- 4.5 mm crochet hook if a looser joining tension is required.
Additional Tools
- Tapestry needle for weaving in ends.
- Stitch markers for marking petal sections.
- Sharp scissors for trimming yarn.
- Measuring tape for checking flower and blanket dimensions.
- Blocking mats for shaping the completed motifs.
- Rust-resistant pins for positioning flowers before joining.
- Two pillow inserts, approximately 45 × 45 cm.
Crochet Abbreviations
This pattern uses US crochet terminology.
| Abbreviation | Meaning |
|---|---|
| MR | Magic Ring |
| ch | Chain |
| sc | Single Crochet |
| hdc | Half Double Crochet |
| dc | Double Crochet |
| tr | Treble Crochet |
| sl st | Slip Stitch |
| st | Stitch |
| sts | Stitches |
| inc | Increase |
| dec | Decrease |
| rep | Repeat |
| FO | Fasten Off |
An invisible decrease is worked through the front loops of two adjacent stitches to reduce bulk, although this flat floral design relies primarily on increases and decorative stitch groups.
Pattern – Step by Step
The following instructions describe an original crochet construction inspired by the reference image. The exact pattern used to make the photographed bedspread is unknown.
Part 1: Crochet the Yellow Pansy Center
The yellow center forms the foundation of each flower.
Yarn: Golden yellow
Hook: 3.5 mm
Round 1
Create a magic ring.
Work 6 sc into the ring. (6)
Pull the yarn tail to close the center.
Join with a slip stitch.
Round 2
Ch 1.
Work 2 sc into each stitch around. (12)
Join with a slip stitch.
Round 3
Ch 1.
Repeat (1 sc, inc) six times. (18)
Join with a slip stitch.
Round 4
Ch 1.
Repeat (2 sc, inc) six times. (24)
Join with a slip stitch.
Fasten off the yellow yarn.
Leave a short tail for weaving in.
The completed center should form a relatively flat circle.
If the center begins to cup, loosen the working tension slightly.
Part 2: Crochet the Purple Pansy Petals
The pansy flower is formed by five rounded petals worked around the yellow center.
Two upper petals are slightly smaller, while the three lower petals are wider.
Yarn: Deep purple
Hook: 4.0 mm
Round 5: Establish the Petal Sections
Attach the purple yarn to any stitch of the yellow center.
Ch 1.
Work the following groups around the 24-stitch center:
- Work 1 sc in the first stitch, ch 3, skip 3 stitches.
- Repeat the same sequence four more times.
- Work 1 sc in the next stitch, ch 3, skip the final 3 stitches.
Join with a slip stitch.
This produces six chain spaces. Five spaces will support the petals, while the sixth can be used as a joining or shaping space.
Round 6: Form the Main Petals
Work into the first chain-3 space:
- 1 sc
- 2 hdc
- 5 dc
- 2 hdc
- 1 sc
Work the same sequence into the second chain-3 space.
For each of the next three chain-3 spaces, work:
- 1 sc
- 2 hdc
- 7 dc
- 2 hdc
- 1 sc
In the remaining chain-3 space, work 1 sc, ch 3, and 1 sc to create a small joining loop.
Join with a slip stitch.
The flower now has five rounded petals.
Round 7: Add the Petal Edging
Continue using purple yarn.
Work 1 sc into each stitch around the outer edges of the petals.
At the center of each petal, work 2 sc into one stitch to maintain the rounded shape.
Work a slip stitch between adjacent petals to create a visible separation.
Fasten off, leaving a 20 cm yarn tail.
Note: The edging stitch count varies according to the exact placement of the petal increases. Keep the edging flat and symmetrical rather than forcing a fixed total.
Part 3: Add the Yellow Pansy Details
The reference image shows yellow markings extending outward from the center of each purple flower.
These details resemble the contrasting lines found on natural pansy petals.
They can be recreated using surface embroidery.
Embroidered Flower Markings
Thread a tapestry needle with golden yellow yarn.
Bring the needle from the back of the flower to the front near the yellow center.
Make a straight stitch extending approximately 2–3 cm into a purple petal.
Return the needle to the back of the flower.
Repeat several times around the center.
Concentrate the yellow markings on the three larger petals.
Use shorter stitches on the upper petals.
Avoid pulling the embroidery yarn too tightly.
Excessive tension can distort the flower and cause the center to pucker.
Part 4: Make the Required Flower Motifs
Repeat the flower instructions until enough motifs have been completed for the desired bedspread size.
The exact number depends on the finished diameter of each flower.
For planning purposes, assume that each blocked flower occupies approximately 15–18 cm across its widest point.
A large bedspread may require approximately 150–220 motifs, depending on the joining arrangement and spacing.
This is an estimate rather than a fixed pattern requirement.
Checking Flower Consistency
After completing the first five flowers, place them side by side.
Compare their diameter, petal shape, and center size.
Measure each flower across its widest point.
If the measurements differ significantly, check your yarn tension and hook size.
Consistent motif dimensions make the joining process considerably easier.
Part 5: Join the Pansy Flowers into a Bedspread
The photographed bedspread uses an open floral arrangement with small spaces between neighboring motifs.
A chain-based joining method can create a similar appearance.
Prepare the Layout
Arrange the completed flowers on a large flat surface.
Position the yellow centers facing upward.
Rotate neighboring flowers slightly so the petals fit together naturally.
For a rectangular blanket, begin with a regular grid and adjust the spacing as needed.
Joining Method
Using purple yarn and a 4.0 mm hook:
- Insert the hook into an outer stitch of the first flower.
- Attach the yarn with a slip stitch.
- Ch 3.
- Insert the hook into a corresponding outer stitch of the neighboring flower.
- Work 1 sl st to connect the motifs.
- Ch 3 and return to another attachment point on the first flower.
- Continue alternating between the flowers until the connection is stable.
Use approximately three attachment points between neighboring flowers.
The joining chains should lie flat without pulling the petals inward.
Continue joining flowers into horizontal rows.
Connect the completed rows using the same method.
Maintaining the Openwork Structure
The white spaces visible between the flowers in the photograph are an important part of the design.
Do not fill every opening with additional crochet stitches.
Instead, allow small gaps to remain between the motifs.
These openings help preserve the individual flower shapes and reduce the overall weight of the bedspread.
Part 6: Create the Decorative Bedspread Border
A simple purple border can stabilize the outer edges without distracting from the floral motifs.
Round 1
Attach purple yarn to an outer flower near a corner.
Work single crochet stitches around the perimeter.
Use chain stitches to bridge spaces between the outer motifs.
Place additional stitches at the corners to maintain a rectangular shape.
Round 2
Ch 1.
Work 1 sc into each stitch around the border.
At each corner, work 3 sc into the corner stitch.
Join with a slip stitch.
Round 3
Work a decorative shell edging.
Repeat the following sequence:
- Skip 2 stitches.
- Work 5 dc into the next stitch.
- Skip 2 stitches.
- Work 1 sc into the next stitch.
Adjust the repeat near the corners to prevent rippling.
Fasten off and weave in the yarn ends.
Part 7: Crochet the Matching Pansy Flower Pillows
The reference image includes two decorative pillows covered with matching purple flowers.
Each pillow can be constructed using a crochet panel or a fabric-backed floral arrangement.
Pillow Front – Make 2
Prepare approximately 9–12 pansy flower motifs for each pillow.
Arrange the flowers into a square or slightly rectangular shape.
Join neighboring flowers using the same chain-based method used for the bedspread.
Measure the completed floral panel.
Adjust the arrangement until it fits the intended pillow insert.
Pillow Back – Make 2
For a simple crochet backing, use deep purple yarn and a 4.0 mm hook.
Row 1: Ch 66. Work 1 dc into the fourth chain from the hook and continue across. (63 dc)
Row 2: Ch 3, turn. Skip the first stitch, work 1 dc in each following stitch, and work the final dc into the top of the previous turning chain. (63 dc)
Rows 3–35: Repeat Row 2. (63 dc per row)
Measure the panel and adjust the number of rows until it matches the floral front.
Joining the Pillow Cover
Place the floral front and solid back together with their correct sides facing outward.
Join three sides using single crochet stitches.
Insert the pillow form.
Close the remaining side or add a removable fastening.
For easier washing, an envelope-style backing is a practical alternative.
Assembly – 10 Steps
- Complete the yellow centers. Crochet the required number of yellow circles, keeping their stitch counts consistent.
- Work the purple petals. Attach the main yarn and complete five petals around each center.
- Add the yellow markings. Embroider short lines extending outward from the center of each flower.
- Block the flowers. Shape the motifs to a consistent diameter before joining.
- Arrange the blanket layout. Position the flowers on a flat surface according to the desired dimensions.
- Join the first row. Connect neighboring flowers using chain stitches and slip stitches.
- Connect the remaining rows. Maintain consistent spacing and avoid pulling the motifs out of shape.
- Complete the outer border. Work the stabilizing rounds and decorative edging.
- Assemble the pillows. Join the floral fronts to their backing panels and insert the pillow forms.
- Finish the project. Weave in all yarn ends, inspect the joins, and measure the completed bedspread.
The finished set consists of one purple floral bedspread and two coordinating pansy pillows.
7 Technical Tips for Better Results
- Measure the first completed flower. A difference of 1 cm per motif can create a significant size variation across a large bedspread.
- Use stitch markers for petal placement. Mark the beginning of each petal section to prevent uneven spacing around the yellow center.
- Keep the yellow centers flat. Excessive tension can cause the center to cup and distort the surrounding petals.
- Maintain consistent joining chains. Different chain lengths can create irregular gaps and pull neighboring flowers out of alignment.
- Block the motifs before joining. Unblocked flowers may have curled edges that make the final arrangement difficult to measure accurately.
- Check the weight of the completed fabric. A large flower blanket can become heavy, especially when made with cotton yarn.
- Secure the embroidery tails carefully. Loose yellow yarn ends may become visible through the openwork spaces between the petals.
Choosing the Best Yarn for a Purple Crochet Pansy Blanket
Yarn selection affects the appearance, flexibility, and weight of the finished bedspread.
Worsted-weight acrylic yarn is a practical option for large floral projects because it is available in many colors and generally maintains a consistent thickness.
Cotton yarn produces clearly defined petals but can increase the total weight of the blanket.
A cotton-acrylic blend offers another option for balancing stitch definition and flexibility.
Why Deep Purple Works Well
Deep purple provides strong contrast against the bright yellow flower centers.
The contrast makes the floral structure easier to distinguish when the motifs are joined closely together.
For a design similar to the photograph, choose a rich violet or royal purple shade.
Use the same dye lot whenever possible to avoid visible color differences between motifs.
Choosing the Yellow Accent
A golden yellow creates a strong visual center.
Bright lemon yellow can also be used, although it produces a slightly different appearance.
Keep the yellow yarn the same weight as the purple yarn unless a smaller, more compact center is desired.
How to Adjust the Bedspread for Different Bed Sizes
The modular flower construction allows the bedspread to be adjusted for different mattress dimensions.
| Bed Type | Suggested Bedspread Size |
|---|---|
| Single | 150 × 220 cm |
| Double | 200 × 230 cm |
| Queen | 220 × 240 cm |
| King | 260 × 260 cm |
These are suggested decorative covering dimensions rather than universal mattress measurements.
Measure the mattress and determine the desired drop before calculating the required number of flowers.
Estimating the Number of Pansy Motifs
Assume that each blocked flower occupies approximately 16 cm of horizontal space, including the joining area.
For a blanket measuring 220 cm wide:
220 ÷ 16 = 13.75
Approximately 14 flowers may be needed across the width.
For a length of 240 cm:
240 ÷ 16 = 15
Approximately 15 rows may be required.
This produces an initial estimate of:
14 × 15 = 210 flowers.
The actual quantity depends on motif size, orientation, and joining tension.
How to Care for a Crochet Pansy Flower Bedspread
Openwork floral blankets require careful handling because the connecting stitches are more exposed than those in a solid crochet fabric.
Before washing, check the yarn manufacturer’s care instructions.
If machine washing is permitted, select a gentle cycle and use a large laundry bag when practical.
A particularly heavy bedspread may be better suited to hand washing.
Support the fabric when lifting it from water.
Avoid pulling the blanket by one corner or by an individual flower.
Lay the bedspread flat to dry whenever possible.
While the fabric is slightly damp, arrange the flowers so their petals lie evenly.
Allow the blanket to dry completely before folding or storing it.
Common Problems and How to Fix Them
The Pansy Petals Curl Too Much
The crochet tension may be too tight, or the petal increases may not provide enough width.
Try a slightly larger hook or add a small number of stitches to the outer petal edge.
The Yellow Centers Become Raised
The center may be worked too tightly.
Check the stitch counts and loosen the tension slightly.
The Joined Flowers Pull Together
The connecting chains may be too short.
Increase the chain length or reduce the number of attachment points.
The Blanket Does Not Lie Flat
Uneven motif dimensions or inconsistent joining tension may be responsible.
Measure several flowers and block them before adjusting the joining sections.
The Yellow Embroidery Looks Uneven
The decorative stitches may have different lengths.
Use a measuring guide or mark the intended stitch endpoints before embroidering the petals.
Frequently Asked Questions
Is This Purple Crochet Pansy Bedspread Suitable for Beginners?
The project is best suited to intermediate crocheters.
The individual flowers use familiar crochet stitches, but assembling a large number of motifs requires accurate measurements and consistent joining tension.
Beginners can practice by making a single pansy flower or a small cushion cover.
How Many Crochet Pansy Flowers Are Needed for a Bedspread?
The number depends on the bedspread dimensions and the finished flower diameter.
A large decorative blanket may require approximately 150–220 motifs.
Complete and measure one flower before calculating the final quantity.
Can I Use Different Colors?
Yes.
Pansy flowers can be made in violet, lavender, blue, burgundy, white, or combinations of several colors.
The yellow centers can remain consistent throughout the blanket to create a coordinated appearance.
Can I Make the Flowers Larger?
Yes.
Using thicker yarn or increasing the number of stitches in the petal sections can produce larger motifs.
However, larger flowers may require adjustments to the joining method.
Should I Join the Flowers as I Crochet?
Both join-as-you-go and separate assembly methods are possible.
For this design, completing and blocking the flowers before joining provides greater control over the final arrangement.
Can This Bedspread Be Used Every Day?
The bedspread can be used as a decorative covering.
However, frequent friction may affect the raised petals and connecting stitches.
For regular use, place the floral bedspread over a conventional blanket and avoid pulling it by individual motifs.
Can I Make Matching Curtains or Table Runners?
Yes.
The same pansy flower motifs can be joined into narrower panels for decorative home accessories.
For curtains, consider the weight of the completed fabric and the strength of the hanging hardware.
Conclusion
The purple crochet pansy flower bedspread pattern combines five-petal floral motifs, contrasting yellow centers, and openwork joining techniques to create a decorative bedroom set. The modular construction allows the finished dimensions to be adjusted by changing the number of flowers and the spacing between them.
Before beginning the full bedspread, crochet one complete pansy, block it, and record its diameter and weight. Use those measurements to calculate the required number of motifs and estimate yarn consumption.
Save this project to Pinterest or share your finished crochet flowers on Instagram using #VioletPansyGardenBedspread.
Would you keep every pansy deep purple with a yellow center, or combine several violet shades to create a more varied floral arrangement?