SEO Meta
SEO Title: Textured Crochet Maple Leaf Pattern – Free Tutorial
Meta Description: Make a textured crochet maple leaf pattern with five pointed lobes, raised veins, and a short stem. Includes autumn colors, shaping, and finishing tips.
Keywords: crochet maple leaf, maple leaf coaster, textured crochet leaf, autumn crochet pattern, crochet leaf appliqué
Introduction
A maple leaf has five principal lobes, but its smaller edge points determine whether the finished crochet shape looks botanical or merely star-shaped. This textured crochet maple leaf pattern uses a flat foundation, shaped points, raised veins, and a separate brown stem. Make the leaves with DK cotton and a 3.5 mm hook for an intermediate-level project. Finished motifs can be used as autumn coasters, decorative appliqués, or components of a seasonal garland.
The Design: What Makes These Maple Leaves Different
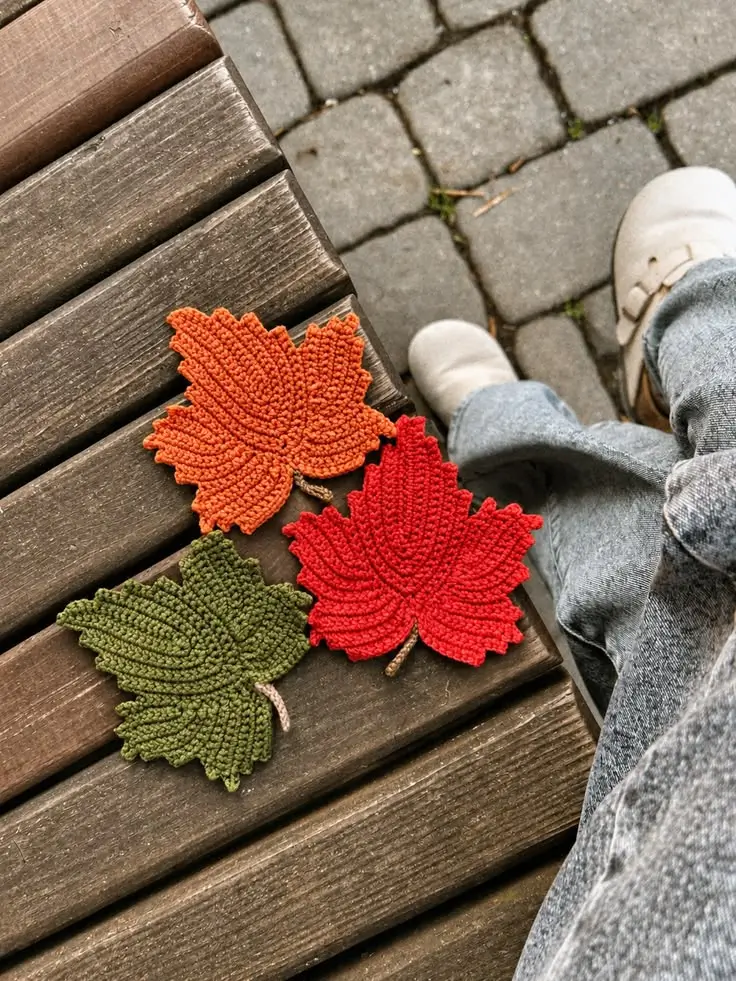
The photographed leaves have pronounced ridges that radiate from the center toward the outer points. Those ridges imitate the branching vein structure of a maple leaf and provide more surface definition than a flat crochet motif.
The second structural decision is the five-lobe outline. Three upper lobes establish the familiar maple silhouette, while two lower lobes broaden the leaf near its base. Smaller points along the edges reduce the appearance of a simple five-point star.
A third feature is the short brown stem. Making it separately allows the stem to remain narrow while the leaf body uses thicker stitches.
The most common mistake in a ribbed crochet maple leaf is placing the raised veins too close together. In this autumn crochet leaf pattern, each vein should follow a separate lobe without pulling the fabric inward.
Project Info at a Glance
| Skill Level | Estimated Time | Finished Size | Hook | Best For |
|---|---|---|---|---|
| Intermediate | 45–90 minutes per leaf | Sample-dependent; approximately 13–17 cm target width | 3.5 mm | Coasters, garlands, table decorations |
The time and target width are planning estimates for this reconstruction. Published maple leaf patterns vary considerably in size and construction.
Materials and Tools
Yarn
- Mustard-yellow DK cotton yarn — approximately 10–20 g for one large leaf; suggested color: golden ochre.
- Dusty-rose DK cotton yarn — approximately 10–20 g; suggested color: muted antique pink.
- Natural-cream DK cotton yarn — approximately 10–20 g; suggested color: warm ivory.
- Medium-brown DK cotton yarn — approximately 1–2 g per stem; suggested color: chestnut brown.
These quantities are estimates for purchasing and sampling, not measured requirements for the photographed objects.
Use the same yarn brand and weight for all three leaf colors if you want the finished motifs to have similar dimensions.
Tools
- 3.5 mm crochet hook
- Yarn needle
- Scissors
- Locking stitch markers
- Tape measure
- Blocking mat
- Rustproof pins
Abbreviations
- MR — magic ring
- ch — chain
- sl st — slip stitch
- sc — single crochet
- hdc — half double crochet
- dc — double crochet
- tr — treble crochet
- inc — two stitches in one stitch
- dec — decrease
- BLO — back loop only
- sp — space
- st/sts — stitch/stitches
- RS — right side
- WS — wrong side
An invisible decrease works through the front loops of two adjacent stitches and is useful when shaping rounded crochet pieces, although the leaf outline below relies primarily on changes in stitch height.
Pattern Notes
This reconstruction is worked in joined rounds rather than a continuous spiral.
The first five rounds create a flat circular foundation with thirty stitches around its outer edge.
The next stage divides those stitches into five equal groups.
Each group supports one pointed lobe.
The outer border adds small decorative points, and the raised veins are worked separately on the finished surface.
The completed shape is an interpretation of the photograph. It does not duplicate the original leaf’s short-row ribbing.
Pattern — Step by Step
Part 1 — Central Leaf Foundation
Yarn: mustard yellow, dusty rose, or cream.
Make one complete leaf in each color.
Round 1
Make an MR.
Work 6 sc into the ring.
Join with sl st to the first sc.
R1: 6 sc in MR (6).
Pull the ring closed.
Round 2
Ch 1.
Work 2 sc in every stitch.
Join with sl st.
R2: inc × 6 (12).
Round 3
Ch 1.
Repeat around:
(1 sc, inc) × 6.
Join with sl st.
R3: 18 sc (18).
Round 4
Ch 1.
Repeat around:
(2 sc, inc) × 6.
Join with sl st.
R4: 24 sc (24).
Round 5
Ch 1.
Repeat around:
(3 sc, inc) × 6.
Join with sl st.
R5: 30 sc (30).
The foundation should lie flat.
Mark every sixth stitch to divide the circumference into five equal sections.
These markers identify the positions for the five principal lobes.
Part 2 — Five Pointed Maple Lobes
Work one lobe across each group of six foundation stitches.
The first three lobes will form the upper portion of the leaf.
The remaining two will form the lower sides.
Because the lobe shaping is worked outward from a circular center, the leaf will initially resemble a five-point botanical star.
The edging and stem will make the maple outline more distinct.
Principal Lobe — Make Five
Yarn: same color as the foundation.
Join yarn in the first stitch of a marked six-stitch section.
Work the following sequence across those six stitches:
1 sc, 1 hdc, 1 dc, 1 dc, 1 hdc, 1 sc.
Base count: 6 stitches worked into 6 foundation stitches.
At the end of the section, ch 1 and turn.
Work back across the six stitches:
1 sc, 1 hdc, 1 dc, 1 dc, 1 hdc, 1 sc.
Row 2 count: 6 stitches.
Ch 1 and turn.
Work:
1 sc, 1 hdc, 2 dc, 1 hdc, 1 sc.
Row 3 count: 6 stitches.
Ch 1 and turn.
Work:
1 sc, 1 hdc, 2 dc, 1 hdc, 1 sc.
Row 4 count: 6 stitches.
Ch 1 and turn.
Work:
1 sc, 1 hdc, 2 dc, 1 hdc, 1 sc.
Row 5 count: 6 stitches.
Ch 1 and turn.
Work:
1 sc, 1 hdc, 1 hdc, 1 hdc, 1 hdc, 1 sc.
Row 6 count: 6 stitches.
Ch 1 and turn.
Work:
1 sc, 1 hdc, 1 dc, 1 dc, 1 hdc, 1 sc.
Row 7 count: 6 stitches.
Fasten off.
Repeat the same sequence in each remaining marked section.
At this stage, all five lobes are rectangular at their outer ends. The following edging creates pointed tips.
Part 3 — Shaping the Lobe Tips
Join yarn at the outer corner of the first lobe.
Work sc along its first side until reaching the outermost row.
Across the six stitches of the outer row, work:
1 sc, 1 hdc, 1 dc, ch 3, sl st into the first chain, 1 dc, 1 hdc, 1 sc.
The chain-three picot creates the pointed tip.
Continue working sc down the opposite side.
Fasten off.
Repeat on the remaining four lobes.
Pin the leaf flat and inspect its outline.
The three upper lobes should form a broad crown, while the two lower lobes should angle outward from the center.
Part 4 — Smaller Serrated Points
The photographed maple leaves have additional small points between the five principal lobes.
These details distinguish the silhouette from a simple star.
Join yarn along the side of one lobe.
Work sc until reaching the intended point position.
Ch 3.
Work sl st into the second chain from the hook.
Work sc into the next chain.
Anchor the small point with sl st in the leaf edge.
Continue along the edge.
Add two or three smaller points along each upper lobe.
Keep the points shorter near the valleys between lobes.
Repeat on the opposite side.
Work the same treatment on all three leaves for consistent shaping.
Part 5 — Raised Central Veins
The strongest visual feature in the photograph is the branching ridge structure.
Surface crochet provides a practical way to approximate these veins.
Lay the leaf right side up.
Identify the center of the magic ring.
Mark a line from the center toward the tip of the uppermost lobe.
Join matching yarn near the leaf center.
Insert the hook from the front through the fabric.
Pull up a loop from the working yarn behind the leaf.
Insert the hook at the next position along the marked line.
Pull up another loop and draw it through the loop already on the hook.
Continue making surface slip stitches toward the lobe tip.
Fasten off on the wrong side.
The resulting line sits slightly above the surrounding fabric.
Part 6 — Branching Side Veins
Work additional raised lines from the center toward the remaining four principal lobes.
Each line should follow the middle of its lobe.
Keep the surface stitches loose enough that the fabric does not contract.
For more detail, add short secondary branches along the two widest lobes.
Position each branch at an angle rather than perpendicular to the main vein.
The photographed leaves have several closely spaced ridges, so multiple branches will create a closer visual approximation.
However, adding too many raised lines can make the leaf stiff.
Test the density on one sample before repeating it in all three colors.
Part 7 — Brown Crochet Stem
Yarn: medium brown.
Join brown yarn at the lower center of the leaf.
Ch 10.
Beginning in the second chain from the hook, work one sc into each chain.
Stem count: 9 sc.
Work sl st into the base of the leaf.
Fasten off, leaving a 15 cm tail.
Thread the tail onto a yarn needle.
Secure the stem at its attachment point.
Weave the remaining tail into the wrong side of the leaf.
For a narrower stem, replace the single crochet stitches with slip stitches.
Part 8 — Finishing the Leaf Edge
Inspect the outline after the five lobes and small points are complete.
If a section appears uneven, add a short run of slip stitches to smooth the transition.
Do not add extra stitches indiscriminately.
Too many stitches cause the edge to ripple.
Work around the leaf slowly, checking the point placement after every lobe.
Fasten off and weave in the remaining yarn ends.
The finished leaf should lie flat without curling toward its center.
Making the Mustard-Yellow Maple Leaf
The mustard leaf in the photograph has a deep golden color and pronounced ridges.
Use golden-ochre DK cotton for the foundation and lobe sections.
Work the raised veins with the same yarn rather than a contrasting color.
Matching yarn makes the ridges visible through texture rather than color.
Attach a medium-brown stem.
Block the completed leaf so the upper lobe points remain distinct.
Use this first sample to establish the target size for the remaining colors.
Making the Dusty-Rose Maple Leaf
The pink leaf has a muted rose shade rather than bright red.
Choose a dusty-pink yarn with a slightly warm undertone.
Repeat the same foundation rounds and lobe construction.
Keep the raised veins at the same spacing used on the mustard sample.
Attach the brown stem at the lower center.
Block the leaf to the same approximate dimensions.
Compare the two leaves before making the cream version.
Making the Natural-Cream Maple Leaf
The cream leaf shows the stitch texture particularly clearly.
Use natural ivory yarn with a smooth finish.
A tightly twisted cotton or cotton-blend yarn will give the surface veins a defined appearance.
Repeat the complete leaf pattern.
Work the raised ridges with cream yarn.
Add the brown stem.
Block the finished motif and compare its outline with the other two leaves.
Minor size differences may occur even when the same hook is used.
Assembly — 10 Steps
- Choose DK yarn in mustard yellow, dusty rose, natural cream, and brown.
- Make the six-stitch magic-ring foundation for the first leaf.
- Increase the foundation to thirty stitches over five rounds.
- Mark the five equal sections that will support the principal lobes.
- Work all five lobes and add pointed tips.
- Add the smaller serrated points along the outer edges.
- Work raised surface-crochet veins from the center toward the lobe tips.
- Attach the separate brown stem and secure the yarn ends.
- Repeat the complete process in the remaining two colors.
- Block all three leaves and inspect the finished shapes.
The completed set contains three flat maple leaf motifs with raised veins and brown stems.
7 Technical Tips
- Place a stitch marker after every sixth foundation stitch. An incorrectly divided thirty-stitch round produces uneven lobe spacing.
- Check that the foundation lies flat after Round 5. Cupping at thirty stitches indicates excessive tension or an unsuitable hook size.
- Keep the five principal lobes the same length before edging. A difference greater than approximately 5 mm makes the outline visibly asymmetrical.
- Use loose surface slip stitches for the raised veins. Tight surface stitches pull the leaf inward and create ridges that distort the background.
- Keep smaller edge points shorter than the main lobe tips. Oversized serrations make the finished shape resemble a snowflake.
- Pin the five principal tips before blocking. Uneven pin placement stretches individual lobes beyond their intended proportions.
- Weave stem tails through at least 4–5 cm of matching stitches. A short unsecured tail can loosen where the brown stem meets the leaf.
Using Crochet Maple Leaves as Coasters
Flat maple leaf motifs can be used as decorative coasters when worked in suitable yarn.
Cotton is a practical choice because it tolerates repeated washing and provides a relatively stable fabric.
For a functional coaster, test whether a mug sits securely on the center of the leaf.
Raised surface veins can create an uneven resting surface.
If the mug rocks, reserve the motif for decoration or reduce the height of the central veins.
Avoid placing very hot cookware directly on an untested crochet surface.
The finished leaf should be fully dry before being stored.
Creating an Autumn Maple Leaf Garland
Make several leaves in coordinating colors.
Use mustard yellow, dusty rose, cream, rust orange, and olive green for a broader autumn palette.
Block all motifs before attaching them to the garland cord.
Work a long chain in brown or cream yarn.
Space the leaves evenly along the chain.
Attach each leaf near its stem base.
Keep the attachment stitches small so the leaves can hang naturally.
For a balanced arrangement, alternate light and dark colors rather than grouping all cream leaves together.
Blocking the Finished Maple Leaves
Blocking is particularly useful for pointed botanical motifs.
Dampen the leaf according to the yarn manufacturer’s care instructions.
Place it on a blocking mat.
Pin the central upper lobe first.
Position the two neighboring upper lobes.
Pin the two lower lobes.
Arrange the smaller serrated points without stretching them excessively.
Check that the brown stem remains centered.
Allow the leaf to dry completely before removing the pins.
Repeat the same procedure for the remaining colors.
Related Patterns
- Crochet Oak Leaf Pattern — A rounded autumn leaf motif with deeper edge lobes. [INTERNAL LINK NEEDED: crochet oak leaf]
- Autumn Crochet Coaster Set — Coordinated flat motifs for seasonal table settings. [INTERNAL LINK NEEDED: autumn crochet coasters]
- Crochet Maple Leaf Garland — Repeated leaf appliqués joined with a decorative chain. [INTERNAL LINK NEEDED: maple leaf garland]
- Textured Crochet Leaf Appliqué — A botanical decoration emphasizing raised stitch ridges. [INTERNAL LINK NEEDED: textured crochet leaf]
Conclusion
The five principal lobes, serrated edges, raised veins, and short brown stem define this textured crochet maple leaf pattern. Begin with the mustard sample and check the foundation stitch counts before shaping the remaining leaves. Next, compare the completed lobe lengths and test the surface-crochet tension. Repeat the construction in dusty rose and natural cream, then block all three motifs to consistent dimensions. Use the finished leaves as decorative coasters, table accents, or garland components. Share the completed set on Pinterest or Instagram using #TexturedMapleLeafCrochet. Which detail would you emphasize in the next version: the smaller serrated points or the branching raised veins?